DOS, pursues the restoration of the performance of computer equipment under the control of operating systems of the Windows family. Error detection and correction is much easier, at a low DOS level, before loading the system files of the main operating system. To do this, you need to make changes in the BIOS, specify the specific hardware in the "boot loader" section.
The question may seem strange to most users. Why go back to dense methods, transfer DOS to a USB flash drive at the current level of information technology development? Its presence will help the owner:
- safely reflash BIOS;
- fix corrupted configuration files;
- update system drivers;
- access all files.
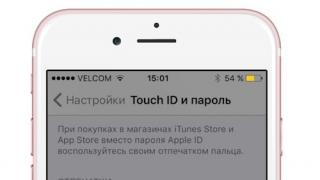
IMPORTANT. For diagnosing, troubleshooting, and testing workstation hardware, a bootable DOS flash drive is extremely useful. The proof is the "MemTest86 +" utility for checking the RAM "MemTest86 +", sewn, without fail, by Microsoft to detect errors.
In addition, a bootable MS DOS flash drive will help to lift any operating system that has failed for various reasons. In most situations, she remains the only "savior" from sudden troubles. History proves once again that the bootable USB flash drive and DOS have not lost their relevance.
Multi-tasking options
System administrators prefer to create bootable DOS flash drives, which provides conflict resolution on many platforms (Windows and Linux). Utilities, file manager, anti-virus programs, and other applications are copied to the connected external media.
Before making a bootable DOS flash drive, a set of software necessary for installing a wide range of tasks is determined.
A universal bootable USB flash drive running MS DOS can work wonders when working with FAT32, NTFS, UEFI.

A flash drive running MS DOS is a must for every PC owner
Step-by-step instruction
To create an image of a bootable USB flash drive in DOS format, it is recommended to download the Easy2Boot (E2B) archive.
- Unpack to any directory on your PC.
- Run the file called _ISO \ docs \ Make_E2B_USB_Drive.cmd.
- To burn a Live-CD image - specify the path by selecting a disc from the list.
- Answer the question about the options for the proposed formatting of the media.
During the transfer of MS DOS to a USB flash drive, several problems arise:
- FAT32 works well with UEFI, supports files no higher than 4 GB;
- NTFS without UEFI has no limitations;
- for images up to 4 GB, you can safely create a bootable USB flash drive in FAT32.
So that NTFS can interact with UEFI under MS DOS - creating a bootable USB flash drive is similar to the previous description. But in BIOS, you need to select a UEFI image so that Easy2Boot changes the record of the first boot sector on the MBR disk (this is true, provided that the bootia32.efi, bootx64.efi configuration files are available).
Recommendations on how to make legacy Windows bootable
The described method is suitable when you need to install MS DOS on a USB flash drive to work with Windows no older than version 7. Otherwise, the risk of irrecoverable data loss is inevitable.
You will not be able to create a bootable card or USB-drive using standard Windows tools, unless you download usb_and_dos.zip additionally.
Insert the drive into the slot, then unpack the archive and click hp_usb_tool.exe. 
After starting the program, specify FAT. Before creating an MS DOS bootable USB flash drive, mark the appropriate checkbox with a tick and specify the file extraction path.
After the installation is complete, restart your computer. Enter the "BOOT" section of the BIOS, change the priority of the disks by moving the USB-HDD to the top line.
To restore Windows-7, 8, 10, you need modern programs run by a privileged user as root.
There are several ways how to create MS DOS bootable USB stick for popular operating systems yourself. One of them is the reliable Boot_USB_Sergei_Strelec_2015_v.8.0_x86 software.
The assembly includes Acronis Disk Director for partitioning the disk and Acronis True Image for capturing the finished image and backing up the system. All utilities have an intuitive interface. Any user can deal with them. 
To start the Live CD, you need to change the boot loader priorities.
Create or not
A flash drive is a very useful thing. Among the shortcomings, it can be noted: the discomfort of constantly switching boot disks in the BIOS. But the user is given the right to choose rescue utilities for multiboot media.
DOS devices are incredibly useful for recovering the system after failures, when you need to get quick access to the hard disk partitions of a "killed" machine. The graphical shell of the file manager, for example, Norton Commander, has been helping out "system specialists" for many years.
Instructions
Buy a floppy disk, choose a good manufacturer, as this floppy disk will serve as a reanimation of your system. Remove copy protection (open the checkbox at the bottom left of the floppy disk). Perform the following sequence of operations if your operating system is Windows 98: click the "Start" button in the lower left corner of the screen, left-click on the "Settings" line. Then select "Control Panel", in the window that appears, click on the task "Add or Remove Programs" and in the tab that appears, click on the "Boot Floppy" button.
Perform the following sequence of operations if your operating system is Windows XP: right-click on the "My Computer" icon, and in the menu that opens, select the "Open" tab with the left mouse button. In the dialog box that opens, find the line "Disk 3,5 '' and right-click on it. In the list of operations that appears, left-click on the "Format" line and check the "Create system disk" box, then click on the "Start" button. The operating system will open a dialog box with a warning that all data on the disk will be destroyed. In this window, click the "OK" button.
After that, the formatting process will begin, do not interrupt it. At the end of the operation, the following set of files will be written to your floppy disk: autoexec.bat, ms-dos, io.sys, config.sys, command.com. Files are written to disk by the operating system, some of them will be hidden. Do not try to overwrite them on another floppy disk, this is not possible. If you do not have (the operating system does not rise) or the operating system is not installed, boot the computer using the Dos installation floppy disk you created.
In practice, users of operating systems of the Windows family often encountered situations in which the system did not want to boot to the end, going into the reboot phase or displaying simple white phrases on a black background. To restore work, emergency floppy disks were often used, from which it was possible to boot.
You will need
- Operating system Windows XP.
Instructions
Recovery using bootable floppies was carried out until the appearance of Windows 2000. It was this system that marked the beginning of a radical change in the structure of systems. The boot floppy was used extremely rarely, but it could not disappear completely, like an atavism.
More and more often, IT specialists recommend using a distribution kit as a recovery disk, i.e. An installation disc from which you can update lost system files. It was also a good help to use different boot methods, for example, "Safe Mode" or "Load Last Known Good Configuration". To do this, at boot, you must press the F8 key after loading the BIOS of the motherboard and the appearance of the coveted system logo.
But there are times when loading even these modes is impossible, here it is necessary to create a bootable floppy disk. Therefore, initially prepare a working floppy disk and insert it into a floppy drive (3.5 A). It needs to be formatted, but not as bootable, but in a standard way. To do this, open "Explorer" or double-click the left mouse button on the "My Computer" icon.
In the window that opens, find the floppy drive, right-click on it and select "Format". In the window that opens, click the "Start" button.
Then go to the "C:" drive. If Explorer displays a warning "Show the contents of this folder", feel free to click on this inscription. You need to copy some system files from the system disk to a floppy disk, which are most likely hidden from prying eyes.
To display hidden files, go to the top Tools menu and select Folder Options. In the window that opens, go to the "View" tab and check the box next to the item "Show hidden files and folders", and opposite "Hide protected system files" the checkbox must be unchecked. Answer yes to the warning that appears, then click the "OK" button.
Copy the boot.ini, ntdetect.com and ntldr files from the root of the system disk and paste them onto the floppy disk. After you eject it, it is recommended to put write protection on by sliding the switch on the front of the floppy disk. It would be nice if you sign it appropriately, for example, "Boot Floppy".
Now go back to the "Folder Properties" and on the "View" tab restore the defaults, then click the "OK" button.
Reinsert the floppy disk and restart the computer, shutting down all applications. Check that the boot floppy is working.
Related Videos
To format floppy disk you don't have to read a bunch of literature. All you have to do is insert floppy disk into the floppy drive and do some manipulation with it.

You will need
- Computer, floppy disk.
Instructions
Once purchased from a store, you need to format it before you can write certain information to your device. Before you paste floppy disk c, make sure the window is open (in the bottom corner of the floppy disk). If there is a window, just open it and insert the device into the drive.
When you first open the floppy, nothing will happen. You need to complete it. To do this, you need to follow the sequence of the following steps. Start from the desktop "My Computer". In the window that opens, you will see a shortcut to the connected floppy drive (by default, the system's disk is like "Disk 3.5 A"). Click on the shortcut of the flexible reader with the right mouse button.
The disk A menu will open. Among all the options for possible operations, you need to select the function of formatting the floppy disk (denoted as "Format"). In the window that appears, set the required parameters and start the process.
Formatting usually does not take long (1-10 seconds). After this operation is completed, you can record on floppy disk necessary information. The main thing is the fact that they are extremely incapable and short-lived with their active use.
Related Videos
On many modern computers, there is no way to open floppy disk... This is due to the fact that floppy disks are an outdated storage medium, and practically few people use them nowadays.

Instructions
To open a floppy disk, it is necessary that there is a special hole in the system unit, into which floppy disk insert. An arrow is drawn on the floppy disk which indicates which side to insert it. During this process, a click should occur, indicating that the media is fully inserted.
Go to "My Computer", which is usually on the desktop or in the "Start" menu. Double click on the "Disk 3.5" icon (A) and the contents of the floppy disk will become available.
If the computer does not have a slot, then use a removable one, you can in the store (but they are rare) or order on the worldwide network.
But it so happens that a floppy disk, but only a message appears stating that it is not formatted. If you decline the offer to format it, the diskette will not open, and if you agree, the diskette will lose all data. What ? Format floppy disk... After that, it will open, but there will be no data on it. In fact, the data that is being formatted can be done using a special data recovery program.
An example of such a program is EasyRecovery Professional (Ontrack Data Recovery Inc.). Install EasyRecovery Professional and run. Further problems with recovery should not arise - everything is extremely, just follow the instructions of the program.
The step-by-step recovery looks like this:
"Data recovery" (in the menu of the main program window) - scanning the system and warning that the data being recovered must be copied to another disk.
Click OK - in the window that appears, select Floppy Disk A - FAT 12 and Next - select files to recover.
A floppy disk is a storage medium that is practically not used in the modern world. However, many have survived to this day. If exposed to sudden temperature changes, demagnetization and dust ingress, the diskette may become unusable. How can you check it?

Instructions
Insert floppy disk into the drive. note that floppy disk, which has been in frost, cannot be inserted immediately - let the condensate evaporate. Do not open files from a floppy disk directly - they may contain harmful viruses. First, check the floppy disk for errors or unwanted programs with antivirus.
Click on "Start" and select "My Computer" from the main menu. A window will appear on the screen, which will contain information about all disk devices on the computer. Find the drive icon and right-click on it. As a result of the actions, a context menu will appear. In it, select "Properties". The computer will display a window with the properties of disk 3.5 (A :), i.e. floppy disks.
Select the General tab. Check the type, file system, and capacity of the storage medium. Capacity data will be displayed in two forms - numeric with the output of units of measurement of information volumes in bytes and megabytes, and a diagrammatic one, where the ratio of occupied and free disk space will be clearly presented.
The magic program Rufus (habitat - rufus.akeo.ie) will help us out in a matter of moments. So, download the latest version and boldly click Run

The main program window appears. I prudently inserted a 16GB USB stick.

If leave everything as it is and don't go into details and just click Startnow, then the program will create a bootable DOS flash drive. All that remains is to copy the necessary files to it and that's it. But we want to be aware what will happen with our USB stick after we press this button.

In the program window, you can select PartitionScheme(partition diagram) for systems BIOS or UEF I. With BIOS, everything is clear, it is already on every computer, but UEFI is a whole small operating system that replaced the old BIOS and MBR(master boot record). Appears beautiful graphical interface and mouse, support downloads from hard drives larger than 2 TB with a bunch of partitions using the partition table GPT, and of course allows the computer load faster... In general, progress does not stand still!
Type of file system (FileSystem) by default is FAT32(file allocation table) created back in 1996, great for flash drives. There is still an option to choose NTFS (new technology file system), it is safe, it supports compression, access control, and even files larger than 4 GB. Finally, exFAT (extended file allocation table) eliminating the annoying limitations of its predecessor FAT32, but still more "simple" than NTFS... The choice is yours, any of the file systems described above is suitable for creating a bootable USB flash drive)
Cluster size (Cluster size) is an interesting thing. Files take up disk space, text files take several kilobytes, but films are already a million... Let me explain how it works - kilobytes are added into clusters. If, say, a text file with a margin is located in one cluster of 32 kilobytes, the remaining space is of this cluster will remain unoccupied, and we have lost precious disk space. Therefore, for small files, it is advisable to select the appropriate cell size - a cluster of 4 KB, but for massive files of music, movies or games, you can put 64 KB.
Then you can choose volume name (NewVolumeLabel), as our flash drive will be called. Will be used if there is a check mark Create additional label and icon(Createextendedlabelandiconfiles). If you create a USB flash drive, for example, to install Windows 7, it will be convenient to name it that way, so as not to accidentally format it later).
Stop, we created a bootable USB flash drive with DOS. But if you take a closer look at the program, unexpected prospects open up!
It is worth a tick to produce quick format (QuickFormat), many people think that "formatting" means deleting everything, but in addition to deleting files, there is also re-creation the structure of the file system on the drive, these are the same FATs and NTFSs that we talked about above.
Create a boot disk using ( Create a bootable disk using) FreeDos Is an operating system, it is distributed free of charge, with the help of it you can update BIOS computer, fix the winchester Victoria program or check RAM (RAM) with Memtest. Actions are mainly performed from the command line
The DOS operating system used to be the most widespread and did not have a graphical shell. It consists only of a shell, like the command line, into which we enter commands. Since DOS technology is already outdated, few people use it, but nevertheless it can be used to solve many problems, for example, to flash. We used floppy disks to boot into DOS, but now we can use a regular USB flash drive.
In this article, I will tell you how to create a bootable DOS USB flash drive. If you are interested in how to create a bootable USB flash drive for any OS versions, then here are some links to articles.
How to create a bootable Dos USB stick?
There are many programs out there that are used to create bootable USB sticks, but for this tutorial we will use the Rufus program, which already has everything you need.
You can download the latest version of the utility from the official website. Now we proceed to the points that are necessary to create a flash drive.
- You need to have a USB flash drive, having previously formatted it, do not forget to move important data to another medium before that;
- Insert the USB stick into your computer and launch Rufus. In point "Device" select our flash drive, it is usually detected automatically. Select the file system FAT32. Now check the box "Create bootable disk", and in the dropdown menu select the option FreeDOS or "MS-DOS".
- We leave everything else as it was and press the button. "Start"... All the windows that appear are confirmed with the OK button.
After a short process, the DOS flash drive will be ready and you can boot from it. When you enter a USB flash drive from regular Windows, you may find some files that I do not recommend touching, otherwise you will not be able to boot from MS DOS. But you can throw other files there, at least when I moved extraneous files to the USB flash drive, loading from the USB flash drive worked.
If you need to perform some actions through DOS, for example, BIOS firmware, then you need to drop certain files onto the USB flash drive, and then, using special commands in DOS, you can do all this. But I have already said more than once that this is a dangerous business and it is better not to do anything without special knowledge.
The updater together with the newest "firmware" takes 1 156 258 byte. And in the BIOS itself there is no possibility of self-updating. The motherboard developer's website says that to update the BIOS, you need to boot from a boot floppy Windows 95 or Windows 98... Jokers ...
To make everything clear to the end, three files from DOS (COMMAND .COM, IO.SYS, MSDOS .SYS) take up space 316 400 bytes on a floppy disk 1 457 664 byte. It turns out that all this economy simply does not fit on one floppy disk! Of course, it was possible to make a DOS floppy disk with support for a CD-drive ... But, as it turned out, the BIOS flashing program for this motherboard does not work if an extended memory driver and HMA memory for the MS-DOS operating system is used, which provides support for additional memory ( extended or expanded). So-called HIMEM .SYS... This driver is required to load the drivers for the CD drive. I just needed more space on the boot device than 1.44 floppy disk! Having rummaged through the Internet, I found a wonderful utility from Hewlett-Packard to create bootable flash drives -. This was my salvation!
archive USB _boot_Flash.zip, and unzip to any location on your disk. Go to the unzipped folder USB _boot_Flash and run the utility setup file to create bootable flash drives hp_usb_tool.exe.
Click on Next>.

Accept the terms of the license agreement and click Next>.

In the next window, click Next>.

Accept another license agreement by clicking Yes.

At this stage, you can change the destination folder for the installed program by clicking the button Browse ... or continue installation to the default folder c: \ DriveKey by clicking Next>.

In the last window, complete the installation of the utility by clicking the button Finish.

On your desktop, you will find a shortcut to the installed utility HP USB Disk Storage Format Tool.
A warning: In the process of creating a bootable USB flash drive, all information from it will be deleted !!!
Run the utility HP Windows Format Utility for USB Drive Key or DiskOnKey using this shortcut.

Up in the field Device indicate the device on which your flash drive is located. Put a tick opposite Create a DOS startup Disk, we mark using DOS system files located at and indicate the path to the DOS folder in the folder where you unpacked the archive downloaded from my site USB _boot_Flash.zip(in my case, this is the folder C: \ USB_boot_Flash \ dos). In field File System indicate FAT32, in field Volume label you can specify the label of the future bootable USB stick. We start the process of its creation by clicking Start.

In the warning window that appears that all information located on the USB flash drive will be destroyed, click Yes.

In the next window, you will see the status of the bootable USB flash drive creation process.

At the end of the process of its creation, you will see an information window about the status of your flash drive. End the process with a button OK.

Returning to the previous window, close it by clicking Close.
We just have to copy the entire contents of the folder C: \ USB_boot_Flash \ USB to your USB stick. You can also copy the programs necessary to run from under DOS there, in my case I copied the program for updating the BIOS and the new firmware itself (now there is more than enough space!)
It remains to go into the BIOS and in the boot methods settings, select the first item to boot from our newly created USB flash drive. When booting from it, you will see a clean DOS with a running file manager Volkov Commander.
Finally, for those who might need a boot floppy Windows 98 with the ability to access the CD-drive, I propose a utility that creates such a floppy disk. Unpack the contents of the archive to your disk and run the file boot98se.exe who will do all the dirty work for you. In the process of booting from it, you can select boot items with or without CD-drive support drivers.