The problem of unstable operation of Windows 7 is often associated with damage or deletion of system files, for example, after reinstalling or installing an infected program. This is not the most difficult problem - there are many ways to recover data using standard OS tools or manually. We will consider the simplest and most effective options further.
Rollback to the last stable state
By default, protection is active for all Windows system partitions. It is responsible for creating special checkpoints that contain configuration information and system files for the environment before modifying it — installing applications, drivers, and updates. Moreover, restore points are created without such a reason by the system at regular intervals or by the user himself.
If problems began to appear relatively recently, and you remember the approximate date of their appearance, then the best solution is to roll back the OS to the point when no failures were observed during the operation of the OS.
It is very easy to do this in a production environment:
All that remains is to reboot, after which the damaged system files will be replaced with the previous working versions.
If Windows won't boot
Even if the damage to system data is so serious that the OS cannot boot on its own, there is an opportunity to use restore points:

The corresponding utility for selecting a checkpoint will start, and you need to work with it in the manner described earlier.
If the boot options window does not open when you press F8, then you can get into the recovery environment only when using a boot / installation disk.
Using the standard SFC utility
This application checks and repairs basic OS system files. It can also be run from the command line from the boot disk, from the boot options window after pressing F8, and from a running system. The last option is the simplest:

Upon completion of the operation, the SFC will notify you of the results - the corrupted data must be detected and repaired.
Recovering data manually
Sometimes the methods described above cannot fix the problem. For example, when updating DirectX from distributions that come with various applications, DLLs are often lost. Therefore, always try to update DirectX from. Microsoft website, and if a problem has already happened, then if a new version is available, all DLLs will be updated automatically after installing a fresh package of components from the site http://www.microsoft.com/ru-ru/download/confirmation.aspx?id=35.
If there is no new version on the specified page, then any DLL from another source can be transferred to your system yourself. Libraries are stored in the following directories:
- for Windows 7 × 32 - in the C: \ Windows \ System32 folder;
- for Windows 7 × 64 - in the C: \ Windows \ SysWOW64 directory.
If, when starting an application, a window appears informing about the absence of any DLL, and the installer from the Microsoft website informs about the presence of the latest version of the libraries in your system and does not update the components, then you can simply use the search engine. Search the Internet for DLLs and move them to the specified folders.
Not only DLLs, but also any corrupted system files can be extracted from the Windows 7 installation distribution. To do this, you just need to know which files are damaged. Often, the OS itself informs the user about the absence of any DLL or about an application error, for example, Explorer.exe. You can get information yourself.
Find out which system information is faulty
To do this, you will need the command line again, we have already described how to open it. Write the following command here:
indstr / N: ""% windir% \ Logs \ CBS \ CBS.log> "% userprofile% \ Desktop \ sfcdetails.txt", where N is the drive letter.
Press Enter, after which sfcdetails.txt will be created on the desktop, which you need to open and carefully review. Its content will be something like the image below.
Here we can see that the damaged library is Accessibility.dll. It will be necessary to find it on the Web or independently extract it from the existing Windows 7 distribution kit for recovery.
Extracting OS components from the distribution
In addition to the installation disc, you will need a small free 7-zip application. With its help we will work with the install.wim image located in the sources directory. The order is as follows:

All that remains is to copy them to the desired folder or to a USB flash drive. You can replace corrupted data with them using installation / bootable media or LiveCD.
Hello readers of the blog of the ComService company (Naberezhnye Chelny)!
Restoring system files Windows 7 or Windows 8 / 8.1 is an interesting topic. Especially if the operating system starts to glitch, and we do not have a recovery image and we forgot to enable system protection in order to create. In this case, we will not be able, we will not be able to roll back Windows to the created restore point, and we are too lazy, since this will take a whole day. And this is where we have another chance to get Windows back to normal - try it. In this article I will try to fully disclose the topic so that we can revive ours in any situation.
Article structure
1. Recovering system files on a loaded system
press Enter and wait for the scan to complete

It was on the virtual machine from where it was taken, so I was not surprised that the system files were found and restored.
3. How to find the drive letter of the installed Windows
If you got it with the key F8 call the "Additional boot options" window and select "Troubleshoot computer problems", then we need to find out the drive letter where Windows is installed which was assigned by the recovery environment. This can be done in two ways
1. Call notepad with the command
Expand the menu in notepad File and choose Open…
Left click Computer and before you there will be discs with letters

You can go to the disk and see what and where.
2. We use the utility DISKPART
On the command line, enter
diskpart- call the utility for working with disks
list disk- look through the list of disks
select disk- choose the one I need
detail disk- I call information about this disk

4. Restore system files manually
If using the sfc utility it was not possible to recover the broken files, you need to try to do it manually. In this case, you need to additionally run the command
findstr / c: ""% windir% \ Logs \ CBS \ CBS.log> "% userprofile% \ Desktop \ sfcdetails.txt"
and examine the file carefully sfcdetails.txt on your desktop.
There should be something similar to the picture below.
Once the name of the damaged file is known (Accessibility.dll), I would look for the same in the distribution and replace it. In this case, it will naturally be necessary to receive. And before you boot into Windows and get the rights to the files, you can try to copy the necessary files using a notepad launched from the recovery environment (as described above).
Conclusion
Friends! Everything written above about restoring system files in Windows 7 is also true for. And, I would also apply this command to Windows 8

I have not tried this command myself, but if the system does not boot, then it certainly will not be worse.
Just like hardware, software also falls into disrepair, since it is exposed to significant loads from the user. Therefore, the integrity check of system files in Windows 10 should be performed periodically, and, if necessary, damaged areas are restored.
Examination
The OS has a built-in utility that detects damaged files and replaces them with workable versions.
Good to know! The original OS files are stored on the system drive in the folder Windows \ WinSxS.
Possible problems
OS recovery using sfc / scannow will fail if the source repository itself has been damaged. In this case, you must first restore the original image using the utility Deployment Image & Servicing Management (DSIM)... It is designed to work with Windows images.

Good to know! DISM uses Update Center when restoring the repository.
Recovery
After running the utility DISM and restore the sources, run the command again in the command line sfc / scannow... This will completely restore the integrity of the system. Restart your computer for further work. If, for some reason, the fix did not work and you are using a radical method of reinstalling the OS, read how to create a bootable USB flash drive in the article "How to create a Windows 10 installation flash drive in different ways".
Conclusion
The integrity of Windows 10 files is compromised after incorrect work with them, frequent reinstallation of programs or overwriting of information. Use the built-in utility to restore sfc / scannow which will do everything automatically using the original file storage. If the original image is damaged, restore it using Deployment Image & Servicing Management.
). In this case, some begin to worry and look for all sorts of reasons and ways to eliminate freezes.
I will not repeat myself and write why this is happening, tk. the article is not about this and I have already given a link to solving the problems above.
I'd rather show you one interesting way that will help you check the system for errors.
Few people know, but in Windows there is one useful "trick" that can itself search and correct errors in the system itself. Moreover, it will not touch third-party programs, but only check its system files. This is useful and interesting because many do not think that the reason may be hidden in the system itself, but start feverishly, and so on. Generally . Yes, this is useful and can lead to good results, but with all these actions it is good to remember what I will write about below.
I already wrote a little about this function in the article, which can also arise due to a failure in the system files, which are often forgotten. But still, within the framework of this article, I will repeat ...
So, let's run:
and enter into it sfc / scannow:

The system check will start:

You just have to wait.
For anyone interested, here is a description of the command and keys.
sfc
where:
/ scannow - performs an immediate scan of all protected system files.
/ scanonce - a one-time scan of all protected system files at the next system boot.
/ scanboot - check all protected system files on every boot
/ REVERT - Sets the original default options.
/ ENABLE - Enables the normal operation of Windows file protection
/ PURGECACHE - Clear file cache and check files immediately
/ CACHESIZE = x - Sets the size of the file cache
In the command line (Start -> Run -> cmd) write the sfc / command and the required key.
After completing the check, the system will report the results and ask you to reboot.
That's all for me. Thank you all for your attention.
Whenever something goes wrong with your computer or laptop, there are a number of troubleshooting tools you can follow to try and fix the problem. Windows 10/8/7 has several built-in commands that you can use to check and repair corrupted system files that cause problems over time when changed. One of the ways to troubleshoot Windows-related problems is System Check and System File Restore. It can help with all types of problems like slow system, blue screen of death, sudden power failures and system crashes.
Let's take a look at how to run the System File Checker tool on Windows using command line CMD and PowerShell commands such as sfc / scannow and tool DISM. I want to note that for the Windows 10 Anniversary Update, it will be better to use methods with PowerShell.
Checking and restoring system files via CMD
System File Checker scans your computer for any damage or changes to system files that might otherwise interfere with your PC's normal operation. From there, it replaces the file with the correct version to keep it running smoothly. Using the command line, you can try to scan and repair system files of late operating systems like Windows 10/8/7 / Vista. Let's analyze two commands sfc / scannow and DISM using CMD.
1.
- Run Command Prompt (CMD) as administrator. Click "search" and write simply "cmd" or "command line", then right-click on it and run as an administrator.
- Set command sfc / scannow and wait for the process to finish.

Note: After scanning your system, you will get one of three results:
- There will be no system file errors.
- There will be system file errors and Windows will repair them automatically.
- Windows has encountered errors but is unable to repair some of them.
If option 3 shows you that an error was found and the system cannot recover, then repeat the procedure. I advise you to disable encryption and, if they are available at the time of verification. Nothing succeeded? We move below.

2. (DISM)
If the above doesn't work in safe mode, there is one final way to check for corruption in system files and fix them. We use the Deployment Image and Service Management (DISM) tool. The team works with Windows 8 / 8.1 / 10 systems. Open back and use the following command:
The process can take a long time with the percentage scale freezing. When finished, restart your computer and start back sfc / scannow, to make sure there are no errors or the error is gone.

Checking and restoring system files viaPowerShell
We'll be using Windows PowerShell to show you how to use the Servicing and Management Service. DISM to scan and fix corrupted system files in Windows 10. This method will be more effective for updating Anniversary windows 10 than the command line.
1. Using the System File Checker (SFC) Tool
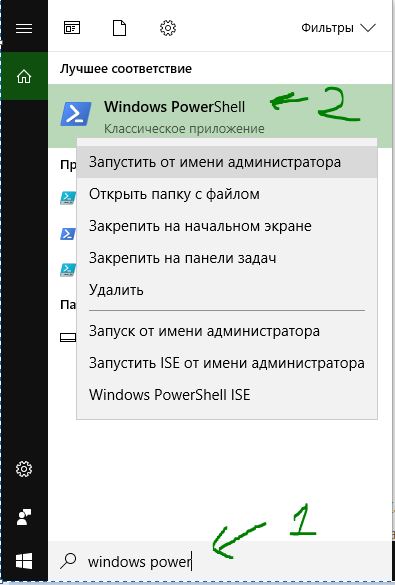
- Run PowerShell as administrator. Click "search" and type windows powershell, then right-click and select as admin.
- Enter the command in the PowerShell window sfc / scannow. If the scan finds any problems, Windows will try to fix them. If Windows cannot fix them, it will warn you that further research and action is needed. Move down if errors are found.

2. Using the Deployment Image and Service Management Tool (DISM)
DISM scan detects corrupted system files and Windows will try to fix them and give you a progress report at the end. If Windows cannot find the files it needs to repair corrupted system files, you will also be provided with information on what to do next, with a link to Microsoft's website and troubleshooting options. Issue below command to PowerShell window.
DISM / ONLINE / CLEANUP-IMAGE / RESTOREHEALTH
If DISM fixed everything or did not find errors, then restart the laptop, computer and run it back to check sfc / scannow.


