There is no magic button that will easily and simply restore a deleted photo or VKontakte ava. More precisely, when you delete a photo, a link appears "Restore" in case the photo was deleted by mistake. But if you have already left there, read this instruction to the end.
Deleted photos disappear from your page, but remain on VKontakte servers. This does not mean, that it will be easier to recover a deleted photo (or avatar) and especially does not mean that anyone can look at your deleted photos. The fact is that it is easier for VKontakte owners not to delete photos completely, but only to remove them from the pages so that no one can find them.
Recovery methods
Despite the fact that the deleted photo is still somewhere out there, on one of the VKontakte servers, it is almost impossible to find it. To open this file, you need to know the exact link to it (many, many letters, numbers and at the end “.jpg”). Even if we knew part of this link, selecting the remaining options would take a very long time (longer than you might imagine).
Therefore, you need to try to take advantage of other, more realistic chances. The main thing is not to waste time.
Is there a photo left somewhere?
If it was a truly valuable photo or profile picture, then most likely it is somewhere else. For example, on your computer in a folder with photos, on your phone, somewhere on a disk or on a flash drive. Perhaps your boyfriend or girlfriend. If someone else made you an avatar, then that person probably still has it. One of your VKontakte friends can help you restore a deleted ava, if he liked it and saved it somewhere at home. Don't be shy to ask people!
A copy of the page in the Google search engine
If your page was open to everyone (or the album with the photo you were looking for was not closed), then the deleted photo could be saved in Google. From time to time, Google makes copies of all pages on the Internet and stores them for a while. This is called "in cache". There is a chance of recovery if not much time has passed since the deletion (no more than a week). But even if the photo remains there, most often it is possible to restore only the miniature (photo in a small size).
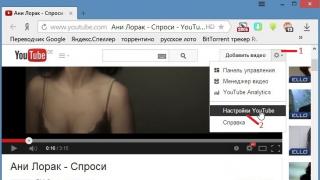
Check if your page is still in the Google cache - enter the address of your VKontakte page in the search bar (below) - for example, https://vk.com/id126494354. The easiest way is to open your VKontakte page and copy the address here from the address bar of your browser.
Finding a saved copy of the VK page
Then press "Find", A new page with search results will open. If you find something, open your saved page:
- Click on the small green triangle next to the page address.
- Select an item "Saved copy."
- Click on it.
An example of what it looks like:
Now the saved copy of your page will open. If there is a photo there that you want to restore, open it and save it somewhere to yourself (usually you need to right-click on the photo and select "Save image as...").
If there is no green triangle at all, then there is no copy of the page in Google, and this method will not work.
Browsing history or browser cache is a chance!
If you recently looked at this photo in full size, then it could remain in your browsing history or in the cache (temporary files) of your browser - the program with which you view websites. This is one of the real chances. What if you opened the photo using the button "Open original" maybe you can even find a link to the VK site where this photo is still stored.
How to find a deleted photo in your browser history
Usually you can view your browsing history in the browser using a key combination Ctrl-H or call through the menu. It is especially useful to search there if you have recently opened a photo via a link "Open original."
How to find a deleted photo in temporary files
You will need a program to view the cache. There are different programs for different browsers, download and run the one that is designed specifically for yours (Chrome, Mozilla Firefox, Opera, Internet Explorer). If you're not very good with computers, it's time to stop touching anything and call a boy who is good at it to continue from there.
A page with programs for viewing the cache of various browsers: Web Browser Tools. Download the program for the browser used on this computer. Run it and look in the cache for image files (.jpg) of a sufficiently large size - among them may be the same deleted photo.
Is it possible to recover a deleted album and how?
Unfortunately, VKontakte albums are deleted immediately and forever. As in the case of individual photos, you can restore an accidentally deleted album only immediately after deleting it, as long as there is a link on the screen "Restore". Therefore, be especially careful when deleting an entire album. If you have closed the page, your only chance to restore the album is through support (read below).
Is it possible to restore a photo along with likes and comments?
This is absolutely impossible.
How to recover photos through support?
The last chance is to write to VKontakte technical support and ask to recover deleted photos. Do it as quickly as possible, you literally have only a few days! Give them the following information:
- I accidentally deleted a photo, please restore it.
- How many photos did you delete?
- When exactly did I delete them and how exactly?
To avoid searching, you can create a new support request about deleted photos using this link.
Instructions
The first way to delete files and folders without possibilities subsequent recovery is as follows:
- select the file or folder to be deleted by left-clicking on it once;
- press the “Shift + Delete” key combination on your keyboard (on some keyboards, the “Delete” button may also be called “Del”);
- a dialog box will appear asking you to confirm the final deletion of the file;
- in this window, click the “Yes” button to confirm deleting the file or the “No” button to cancel this process.
The second method is to disable the Recycle Bin mode when deleting files. Do the following:
- select the system Trash folder by right-clicking on it once (the Trash folder is located on the Desktop as a shortcut);
- in the action selection menu that appears, click on the “Properties” line. The Trash properties window will pop up in front of you.
- in this window, select the "Global" tab. There are general settings for the operating system Recycle Bin;
- in the selected tab, check the box next to "Destroy" files immediately after deleting them, without placing them in the Recycle Bin." After that, all deleted files and the folders will be destroyed completely, that is, without possibilities their subsequent recovery.
If deleted files and the folders are already in the Trash, then to completely destroy them you need to empty the Trash. To do this, right-click on the Trash icon once and select “Empty Trash” from the menu that appears. Then simply confirm to empty the trash.
Video on the topic
Typically, a node is removed from the cluster in order to be redeployed, verified, or replaced. The process of removing or adding nodes must be completed before the quorum changes. For example, after you remove a node, wait for the process to complete before replacing it.
You will need
- - computer;
- - system administration skills.
Instructions
Perform a service return clusters to its original state, so service clusters you won't succeed. To do this, run the “Administrator” command clusters", enter the following in the Run window of the main menu: Cluadmin.exe. Call the context menu on the node that you want to exclude from clusters server.
Select the option "Stop service" clusters" If the server is the last node in the cluster, do not do this. In this case, right-click on the node and select “Exclude Node”. This command will return to its original state.
Before removing a node from a cluster, check with your application vendors to determine whether these programs require a cluster removal procedure. Before doing this, close all applications as information loss may occur. When you remove the last node from clusters, the service account will not be automatically deleted. Remove it from the local Administrators group yourself if you no longer need it.
Complete this procedure; to do this, you must be a member of the Administrators group. Use the Run As command. Click on the “Start” button, select “Control Panel”, double-click on the “Administrative Tools” option, then “Administrator” clusters" Stopping a service clusters, as well as removing the last node from the cluster is sometimes impossible, for example, if you are trying to remove a node from XOX.
In this case, manually remove the service configuration clusters on this node. Enter the name of the node at the Cluster node command line. At any time you can add a remote node or create a new one. To return services clusters to its original state, go to the main menu, select the “Run” option. Enter the command cluster node “Node name” in the command line, then click the Enter button.
Video on the topic
Tip 3: How to permanently delete data from HDD
Situations regularly arise when it is necessary to restore personal and service files that were accidentally deleted or located on storage media. The opposite situation, when you need to delete data from the HDD so that no one will ever see it, is less common. However, if you decide to give someone else a hard drive on which confidential data was stored, it can be permanently deleted.

There is no need to write files or install programs on the hard drive or USB flash drive that contains the information you want to recover. This is connected with the principle of deleting information, the fact is that when you click on the “delete” button, the information is not actually deleted, but only its header is erased, the file or folder itself remains, but the next time it is written to a disk or USB, it is replaced in the place where a deleted file or folder is located, new information is written, the old one can no longer be restored.
Ways to recover a deleted file or folder.
1) Check cart
The first and simplest thing to do is check the Recycle Bin to see if there is a deleted file or folder there. To do this, click on the Recycle Bin shortcut on your desktop and if you see a file or folder there that you accidentally deleted, right-click on it and select "Restore". The data will be restored to the same location where it was before it was deleted.
If you are unlucky and you do not find the deleted file or folder in the trash, then you need to use one of the recovery programs described below
2) Use the free data recovery program Recuva.
First of all, go to the site Recuva and download the latest version of the program. Then you start installing the downloaded program, the installation process is very simple, the first step is to select the installation language.

Then we specify additional parameters (whether to create a shortcut on the desktop, whether to search for program updates...), you can leave them as default. Please note that if the deleted file was located on the disk where the operating system is installed (often drive C), then the Recuva program should not be installed on this disk, otherwise by installing it you may overwrite the file and it will not be possible to recover it. To select a different drive to install the program, click the button "Additionally" and specify a different installation path for the program.

After this, you will be prompted to install the Google Chrome browser; if you do not want to install, uncheck the box.

After installation, the Recuva wizard will launch to help you recover your files or folder. I strongly recommend using the wizard, as it is more understandable and convenient. Click "Next"

Selecting the type of recovered file

Select the location where the file or folder was located.

Put a tick "Enable in-depth analysis", press "Begin".

After this, the search for files will begin, this can take up to several tens of minutes, depending on many factors (computer power, disk or USB device capacity, disk speed, USB device, etc.).
After searching, you will see a list of files that can be recovered. If you want to get more detailed information about the files, you can click on the button "Go to advanced mode".

To restore a file, check the boxes next to them and click the button "Restore", then indicate where to restore the file and within a few seconds the file will be restored. 
3) Using the paid program EasyRecovery.
I, like many, am for free software, but in this article I will describe file recovery using a paid program, since during my test recoveries this program saw more deleted files than Recuva (2385 files versus 2461). I would recommend using this program if the free one did not help. You will still not lose anything, since with this program you can find deleted files for free, but to restore these found files and folders you will need a license key.
So, first of all, download the latest version of the program EasyRecovery (in this example I will use the Home version). Install... the process is not complicated, we agree with everything and click "Next", let me remind you that the program must be installed on a volume (disk) from which you will not restore the file or folders, since you can overwrite the file or folder being restored. After installation, run the program, the first window to appear is the licensing window, which you can skip if you click "Run as a DEMO". The first EasyRecovery window appears in front of us, click "Continue".

In the next window, select the location where the file that needs to be restored is located.

The next step is to select a recovery script. If the file or folder was simply deleted, it is recommended to select "Deleted File Recovery", if the hard drive/USB flash drive has been formatted, you must select "Formatted Media Recovery".

After this, an information window will appear in which all the specified search settings are indicated, if you have not confused anything, click "Continue".

The search for files will begin, this process may take quite a lot of time, depending on the volume size of the hard drive or USB device, the power of the computer, etc. After the entire disk or USB flash drive is scanned, all deleted files will appear in front of you, divided into groups depending from expansion. If you click on a file and try to open the file (Open) or save it (Save as), you will be prompted to enter a license key; without it, the file will not be restored.
I hope this step-by-step guide helped you recover your files and folders, saving a lot of time and possibly money. In the future, I recommend using backup of important files, if possible, store important files on several media or at least in different folders.
There are often cases when a user deletes important files and realizes what happened after the fact. It’s good if the computer owner did not have time to empty the recycle bin itself, but if the files are deleted from there, then many people think that they are lost forever. Today we'll figure it outand is it possible to return those objects that were deleted from the recycle bin too.
Regardless of the operating system that the PC owner uses, the list of services includes a “Trash”. This is a kind of intermediate buffer in which all deleted information is stored until a certain point. Today, “Recycle Bins” are even installed on mobile operating systems, albeit in the form of separate applications, but the essence of the action is the same. The service simply captures deleted content and stores it. Files are deleted from the Recycle Bin in two cases:
- the user cleared the buffer independently;
- The storage is full and previously deleted files are gradually replaced by more recent “garbage”.
It is worth noting that the data in the Recycle Bin continues to occupy memory and is deleted when using auxiliary utilities such as .
It is worth noting that files that are still stored in the Recycle Bin are quite easy to remove from there. The answer to the question iswill not cause difficulties even for the most inexperienced user. Simple enough:

That's all, the deleted file will be in the place from where it was sent to the trash. You can also find the required command in the context menu, which is called up by right-clicking on the found object. That is, if you accidentally deleted important documents or other content, you can quickly and easily restore it from the Recycle Bin, provided that the Recycle Bin has not been emptied and the file itself has not been replaced with fresh garbage.
How to recover deleted files from the Recycle Binif it is cleaned
At the time of emptying the recycle bin, the system notifies the user that the files will be deleted from the computer forever. Many PC owners really believe that after this, important objects are lost forever. Actually this is not true. 
More experienced users know that there are special recovery programs that, in some cases, can restore accidentally deleted files. We will talk about them in more detail. But we warn you right away, this software is not a panacea and is not always able to give the desired result.
In fact, the process of permanent deletion is that the operating system changes the symbol in the file table code, after which the objects simply no longer appear in file managers. The recovery program scans the hard drive and finds similar files, allowing you to restore them. Today there is a lot of similar software available, both for paid and free access. We will consider only the most effective and popular.
Data Recovery Wizard

According to user reviews, this is an excellent and very effective product. As mentioned above, such programs do not restore all files deleted from the Recycle Bin. Data Recovery Wizard will please even the most demanding user in this matter. The program has been personally tested several times and we can safely say that it will restore almost all deleted files in the OS, unless overwritten.
The big plus is that before restoration the program allows you to organize a preview of the object. This makes it possible to make sure that the content is exactly what is needed and the user is not confused.
The disadvantages of the software include the fact that it is paid. But there is a demo version that will allow you to perform the recovery several times. Having tried out the features, it will be easier for the PC owner to make a decision about purchasing it. You can download the program on the developers website https://www.easeus.com/ , and on . We advise you to download programs only from official resources to avoid unnecessary troubles.
Let's figure it out using the program.

Experienced users advise saving recovered files not in the same place where they were located, but in a different partition of the disk. This will prevent you from losing data. Since in fact you will try to overwrite the partition that is being restored.
Handy Recovery

The previous software is not the only one that allows . The program is similar to Data Recovery Wizard and will help you recover a couple of files that were accidentally deleted from the Recycle Bin. But according to user reviews, it is not so effective.
You can download the distribution kit for installation on the official website https://www.handyrecovery.ru/. The program has both a free and an extended version with greater capabilities. The free version allows you to recover up to 100 MB of deleted files. The software works with all types of drives, the main condition is that they are not damaged.

If the required file is not found, you can use the advanced analysis function, but it is only available in the advanced version. The program also allows you to preview found files. This is especially true considering that the latter often change names, but the expansion and size are preserved, this allows you to further identify the desired object.
Tell how to recover deleted photos from a camera, my wife and I were on vacation, we took a lot of good photos, we came home and immediately called our friends, connected the camera to the computer and looked at all the photos on the monitor, they didn’t think of copying everything to the computer’s hard drive at once, and there was no time for that, guests they came, you understand. I got up in the morning, I think let me look at all the pictures more carefully, but there are no photos, the memory card on the camera is empty!!! In short, you have no idea what state I’m in, how this happened and I don’t know how they left. A computer scientist I know said that there are programs, even free ones, that can restore everything, but he doesn’t dare to do it himself. I live outside the city, I have the Internet, do you think it’s worth trying some kind of file recovery program or go to St. Petersburg and look for an office there that can recover lost data? I kindly ask you to answer quickly. Yes, I understand what you are telling me now, but still advise me something.
How to recover deleted photos
Friends, a friend of mine recently had a similar situation; he also accidentally deleted photos on his camera’s memory card, and together we quickly restored them. Our article is about how we did this. When restoring, we used the free PhotoRec program. Many may notice that there are also free utilities for photo recovery and we also have articles written about these programs, for example, and, Restoration or Undelete Plus, but in my personal opinion, PhotoRec works a little faster.
For fans of paid software, we also recover deleted photos from the camera using the best data recovery program R-Studio.
Friends, among novice users, there is an opinion that it is possible to recover deleted photos from memory cards, hard drive partitions, flash drives, CDs only with such powerful programs as R-Studio or, as well as (separate articles have been written about working with these powerful programs), but this is not so, all of the above programs will actually cope with this task, but there are also free utilities that will work just as well, for example PhotoRec.
- By the way, we have a whole section in which there are many similar articles, in them you can learn how to recover damaged information from scratched CDs, deleted information from hard drives, and so on, it’s called, if you’re interested.
It cannot be said that the process of recovering deleted data (photos, for example) is very complicated, although of course a lot depends on the circumstances, the most important thing is that no other information is written to the memory card with deleted photos, for example, if after accidentally deleting photos from camera, this memory card was in use and there are now other photographs on it. But even in this case, you and I have every chance to recover deleted photos.
Well, now let's return to the question of how to recover deleted photos from a camera.
So, we connect the camera to the computer via a USB cable and we see this picture: the memory card is absolutely empty, there is absolutely nothing on it. My friend, who owns the camera, has long said goodbye to his photographs in his thoughts and there is absolutely no hope in his sad look.
Please know that there are chances for photo recovery even when the file system on the flash drive is not detected at all and is designated as RAW (undefined file system).
Let's go to the website of a wonderful program specializing in recovering deleted hard drive partitions TestDisk, it also includes another good utility Photorec, we will recover photos using it. So, click on the TestDisk Free download button, if you have Windows 64-bit, select your version of Windows.

The program is downloaded in an archive, unzip it, Photorec works without installation and is located in the TestDisk folder.

First of all, we create a folder on the computer’s hard drive, in which we will save the restored photos, let, for example, this folder be located in the root of the drive (C:) and called restored photo (restored photos).
Under no circumstances should you restore deleted files to the same media from which you are restoring damaged information.
We launch the Photorec utility; managing the program is not complicated. We are immediately prompted to select the desired disk, use the arrows on the keyboard to select our memory card and press Enter.

The program determines the choice of partition itself, you will probably have FAT-32, but our flash drive is formatted in FAT-16, then press Enter on the keyboard.

The Photorec program will also determine the type of file system that was previously on the memory card itself, leave Other and press Enter.

Here, friends, be careful, if you select Free, the free space of the camera’s memory card will be scanned and only deleted photos will be restored, but if you select Whole, the program will try to restore everything it can and on the entire partition, the number of recovered photos will also include non-deleted photos, you must Note that the scanning time will increase slightly. This Whole method should be used if the partition is damaged, for example the file system of the memory card is defined as RAW or another option - other pictures have already been recorded over the deleted photos.
So, first of all, try the Free option and press Enter.

Now we need to use the arrows on the keyboard to select the previously created restored photo folder.

into which the Photorec program will restore erased photos, we created this folder in the root of the system partition (C:), and here is our folder. Press Enter and enter it.

To start the photo recovery process, you and I need to click on English keyboard layout key C, (if you need to exit to the previous window, press Q), as we see, the process of restoring deleted images has begun.

No more than 20 minutes passed, go to the folder C:\restored photo\in it the program created another folder recup_dir.1 All the necessary photos were restored, in addition, there were five times more restored photos than needed, PhotoRec restored even those photos that were deleted several months ago, our program also restored a sufficient number of well-playable video files with the .mov extension. My friend did not even hope for such a result and the expression on his face is completely different.

How to recover deleted photos using R-Studio
Now it’s R-Studio’s turn, launch the program, in the main window, on the left side of the “Disk Panel” all drives located in the system are shown: hard drives divided into logical partitions, USB drives, memory cards, DVDs, right window in turn, provides comprehensive information about the media we have chosen - name, size of clusters, and so on.

We indicate our memory card and click Scan,

in the settings window you can leave everything as default: Search for known file types and Detailed view, click Scan.

By the way, the settings can be changed; the program is made very convenient in this regard.
R-Studio takes more time to scan deleted files, since the program is universal and recovers almost all known file types, and in the settings we specified Search for all known file types. The entire process is displayed on the right side of the window; sectors of the hard drive are displayed as colored squares. The process of scanning deleted files has ended, let's see what the program can restore for us.

We double-click with the right mouse on Extra Found Files - this is all the data found that the program was able to associate with any file structure.

In this window, you and I can go into each folder and view files that can be recovered,

As for photos, before recovery, you and I can even view them in a special viewer; if the photos we need are found, we can tick them and restore them individually, or we can restore everything. As you can see, the R-Studio program even recovered video files with the .mov extension that were shot on a camera and deleted more than a month ago.

We look through the contents of all folders in the left window and mark the necessary checkboxes, then click Restore marked.

The program prompts you to select a location to save, for example, select C:\Users\Documents\R-TT\R-Studio and click Yes.

and go to this folder, as we see all the necessary photos have been restored.
So we can say that both of our photo programs recovered almost the same number of photos, but the R-Studio program recovered a little more video files. In any case, we are pleased with the result.