Like Windows 8, there is a built-in antivirus that provides real-time protection. It automatically runs in the background, which guarantees a basic level of virus protection for all Windows users. Thanks to this, Windows 10, unlike Windows 7, does not bother you with a request to install an antivirus.
Those who used Microsoft Security Essentials in Windows 7 and previous versions of the system are already familiar with the new antivirus. It's the same basic program, just renamed Windows Defender and included with the operating system since Windows 8.
Automatic scanning and updating
Like other antivirus applications, Windows Defender automatically runs in the background, checking each file before opening it. You can forget about it at all - the Defender attracts attention only if it detects malware.
At the same time, he does not even ask what to do with the find, but automatically removes viruses and sends files to quarantine. You just get a message saying that malware has been detected and Windows Defender is taking action to remove it, or that it has already removed all detected threats. The message is saved in the notification center.

Anti-virus database updates are installed automatically via Windows Update without requiring a reboot. The user does not need to worry about updating Windows Defender.

Customization and exclusions
Windows Defender settings are found in the Settings interface. To get there, open the Start menu and click the Settings link. Select "Update & security" and then "Windows Defender".
By default, Windows Defender automatically provides real-time protection, cloud protection, and sample submission. Real-time protection means that the program constantly scans the system for malware. This feature can be disabled briefly if you want to improve system performance, but then automatically re-enabled to ensure future protection. Cloud protection and sample submission allow Windows Defender to share information about threats and detected malicious files with Microsoft servers.

You can also set up exclusions here - to do this, scroll through the page and click the Add an exclusion link. You can add specific files, folders, file types, and processes to exceptions. If an antivirus slows down a guaranteed safe application severely, you can add it to the exclusions to improve performance. However, you should not abuse exclusions - if you do not approach things wisely, this can weaken the security of your computer, because Windows Defender will simply stop checking certain places.

Manual check
If you scroll down the settings page to "Version info" and click the "Use Windows Defender" link, the desktop interface of the antivirus will open. Those who have previously used Microsoft Security Essentials will immediately recognize it. (In the future, however, Microsoft will likely move other settings from here to the Settings interface.)
In this window, you can run a quick scan, a full scan, or a custom scan of specific folders. You can, for example, conduct a special check of an external drive connected to the computer.
It is not necessary to perform a manual anti-virus scan regularly. Windows Defender scans everything in the background anyway and does a full computer scan on schedule. So the ability to run a scan manually is relevant only for scanning external media and network folders.

View quarantine
If Windows Defender has reported malware blocked, you can view the blocked files in the antivirus desktop interface. Click on the “Use Windows Defender” link mentioned above in “Settings”, and in the window that opens, go to the “History” tab. Click the "View details" button to view the list of blocked programs. It specifies the name of the malware, the date it was detected and quarantined.
Here you can completely remove malware from your computer or allow files that Windows Defender considers dangerous to run. You should only do this if you are one hundred percent sure of the error. If not, do not run files from quarantine.

Installing another antivirus
When you install another antivirus, Windows 10 automatically disables Windows Defender. It stops performing real-time system scans, so there are no conflicts between two different antiviruses. If you open the Windows Defender settings after installing another antivirus program, all options will be grayed out, and when you click the Use Windows Defender link, you will see a message that it is disabled. The message will say that the application is disabled and is not monitoring the computer.
After uninstalling another antivirus, Windows Defender will work again to provide uninterrupted antivirus protection.
Configuring the built-in Windows Defender antivirus in Windows 10, 8.1 and 8 operating systems. Configuring scheduled scans and updates, managing quarantine.
Translation . Based on materials
Introduction
Windows Defender is the basic antivirus protection in Windows 8, 8.1 and 10. Unlike the equivalent tool in Windows XP, Vista and 7, the Windows 8/8.1/10 version protects against viruses and other types of malware, not just spyware . The product is similar to Windows XP, Vista and 7, but unlike it does not have several features such as the ability to select the time or limit the CPU resources used for scheduled scans using the graphical interface, quickly launch a scan using the context menu, display an icon in taskbar notification area, etc.
Windows Defender uses the Windows Update service to download new virus signatures once a day. If the update process fails, you need to reinstall Windows Updates.
Please note that you cannot install Microsoft Security Essentials on Windows 8, 8.1, or 10. When you install a third-party antivirus program (for example, ), Windows Defender will turn off automatically - there is no point in consuming extra system resources by using multiple antivirus solutions.
Setting up Windows Defender in Windows 10, 8.1 and 8
To launch Windows Defender in Windows 8 and 8.1, open the application search bar by pressing the key combination - Windows key and Q, enter the phrase "Defender" in the search bar and click on the result.
Users of touch screen devices can bring up the sidebar on the right side of the screen and then select the “Search” option.
In Windows 10, open the Start menu or Search Cortana by pressing the key combination - Windows key and S, enter the phrase "Defender" in the search bar and select "Windows Defender Settings". Since all Windows Defender settings are now located in the new universal interface, it makes no sense to open the main program window.

If you previously uninstalled a third-party antivirus, you will see a dialog box stating that Windows Defender is disabled. In this case, open the Action Center from the icon in the taskbar notification area and in the "Security" section, enable the "Virus protection" and "Protection from spyware and unwanted programs" options. Alternatively, you can open the Control Panel (Windows key + X), type "Center" in the search box, and then toggle the options in the "Security" section to the "On" state. Please be aware that in Windows 8 and 8.1 the Action Center may not display the red icon in the notification area for several days after uninstalling a third-party antivirus product.

Windows Defender settings in Windows 8 and 8.1
When the main Windows Defender window opens, go to the "Settings" tab and make sure that you have "Turn on real-time protection (recommended)" checked. These measures are enough to activate Windows Defender Antivirus protection in Windows 8 and 8.1 after uninstalling third-party free and paid antivirus solutions.

If something is blocking activation, run to end malicious processes and services that may be preventing Windows Defender from starting. Then repeat the operation without restarting the computer.
The next 3 tabs of the “Settings” section work with exceptions: the user can prevent scanning of certain files and locations (folders), file types and processes. These settings should be used by experienced PC users who clearly understand why it is necessary to exclude scanning of certain objects.
Click on "Details" in the menu on the left. Enable the "Scan archive files" and "Scan removable media" options. The first option allows you to scan compressed folders (files with the .zip extension) for malware. The second setting allows you to scan for connected USB devices during a full scan. This is very important because malware can be distributed in these ways.
Then check the "Create a system restore point" checkbox. In this case, a system restore checkpoint will be created each time a detected virus or malware is removed or quarantined. If your computer becomes unstable after uninstallation, you can restore it to its original state using the System Restore tool.
If you want all PC users (not just administrators) to be able to view detected objects on the “Log” tab, activate the “Allow all users to view the results of all scans” option. Set the value of the “Delete quarantined files after” parameter to “3 months”. This measure will free up some space on your hard drive.
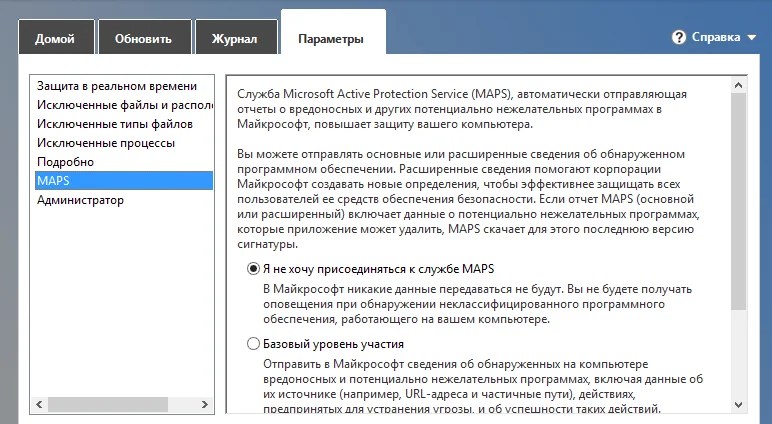
In Windows 8.1, another setting item is presented here - “Automatically send sample files if further analysis is required”. When this setting is enabled, the system antivirus will display less annoying alerts, so it is recommended to enable this feature.


If you are seriously concerned about the privacy of your personal data, go to the “MAPS” tab and select the option “I do not want to join the MAPS service”. In this case, information about detected objects will not be sent to Microsoft. Other users can leave the item “Basic participation level” active.
Finally, open the "Administrator" tab and make sure "Turn on Windows Defender" (in Windows 8) or "Enable application" (in Windows 8.1) is enabled. Click the Save Changes button.

The settings will be saved. You can now safely close Windows Defender by pressing the keyboard shortcut ALT + F4. The defender will run in the background and will monitor files and settings. The program will automatically update virus and spyware signatures once a day when the Windows Update service is running.
Windows Defender settings in Windows 10
Windows 10 makes it even easier to interact with Windows Defender settings and uses the universal Settings app for customization.
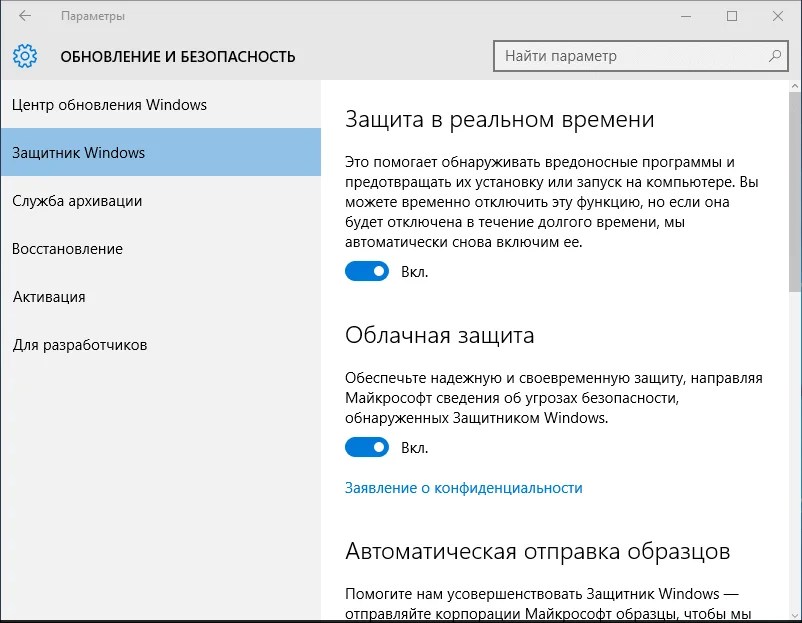
First, turn on the "Real-time protection" option in order to enable Windows Defender. If the option is disabled, the rest of the options will be unavailable (grayed out).
"Cloud protection" allows you to increase security for most users. Only if you are seriously concerned about privacy, disable this option.
"Submit Samples Automatically" is very similar to the previous setting, so leave this option enabled.
If you are not a professional IT specialist, it is better not to touch Exceptions.
You can now close the Settings app.
Windows Defender messages in Windows 8, 8.1 and 10
In Windows 8 and 8.1, Windows Defender does not have an icon in the taskbar notification area (system tray), so the best solution is to periodically check the status of the Action Center icon (white flag). If the checkbox has a red circle with an “X” label, something has gone wrong. Click on the icon to view a list of detected issues - this may not be related to Windows Defender.
Windows 10 brought back the Windows Defender icon. The icon works stably, nothing overlaps it. To open the program itself, right-click on the icon and select "Open".

If the icon has a red circle with a white cross, something has gone wrong, such as a malware infection and the user's attention is required for cleaning.

If a green circle is displayed next to the icon, then a scan is in progress - no action is required.
If Windows Defender needs to scan your computer, an alert will appear in the Action Center, just click on it to start the scan. The program performs an automatic scan every day at 3:00 by default, and the user will see notifications if the system antivirus has missed several scans.
If the Action Center displays "Update your antivirus protection (Important)" and "Update your antispyware protection (Important)" alerts, click on them to open Windows Defender to download the latest signature definitions.
If you see the messages “Turn on virus protection (Important)” or “Turn on spyware protection (Important)”, click on any of them and wait for Windows Defender to load. The computer status in the main Windows Defender window should soon turn green, after which you can safely close the window. These messages usually appear when services or Windows Defender Real Time Protection are disabled.

If you see the message “Windows Defender service cannot start”, the antivirus protection service has been stopped or disabled. Click the "Close" button.
In Windows 8 and 8.1, open the search (Windows key + W), enter the phrase “services” and select the “View Local Services” utility. In Windows 10, open the Start menu or search for Cortana (Windows + S keyboard shortcut).
Scroll down the list of services to "Windows Defender Service" and check if the "Startup Type" field is set to "Disabled".
Windows 8 only: Call the context menu of the disabled service and select the “Properties” menu item.
In Windows 8.1 and 10, you can't change Windows Defender service settings in normal mode.

Then only in Windows 8, in the Windows Defender service settings window, change the startup type to “Automatic”. Then click the "Run" button and then "OK".

In Windows 8.1 and 10, you need to boot into Safe Mode. After authorization, the start screen and the start menu will open, enter the command regedit, right click on the result and select the "Run as administrator" option.

Go to section HKEY_LOCAL_MACHINE\System\CurrentControlSet\Services and click on record windefend. Select an entry start in the right panel . If the parameter value is 0x00000004 (4), the service has been disabled. Double click on the entry start.
Enter 2 and make sure it's in hexadecimal, then click OK. The Windows Defender service will now start automatically.
Then repeat the same step for the WdNisSvc service (Windows Defender Inspection Service).
Save the changes and restart your computer in normal mode, Windows Defender should now work correctly.
If Windows Defender cannot start, we first launch and then perform a full scan using the program without restarting the computer.
If the Action Center displays the message “Update antivirus protection” or “Update antispyware protection”, click on either of them to launch the Windows Defender window and download the latest antivirus databases.
In case the signature update fails, try reinstalling Windows Updates.
When a malicious program is detected, a message (pop-up notification) appears in the upper right part of the screen. You do not need to do anything. Windows Defender automatically removes or quarantines the threats it finds.
The pop-up alert closes automatically. If no other messages appear, your computer has been cleaned successfully.

If a computer restart is required to complete the cleaning, the following notification will appear. Click it to launch Windows Defender.

Click the big "Restart Now" button in the Windows Defender window.

As with Microsoft Security Essentials, a confirmation window appears. Click "Yes" to restart your computer.

Your computer will restart and Windows Defender will remove the remaining traces of the malware.
If you see repeated messages about malware detection and/or removal, run to stop the malicious processes, then perform a full system scan with .
Manage Quarantined Items in Windows Defender in Windows 8, 8.1, and 10
By default, most infected objects are quarantined, a safe place where malware cannot harm the real system. Windows Defender deletes objects after three months (if the option is selected). To scan and manage quarantined objects, in Windows 8 and 8.1, open the search bar (Windows key + Q), enter the phrase “protector” in the search box, and click the result.
Users of touch screen devices can bring up the sidebar panel on the right side of the screen and then select the “Search” option.
In Windows 10, open the start menu, type "defender" and select the top result "Windows Defender".
Click the History tab and make sure that Quarantined Items is selected. If you have not enabled the “Allow all users to view the results of all scans” option (available in Windows 8 and 8.1) in Windows Defender settings, you must first click the “View details” button (even if you are a device administrator).

It is usually recommended to select the “Remove all” option - all objects have been quarantined for some reason. If you are curious and want to know more information about the quarantined files, you can click on the item in the list to view the description and the original location. You can also select any detected object by checking the box on the left side of the list. You can then delete the selected files using the "Delete" button.
You can also restore an object to its original location using the Restore button. Be extremely careful - false positives are rare. Never restore objects with strict, high, or medium alerts!

Configuring Windows Defender Scheduled Scans and Updates in Windows 8, 8.1, and 10
Unlike Microsoft Security Essentials, Windows Defender does not have scheduled scan settings in the program's graphical interface, but the user still has the option of automating a quick or full system scan.
In Windows 8.1 and 10, a quick scan runs daily (by default at 3 a.m.) in conjunction with Windows Feature Updates and other tasks. If the operation was skipped or canceled due to shutting down or restarting the computer, the scan will start the next time the computer is turned on or restarted. You will see a clock icon next to the Action Center icon in the taskbar notification area (system tray) during maintenance.
If a scan has not run for an extended period of time, the Action Center will notify you with the message “Windows Defender needs to scan your computer.”
To schedule a Windows Defender scan, in Windows 8 and 8.1, open the search bar (Windows key + W), type “schedule” and select the “Task Schedule” object.
In Windows 10, open the Start menu, type "scheduler" and select the top result "Task Scheduler".
Touch screen device users can bring up the Charms bar by swiping from the right side of the screen and then selecting the “Search” option.

Right-click on "Task Scheduler (Local)" and select the "Create a simple task" option.

The New Simple Task Wizard opens. Specify a name and descriptions for the scan task and click Next.

If you want to run quick system scans weekly, select the Weekly option (in Windows 8.1, quick scans are scheduled by default).
Since full checks can take a long time, you should use the “Monthly” value for this purpose.

On the next screen, you can set the day of the week and time for quick checks, and the months, days, and times for full checks. Since there is no limit to the use of CPU resources, it is recommended to select the time when the computer is most likely to be idle - the scanning process reduces the performance of the computer.

When selecting the desired action, select the option “Start the program”.

Click the "Browse..." button.

Go to folder C:\Program Files\Windows Defender and double click on the MpCmdRun.exe file. This executable allows you to run basic Windows Defender tasks.

To perform a quick scan, in the “Add arguments (optional)” field: write “-Scan -ScanType 1”, and to perform a full scan, type “ -Scan -ScanType 2”.

The setup process is almost complete. Enable the option “Open a Properties window for this task after clicking the Finish button”.

The properties window will open with the General tab active. Click the “Change...” button in the “Use the following user account when performing tasks” option in the “Security Options” section.

In the “Enter the names of the objects to select” field, enter “SYSTEM” in capital letters and click the “Check Names” button. The title should be underlined. Click the "OK" button. Thus, the account with the highest priority and user rights will be selected.

We return to the “General” tab of the scheduler settings and check the “Run with highest privileges” checkbox. In this way, Windows Defender will be launched with elevated privileges, which guarantees the success of complex malware removal.

Open the "Settings" tab and enable the "Run the task immediately if a scheduled start is missed" option. If the computer was turned off when it was time for a scheduled scan, the scan will be performed the next time the computer is turned on and logged into the account. Click "OK" in the "Options" window.

During scheduled operations, a command prompt window will be launched. It will close automatically when the scan is completed.
Update Windows Defender more than once a day
If you are not happy with the fact that Windows Defender only updates the databases when it checks for updates from the Windows Update service (i.e. once a day), you can follow the steps below. Create a new simple task, set the frequency to "Daily" and set the time to 12:00 AM (0:00). On the "Action" screen, specify the same MpCmdRun.exe file but with a new argument "-SignatureUpdate".
. We are all human, each of us has the right to our own opinion.
Any point on the map can be the center of the world. He is neither bad nor good. He just is. There is no virtue or dishonor here. There is only you alone with your conscience. And so on until the race is over, until the end comes, until we turn into the ghosts that we thought we were. (c) film "Legend"
Windows Defender- an anti-virus tool built into the system - in its tenth version it has grown significantly. Has grown functionally: it received some new features in almost every supplied for "Tens" cumulative update. Has also grown in terms of activity in the pursuit of threats. However, independent laboratories that periodically test various Windows anti-virus products for their effectiveness are in no hurry to state improvements in the work of Defender.
It doesn't even make it into the top 10 antivirus software. Many Windows 10 users who have trusted native protection have probably noticed an increase in protective measures lately. Such measures, alas, have a downside - an increased percentage of false positives.
How to get the files mistakenly blocked by it from the quarantine of the standard Windows 10 antivirus?
After massive epidemics of ransomware viruses WannaCry And Petya In 2017, Microsoft was seriously concerned about the problems of protecting Windows devices. System 10 Defender introduced a feature to protect against ransomware, and threat detection methods became more aggressive. Aggressive does not mean effective. Defender in "Ten" constantly scanning something, blocking an incredible number of threats, its process Antimalware Service Executable periodically loads computer resources. All more or less suspicious startup files fall into the category of objectionable regular antivirus content. And these are not only keygens as part of pirated software, but also quite harmless working files of programs from among those from developers unverified by Microsoft. Not everything that the Defender considers threats is actually such. Moreover, not all intercepted threats are reported to us by the Defender.
We learn that there are supposedly threats on the computer from the system message.
We can open and click on such a message in order to get to the threat log section in the system application using a direct link. Security Center.

Or launch the application and open threat log.

In the log, we will see a list with detailed information on detected threats. We open each separately and look at its details.

Here is the worst false positive: The defender mistakenly blocked the launch file of a handicraft utility on board the Live disk image and unfairly called it a Trojan .

Close the details window and restore this file. In the options for actions, select . Click above "Starting Actions".

Additionally, we confirm the permission.

And so we consider each detected threat, if necessary, look for help on blocked files on the Internet and then make a decision - to allow this file or delete it.
But, as mentioned, Defender does not notify us of all blocked files. Some things he does quietly. In the threat log, click .

And only now will we see the full list of files objectionable to the Defender. Here you also need to view the details for all files regarded as threats. And if these files turn out to be not malicious, then they can be allowed on the computer.

In this article, we will tell how to properly configure the program to automatically delete all quarantine content after the specified period of time. If you do not want Windows Defender Antivirus to keep all suspicious files in quarantine all the time, then in this article we will tell you how to properly configure the program to automatically delete all quarantine content after a certain number of days.
Why is it needed at all?
Windows Defender is a standard utility developed by Microsoft, which provides basic protection for the operating system from various kinds of malware, viruses, trojans, and also protects against spyware. Started out as "Microsoft Security Essentials" for Windows XP and Windows 7. Transformed into Windows Defender starting with Windows 8 and now comes standard with Windows 10. After several updates, the program has acquired a number of useful features such as the time selection option or the ability to manage resources CPU, quick scan via dropdown menu, etc.

The program uses a standard utility to constantly receive new virus and malware signature databases every day. If the databases were not updated automatically and a failure occurred, then it is highly recommended to restart the update manually. Like any antivirus program, Windows Defender needs to operate with the latest threat databases in order to provide the best protection for your system. So if you don't see the daily alert that malware databases are up to date, do it manually. It is important!
If you want to use third-party antivirus software, then Windows Defender will be disabled automatically after installing it.
Basic Windows Defender settings
The Windows 10 operating system is designed to make it as easy as possible to work with applications, which, to a certain extent, is Windows Defender. Setting up the program is greatly simplified and is carried out, again, through the universal standard utility “Parameters”. To go to the Windows Defender settings, you need to click on the button "Start" and then click on the icon "Parameters" in the lower left corner. Then click on the item.

All that remains is to go to the tab "Windows Defender" and press the button "Open Windows Security Center".


For maximum protection for your PC, make sure all of the following options are enabled:
First: "Real time protection" is a feature that detects and stops the download or installation of potentially unwanted or malicious software. Stops opening suspicious files. It actually starts the program, if this option is disabled, then all other actions become inactive and stop working.
Second: "Cloud Protection"- a feature that allows you to provide advanced protection for your PC, provides the ability for Windows Defender to access the cloud, which stores the most up-to-date threat data. We do not recommend disabling this feature, as it will allow the antivirus to respond as quickly as possible to newly emerging information about threats. For example, it can help protect the system from so-called zero-day vulnerabilities.
Third: "Automatic sample submission"- the function allows you to send data about threats found on your PC to the cloud. It is also recommended to leave it enabled.
fourth: "Controlled Folder Access" is a feature that allows you to easily restrict access to your critical data. That is, you can prevent programs and applications from modifying, deleting, or copying data in the directories you choose.
Fifth: "Exceptions" is a feature that allows you to tell Windows Defender which programs you don't want to scan. That is, if you have specified any application in "Exceptions", then Windows Defender will not interfere with this software, even if it may harm your system. Therefore, use this option at your own risk.
Windows Defender Quarantine
When Windows Defender Antivirus cannot determine for sure whether any suspicious file is infected or not, then the program usually moves it to "Quarantine". This is a special place designed to isolate suspicious or dangerous files so that they cannot harm your computer, or, if necessary, restore such files if the suspicions are false.
So far so good, but there is one catch, these suspicious items will forever remain in the Quarantine directory until we do something about it. However, what if you don't want to keep these items for a long time or want malware to be unable to get them out of quarantine? To do this, you must additionally configure the antivirus so that it automatically deletes quarantined items after a certain number of days. Next, let's look at two of the easiest ways to configure Windows Defender so that data is kept in quarantine for no more than a month.
Managing Quarantine with Group Policy
If your PC has Windows 10 Pro or "Enterprise", you can use the Local Group Policy Editor to automatically clear the Windows Defender Quarantine.
Note: follow these instructions very carefully and be sure to allow enough time to investigate suspicious processes and files to be 100% sure whether these elements really pose a threat to your system or not.
Press the key combination on the keyboard Windows+R to open a command "Run". Next enter the line "gpedit.msc" and press "OK" to open the Local Group Policy Editor.

"Computer Configuration" – "Administrative Templates" – "Windows Components" – "Windows Defender Antivirus" – "Quarantine".

Double click on the item on the right side. The Delete Items Policy Settings window opens.

Next, select the option "Included", and in the section "Parameters" select the number of days (for example, 14), this will be the period for which suspicious items will be stored in the directory "Quarantine". After that we press "Apply" And "OK".

After you have completed all these steps, Windows Defender will automatically remove all items contained in the directory "Quarantine", after the number of days you specify, or will delete immediately if you set «0» (zero) in the field "Parameters".
Naturally, you can always change this policy or completely cancel all the changes made. To do this, use the same steps, but in the parameters select the option "Not set".
Managing Quarantine Using the Windows Registry
If your PC has Windows 10 Home, you won't have access to the Local Group Policy Editor, but you can use the Registry Editor to set up Windows Defender Quarantine to clear automatically.
A warning: Just a reminder that editing the registry is risky and can cause permanent damage to your operating system. If you want to protect yourself from losing the necessary data, then we recommend that you back up all critical files and directories.
Again, press the keyboard shortcut Windows+R to open a command "Run", and enter the line "regedit" and press OK to open the Windows Registry Editor.

Now, navigate to the following path: "HKEY_LOCAL_MACHINE" – SOFTWARE – Policies => Microsoft – Windows Defender. (Insert path: HKEY_LOCAL_MACHINE\SOFTWARE\Policies\Microsoft\Windows Defender)
>Enter a name for the new section Quarantine and press Enter. Next, right click on the folder Quarantine, select an item "Create" and click on value "DWORD Value (32-bit)".

Name the new parameter "PurgeItemsAfterDelay" and press "Enter". Now on the right side of the registry editor you can see the newly created entry with the value «0» (zero).
So, we work without logging into a Microsoft account, using only local accounts.
For optimal protection, you need to have at least two accounts on your computer. One account with administrator rights - used exclusively for configuring and maintaining the computer. Second entry with restricted rights. Under this account we will constantly use the computer. This will somewhat protect us from infecting the entire computer in the event of such a sad event. And even if such an event harms this entry, in most cases it is enough to delete it and create a new one, without reinstalling the entire operating system.
I would like to draw your attention to the fact that we are working with UAC enabled at the level of 66%, as recommended by Microsoft at one time for those using screen readers. The interface is native, no third-party programs are used, everything is simple and accessible.
Launch Defender
If you installed Windows using the original distribution, in which no one from outsiders was tinkering, and there are no other antiviruses on your computer, then Defender turns on automatically. At the same time, an announcement can be found in the system tray: "No action is required."
The modern Defender is sometimes overly suspicious and at times can significantly load the computer. To calm him down, just spend a couple of minutes on a quick check, after which you can continue to use the computer without any problems. To quickly launch the check, it is better to create a special shortcut.
Quick Start
To create a shortcut, call the context menu on the desktop or in any other folder, after deselecting the files, and select the New\Shortcut command.
In the first editor, paste the following line:
"%ProgramFiles%\\Windows Defender\\MSASCui.exe" -UpdateAndQuickScan
Defender
And press Enter. The label is ready. If necessary, you can register shortcut keys in it.
Now, to start a quick check, just call the Defender using this shortcut and immediately press Enter - a quick check will begin.
Windows Defender Security Center window
The easiest way to open it is to call the main start menu and start typing an expression
Windows Defender Security Center
It usually appears first on the list.
When you open it, note that if you press Shift + Tab a couple of times, then we will get to a list of six items. To work with one of the items, you need to select it, and then you can move the Tab key to configure this particular item. If not selected, then the settings will be from another item.
For example, let's select "Cabinet" with a tab and see the same items that are in the list below.
If we select "Firewall" in the list, then access to its settings will immediately open.
To go to the settings, for example, the Defender, you need to return to this list again and select exactly the line "Protection against viruses and threats."
Adding to exclusions
Sometimes there are situations when the Defender prevents files from being downloaded, although no viruses are observed in the places where they are stored, for example, in the cloud on Yandex disk. This is how it usually reacts to some program files designed to work with the operating system, as well as to some other executable files. Therefore, it is better to place the folders where the download will be made or local folders of the clouds immediately into exceptions.
Open Center", then "Virus and threat protection", tab and open "Virus protection settings".
Here you can add the necessary folders to exclusions, as well as view a list of previously added exclusions.
Windows Defender Quarantine
Open the "Windows Security Center".
Then "Protection from viruses and threats."
Managing its settings is very easy. Click "Remove All" and all threats will be removed.
If you want to know the details related to a particular malicious program, highlight it with a space, click the "Show details" button.
To view all neutralized threats, in the previous window, click on the "View full log" button. The "Full log" will open with information about all objects neutralized by the antivirus.
Restoring a file from quarantine
I launched the LBDB program, the Defender decided that it was a virus and ate the lbdb.exe file. An announcement appeared in the system tray saying "Action Required".
I open the notifications, Win + a, look through the log and make sure that it was the Defender who requested intervention.
I call the Start menu, start typing the word protection, open the Security Center, Scan Log. I find the first threat that the Defender called a Trojan and highlight it with a space.
Then we use flat view: Insert +2 on the digital block several times, until we find the “Restore” button with numbers 4 and 6, press Insert + Slash, then just a slash, all this is on the digital block.
Previously, the entire Lbdb folder was placed in the exceptions for the Defender.
I opened the magazine again and looked through it. There is another threat associated with kms activation. There is no "restore" button for it, only "Apply action". Applied, and the threats in the magazine ended.
Disabling and enabling Defender
Open the "Security Center". Enter on the Virus & Threat Protection button. Tap to Virus & threat protection settings, Enter.
Press Space on Real-time Protection. Confirm the deactivation in the User Account Control window. To turn on, repeat everything in the same order.
Windows Defender Firewall
You can familiarize yourself with its settings, bearing in mind that NVDA does not read everything in this window. To get acquainted, you can start reading the entire window or use a flat view.
If necessary, you can restore all default settings by clicking the appropriate button.


