After getting acquainted with such a software product as VMware workstation (see the article: Installation and first acquaintance with the VMware workstation emulator), many beginners encounter problems in the inconvenience of using certain functions, and there is not enough sensible help in Russian on all VMware workstation functionality , in order to eliminate the "white spots" in the setting, I decided to publish this article, where I will try to describe as much as possible everything that is hidden in the bins.
Let's proceed directly to the global settings of the program:
In the sidebar, we can place virtual machines into groups
Let's perform global program settings. Edit Menu - Preferences

1. Workspace. Allows you to set basic options for the workspace. Default Location for virtual machines and teams allows you to set the path to the directory where the default virtual machines will be saved. After we create a directory for virtual machines, and indicate the path to it, by default, upon subsequent creation, each virtual machine will be located in this directory.
- Remember opened tabs between session - Remembers open tabs between sessions - remembers open workspace tabs.
- Keep VMs running after Workstation closes - Run enabled guest operating systems in the background, a very convenient function if we want to have a parallel operating system, or a server running any services on our physical machine.
- Enable all shared folders by default - we will not use this function yet, and will touch it a little later, while this checkbox can be unchecked.
- Default hardware compatibuility - Default hardware compatibility - may be needed if you have a virtual machine from a previous version of VMware Workstation. By default, the Workstation 8 compatibility mode is set. You can also see the inactive option "Compatibility with: ESX Server", I will tell you what ESX Server is a little later in a separate article.
- Save screenshots to - Save screenshots to: (Clipboard) Clipboard, (File) File - the function allows you to make a PrintScreen of the virtual machine screen and save it, respectively, to the clipboard or to a specified location.
- "Show Aero Pick thumbnails for open tabs" if in Russian it sounds something like this: "Show thumbnails of tabs of open tabs of virtual machines in the Windows Aero theme." This function does not work in Windows XP.
- Function "Privacy" or "Privacy" with the button "offer to save login information for remote hosts" This function allows you to save information about the login / password when connecting to a remote virtual machine.
2. Input

"Grab keyboard and mouse input on mouse click" - Capture keyboard and mouse on mouse click
"Grab keyboard and mouse input on key press" - Capture keyboard and mouse on key press
Group "Cursor"
Warning: "You may need to install VMware Tools for these options to work correctly" - You may need to install VMware Tools for these options to work correctly.
"VMware Tools" drivers (utilities) for working with virtual machines are located in \ VMware \ VMware Workstation in the directory of the installed program. I think I need to tell you a little about them because the success of comfortable work with virtual machines depends on the integration of VMware Tools by 50%. We will need them after installing the guest operating system, I will say in a nutshell what they are:
as I said earlier, these utilities are located by default in the "\ VMware \ VMware Workstation" directory in the * .iso image format, and if you look into this directory, you will see, among other system files:
- freebsd.iso - for FreeBSD operating systems
- linux.iso - for Linux operating systems
- netware.iso - for NetWare operating systems
- solaris.iso - for Solaris operating systems
- windows.iso - for Windows operating systems
- winPre2k.iso - for Windows operating systems earlier than Windows 2000
These images, as I said, will come in handy after installing the above operating systems. Now let's go back to the "Input" setting
Ungrab when cursor leaves window - Releases the capture of the mouse cursor when the cursor leaves the guest operating system window. This function allows you to work with the guest operating system as with a regular browser (without pressing the hotkeys to switch the cursor capture).
"Hide cursor on ungrab" - Do not show the cursor in the guest operating system if an interception has occurred. That is, the cursor of the guest operating system and the main host is merged.
"Grab when cursor enters window" - interception of the cursor when it is over the window of the guest OS.
At the moment, all 3 of the above functions should be left enabled, since these functions will provide us with a convenient and comfortable principle of working with guest OS.
and the last function with the drop-down list "Optimize mouse for games" is to optimize the mouse cursor for games (we leave the default value "Automatic").
3. Hot Keys

Hot keys provide a shortcut to commonly-used virtual machine operations. Click the buttons below to modify your hot keys - Hotkeys provide quick access to frequently used operations on virtual machines.
Click the button below to change the hotkeys.
If these options are left by default, VMware will work with the following keyboard shortcuts:
- To release from the current virtual machine, press Ctrl + Alt - press Ctrl + Alt to release the intercepted cursor
- To enter or leave full screen mode, press Ctrl + Alt + Enter - to switch to / from full screen mode, press Ctrl + Alt + Enter
- To switch to the previous full-screen virtual machine, press Ctrl + Alt + Left Arrow - to switch from full-screen mode to the previous virtual machine, press Ctrl + Alt + Left Arrow
- To switch to the next full-screen virtual machine, press Ctrl + Alt + Right Arrow - to switch from full-screen mode to the next virtual machine, press Ctrl + Alt + Right Arrow

Autofit group - Auto-fit or auto-align
- Autofit window - automatic alignment of the main working area window. When the virtual machine display settings change, resize the application window to match - When the display settings are changed in the guest OS, the main workspace will automatically be resized.
- Autofit guest - automatic alignment of the guest OS window. When the application window is resized, change the virtual machine display settings to match - When you change the settings of the main work area, the display size of the guest OS will be automatically resized.
- Autofit guest (change guest resolution) Requires VMware Tools to be installed - Automatically change the resolution (resolution) of the display in the guest OS. The VMware Tools must be installed.
- Stretch guest (no resolution change) Stretches the guest screen to fill the host display - Stretch the display. Do not change the resolution (resolution) of the display when switching to full screen mode.
- Center guest (no resolution change) Guest may appear with borders or scrollbars - Center the display. Do not change the resolution (resolution) of the display when switching to full screen mode. The guest OS can hide outside the main working window and be viewed through the scrollbars.
- Use a single button for power controls - Use a single button for power controls (allows you to set the toolbar drop-down list or different power control buttons of the guest OS).
- Combine toolbar with menubar in windowed mode - combine menu and toolbar.
- Show toolbar edge when unpinned in full screen - Shows the edges of the unpinned toolbar in full screen mode.

Unity applications menu hot key. Hot key: Ctrl + Shift + U
For more information on Compatibility Mode, see the article: Compatible Mode in VMware workstation
6. Updates

There are three main options:
- Check for product updates on startup - Check for product updates at program start
- Check software components as needed - This is about checking for updates to newer versions of the previously mentioned VMware Tools.
- Automatically update VMware Tools on a virtual machine - automatically check for preinstalled VMware Tools utilities on guest OS.
Here it is suggested to improve and improve the program by sending anonymous data to the VMware center.
8. Shared VMs (Sharing guest operating systems, or sharing VMs)

Another new feature of VMware worstation is the ability to share operating systems. This is convenient if, for some reason, you cannot use one of the protocols for organizing access to a remote desktop. And also if you need to connect remotely to the console of the guest operating system. For example, you can demonstrate the capabilities of applications or functions directly inside the virtual environment without downloading the entire hard disk of the virtual machine from a remote server.
All ports for adding rules to the firewall, through which the protocol of remote VMware virtual machines works, can be viewed on the official website here
For VMs, a little information on configuring TCP \ IP ports on the official website
By default, to access a shared virtual machine in the firewall, you need to register rules for the following ports:
- HTTPS - port 443 TCP
- HTTP - port 80 TCP
- VM console port 902 ANY
- Virtual machine sharing and remote access is enabled and the Enable or Disable Sharing button is an option that allows you to start or stop a service that organizes access to a remote client.
- Port used by VMware Workstation Server: Use the port to connect clients to shared virtual machines.
- Shared VMs locations - Path to the directory where shared virtual machines are stored.
Reserved Memory Group
How mach host RAM should the system be able to reserve for all running virtual machines? - How much physical memory can be allocated for all running virtual machines?

Here we are talking, of course, about RAM (random access memory). If you have about 1024 Mb of RAM allocated for virtual machines, then it will not be possible to start two 1024 Mb machines. Accordingly, a maximum of 2 virtual 512 Mb each. You can allocate memory for virtual systems depending on how much free memory remains when working with the host operating system.
Additional memory group
How should the system allocate memory for all virtual machines - how to allocate a virtual memory system for all guest operating systems
I must note that virtual machines allow you to place RAM not only in RAM but also in the paging file of the host OS. And the next three options allow you to set the memory allocation parameters.
- Fit all virtual machine memory into reserved host RAM - Use only the physical memory of the host OS.
- Allow most virtual machine memory to be swapped - Allows most virtual machines to place virtual memory in the host OS paging file.
- Allow some virtual machine memory to be swapped - Allow some virtual machines to allocate virtual memory in the host OS paging file.
10. Priority

Default Process Priority group
- Input Grabbed - interception of the current guest OS
- Input Ungrabbed - Guest OS background mode
Snapshots group
- Take snapshots in the background when possible - Take snapshots in the background when possible.
- Restore snapshots in the background when possible - Restore snapshots in the background when possible.
11. Devices
Removable media group - Removable media
If the CD-DVD disks on the physical host allow autorun, we can temporarily disable it while the guest OS is running to connect the drive inside the virtual machine. This is done with the option:
- Disable Autorun on the host when a VM is running - Disable auto-start on the host when the virtual machine is running
Virtual machine- software that emulates the hardware of a computer. Allows you to create and simultaneously run several operating systems that are directly independent from each other.
The original, main or real operating system is called a host (Host), while the OS installed through a virtual machine is called a guest, secondary or virtual one. In this case, the host and the guest OS will work as separately as possible. In the event of a virus attack or other malicious activity on the virtual machine, the data of the real OS (host) will not be affected.
One of the most popular programs for creating a virtual machine is VMware Workstation or its reduced functionality, free distribution version VMware Player... With its help, you can install a secondary OS X on the main Windows OS or vice versa, as well as a number of other OSs, for example, the Linux family. There are ample opportunities for configuring and debugging a virtual OS.
Before creating a virtual machine, you need to install special software that allows you to do this. In our case, this is VMware Workstation. If for some reason this particular program does not suit you, then you can install the guest OS on a virtual machine Virtualbox.
Installation of the VMware Workstation distribution is similar to any other software:
- Run the executable file of the program. Preparation for unpacking begins.
- Next, a window will appear in which you can select a standard or custom installation. If you do not know which components you need and are using a virtual machine for the first time, then choose the "standard" program package. If necessary, you can always expand the functionality and add them through the program menu.
- After clicking the Next button, you will be prompted to select the directory where the program will be installed.
- If necessary, you can mark the places where VMware Workstation shortcuts will be additionally placed for quick launch.
- At this stage, the preparatory stage is considered completed, and after clicking the Install button, the distribution kit will begin the process of unpacking the main components.

Once the download is complete, a message will appear on the screen prompting you to get started. This means that we figured out how to install a virtual machine, and now you can start creating the virtual machine itself using VMware Workstation.
First start
The virtual machine and the guest operating system created in it will consume a certain amount of system resources. Therefore, before working with the virtual machine, it is recommended to close other resource-intensive programs, including those running in the background.
The next thing to understand is that the higher the production power of the computer, the more comfortable it will be to work with the virtual machine. It is not recommended to create, let alone run, more than one virtual OS on a device with weak hardware.

Immediately after launch, the main page of the program will open. In total, the user will have access to two main menus: top and side, located on the left, as well as the main screen or "Home".
The top menu is similar in its capabilities to most programs of this level. Here you will find all the tools you need to configure: file, edit, view, virtual machine, tabs, help.
On the left side of the screen is the "Library". It is here that all virtual machines installed in the program will be displayed. Using the same menu, you can learn how to delete a virtual machine.
The "home" or central screen contains the most frequently used functionality. Allows you to immediately start creating a new virtual machine or launch an already created one, even on another device (you must first copy the data), as well as connect to a remote server or synchronize with Vmware vCloud Air.
Since it is impossible to install Windows on a virtual machine without first creating it, we suggest that you familiarize yourself with this process.
Machine creation
To create a virtual machine, you need to follow the sequence of steps:

- Installation using a bootable DVD via a physical, not virtual, laptop or PC drive.
- Booting using a virtual disk drive and a ready-made image file (ISO).
- Postpone the OS boot until later and create only the VM shell.

If you decide to install a secondary operating system immediately, choosing one of the first two options, then a window will appear on the screen with all the information regarding the installation of the application. In our case, this is Windows. Here you can immediately enter all the necessary data, key and password, or postpone it for later.

If the first or second boot method was selected, then after making all the necessary settings, the direct installation of the selected OS will begin. Otherwise, it will start after debugging the basic configurations of the virtual machine itself.
If you decide to install the guest OS later, using the third option, the program will offer you to select an OS type from the list: Linux, Windows, Other, etc. After that, you must specify the version of the OS that will be installed. As in the previous menu, you can mark it as "Other", but only if the required version is not in the list.

The program has a huge selection of pre-installed configurations for a wide variety of operating systems and their versions. Therefore, there should be no problems.
Customizing the application shell
The next thing to do is to give a name for the VM, as well as specify the directory into which the main components of the program will be installed.

If the device has several disks, for example, system C and D, then the location of the main folders and other system data of the VMware Workstation virtual machine is recommended to be changed to D. That is, to the disk that is not the system one. This should be done so that in the event of a virus attack, unauthorized access or an ordinary failure of the host (real OS), the VM files are not damaged.
Before setting up a virtual machine, make sure you know exactly what parameters you need. Otherwise, leave the default settings.
Thus, after reinstalling the main operating system on the C drive, the data of the secondary operating system will not be affected.
It will only be necessary to reload the shell of the VMware Workstation program, and then turn on the already existing virtual machine, indicating the program the path to the files. But before starting it, make sure that all the necessary tools are already installed.
Now you need to select the maximum amount of disk space that will be occupied by the virtual machine you are creating. By default, this figure is 60 GB. This is sufficient for most tasks, but you can change this parameter to a value greater or less if desired.

Here it is necessary to take into account the fact that by saving, without splitting the disk space into several component parts, the guest OS you created in the virtual machine and the included host will work much faster.

This completes the VM configuration. And after clicking the Finish button, the process of loading a secondary, virtual, operating system will go.
Virtual machine configuration
As a rule, there is no need for additional VM configuration. VMware Workstation automatically adjusts to the system and offers the best option. Moreover, if during the installation most of the parameters did not change and were selected by default.

If necessary, some configurations can be changed after the download. Namely:
- open shared or remote access to some files and folders;
- change the characteristics of the hardware of the VM;
- add or change the previously selected drive for installing a secondary operating system;
- change the settings for connecting external and USB devices.
To make some files and folders available for general use by the guest OS and the host, you must:
- Go to the “ Parameters"And in the drop-down list find the line" Shared folders", Depending on the version, which may have a different name.
- In the window that opens, check the box " Map as network drive in Windows guest».
- After that, an additional Add button will appear, by activating which you can create and select a folder that you plan to make publicly available for the guest OS and host.

To avoid problems of data loss, reinstallation of the main OS, it is recommended to select a directory that is not located on the disk with the real operating system installed on it.
After completing the steps above, the folder will automatically become public. By setting the default parameters, you will be able to use the capabilities of the system drag-and-drop, both from the secondary OS to the host, and vice versa. If any of the described functions are not necessary, then do not forget to uncheck the unnecessary option.
As you can see, setting up a virtual machine does not take much time and does not require additional knowledge in order to understand how it works.
Frequent problems and their solutions
Most of the problems, as a rule, arise from the lack of components necessary for the correct operation of computer hardware (processor, video card, audio card, etc.). Do not forget that a secondary OS, like the main one, needs the most necessary programs to ensure the stable operation of the video adapter, sound card, etc.
To avoid unnecessary problems with their search and installation, immediately after booting to the virtual machine, VMware OS will offer to install an additional component - VMware Tools, made in order to simplify the work not only with VMs, but also with external devices, for example, printers, faxes, USB-drives.

If for some reason this does not happen, then you can start downloading the tool yourself. To do this, go to the menu item " Virtual machine»And in the drop-down list find an offer to download this package. Upon completion, you will be prompted to restart the guest OS. The installed tool will start working automatically, and you do not need to perform any additional operations to launch it.
One of the most common problems is the appearance of an error like: The VMware Authorization Service is not running. To solve it, just go to the "Services" menu on the main OS, you can do this through the Control Panel - Administrative Tools. Then, in the list of services, find the required one and start it. If necessary, enter the name manually. If it appears that the service is already running, turn it off and on again.
To avoid most of the problems, it is highly recommended to install only official or verified builds of the program.
Related Videos
Today I launch a ruble on the Virtualization blog, it will contain posts about virtual machines, settings and everything in that spirit. And logically, the first post will be on how to install VMware on Windows 7, as usual, a lot of screenshots and detailed comments on them. If you need a virtual machine, then read on, and I will tell you in detail how to install VMware!
Before proceeding with the description of the VMware installation process, I will explain why and why you need a virtual machine. If you have already decided what and for what purposes you will use VMware, then skip these lines.
What is a virtual machine?
In a nutshell, a virtual machine is an ordinary program, with its help you can run another operating system and not one, but several systems at once. At the same time, without interfering with the main system that is installed on your computer "host system". Explanations;
Host system: This system is already installed on your computer.
Guest system: This system is installed on a virtual machine.
On a virtual machine, you can install both Windows and * nix systems. Thus, you get the opportunity to get acquainted with another system without leaving the host system.
What is a virtual machine for?
VM is needed for different people for different purposes. Below I will list a few of them.
Main purpose:
This is already from the words of the developers themselves. For vendors of various programs, system administrators, for technical support of users, well, in general, everything in this spirit!
Programmers:
For these guys, a virtual machine is a convenient and excellent solution for testing their programs on different platforms. For example, a programmer writes a program in Windows 7. As soon as he finishes working on a program, a virtual machine will allow him to test the program on Win XP, Win 8 without any problems and see if the program works correctly on other systems.
Main system security:
Do you have doubts about the file downloaded from the Internet or received via icq? In this case, "VMware" is perfect. A dubious file can and even need to be run on a virtual machine, and if something happens, then Windows installed in VMware will die, and not your main system.
For you and me, ordinary mortals :):
You can get acquainted with programs, for example the same. Just recently, a new operating system Windows 8 was released. Someone boldly installed it on their PC and started to get acquainted, and someone was tormented or still tormented by doubts whether to switch to Win 8 or not. And this is where VMware will help. You can install Windows 8 on it and get familiar with it, and then decide whether you need win 8 as your main system or not.
The same situation can arise, for example with Ubuntu it is worth or not worth changing win to Ubuntu. Also, Ubuntu is installed on the virtual machine and the conclusion is drawn.
By the way, soon there will be a post on how to install Ubuntuon VMware, do not miss, for this just subscribe and with the release of the post I will send you an announcement by mail.
How do I install VMware on a PC?
The installation process for VMware Workstation is not complicated and does not take much time. Run the installation file, a window with downloading some files will appear. Wait for the end, literally half a minute.
After all the files are unpacked, a welcome window will appear. Click the button "Next>"

At the next stage of the installation, agree to the license agreement. Check the box as shown in the screenshot below, and click the Next> button again

After the agreement, the installer will offer us to choose the installation options. Typical VMware installation or custom installation. I suggest leaving this as it is and choosing a regular VMware installation.

If for some reason you are not satisfied with the standard VMware installation path, you can change it in the next window. Click the "Change ..." button and specify a different path for installing VMware, if required by the situation. If everything suits you by default, then just click the button "Next>"

In the next step of the installation, you will be prompted to check for updates or not. I prefer to uncheck the box, if I need to, I myself will find out about the availability of a new version and others. Therefore, here at your discretion, if you want, leave a check mark or uncheck it.

Next, I propose to help improve this product. I propose to refuse such a kind offer and entrust such a responsible task to the shoulders of the developers themselves or other users :) Uncheck the box "Help improve VMware Workstation"

In this window, I suggest leaving all the checkboxes in contrast to the previous one. In this case, a shortcut will be created on the desktop, and also, the program can be found in the start menu, a VMware folder will be created there from which you can also run the program.

Here it is suggested to press the "continue" button in order to start installing the program on the PC. Click!

Now we just have to wait for the VMware installation process to finish. As I mentioned above, you won't have to wait long.

And in the final stages, you need to enter the product license key in the appropriate fields for this.

And by clicking "Next>" and in the next window "Finish" we successfully complete the installation of VMware on your computer. Now the program is installed on your computer and you can start using it.
First launch and a few words about VMware
As part of this post, I will not go into detail about the various features and settings of VMware. About all this, I will write other posts and not only about VMware but also about such programs for system virtualization as "VirtualBox".
The main window of the program after launch looks like this:

Installed guest systems will be displayed on the left side of the program in the "library" section. As you may have noticed, by default, the "Home" tab is open from which you can start the New Virtual Machine Wizard.
In the same tabs as "Home" will go through the process of installing operating systems and their use. For clarity, a screenshot from the Internet, since I have not yet installed anything.

At the top of the program, the frequently used button "Switch to full screen mode" (third from the right). This button allows you to expand the guest system to full screen, such actions will create the impression that the guest OS is installed as the main one, if you collapse the top panel ...
If you have any questions, then I look forward to your comments with questions and additions to the post.
Getting Started with VMware Workstation
(for Dummies)
Many people, having heard the term "virtual machine", think that it is very difficult and do not want to use this wonderful and very useful tool, which greatly facilitates the life of both software developers, testers and ordinary users. In this article, I will try to dispel the myth about the complexity of working with virtual machines and take the whole process by surprise, from installing the virtualization program to installing and configuring the guest operating system. Also, in conclusion, I will give the basic techniques for working with a virtual machine.
I chose VMware Workstation 7.1.4 virtual machine and ubuntu-12.04 guest operating system as an example. And I will install and configure all this in the Window XP host operating system.
Well, let's get started and start by describing the process of installing a virtual machine.
1. Install the VMware Workstation 7.1.4 virtual machine.
The VMware Workstation 7.1.4 distribution is delivered as a single executable file: VMware_Workstation_7.1.4_Micro_Rus.exe. After starting the executable file, a window appears on the screen showing the preparation process for installing the program (Figure 1).
Figure 1. Preparing to install the virtualization system.
In 10-20 seconds, after collecting all the necessary information and preparing for the installation of VMware, the installation assistant window will open on the screen, first of all, warning about intellectual property rights (Figure 2).

Figure 2. VMware Installation Assistant.
Feel free to press the "next" button to go to the choice of the type of installation (Figure 3).
Since this article describes the installation for novice users, we will not be smart and choose to install the standard VMware package, which will be sufficient for most user requirements for virtualization software. In the future, it will always be possible to add components that are not included in the standard package.

Figure 3. Selecting the type of installation.
After clicking on the "Next" button, the installation wizard will offer to select the folder where the program will be installed (Figure 4).

Figure 4. Selecting the installation site.
After pressing the Next button again, you will see a window with a choice of the location of the shortcuts for the quick launch of the virtualization program (Figure 5). Where to place quick launch shortcuts is a matter of taste. The most convenient way for me is the Start menu.

Figure 5. Choosing a quick launch location.
This was the last preparation for the installation, which you will be informed about by the window that opens after clicking on the "Next" button (Figure 6).

Figure 6. Message about readiness to install.
To start the installation, click the "Install" button and you will see a window showing the installation process (Figure 7). Now you have to wait a couple of minutes.

Figure 7. Installing VMware Workstation.
After the installation is completed, a window will open on the screen informing about this long-awaited event (Figure 8). Click the Finish button to complete the installation and proceed to create and configure your first virtual machine.

Figure 8. Completing the installation of VMware Workstation.
2. We create a virtual machine.
Creating your first virtual machine is as easy as installing a virtualization program. To create a virtual machine, start the virtualization program “VMware Workstation” from the “Start” menu (Figure 9).

Figure 9. Launching VMware Workstation.
Naturally, when you first start the program, it will offer you to read the license agreement and accept it (Figure 10). We do not have much choice, and if we want to create a virtual machine based on VMware, then we agree with it.

Figure 10. License agreement.
As soon as you agree to accept the license, a window of the “VMware Workstation” program will open in front of you (Figure 11), in which you will be offered a choice of one of three actions:
- create a new virtual machine;
- create a new group of virtual machines (usually used when you need to create a virtual computing system for easy access and work with individual virtual machines that are part of a virtual computing system);
- open an already existing virtual machine or a group of virtual machines.
Since this is our first launch of VMware Workstation, there is nothing to open yet, and it is too early to create a group, first you need to learn how to handle a separate virtual machine. Therefore, we choose the first of the proposed options.

Figure 11. VMware Workstation software.
After choosing the first option, a window of the virtual machine creation wizard will open (Figure 12), which will help you quickly and easily create and configure your first virtual machine.

Figure 12. Virtual Machine Creation Wizard.
For the first time, we will choose a standard virtual machine configuration that will suit most users. For this, in the configuration options offered to choose from, the option: "Normal (recommended)" and press the "Next" button.
After that, a window for selecting the source for installing the guest operating system will open (Figure 13). I downloaded the Ubuntu 12.04 guest operating system in advance from RuTracker.org in the form of an installation disk image (.iso). Therefore, in the window that opens, select the second option: "Install from the installation disk image" and specify the path to the required file (ubuntu-12.04-oem-i386.iso).

Figure 13. Selecting the source for installing the guest OS.
To simplify the installation of the guest operating system, in the next step, the virtual machine wizard will offer to specify personal data for installing the guest operating system (Figure 14). In the window that opens, enter your name, username and password.

Figure 14. Entering personal data.
After pressing the “Next” button again, proceed to setting the parameters of the created virtual machine. First of all, you will be asked for the name of the virtual machine and its location. An example of filling these parameters is shown in Figure 15.

Figure 15. Name and location of the created virtual machine.
For comfortable work with the Ubuntu operating system, 20 GB is enough. The file size is large enough, so if you plan to transfer it to other computers or make backups, then you should think about the possibility of placing the virtual hard disk in several files.
Since my task is not to move or copy a virtual machine, I will choose the option "Save virtual disk in one file". In addition, the virtual machine works slightly faster with these virtual hard disks.

Figure 16. Configuring the parameters of the virtual hard disk.
This completes the basic settings of the virtual machine and after clicking on the “Next” button a window will open showing the parameters of the virtual machine you have set (Figure 17).

Figure 17. Installed parameters of the virtual machine.
As you can see from the figure, all the basic parameters necessary for comfortable work with the virtual machine have been set:
- hard disk size - 20 GB;
- RAM size - 500 MB;
- network adapter type - NAT;
- input / output devices, etc. - CD / DVD, Floppy, USB controller, Printer, Sound Card.
Almost all virtual devices are present here and their parameters are quite suitable for normal operation with a virtual machine. If, for any reason, you need to connect an additional device or change the parameters of the virtual machine, for example, the amount of RAM, then click the "Hardware settings ..." button and select add devices or change their parameters.
Since it is possible to add new devices or change any parameters of a virtual machine without any problems even after its creation and installation of the guest operating system, at this stage I will not change anything in the proposed parameters and proceed to install the guest operating system.
To do this, just check the box "Start virtual machine after creation" and click "Finish" to complete the creation of the virtual machine. In this case, the files of your virtual machine will appear in the folder you have chosen (Figure 18), the virtual machine will start, and the process of installing the guest operating system will automatically begin (Figure 19).

Figure 18. Files of the created virtual machine.

Figure 19. Starting the installation of the guest OS.
3. Install the guest operating system.
The guest operating system is installed on a virtual machine in almost the same way as on an ordinary computer, but still I will briefly describe the process of installing Ubuntu 12.04 as a guest operating system.
The installation of the operating system will start automatically after the creation of the virtual machine is complete, and after a few seconds a window with the Ubuntu installation wizard will open on the screen (Figure 20), in which you need to select the language in which the installation wizard will conduct a dialogue with you and select one of the OS installation options :
- try Ubuntu by running the operating system from disk;
- install Ubuntu.
Naturally, we choose the second option, since we need a full-fledged guest operating system. Click the "Install Ubuntu" button to start installing the guest operating system.

Figure 20. Ububtu Installation Wizard.
If you have slow Internet access or not at all, or, for some reason, do not want to download updates for the operating system being installed, uncheck the Enable Networking menu item, for which click the button, and then click on the line in the menu that appears "Enable Networking" (Figure 21).
As a result of the actions taken, the check mark opposite the "Enable Networking" line should be absent. This will allow you to save a lot of time when installing the operating system, and if you wish, you can update the system and install the latest software versions after installing and configuring Ununtu.

Figure 21. Disconnecting the network during installation.
Before starting the installation, the "installation wizard" will inform you about the required hard disk space and the need for an Internet connection, which is desirable, but not at all necessary (Figure 22). In addition, with a slow Internet connection, the installation process can be greatly delayed.
It is also desirable to enable the installation of Fluendo MP3 for playing multimedia content.

Figure 22. Preparing to install Ubuntu.
The next step is to choose a way to partition the hard disk into partitions (Figure 23). Since we have created only one virtual hard disk and not very large, we will choose the first option, besides, after creating a virtual hard disk, there is no useful information on it and you can safely format it.

Figure 23. Partitioning a hard drive.
At the next stage, we select the hard drive on which we will install the operating system. And since we have only one virtual hard disk, there is actually nothing to choose from and it will be offered by default. Just click the Install Now button to start the installation.

Figure 24. Selecting a hard drive for installation.
After clicking the Install Now button, the files will start copying from the installation disk image to the virtual hard disk. To save time, in parallel with the copying process, you need to make basic settings for the operating system and the first setting will be to choose your location.
You can enter the name of a city or select its approximate location on the map. Once the required city is specified, click the "Continue" button.

Figure 25. Selecting a location.
The next step is to select the keyboard layout (Figure 26). In the same window, you can check the selection and make sure that the printed text is displayed correctly. Usually, by default, the keyboard layout is determined correctly by the city you specified and no additional actions are required at this stage. Click the "Continue" button to proceed to the next step in setting up Ubuntu.

Figure 26. Selecting a keyboard layout.
Now you have to set personal data (Figure 27):
- own name;
- computer name;
- username (must not be the same as your name);
- password for entering the operating system under the specified username.
Here you will be asked to specify the method of logging into the system: automatically or after entering a password. If unauthorized people will have access to your virtual machine, then it is better to select the option "require a password to enter the system". This will keep your personal information intact.
After entering all the data, press the "Continue" button.

Figure 27. Entering personal data.
This completes the basic Ubuntu settings (Figure 28) and the entire further installation process will go through automatically.

Figure 28. Silent installation of Ubuntu.
During the installation process, advertising splash screens will periodically appear, describing the advantage of the installed operating system over previous versions of Ubuntu, which will help to somewhat relieve the wait for the installation to complete. However, the installation process can take several tens of minutes, but fortunately, we install the operating system on a virtual machine, and the window with the installation process can simply be minimized and go about your business.
When the installation is complete, a message will appear on the screen notifying of the completion of the installation and offering to restart the computer (Figure 29). Feel free to click "restart", because this applies only to your new, ready-made virtual machine, and not to the entire computer.

Figure 29. Completing the Ubuntu installation.
In a few seconds, you will see a window of a virtual machine with the Ubuntu operating system installed (Figure 30), which opens the widest possibilities of virtual machines and complexes that you have never used before. Customize the operating system settings for yourself and enjoy your work.

Figure 30. Operating system Ubuntu 12.04.
4. Basic operations with a virtual machine.
4.1. Running a virtual machine
From the start menu, start the virtualization system:
Start-> All Programs-> VMwre-> VMware workstation
In the window that opens, select the menu item:
File-> Open
And select the virtual machine you created (file with the .vmw permission). My virtual machine is located at the following address:
F: / VM Ware / Ubuntu.vmx
Start an open virtual machine in one of the following ways:
4.2. Pause the virtual machine.
When you finish working with the virtual machine, you can pause it, this will preserve the state of the virtual machine at the time of shutdown, and you can close the virtualization program.
After the resumption of work (see p. 4.1) the virtual machine will appear in front of you in the form in which you finished working with it. This is the most common and convenient way to shutdown a virtual machine.
You can pause a virtual machine in one of the following ways:
4.3. Shutting down the virtual machine.
To shutdown the virtual machine, simply shut down the guest operating system in a standard way. In this case, the work of the virtual machine will end automatically and you can close the virtualization program.
However, there is also an analogue of the computer buttons "Power off" and "Restart", which allow, regardless of the state of the guest operating system, to shut down or restart the virtual machine. You can turn off a virtual machine:
You can reboot a virtual machine:
- select menu item: VM-> Power-> Reset;
- press the key combination ctrl + R.
However, the most convenient way to finish working with a virtual machine, in my opinion, is to install it on a groove (section 4.2).
4.4. Connecting removable devices to a virtual machine.
You can connect removable devices in the menu:
VM-> Removable Devices
By checking the box next to the required removable devices, you connect them to the virtual machine, unchecking the box - disconnect. As you can see, everything is very simple.
To make it even easier, I will give an example of connecting a USB storage device to a virtual machine:
- connect the USB drive to the computer and after a few seconds in the menu "VM-> Removable Devices" a new item will appear with the name of the USB drive to be connected, in my case it is: Feiya Mass Storage Device;
- put a tick in the menu "VM-> Removable devices -> Feiya Mass Storage Device-> Connect (Disconnect from Host)"(Figure 31) and after a few seconds a folder with the contents of the USB drive will open on the desktop of your guest operating system (in our case, it is Ubuntu);

Figure 31. Connecting a USB storage device.
To disconnect the USB storage, uncheck the checkbox in the same menu.
4.5. Switching between host and guest operating systems.
To switch from the guest operating system to the host operating system, press the ctrl + alt key combination. To return to the guest operating system, it is tedious to click on the window with the guest operating system.
This is quite enough to start working with a virtual machine, and in the future, if you like the capabilities of the new tool, and you will certainly like them, you can easily explore all of its capabilities, and I will try to help you in one of the following articles.
When switching to the next version of the operating system of the Windows line, some users are faced with the lack of support for their favorite applications in the new OS. Or it's even more complicated - you have, for example, OS X, and you need applications that are compatible only with Windows.
At the moment, there are a large number of "virtual machines" that can resolve these inconveniences. For example, paid Parallel Desktop and VMWare Workstation, or free options like Microsoft VirtualPC or VirtualBox from Oracle.
We have already talked about VirtualBox in the articles:
- Creating a virtual computer and installing Windows on it using VirtualBox;
Today I will talk about working with.
The process of installing a virtual machine is no different from the process of installing regular programs, so you can skip it. After installation and reboot, the main program window will appear.
In this emulator, everything is easily customizable. On the left side are the virtual machines that you have installed. On the right is the "invitation" window of the program. With it, you can create or open an existing virtual machine, connect to a remote server, and much more. At the top there are several panels containing controls.
Creating a virtual machine
VMWare Workstation provides several options for creating a virtual machine. To describe all possible functions, we will choose a selective method of creating a machine.

In the next window, you must specify compatibility with previous versions of the program.
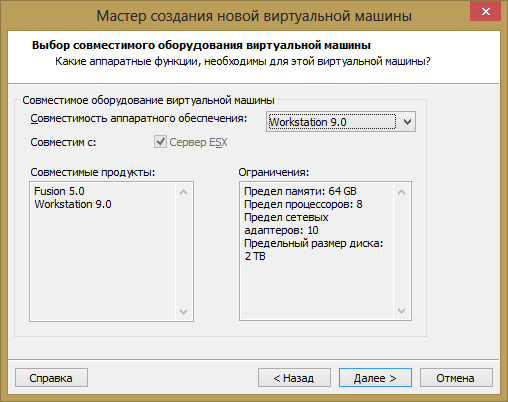
This is usually used for teamwork on different configurations. The products that are compatible with this machine are displayed on the left side of the window, and the restrictions imposed on this configuration are displayed on the right. It doesn't matter now, so we leave everything as it is.
The next step is to install the system on a virtual machine.

In this case, you can specify both a real hard disk drive and a virtual image. Alternatively, you can select the installation media later, right when the virtual machine starts up.
Then you need to select the operating system that you are going to install.

In accordance with your choice, the program will offer the optimal set of settings for a specific system. Next, you need to come up with a name for the virtual machine, as well as the folder in which it will be located.
Most modern computers have more than one processor core. The program can also set the number of cores that you want to use in the guest system.
Note: Do not give too many physical resources to the virtual machine. The computer will become slower, and you will not get a large increase in the performance of the guest system.
At the next step, you need to specify the amount of RAM that will be given to the virtual operating system. The program will also warn you about the minimum amount of memory at which the system will function, and will also indicate the limit above which you should not go. In this case, it is recommended to leave the value that the emulator program specified initially.
The next step is to specify the type of network that you want to use.

In this case, if you do not understand networking technologies, you do not need to change anything. After installation, the virtual machine will have a network and you do not have to configure it separately.
At the next step, you are asked to select the disk on which the system will be stored.

You can create a new virtual disk, or use an existing one. You can also set aside a portion of the physical disk for system operation. In the first two cases, a virtual hard disk will be formed in the form of a specific file or a group of files. Then the configurator will prompt you to select the type of virtual disk. Since SCSI on older systems is either not supported or does not work confidently, it is advisable to choose an IDE interface.
Next, you need to specify the size of the future disk. In this case, you can specify the space slightly larger than what we need. In this case, you can allocate all the disk space at once, or you can fill it up gradually so that the empty space on the virtual disk does not take up real gigabytes. For convenience, the program will offer you to split the disk into several files, or save everything in one.

In conclusion, it is worth familiarizing yourself with the parameters of the created VMWare Workstation virtual machine. If everything is in order, then press the "Finish" button, otherwise - you can go back and change any parameter.
A black screen is now displayed on the right side of the program, indicating that the virtual machine is disabled, as well as information about the hardware of the virtual machine. The process of installing the system on a virtual machine should be skipped as it is no different from installing a real operating system.
Procedure for starting a virtual machine, suspending and shutting down
So now everything is ready to run. If there is already a system on the virtual machine (VM), then it is enough just to start it. Or put the system on a freshly created machine.

There are two options:
- If there is a VM, then in the window on the main tab, select "Open" and select the VM (file with the .vnw resolution).
- After adding (or after creating a new one), you need to start the VM by clicking on the start button located at the top of the window under the Edit menu, or by selecting the Virtual Machine - Power-> Resume menu item, or by pressing the Ctrl + B key combination.
It is worth noting that the virtual machine can be paused. At the same time, its full state at the time of shutdown will remain and the virtualizer program can be closed. After you resume work, all windows, open programs and even processes in memory will remain in the same state in which you left them. This is the most convenient way to use a virtual machine. you don't have to wait for it to load. There are three ways to pause the VM:
- Press the "Pause" button at the top of the window, under the "Edit" menu
- Select the menu item Virtual Machine - Power - Suspend
- Press the keyboard shortcut Ctrl + Z
There is also a less convenient way of shutting down the virtual machine and the virtualizer program - shutting down the guest operating system as if you were shutting it down on a regular computer. Moreover, if you turn off the machine through the capabilities of VMWare, the system will automatically shutdown, as if you had pressed the Power button on the system unit.
You can turn off the virtual machine in the following ways:
- Press the "Stop Virtual Machine" button, which is located under the "Edit" menu
- Select the menu item Virtual Machine - Power - Power Off
- Press the keyboard shortcut Ctrl + R
It is worth noting that sooner or later you will have to turn off / restart the VM. garbage will accumulate in the guest operating system, which will disappear only after a reboot. It will gradually accumulate and, as a result, will make the work of the machine slow.
Everything is fine: the guest system is up and running, but it may not release the mouse outside of its working window. In this case, if you want to leave the virtual system, you need to press the Ctrl + Alt key combination. However, there is a set of drivers that you do not have to install after installing them. The system is integrated into the host machine and you can switch between them without any problems.
You can do this as follows: go to the Virtual Machine - Install / Reinstall VMWare Tools package.

The VMWare Tools package installs drivers for sound cards, video adapters, and other hardware.
An important fact is that VMWare Tools can work with several guest systems at the same time. Moreover, each system will work independently of the others. The number of simultaneously running systems is limited only by the physical capabilities of your computer. And you, as a user, can switch between them using tabs.
There is a problem: let's say that the system has become unstable and you need to press the Ctrl + Alt + Delete keys, but the host system's task manager is called. You can send a similar combination to the guest system using the Virtual Machine menu - send the command Ctrl + Alt + Delete.
Everything is fine: the guest system works and you are satisfied with almost everything, but there is one problem: the system screen is too small and this makes the work inconvenient. There are several ways to fix this problem:
1. If you have a large diagonal monitor, you can simply increase the screen resolution.
2. There is also a more graceful approach: you can enable "single mode". This is the mode of integrating the guest operating system into the main operating system. In this case, you can work in parallel with applications of both the host and the guest system. It is worth noting. That the entire screen will be involved and the resolution of the guest system will be the same as that of the host. In order to switch to this mode, you must click on the "Single mode" button, which is located in the menu under the "Tabs" menu, or go to the View menu - Single mode
3. It is possible to expand the operating system to full screen, completely covering the main workspace. This can be done by clicking on the "Full Screen Mode" button, which is located between the Virtual Machine and Tabs menu, or go to the View - Full Screen Mode menu. You can also use the keyboard shortcut Ctrl + Alt + Enter. In this case, the VMWare Tools panel will appear at the top of the system, which will automatically hide if you do not hover over it.
So now we have a working system. It is necessary to add network folders to it - in this case, we will give the system access to the physical hard disk. To do this, you need to turn off the virtual machine.
The system on the virtual machine is the same as on the real one. Accordingly, you need to turn it off just like a regular system.
After shutdown, you must press the "Change settings" button and go to the "Parameters" tab.
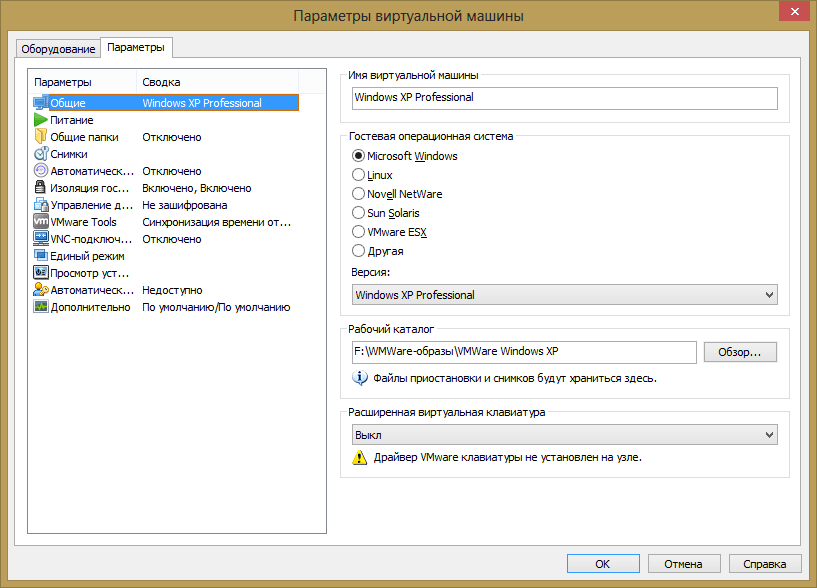
In it, you need to find the "Shared folders" option, put the switch in the "Always on" position and select the necessary shared folders for your system. You can specify either a single folder or an entire hard disk partition.
Apply the changes and boot the virtual machine. Externally, the machine has a network, but internally, you need to connect a disk to the system. The easiest way to do this: open "My Computer" and select "Map network drive". Everything! The virtual system has access to real data.
There is another, easier way to transfer files and folders: to transfer data inside a virtual machine, you just need to drag the file from the real system into it with the mouse.
Connecting removable devices to a virtual machine
Sometimes the question arises: "What to do?" If you want to connect a flash card, printer and other devices directly to the machine. In this case, the developers have provided a number of operations that can connect external USB devices.
You can view the list of devices available to the machine in the Virtual Machine - Devices menu. There you can also see a list of the currently connected equipment. By checking the box next to the required device, you connect it in the guest system, unchecking it - disconnect it. It's that simple!
For example, if you want to connect a drive to a virtual machine, you need to do the following:
- Connect the flash card to your computer and after a few moments it will appear in the "Devices" menu;
- Check the box next to the device and after a while you will find a system message that the device is connected.
Conclusion
Another important point: suppose that you reinstalled the operating system, but you still have the VMWare Workstation virtual machine. To start it you need to open it in the program: Home - Open a virtual machine. After that, at startup, a window will appear.

In this case it is necessary to press the "I copied it" button. And the virtual machine will be loaded. Running virtual machine:

In conclusion, it should be noted that a virtual system is a very useful and, at times, irreplaceable device in work. The undoubted advantages of a virtual machine are such features as:
- If you wish, you can virtualize any operating system and, accordingly, if the system is old, then old programs that are not able to run on modern equipment will work with it;
- Each system is independent, which allows you to conduct experiments without fear of "killing" the OS;
- You can create almost any hardware configuration and check the system performance on it.
However, the medal also has a downside - the VMWare Workstation program is paid and costs 8,300 rubles. Buy it or use analogues - it's up to you.


