The second method according to the scheme of work can be said to be identical to the first. But we will consider it on a more difficult image. For example, I chose a photo with a car. Now I will show you how change car color
As always, we need to specify what color we will replace. To do this, you can create a selection using the color range function. In other words, select an image by color. It is also very convenient today to strive to have good technical support when creating a particular service. And if you don't know how to organize it, then http://pks-alteko.ru/tehpodderzhka/ will help you. An excellent opportunity to entrust this functionality to real specialists who know their work very well.
There is also an idea to create a good service where people will have the opportunity to learn the craft of working with the Photoshop program. This is a really very good program that can currently feed you. After all, it is very necessary to work and create graphic materials for the same owners of commercial sites ...
To do this, go to the menu Selection – Color range (Select – Color Range)

Then it remains to click on the red color of the car and we will see the function determined it - painting it white in the preview window. White color shows which part of the image is selected. The spread in this case can be adjusted to the maximum value. Click OK.

After you click OK, you will see how the selection was created:

Now you can change the color of the selected image. To do this, use the function - Image - Correction - Hue / Saturation (Image - Adjustments - Hue / Saturation)

A dialog box will appear.
Immediately check the Toning option (bottom right). Now using the Hue, Saturation and Brightness options, you can adjust the color. I set the color to blue.
Color replacement
Command Replace Color creates a temporary mask around the specified colors and then replaces them with other colors. The principle of the team is in many ways similar to the team Color Range. Let's see how this command works with an example. Open the graphic file (Fig. 3.29).
Rice. 3.29. original image
Choose a team Image | Adjustments | Replace Color. In the window that appears as a result of executing the command, set the switch selection to see the mask in the preview window. Check box Preview to see how the color setting will affect the image. Tool Pipette click on the darkest part of the background. Part of the background is highlighted. If you click not the background, but the flower, then the background color will not be replaced, but the color of the flower will be replaced - fig. 3.30.

Rice. 3.30. An example of replacing an object's color
Choose a medium pipette Add to Sample and click it on an adjacent area of the background, several times, until almost the entire background is white. Increase slider value Fuzziness (Scatter). If after that there are still unselected areas, click on them with the eyedropper with the plus sign. Changing the position of the sliders Hue (Color tone), Saturation (Saturation) and Lightness (Brightness) you can change the background color in a wide range of colors.
How to Recolor Anything and Everything in Photoshop
Sofya Skrylina, teacher of information technologies, St. Petersburg
The Photoshop graphics editor has a huge number of tools that you can use to recolor various objects. Some of them require preliminary selection of fragments, others do not require the use of selection tools, affecting only certain colors of the image. In this article, we will work only with the background or normal layer, without using any fill layers or layer blending modes.
Color Replacement Tool
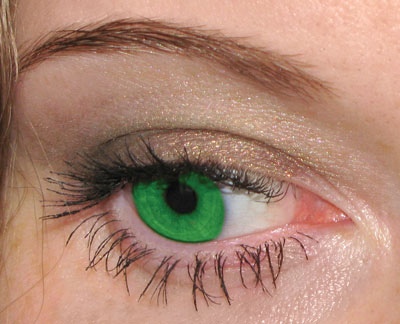
Tool Color replacement(Color Replacement) is in the same group as tools Brush(Brush) Pencil(Pencil) and Mix brush(Mixer Brush) and is intended for repainting image fragments. This tool has a total of four blend modes: Color tone(hue) Saturation(Saturation), Chroma(Color) and Brightness(Luminosity). Modes are used to recolor fragments. Chroma(Color) and Color tone(hue). The first mode provides a brighter shade, so when using it, you should choose shades of the color applied to the object that are much darker than in the second mode. So, in fig. 1 shows an example of repainting the iris in green of one shade: R=7, G=95, B=17. The first result is obtained in blend mode Chroma(Color), the second - in the mode Color tone(hue).
 a
a
 b
b
 c
c
Rice. Fig. 1. Results of repainting the iris with the Color Replacement tool: a — original image; b — Chromaticity mode; c - Color tone mode
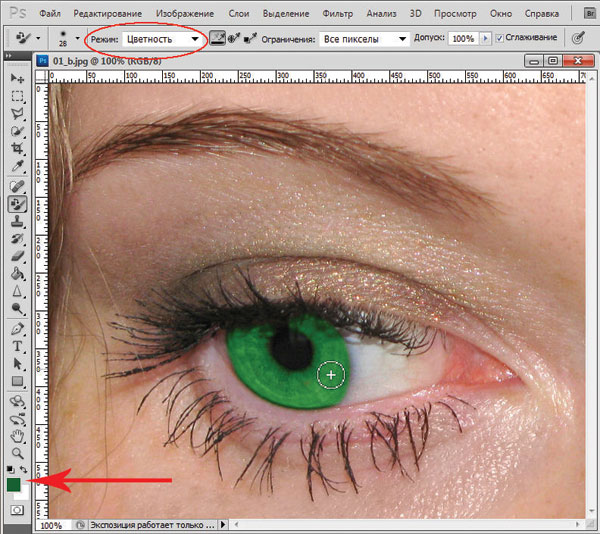
The tool properties panel has a number of other options (Fig. 2):
- All pixels(Discontiguous) - the color is replaced wherever it meets on the path of the pointer,
- Adjacent. pix(Contiguous) - colors are replaced that are close in color to the one under the mouse pointer,
- Edge selection(Find Edges) - when replacing colors, sharp edges of objects are simultaneously preserved;
- parameter Tolerance(Tolerance) sets the sensitivity of the instrument;
- checkbox Smoothing(Anti-alias) sets smooth borders when replacing colors, set by default.
In the example considered, the preliminary selection of the object was not carried out, but if you are working with a more complex object that requires processing with a brush in several stages using several blending modes, then, of course, you first need to select the object.
Note. Basically, instead of a tool Color replacement (Color Replacement) can be used Brush (Brush) which has the same blending modes: Chroma (Color) and Color tone (hue).
Beyond Tools Color replacement(Color Replacement) and Brush(Brush) color correction tools are used to repaint fragments. To call them use the menu Image(Image) -> Correction(Adjustments). Let's take a closer look at these tools.
Dialog window « Hue/Saturation »
For changing the color of an object in a dialog box Hue/Saturation(Hue/Saturation) Responsible slider Color tone(hue). When choosing an item Everybody(Master) replaces all colors that fall into the selected area. At the same time, you can specify one of the base colors of the RGB and CMYK models, which will be affected by the tool (Fig. 3). In this case, if the object is the only one in the image consisting of one group of colors, there is no need to pre-select it.

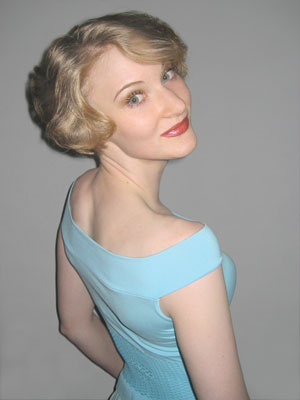

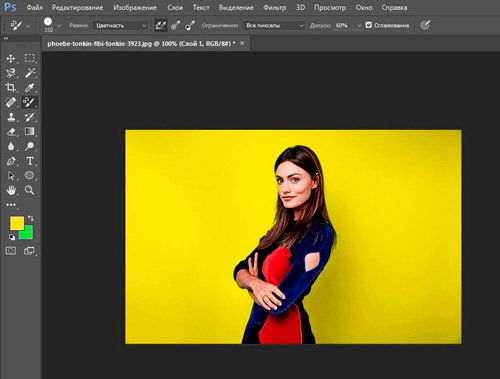
Rice. 4. The original image of the girl (a) and the result of recoloring and applying a tan (b)
So, in fig. 4 to change the color of the jacket from blue to lilac, it was not necessary to select it, it was enough to select the blue color to be replaced (see Fig. 3). But for coloring the rest of the objects, their preliminary selection was carried out.
Note. In the above example, a tool was used to recolor hair and sweaters Hue/Saturation (Hue / Saturation), and for applying a tan - tools Replace color (Replace Color) to darken the skin tone a little, and Color replacement (Color Replacement) to repaint the leather brown.
Don't forget to use the remaining two sliders when replacing the color: Saturation(Saturation), which allows you to increase or decrease the saturation of the selected color, and Brightness(Lightness), darkening or brightening the selected color.
Replace Color Dialog Box
Command Replace color(Replace Color) replaces the color in the image, which is selected using pipettes. The first click with the pipette selects the color to be replaced, subsequent clicks with the pipettes with the “+” or “-” sign refine the range of colors (Fig. 5). Parts of the image corresponding to the selected colors appear in white in the preview area. In addition to pipettes, a slider is used to expand or narrow the selected shades scatter(Fuzziness).
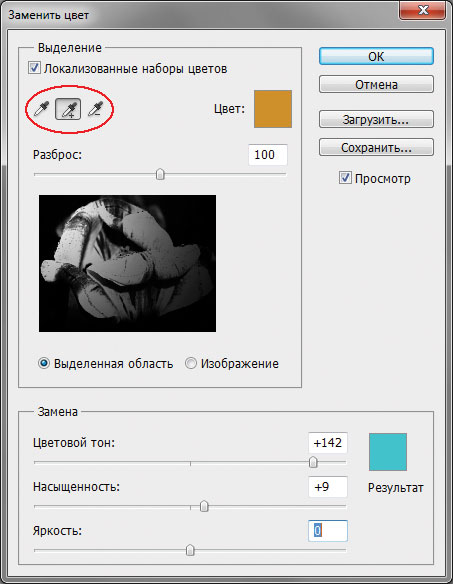
With sliders Color tone(hue) Saturation(Saturation) and Brightness(Lightness) determines the replacement color. In addition, replacement and replacement colors can be selected from the color palette, which is called up by clicking on the color swatch. In most cases, preliminary selection of fragments is not required.
Note. Please note that the dialog box Replace color (Replace Color) very similar to the selection tool Color Range (Color Range), which selects a fragment by a group of colors. It turns out that the dialog box Replace color (Replace Color) combines the functions of two tools: the selection tool Color Range (Color Range) and Color Replacement Tool Hue/Saturation (Hue/Saturation).
Best result when using a dialog box Replace color(Replace Color) is achieved if the replaced color is close to uniform. Otherwise, noise appears on the image, which you have to get rid of with the help of additional tools. An example of using this tool for recoloring tulip petals is shown in fig. 6.
 a
a
 b
b
Rice. 6. The original image of the tulip (a) and the result of its recoloring in the Replace Color dialog box (b)
Selective Color Correction
Selective color correction is carried out in the dialog box Selective color correction(Selective Color) (Fig. 7), which allows you to selectively change the amount of a compound color in any of the primary colors without changing other primary colors.

This tool can be used to recolor image fragments while maintaining the base color. For example, red can be changed to any other color that includes red: from yellow (a mixture of red and green) to lilac (a mixture of red and blue). But, for example, turning red into blue will not work. This tool is also indispensable in situations where you want to remove the color cast created by a light source, such as a conventional table lamp (Fig. 8).
 a
a
 b
b
Using Lab mode
The Lab color model is based on three parameters: L- brightness (Lightness) and two chromatic components - a and b. Parameter a changes from dark green through gray to purple. Parameter b contains colors from blue through gray to yellow. This circumstance can be used to quickly recolor image fragments by inverting a straight line in each channel (provided that this object is easy to select or all other colors in the image are close to neutral). To invert a line, just drag the top right point of the line down and the bottom left point up.
a you can get the following results:
- red and burgundy colors are repainted in green;
- green becomes light brown.
When inverting a straight line in a channel b you can get other results:
- red becomes purple or lilac depending on the original hue, and magenta and lilac become red;
- yellow turns to blue.
When the straight line is inverted in both channels, the following results are obtained simultaneously:
- red is repainted in blue, the shade of which depends on the original shade of red;
- blue and magenta become green.
Note. Since the Lab color model can display more colors than the RGB model, converting an image from Lab to RGB and vice versa does not affect its quality. Therefore, the transfer can be carried out as many times as you need.
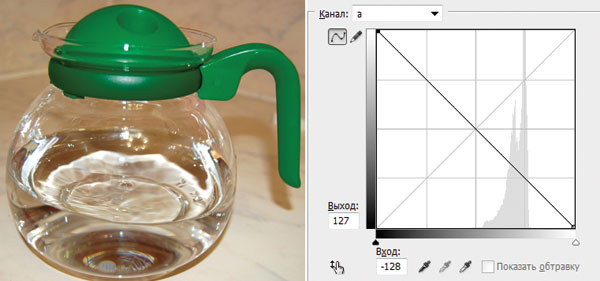
Now let's look at a few examples. On fig. 9 shows the original image of a jug with a lid and a red handle.
First you need to put the image in Lab mode by running the command Image(Image) -> Mode(Mode) -> Lab. In this case, the tool will fit perfectly to select the lid and handle. Quick Selection(Quick Selection).

 a
a
 b
b
 c
c
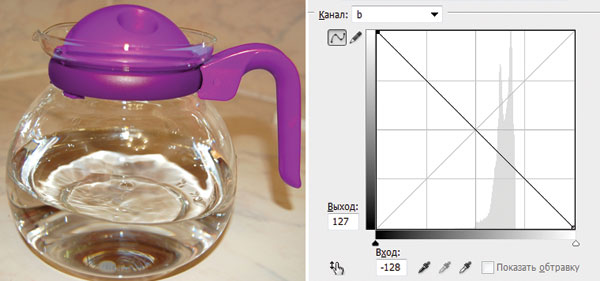
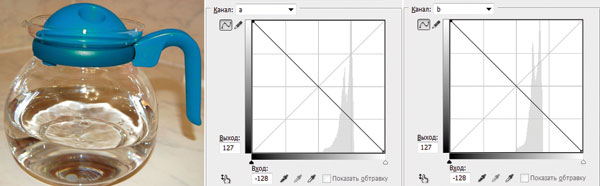
Rice. Fig. 10. The result of recoloring the fragments: a — in green color by inverting the straight line in channel a; b - to lilac color by inverting the straight line in channel b; c - to blue color by inverting the straight line in channels a and b
In the dialog box Curves(Curves) (it is called by the key combination Ctrl + M) from the list Channel(Channel) select a channel a and invert the straight line (Fig. 10 a).
If we invert the straight line in the channel b without changing the position of the line in the channel a, we get a lilac color (Fig. 10 b). Inversion of the straight line in both channels will give a blue color (Fig. 10 in).
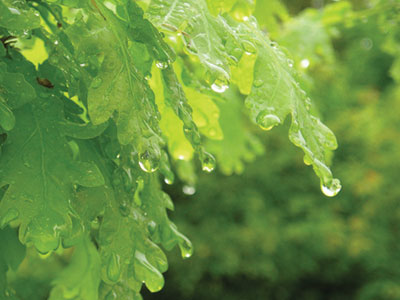
During repainting, the colors of the images may fade. You can also increase their saturation in Lab mode without resorting to the dialog box Hue/Saturation(Hue/Saturation). To do this, it is necessary to increase the angle of inclination of the straight line in both color channels. On fig. 11 shows the original image of green leaves. When inverting a straight line in a channel a we get a faded brown color (Fig. 12).

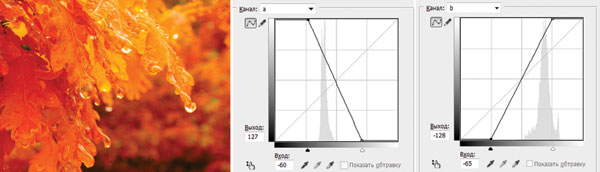
To increase the saturation of colors and turn the summer landscape into autumn, we will change in the channels a and b the angle of inclination of the straight line (Fig. 13).
As you can see, Photoshop offers a really huge selection of tools for recoloring image fragments. Which of the available tools to use is up to you.
1 voteHello dear readers of my blog. Today we will again comprehend the basics of working with Photoshop. I wonder how you would look if the color of your hair or skin was completely different? I have already talked about.
Today I will tell you how to change the color of a layer in Photoshop without any problems. I won’t mention once again how to work with them, well, I’ll tell you about various tools: a magnetic lasso, a magic wand, and so on.
All the relevant articles are already on my blog, and if you accidentally stumbled upon this publication and want to fill in some gaps, you can easily find out all the information of interest from the materials prepared in advance.

Today we will quickly go over the main tools, at the end you can find a good video instruction, and over the next 5-7 minutes you will meet with a sea of screenshots that will help you figure out what manipulations will be necessary in order to change the color of the picture or her area.
I will work in Photoshop CC, but if you have a different version, then it's okay. All functions are simple. The software is installed in Russian. By the way, if you have an English version, I can also recommend the article "". Very convenient, makes life easier.
Color correction
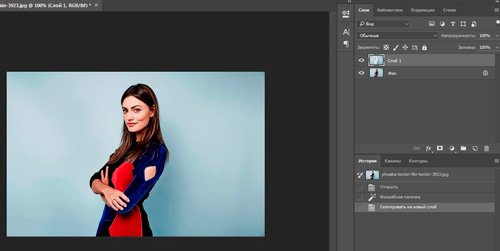
So, I have already selected the object, or rather the background of the photo, and transferred it to a new layer using the keyboard shortcut Ctrl + J.
Now go to the tab "Image" - "Correction". There are a lot of options here that will help you change the hue: Brightness / Contrast, Color Balance, Photo Filter, and even Gradient Map. You can try each of them in order to understand from your own experience how this or that tool works, choose an interesting method that you like specifically.
I'll use Hue/Saturation.

You can pull on different sliders, achieving an excellent effect.

As you can see, the differences cannot be called striking, but you don’t need to fool around with the selection so that the layers look uniform and professional, and the object does not stand out from the general background.
Striking changes
To make the background a completely different color, I will use the "Color Replacement" tool in the same "Correction" tab (how to draw a black background for Photoshop -).

After opening the dialog box, your cursor will change. The pipette tool will be hidden in it. Just click on the color you want to change. Use the Scatter slider to define the area you want to work with, and then click on the color block above the Result entry, or work with the Hue, Saturation, Lightness sliders again.
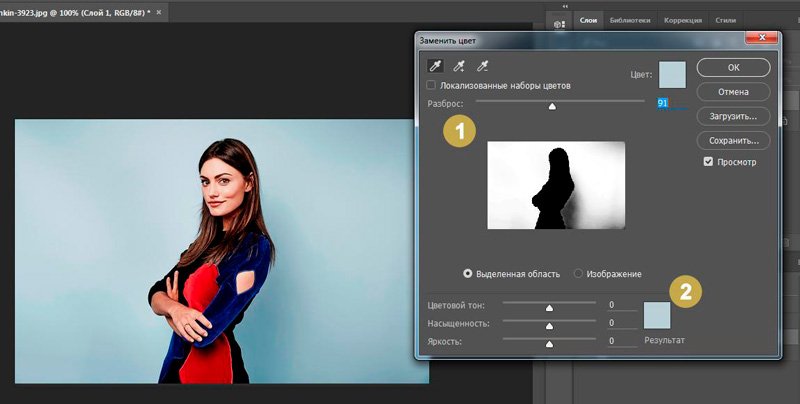
I chose the first option. I clicked on “Result” and now I choose a shade and color on the palette so that the soft blue turns into pink.

Professional, fast, easy
In my opinion, the most successful tool for working with the colors of complex objects is the color replacement brush. Long hold the left mouse button on a regular brush until an additional menu opens.

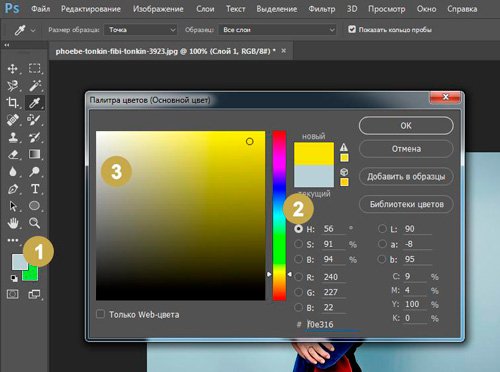
Now select the shade to which you will change the color of the layer.
It remains only to paint over the necessary areas, as you can see, all the shades are preserved. Very fast and convenient.
Can be repainted in any suitable option.

Video instruction
Bonus
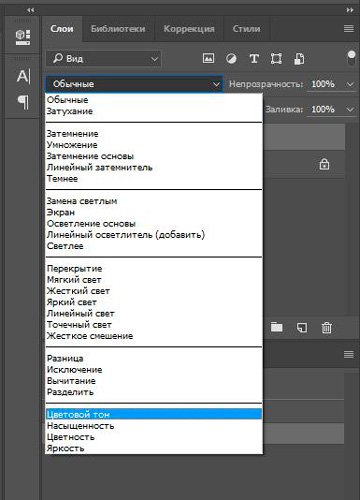
Another way to change the color with a new layer does not impress me too much, but I guess that it may appeal to some and certainly someday come in handy in the future. So, I create a new layer, and then select the blending mode for it "Color tone".
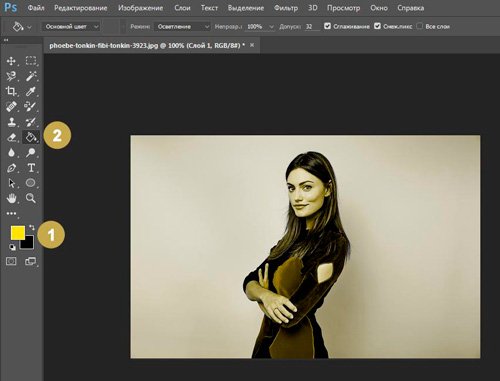
This is how it should end up.

Now I take any color, for example, yellow, the Fill tool and fill the newly created layer.
You can try other blend modes as well. Don't be afraid to experiment.

With the help of an eraser, you can return the girl to a normal complexion.

By the way, do not forget that many professionals use . Still don't know how to work with her? Then the post I linked to will come in handy.
Well, if you want to learn the maximum about all the tools that are in Photoshop, I can advise the course of Zinaida Lukyanova " Photoshop for beginners in video format ". You don't have to wait for anything. Just a few weeks and you will know everything that this program is fraught with.

See you again and good luck.
Hello again, my dear readers. Today I would like to tell you how to replace a color in Photoshop with another one in a separate area and even in the whole picture. After all, you probably often had a desire to repaint something to see how it would look. But in order not to be mistaken, first it is better to do it on some kind of layout or on a photograph. Then you will already know how and what it looks like. Let's see how to change the color of an object to a specific one, using the example of repainting a car in the picture.
First way. Color replacement
Let's look at the simplest case, when our background is completely different from the object itself, i.e. cars.
- So, upload a photo, picture or drawing to our editor and now go to the familiar Image menu. Next, select the item "Correction", and then already "Replace color".

- A color replacement window has opened in front of us. What are we doing here? First, let's make sure that the active tool in this window is a regular eyedropper (no signs). Now just click with the left mouse button somewhere on the hood of the car.

- As you can see, we have a small drawing in the window. What is colored light shows us which area will undergo the color change. Now start dragging the Hue slider. See? Some of the color starts to change as you move this tone. Do not be upset that not the whole car was painted over. We'll fix it.

- To get started, hold down the left mouse button on the Scatter slider and drag it up. Just try to make sure that the car is painted over as much as possible, while the background remains untouched. In this case, there are no yellow tints in the background, which allows me to set the maximum spread to 200.

- The desired object has changed almost all the color, but not completely? Again, no problem. Activate the internal tool "Pipette +" and left-click on those parts of the car where there are unpainted areas in the picture.

- Voila!) As you can see, everything worked out and even our background was not damaged. And by the way, you can still move the sliders "Hue", "Saturation", "Brightness" to achieve the desired hue.

See. Looks like it should. And this function can be used in different areas, for example, to change the color of clothes, or to give an unusual but certain shade to vegetables or fruits. In! Try making blue watermelon. Trust me. It's easy, very interesting and useful for reinforcing.

Correction of misunderstandings
Let's look at a slightly more complicated case. Let's say I again want to change the color of the car, but a different one. As you can see, the color of the car is the same as in the background. Well? Let's do the same as above and see what we get.

But we are not doing well, the background is so similar to the color of the car that neither the "Pipette-" nor the reduction in dispersion helps. If we want to have purple, then our mountains will also be similar. What to do?

In such difficult situations, you will have to work a little with the handles. In fact, there is nothing wrong here. You just have to use the one you know. Yes Yes. With pens we erase failed painted objects or the background, thereby leaving only the object itself with a certain color, i.e. in our case a car.

Even better, before you start changing the color, duplicate the layer and perform all the actions on the created copy. And unnecessary details can be erased with ordinary ones. This will be better if you suddenly want to change the color later.
The second way. Blend mode
Well, since we are talking about repainting a car in photoshop, I cannot but mention another good way to carry out this action. True, here you will also have to work with pens, as you will have to change and paint over everything in places. But on the other hand, we can easily replace the color in Photoshop with any other.
Let me load the same car as above.
- We take and how we would like to paint over this machine. Well, let's say I want to see it green, then I will choose this particular color.
- Now create a new layer by pressing the key combination SHIFT+CTRL+N. And then take a look at the layers panel. See there are blending modes? The default is normal, but you'll open the drop-down list and select "Color" (By the way, the "Hue" mode is also suitable, so you can choose it too). Fine. Well done.

- Now choose the size, shape and hardness of the brush, and go! We paint the car. Just be careful not to overdo it. Well, if you hurt, then correct it with an eraser, it's okay.

- And now, if you want to change the color that you have built, you need to go to our again familiar “Image” menu and select “Correction” there - "Hue/Saturation". But I advise you to immediately use a simple key combination CTRL+U

- Well, in the newly opened window, you can also move the hue, saturation and brightness sliders in order to change the hue. Everything is simple.

Well, how do you like the lesson? Was everything clear and interesting? I hope that yes. Personally, when I learned about replacing the color of an object in Adobe Photoshop, I was simply delighted. If, of course, something is not clear, then you can always clarify or ask. I will be glad to help as far as possible.
I would also advise you to look awesome photoshop video tutorial. The video tutorials are simply awesome, the course goes from easy to complex, everything is told in human language, nothing is missed and at the same time no extra “water”. Everything on the shelves. So be sure to check it out.
Well, I say goodbye to you today. I will be glad to see you in my other articles. Well, in order not to get lost, be sure to subscribe to my blog updates. I will not spam - everything is just on business, honestly. Well, you practice. See you in other lessons. Bye Bye!
Sincerely, Dmitry Kostin.