We decided to make an antenna for WiFi ... There are many options, netizens are looking for new ways. Probably because there are a myriad of situations in life, each decision is powerless to lay out the network. Today we propose to consider a couple of methods for improving reception / transmission. Atypical solutions will be considered, the design process of Kharchenko's antenna has been described many times. According to the designer's idea, dated the 70s of the last century, in a modernized version. Would you like to make a WiFi antenna yourself? Better read the review further! Let's get started.
Increase the gain of the WiFi antenna
With the help of beer cans, you will assemble an antenna for receiving the MV range (the ubiquitous First Channel), an excellent reflector of an arbitrary frequency. A parabolic surface has one interesting property:
Beams coming from any direction are reflected and collected by the focal plane. If you aim the product at the broadcasting point, the lines will intersect in focus.
The Internet was flooded with improvements to factory modems, antennas in order to obtain additional amplification. Without paying a penny. Consider saving techniques. Most external WiFi modem antennas are omnidirectional. In the factory modem, antennas 2-3 (often inside) can be divided as follows:
- The presence of an external / internal antenna.
- The presence of several internal antennas.
- Multiple outdoor antennas.
It is clear that most modems are standard, the uninitiated ask the question: what does the number of antennas give? The answer is simple: better reception and transmission. The communication adopted vertical polarization. The vector rotates, the signal disappears altogether. An antenna with circular polarization will correct the matter, it will receive no worse, it will not fall into dependence on the direction of the electric field.
Homemade antenna
Today there are two surfaces of interest:
- A paraboloid of revolution is obtained if the ordinary graph Y = X 2 is rotated around the axis of symmetry (in this case, the ordinate). The rays coming from the side of the concave part will be collected by the focal plane. Using the principle, satellite dishes work. If you take a ready-made, arbitrary radius, make something similar with your own hands from paper, epoxy resin, foil, you get an efficient device for enhancing reception.
- In the case of whip antennas, a fold surface can be used. A purchased sheet of thin steel is adjusted according to the pattern - let's talk below. The method is widely discussed on the Internet, a semicircle is used instead of a parabola, tin is taken from a beer can. We see a minus: the two lines coincide approximately at the very beginning of the abscissa axis. Accurate focusing is not possible and the gain drops.
Let's see why the WiFi antenna starts to receive better when fenced off with a reflector. In a YouTube video, ValeraZik says: some of the pins, being covered from one side with the palm, receive better (any channel), part of the radiation is reflected by the hand. Not true. If you take the master of kung fu (the path of the blocking fist), the hand will be like a steel hand, the hand of other people, as well as a shuitsa, is unable to reflect anything.
The hand extinguishes radiation coming from other directions. Artificial interference, natural sources. As a result, the quality of the signal increases inexorably. Sometimes noticeable with the naked ear, in the case of long antennas it may not play a role.
Let's imagine using the example of human hearing. Lor is quietly talking numbers, we try to hear, they are constantly chatting at the other end of the room. For example, we have fenced ourselves off from interference with a partition, a sound insulator wall, of course, the necessary information will be perceived more clearly. If the hand is replaced with a grounded metal shield, the situation will change radically. The wall reflects unnecessary waves back, useful information will be concentrated at the right point. Of course, if you choose the correct shape envelope.
Using a parabolic WiFi transmit / receive antenna
It happens that the points of broadcasting, receiving in line of sight, are significantly removed. Firstly, factory, home-made log-periodic antennas, wave channels will come in handy, they act witty too. WiFi at 5 GHz coincides with the frequency of the satellite broadcasting range C. There is a topic at forumru.tele-satinfo.ru/index.php?topic=70121.0, it is shown how to convert the converter from receiving to transmitting a signal. Of course, the experiment is not for beginners, but, having received a successful alignment, we catch the broadcasting of space, all the more we will accept it from the Earth.
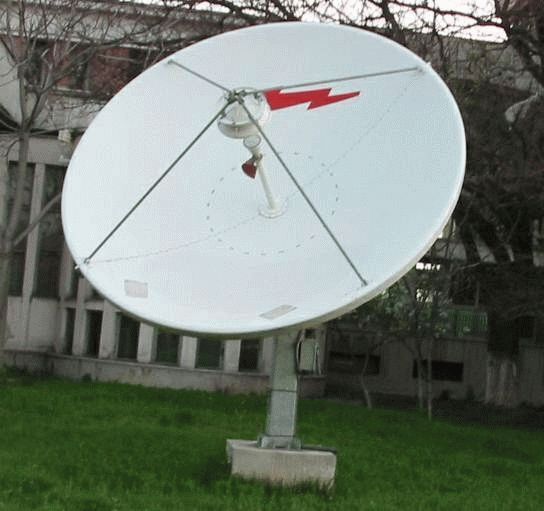
Now let's remember that it is the C range that is less afraid of fogs, rains, and other whims of nature. It is necessary to organize a bidirectional channel. There is a lot about the receiving part, it is written in detail here cqham.ru/ao40_equip.htm. It is proposed to subordinate the MMDS converters to the fishing goals (cable broadcasting on the air, there is no way to lay the network underground, on the surface). The difference with WiFi in the range is 100 MHz, the author at the specified link discusses how to properly convert MMDS converters to WiFi. In more detail, a slightly different problem is being solved, for our case the solution is suitable (in the review, the author is trying to establish a connection at the WiFi frequency with the AO-40 radio amateur satellite).
The topic of a bidirectional channel is discussed. A helical antenna is used for transmission, the construction of which (with your own hands) was discussed in the section. Equally are the nuances of the directional diagram of the device. From the text of the article it can be seen: the factory plate is suitable for the purposes of reception. Suitable for complementing the functionality of the already standing one (NTV +). Discussed how to properly adapt WiFi equipment. Let us briefly recall that there is no need to touch the plate itself, just based on the laws of optics (the angle of incidence is equal to the angle of reflection), estimate at what point in the focal plane the WiFi modem and antenna will be located.
Mini antenna with reflector
A swarm of converters stuck around the multifeed, add a receiver there. The orbit is projected onto the focal plane along one large-diameter arc, the location of the best WiFi reception depends on the coordinates of the transmitter, relative to the dish.
We understand that links to forums are not able to act as a reliable source. Firstly, readers can search Yandex for how to properly perform technological operations, and secondly, they can ask the administrator to post a topic. Then we will do the work. We hope the readers understood, realized the possibility of using satellite equipment for terrestrial communications (MMDS).
Make a beer can screen for a WiFi antenna
Sometimes making an antenna for WiFi with your own hands is not the best option, it's easier to re-equip an existing one. Consider a common case of limiting the broadcast area of an access point. Covering some of the WiFi antennas with your hand will improve the reception quality, you won't be sitting all year round! For those who want to solve the problem, we give the name of the program - Inssider. A signal level meter with which you can find the best antenna, create a suitable screen, aim the device in azimuth. Actually, start with this, then design / buy.
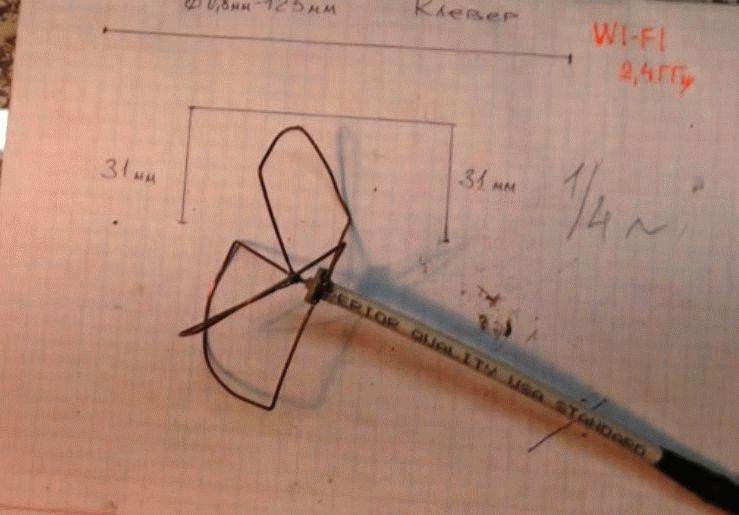
ZikValera in the video demonstrates a comparison of antennas, factory and own assembly. Those who want to spend 20 minutes on contemplation are sent to watch, and we bring the rest: the directional biquadrat, the non-directional “clover” with versatile polarization, shows itself better. The best factory model can be appreciated. But it's not about making a directional WiFi antenna. We want to show you how to improve the existing ones using simple methods.
How to make an antenna for WiFi yourself, modify it to improve the quality. Make a beer screen from a can, put the pin in focus. It is easier to do, if you are too lazy to write out the equation of an ellipse from analytical geometry, place the antenna in the focus of the figure. ZikValera tried to do it optically by eye. I considered the focus to be the position at which the antenna's reflection "spreads out" to the maximum along the inside of the can. The authors presented a scientific approach. Let us add that during visual assessment it is necessary to look from afar - so that the lines of sight are parallel to each other - this is how the wave front behaves in real reception. So you can make the omnidirectional WiFi antenna directional, at the same time raise the gain.
Any antediluvian equipment turns into the right one with a skillful approach. It's funny to see landfills littered with plastic window frames. The picture shows the inability of society to fully use resources.
In the modern world, a wireless network is widespread, to which almost every home is connected. It happens that in a building of 2-3 floors, the signal in some rooms is weak or completely absent. One of the reasons for this situation is an incorrectly selected antenna for a device such as a router. At the moment, there is a large assortment of these devices. An antenna for a router with your own hands can also be made, but this requires certain skills and knowledge, which we will consider below and get acquainted with how the system itself works.
How the antenna amplifies the signal
The antenna is a passive amplifier, meaning it does not use external energy to amplify the signal. The signal is amplified due to the fact that the propagation of radio waves in space is redistributed. A classic rod antenna is capable of emitting a circular signal that has approximately the same power in all directions. The further from the transmitter, the worse the signal becomes. If necessary, the redistribution of the antenna radiation is available, which allows you to amplify the signal in a specific direction, weakening it in others.
There are many software methods to enhance the signal transmission of a wi fi antenna. The methods are as follows:
- Use WPA / WPA 2 protocol;
- Reduce the number of devices requiring the use of MAC addressing;
- Hide the wireless network name.
Legacy Security Protocol (WPA) makes your network not only less secure but also slower. You need to change the protocol to WPA 2, which is done in the router settings section. The limitation of the number of supporting devices also allows to significantly increase the power of the device. As for the MAC addresses themselves, these are identifiers. It is not recommended to leave the network open, since its quality directly depends on the number of connected devices (and if Wi-Fi is available, then everyone will be able to use it). To hide the name, uncheck the "Allow SSID transmission" checkbox in the setup menu).
Types of WiFi antennas
WiFi is a technology that is only capable of normal functionality with a "line of sight". The wireless signal is easily lost among obstacles such as cabinets, walls, mirrors, and so on. Therefore, if you want the network to work stably, you need to carefully consider the issue of choosing an antenna for a wi fi router.

There are two types of WiFi antenna: directional and omnidirectional (indoor and outdoor). Modern wireless networks are usually built around omnidirectional antennas. Their task is to distribute the signal evenly over the range. Often, such devices are in the form of a conventional pin that propagates a signal in a plane perpendicular to its axis.
Important! The omnidirectional Wi-Fi antenna can only be installed vertically. This provides the maximum coverage for the wireless network.
In some cases, coverage of a large area is required, for example, at a manufacturing facility. This is easily accomplished with an 8dB outdoor omnidirectional wifi antenna installed in a central building. The transmission radius of the powerful device is 600 meters.
Using a directional wifi antenna, a point-to-point network is organized. This device perfectly copes with its duties if you need to connect to only one access point or one computer.
Let's consider an example of work. Such an antenna is capable of “piercing” walls in a room. A panel type of device is often used, which is a flat rectangle that transmits radio waves in one direction. As for the gain, it sometimes reaches 6 dB. If it is necessary to transmit a signal, for example, to a neighboring house, then it is recommended to install an external antenna having a cylindrical shape. It is mounted horizontally, since it directs the signal in the direction where the receiver is located. In this case, the gain reaches 18 dB.
There are also parabolic antennas that transmit a wireless signal between similar devices over a distance of several kilometers. Such devices are relevant if signal transmission is required over a distance of more than 100 meters. The gain of parabolic antennas reaches 24 dB.
How to install an external antenna for a router
The first thing to figure out is where the router should be. After all, if there are obstacles in its path, then the reception signal is weakened. It should be understood here that each obstacle degrades the reception quality in its own way. For example, a concrete wall is much "thicker" for a router than a wooden one.
In short, for effective signal propagation, it is necessary to install the router in such a way that there are as few obstacles in its path as possible. The most suitable place is an elevation in the center of an apartment or house (omnidirectional antenna for Wi-Fi). If directional is used, then it is logical to direct it to the area where stable and high-speed Internet is required most often. The same goes for outdoor devices. It is recommended to follow the router firmware updates. It is better to use the latter, which corrects certain disadvantages of the work. Also, experts advise not to put the adapter near windows, mirrors and steel structures.
Do-it-yourself antenna
There are many different schemes on the Internet that allow you to make a directional antenna. One of the more popular examples is a 12dB double biquad. To assemble such a device, a copper wire (diameter - 2-3 mm) 30 cm long is useful. The reflector here is a plate of foil-clad getinax - pressed paper impregnated with an adhesive and covered with copper foil. It is not always possible to find such a metal, so it is replaced with any other, up to the lid of the system unit or an ordinary beer can.

First, a double eight from the wire is bent (the squares should have sides of 30 mm). To do this, the wire is marked into 8 equal parts and bent at the marked places by 90 degrees with pliers. As a result, a kind of do-it-yourself antenna is obtained, which looks like an eight.
Next, a reflector is cut out of the getinax plate. Two holes are drilled in its center - one for the antenna itself, the second for the wire. A distance of at least 15 mm should be maintained between the copper figure and the plate.
Next, you will have to work with the router itself, or rather, its small wi fi antenna. The wire must be removed, for which a small hole is drilled in the device case. A central wire is soldered to a homemade antenna in the form of a figure eight, and a winding is soldered to the leg.
If you wish, you can make an ultra-long-range wi-fi antenna. To do this, you need to find a foil sheet of getinax and fiberglass. It is important that the material is of good quality, of sufficient thickness and size. You will also need to use vinyl self-adhesive stencils with mounting film, which are necessary to protect the mentioned sheets from etching.
The rear reflector wall is made of any flat metal sheets. It can even be foil, as long as it is flat and even. First, you should mark the textolite and cut it with a grinder into two parts - 450 by 350 mm. Before starting etching, the sheet must be sanded with a fine grain. It is important to maintain a distance of 9 mm between the getinax reflector and the board, which is achieved by using flat plastic. Further, the resulting parts are glued together. A hole is left in the soft plastic, which will subsequently allow the wire to be soldered. Wires and connectors are available on radio markets. As for the choice of the connector, here you need to rely on the antenna of the router.
The result is a hand-made ultra-long-range antenna. From the access point at a distance of 1 km, the power of the device reaches 80 dB.
It is quite simple to amplify the signal, for this it is important to know certain subtleties and to make the installation correctly. So, high-quality communication is achieved by observing the following rules:
- To distribute the signal evenly throughout the room, the router should be installed as close to the center of the room as possible;
- The equipment should not be installed on the floor or near heating radiators, which will significantly impair the transmission of communications;
- The standard equipment of modern routers, as a rule, is omnidirectional, so it is recommended to purchase more powerful antennas;
- There are many methods to improve the signal with your own hands. The simplest is foil glued to the cardboard and installed in the desired direction;
- Replacing the adapter allows you to amplify the signal;
- If you install a repeater, this device will significantly increase the signal transmission range.
At the moment, almost everyone uses Wi-Fi, but not everyone likes the speed of the Internet. Fortunately, now there are many ways to improve the transmission quality, where the choice of a specific one depends on different parameters. It is also recommended to clean the registry from time to time, clearing it of unnecessary information.
In the modern world, a wireless network is widely used - wifi. For its operation, special equipment is installed - routers equipped with antennas. The latter are of several types, each with its own characteristics, advantages and disadvantages. Asking the question "how to make wifi faster", you need to understand that there are different ways, both free and requiring investment.
Video
I will show you how to assemble a very powerful antenna for receiving Wi-Fi, capable of receiving a signal over a distance of many kilometers, but at the same time lightweight and easy to assemble. Having crossed two popular antennas, a wave channel and a pouch antenna, I got the idea to create a Wi-Fi gun.
This antenna can be made from any sheet of metal. I used 0.3mm copper foil because it is easy to cut with scissors.
The parts of our antenna will be mounted on a hairpin, we need to cut 7 discs with a hole in the middle.

To do this, you need to place, punch or drill seven holes, and only then circulate the circle. If we do the opposite, then the drill can go to the side, but it is important for us that the hole is exactly in the middle.
We scratch out a circle according to the dimensions shown in the diagram and cut out our discs.
 Picture 1.
 You need to do it as accurately as possible, the deviation is only a millimeter and it will not work like that. The thickness of the metal and the diameter of the pin have almost no effect on the operation of our blaster and can be anything. Such circles are obtained (See Fig. 1) and after all the parts are cut out, we just need to screw them onto the hairpin, observing the size of the gaps between them.
This irradiator is easy to assemble as a constructor. We install the second plate of our
blaster at a distance as indicated in our diagram - 30 millimeters, tightening the nuts we select exactly our 30 millimeters.

On the last two discs, you need to make a hole for the wire. Our blaster is ready. Now it remains to connect it to our device. In the beginning it will be a USB modem, then we will connect it to a smartphone and finally to a router in order to distribute the Internet through our WI-FI gun.
To connect to a Wi-Fi whistle, you need to carefully disassemble the antenna so as not to damage the wire. Tinning the soldering points and soldering the wire to the outermost large disk, and the central core to the next one. We attach our gun to the bracket so that it is convenient to aim at the victim's router.
The gun catches the net even at a distance of 500 meters. Materials for a Wi-Fi gun are not expensive and are available to everyone.
Wi-Fi is a technology that can function normally only within line of sight. Wireless networks are easily lost among walls, furniture and other obstacles in an apartment. Moving an adapter or router around the house in order to increase the efficiency of the devices is not always possible. A more correct approach is to use an external, more powerful, antenna - the active part of the transmitting / receiving device.
Types of Wi-Fi antennas
In terms of use, all Wi-Fi antennas are divided into two classes:
- for outdoor use (outdoor),
- for indoor use.
These antennas differ, first of all, in their size and gain. Outdoor class implies large dimensions and the ability to attach to any support (surface). A high gain in such antennas is achieved by design features. Such devices are usually used for wireless data transmission between points that are at a considerable distance from each other. It is preferable to install them in the line of sight.
Depending on the type of antenna, Wi-Fi is characterized by a higher or lower gain - one of the most important parameters of any receiving and transmitting equipment
Indoor antennas are designed for indoor use and are smaller in size and do not offer outstanding gain and power. Internal antennas are attached either directly to the transmitting / receiving gadget, to the wall, or placed on the surface. The antenna is connected to the device board both directly and by means of a cable.
Additional Wi-Fi antenna in an apartment or house
The main reason for the need for an additional Wi-Fi antenna is to amplify a weak signal. This situation can arise in the following cases:
- the Wi-Fi access point is located at a considerable distance (if the room is large), there are obstacles (walls, ceilings);
- the router is not powerful enough.
Also, an additional Wi-Fi antenna may be needed if you need to organize a network "router - several client points", or if you need to connect several PCs "over the air".
DIY making
On the net you can find many recommendations for making various types of Wi-Fi antennas at home. As a rule, repetition of most designs does not require deep knowledge of radio electronics, scarce materials and specialized tools. You can make any of the Wi-Fi antennas according to the instructions below in just a couple of hours.
Double biquadrat
The "double square" antenna for Wi-Fi and its modifications is the most popular on the network. The classic biquadrat has a good gain and a wide radiation pattern. The dual biquad antenna, discussed below, has even better performance.
To repeat the design, you will need:
- copper mono-core (wire) with a cross section of 2 mm;
- a small sheet of aluminum with a thickness of 1–2 mm;
- a piece of rubber (vinyl) tube, plastic ties;
- soldering iron, solder, rosin, drill, drills, pliers;
- connection cable.
Making an antenna is not difficult, the main thing is to accurately maintain the dimensions, since even small deviations threaten to shift the operating parameters:
- We draw a sketch. The length of one side of each square is 30 mm, the dimensions of the reflector are 220 × 100 mm, and the distance between the active part and the reflector is 15 mm. We mark the holes.
Dual biquadratic - an improved version of the classic biquad antenna
- We bend the copper core strictly in accordance with the template. We clean (if the wire is varnished) and solder the ends.
Even a small slip in size (just a couple of millimeters) will degrade the quality of the antenna
- We make a reflector from an aluminum sheet. We drill holes with a diameter of 3-4 mm.
The reflector can also be made of copper plate or (at worst) steel sheet
- We attach the active element of the antenna to the plate with plastic ties through rubber tubes.
The posts for attaching the antenna to the reflector must be made of non-conductive material
- We fix the adapter (or cable, if the device is located remotely) with plastic ties. We solder the brought out wires. The distance between the contacts is 5 mm.
The adapter should be fastened as securely as possible, but carefully, so as not to damage the device
Of the advantages of this design, it can be noted:
- easy and fast production,
- Significant signal amplification and stable performance.
Perhaps the only drawback of such an antenna is that even small deviations from the required dimensions threaten to reduce its efficiency.
From an aluminum can
This design, of course, cannot be called a full-fledged antenna (in fact, it is a reflector), but it is capable of strengthening a weak Wi-Fi signal to some extent.
What you need:
- empty aluminum can,
- knife and scissors,
- a piece of plasticine.
In terms of the simplicity of manufacturing, an antenna from an aluminum can has no equal:
- Rinse the jar. Cut off the bottom with a knife.
Be careful during work, health is more expensive than even the most high-quality Wi-Fi antenna
- Make an incision at the top, but not all the way - leave an area 1.5–2 cm long uncut.
You can also break off the bottle opener at this stage.
- Use scissors to cut the jar lengthwise from the back.
An aluminum can is easily cut with any scissors, the main thing is that the latter are sharp enough
- Unfold the metal.
The opening angle can be selected experimentally after installation, focusing on the level of the Wi-Fi signal
- Fix the reflector to the device using plasticine, putting it on the standard antenna of the router. Point in the right direction.
In the absence of plasticine, use chewing gum
Pros of an aluminum can antenna:
- ease of manufacture,
- lack of scarce materials,
- universality (will work with any router with an external antenna).
Among the minuses, it is worth noting the insufficient signal amplification and the unstable directivity of reception / transmission.
Powerful sheet metal antenna
The sheet metal Wi-Fi antenna, known as the FA-20, is characterized by increased power and can be used to receive the signal of remote (up to several kilometers) access points.
To make it you will need:
- sheet metal;
- powerful soldering iron (100 W), solder, flux (soldering acid);
- dielectric stands, fasteners (screws, nuts);
- drill, drill;
- connection cable;
- metal scissors, wooden hammer, fine sandpaper, pliers.
Repetition of a design requires at least basic plumbing skills.
FA-20 Manufacturing Instructions:
- Using metal scissors, we cut out quadrangles and strips, strictly observing the indicated dimensions. It is advisable to sand the edges with sandpaper.
Antenna parts are cut individually and then soldered
- We solder the antenna elements. We use solder and special flux for soldering. It is more convenient to do this on a wooden surface.
Soldering of tin elements should be carried out in a well-ventilated area.
- We wash the finished structure under running water to remove acid. We drill holes with a diameter of 3-5 mm.
If necessary, align the antenna with a wooden mallet (mallet)
- We make a box. Dimensions - 450 × 180 mm. The height of the sides is 2-3 cm. If you do not have the skills of a tinsmith, in principle, you can do without the sides (losing a little in sensitivity) by simply cutting out a rectangle. We drill holes in it that coincide with the holes of the active elements. We fix the parts on racks, the distance between the parts is 20 mm.
Support posts must be made of insulating material
- We solder the cable: the red point is the central core, the blue one is the common one (screen).
To connect the antenna to the router, a regular TV cable is suitable
Pros of a homemade sheet metal antenna:
- high power,
- good focus,
- scarce or expensive materials are not required for manufacturing.
A significant disadvantage of the FA-20 is the complexity of its manufacture. In addition, the antenna is quite large and, most likely, is suitable for installation on a roof or balcony.
DIY Wi-Fi antenna variations
On the Internet, among the huge variety of homemade Wi-Fi antennas, the so-called "double square" and its variants are most often found. However, you can also see a lot of handicrafts that are different from the classics.
You can choose and try to make any of the antennas, but remember that not all of these products are really high performance, as the authors claim.
Photo gallery: other homemade designs
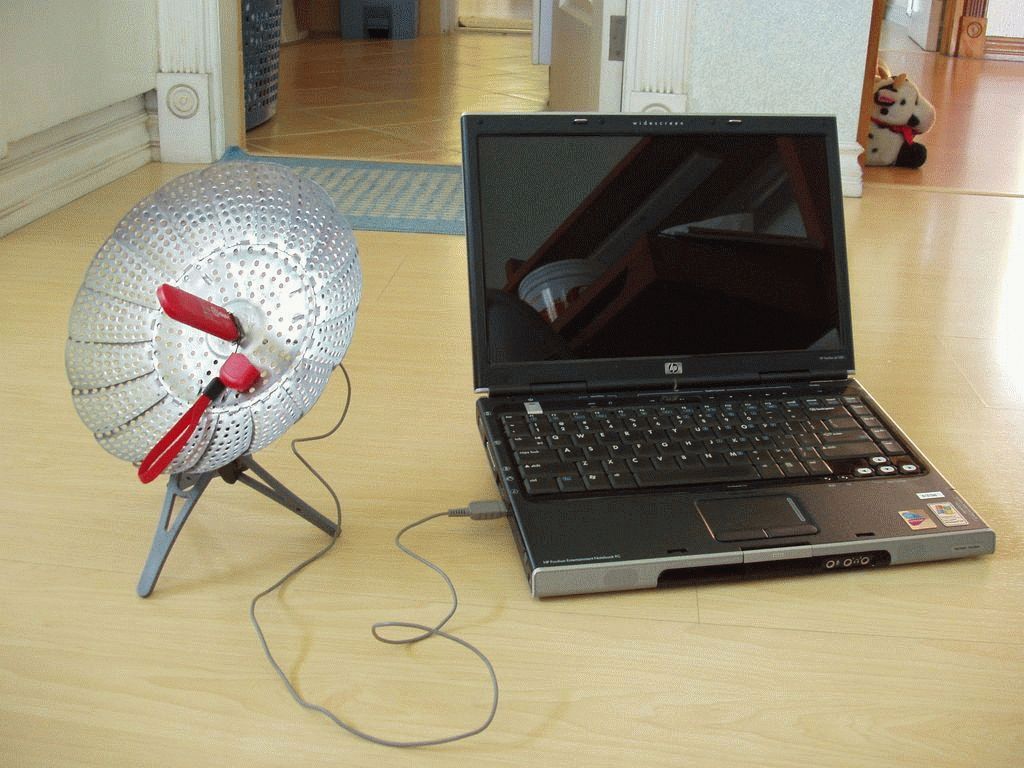
The MIMO antenna has two circuits inside one housing and, accordingly, two connectors for separate reception and transmission. This variation of the biquad antenna amplifies the signal many times. and on the street Antenna from cans looks original, but in fact it is not a very effective design A petal steamer in this design can be replaced with a colander or an iron bowl
Connection
The way to connect the Wi-Fi antenna depends on the type of router, adapter, or other device you are using. In most cases, you will have to open the gadget, find the place where the standard antenna is connected (soldered) and similarly attach (solder) a homemade cable. It is very convenient when the gadget provides for an independent connection of an external antenna, this can be done in the form of:
- connector in the battery compartment, on the back cover of the device, inside the case, etc .;
- the so-called pigtail (usually located directly on the device board).
If the adapter has a removable standard antenna, a homemade design can be connected instead of it.
In any case (excluding the option with soldering), you will need an appropriate connector-connector, which can be purchased at a radio store. You are lucky if your router has an output for connecting an external antenna headset. You can install the pigtail socket on the gadget body yourself if you are confident in your own strength. standard antenna
Customization
Setting up a homemade antenna for Wi-Fi comes down, first of all, to installing it in the right direction. In this case, the following conditions must be observed:
- take into account the signal propagation vector of the receiver / transmitter of the Wi-Fi signal;
- take into account the presence of obstacles between transmitting and receiving devices;
- take into account the fact that hard surfaces reflect the signal, while soft ones, on the contrary, absorb it;
- if possible, install the antenna within the line of sight of the receiver / transmitter.
For best performance, the antenna should point towards the access point.
At the setup stage, the cable length should be reduced as much as possible, so you get rid of unnecessary signal losses and improve its quality.
How to test your changes
The simplest and most affordable option for testing a homemade Wi-Fi antenna is to measure changes in the speed of the Internet channel. For this, a comparative study of the results is carried out alternately with a connected standard antenna and made by hand. You can take such measurements, for example, on the Speedtest resource. The system will automatically select the optimal server, check the ping, download and upload speed.
Video: Do-it-yourself Wi-Fi signal amplification
With the advent of Wi-Fi, many users have the ability to quickly and mobile Internet access. For stable operation of the wireless connection, it is recommended to use special expensive equipment, but you can get by with a little blood by assembling an external antenna with your own hands.
Instructions for making an antenna "double" Bi-Quad (double eight) W-LAN - 2.4 Ghz antennas for wi-fi.
The "Double Eight" is a continuation of the Bi-Quad, the gain of which is 2 dB higher, i.e. is approximately 12 dB. When building, pay attention to the fact that the copper wires do not touch at the intersections. After construction, it is advisable to varnish the "double 8" to avoid oxidation / corrosion. The importance of maintaining a distance of 15 mm between the reflector and the copper wire is illustrated by the two photographs below:


In order to avoid any questions (in the first post there were), we will consider the construction of an antenna with a circular diagram, in this case, something about 270 °.

First, a pipe with a diameter of 70 mm and a height of approx. 100 mm. Then bend a straight 6-element Quad from a copper wire and, using, for example, a bottle, give it a corresponding, curved shape. I repeat for those who read not very carefully: the distance from the copper wire to the reflector in a circle should be 15 mm! It is important that crossing wires do not touch each other!

Of course, this is not the only correct option for building such an antenna. An antenna with a pie pattern can be made larger,


In this case, signal loss in the antenna cable will be minimized.


Ideally, it should look a little different, something like this:

but this is not so important, the main thing is that you can repeat the dimensions by printing. For bending "double eight" - extreme squares are not used... Anyone who does not have a printer uses the following figure to make a frame: the dimensions are given for a wire with a diameter of 2.5 mm

The "Triple Eight" is another continuation of the "Double Eight", the gain factor of the "Triple Eight" can be 14 dB or a little more. This is how a painted "triple eight" looks, in general, not bad:


For beginners! Note that the posts supporting the antenna 15 mm from the reflector must be made of dielectric material!
The "double eight" and circular antenna discussed above can be mounted together in one housing:


From the other.

The antenna is covered. For the manufacture of the protective case, a piece of plastic pipe with a diameter of 125 mm was used, which is used in plumbing, the cover is made of 2 cm plastic. The upper fixing nut is made of plastic. You can paint in any color.


