In this article, you will learn several ways to open BIOS settings on Lenovo laptops, solve possible problems, and how to enter the Boot Menu.
Novo Button
In Lenovo laptops, next to the power button, there is a button with a curved arrow icon. It is called Novo Button, OneKey Recovery or OneKey Rescue System. Turn off the laptop, and instead of using the power button, turn it on using this button.
The Novo Button Menu will appear on the screen. There you can use the arrows to select the BIOS boot or Boot Menu.

Select "BIOS Setup", press Enter and get into the BIOS.

Keyboard shortcut
The second way is to press a key combination during power-up to start the BIOS. On Lenovo laptops, these are most often the Fn + F2 or Fn + F1 buttons. During loading, button combinations are usually written.
Sometimes it helps to hold down the combination of Esc + F1 + Delete buttons when turned on, the “Startup Interrupt Menu” will open, press F1 to get into the BIOS.

Another way is shown in the video - you need to have time to press Enter when loading:
Often people make a mistake at this stage. Press the shutdown, the computer seems to turn off. Then they turn it on, press the buttons and nothing works, the OS loads. In fact, the laptop goes into hibernation mode, since Windows 8.1 defaults to the fast startup settings. To avoid this problem, just open the BIOS when you restart your computer.
Sometimes on built-in video cards the menu is not displayed at boot, the button tips are not visible. In this case, try connecting a separate monitor/TV via HDMI or VGA output, or use another method.
Open from Windows
BIOS can be opened through Windows. It can be useful when the keyboard does not work. Works on Windows 8, 8.1, 10.
Open Start - Settings.
Select Update & Security.
On the Recovery tab, in the Special Boot Options section, there is a Restart Now button. Click it, the system will reboot and show Windows startup options.

Select "Troubleshooting" (Diagnostics) - "Advanced Options" - "UEFI Firmware Settings".


If you are unable to log into Windows, but the login screen appears, you can also open the BIOS. Press the power button, hold Shift and click Restart. Special system boot options will open, further steps are described above.

If the BIOS does not open
There is a problem on Lenovo laptops: if you erase the old version of Windows and put another system on a clean hard drive, the BIOS stops opening by any means.
Solution:
Unplug your laptop and remove the battery. Unscrew the laptop cover from the back and remove the round battery for 15 minutes. This will reset the BIOS settings. Plug everything back in and turn on your laptop.

A couple of errors will come out and the computer will enter the BIOS itself. On the Startup tab, change the item "UEFI / Legacy boot" to "Both". In the next item of the settings "UEFI / Legacy Boot Priority" should be "Legacy".
Now we save everything: on the “First Restart” tab, click “Exit Saving Changes”.
Boot menu
If you want to open the BIOS to change the boot disk (for installing the OS), it is not necessary to enter the BIOS for this. You can open the boot menu (Boot Menu). On Lenovo laptops, this is done by pressing Fn + F12 (when the computer is restarted).
Not always when you turn on the headphones, the sound in them has an optimal volume. Sometimes the smartphone barely whispers and the sound has to be increased. Sometimes - screams so that even those standing nearby are frightened. This may be due to an incorrectly performed preset of the gadget's internal service settings.
Of course, you can adjust the sound strength each time, but this is the wrong approach. It is better to adjust the volume in the smartphone (as well as other parameters) immediately, tweaking these settings a little. However, this must be done correctly and carefully, because you can not only improve the performance of the speaker, but also worsen it.
Install a special application
It is best to cope with setting the parameters (clickable). This program can be downloaded online by simply entering the name into a search engine. If you could not find or install this program, then try entering the universal code. To do this, open the dialing tab and enter the following code:
- *#*#3646633#*#
Implementation of the setting


Access to the MTK engineering menu provides the "engineering" mode. Entering it through the "Engineer Mode (MTK)" item. Now you can change many system parameters, in particular, the sound volume in the headphones after turning on. (Hardware Testing, subsection Audio).


In this section, you need to decrease or increase the volume on Lenovo, which appears when you turn on the headphones. Select "Headset mode" and change "Max vol".


When you have finished making changes to the system, you must confirm them (SET) so that they are saved in the system. Of course, you need to remember to turn on the music during setup to determine the desired volume.
Do not abuse the maximum volume - listening to loud music with headphones can greatly affect your hearing, degrade the sound or damage the speaker.
ATTENTION:
And a little advice on settings: before changing any parameter, remember its default settings. It is possible that you will have to return to them after unsuccessful attempts to do better.
Why rooting an Android device is needed and what opportunities it gives is known to a fairly large number of users, which cannot be said about the hidden advanced menu of hardware settings, also called the engineering menu. Few people know about these settings, and even fewer mobile device owners know how to use them. What is the Android engineering menu and why is it needed?
The Android engineering menu is nothing more than a special subroutine designed for developers to test the operating system and device sensors. The interface of this program is represented by a set of options that allow you to change the hardware configuration of the mobile device. With its help, you can get comprehensive information about the hardware of the gadget, test the processor, operational and physical flash-memory, wireless connection modes, adjust the settings of the camera, display, microphone, speakers, and much more.
Entering the engineering menu
All this, of course, is good, but how to enter the engineering menu if there is no corresponding option in the Android interface? Entering the advanced hardware settings menu is carried out using a special code entered in the line for dialing a telephone number. The menu should open immediately after entering the last character of the combination, but in some cases it may be necessary to press the call button.
There is nothing complicated in the procedure itself, however, it should be borne in mind that there are codes for different models of mobile gadgets. Below we have provided a list of codes for the most popular manufacturers.
The engineering menu codes in Android are universal, however, their correct operation on phones with "left" firmware is not guaranteed. You can also use special programs to access Android hardware settings, for example, "MTK Engineering Menu" or "Mobileuncle MTK Tools".

Such applications are especially useful on tablets, the firmware of which does not provide for the presence of a “dialer”. The interface and the set of available options in these programs are somewhat different, however, it will not be difficult to deal with them.
Whichever method you use, you need to exercise maximum caution when working with the engineering menu. Before starting work, it is strongly recommended to write down all the values of the original parameters in order to be able to restore the settings. Experimenting with the engineering menu just to find out what will come of it is unacceptable, as you can render your device unusable!
To get a list of engineering codes for a specific phone model, you can use a special application Secret Codes available on Google Play. On some models of mobile devices, full access to the engineering menu may require superuser rights (root).
What can be changed using the menu
You know how to get into the engineering menu, now let's find out what settings you can make with it. The possibilities are more than wide. The menu subroutine supports changing the speaker volume and microphone sensitivity, built-in camera settings, audio settings, GPS, Bluetooth and Wi-Fi modules, turning off unused frequencies to save battery power. You can also test key components of your device and an external memory card, adjust I / O operations, determine the exact temperature of the processor and battery, and determine the level of harmful electromagnetic radiation.
Another useful feature is access to the recovery mode - an analogue of the BIOS on computers, which in turn contains a whole set of settings. Recovery Mode features include resetting the device to factory settings, updating the firmware, creating a backup copy of the operating system, gaining root access, deleting sensitive user data. It is not possible to list all the options of the engineering menu within the framework of one article, the more sensors and components in the phone or tablet, the more extensive it will be.
Increase the volume of the phone through the engineering menu
And now we will demonstrate how to work with hardware settings using the example of one of the most popular operations and find out how to increase the volume on Android through the engineering menu. So, go to the menu using Mobileuncle MTK Tools or by entering the “magic” code, then find and open the Audio subsection. If you entered the menu through the Mobileuncle Tools program, this subsection will be located in the Engineer Mode high-order section, in other cases it is usually located on the Hardware Testing tab.

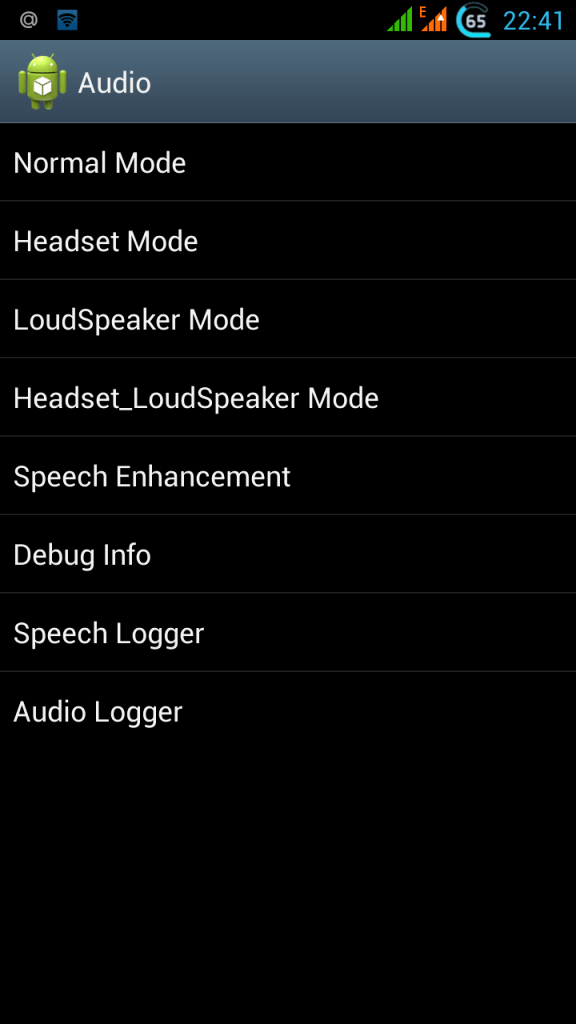
In the Audio subsection, the following options will be available to you:
- Normal Mode - the normal mode that works when a headset is not connected to the device.
- Headset Mode - headset mode, which is activated when headphones or speakers are connected to the smartphone.
- LoudSpeaker Mode - loudspeaker mode. Activated when the speakerphone is turned on, provided that a headset is not connected to the device.
- Headset_LoudSpeaker Mode - loudspeaker mode with a connected headset. The same as the previous one, but with headphones or speakers connected.
- Speech Enhancement - this mode is activated when talking on the phone without using the speakerphone.

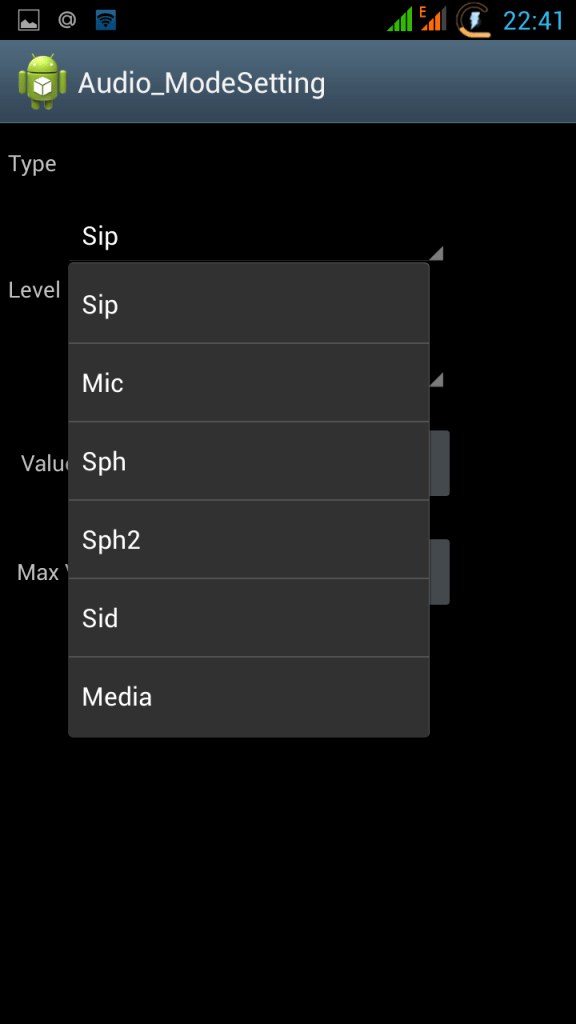
There may be other settings in the section, for example, Debug Info and Speech Logger, but it's better not to touch them. Select the mode for which you want to change the volume level (let it be Normal Mode), select Type in the list that opens and indicate for which function we will change the volume. The following functions may be available:
- Ring - volume setting for incoming calls;
- Media - adjust the volume of the speakers when playing multimedia;
- Sip - sound settings for Internet calls;
- Sph - sound settings of the conversational speaker;
- Sph2 - sound settings of the second conversational speaker (option may not be available);
- Mic - change the sensitivity of the microphone;
- FMR - FM radio volume settings;
- Sid - it is better not to touch this parameter, otherwise there may be problems with the voice of the interlocutor.
Having selected a function, scroll through the current list, set the desired Value (from 0 to 255) and click to apply the new Set settings.

To change the volume level, you can also use the preset templates - the Level option. Most phones have seven levels, from 0 to 6. It is advisable not to touch the Max Vol setting, just as you should not set too high values for Value, otherwise the sound in the speakers will begin to wheeze. Other modes are configured in the same way in the Audio subsection.
Some models of smartphones and tablets require a reboot for the new settings to take effect.
Reset
And the last thing we'll look at today is resetting the engineering menu settings to factory defaults. It may be needed if, after making changes, the device began to work incorrectly. There are several ways to reset. If the system boots normally, go to the settings and open the "Recovery and Reset" subsection.


You can also reset the engineering menu by entering a special service code in the “dialer”. This is usually *2767*3855#, *#*#7780#*#* or *#*#7378423#*#*, but your phone model may require a different code.
Another option is to use the recovery mode, which was mentioned above. To get into it, use one of these combinations:
- Power button + volume down.
- Power button + volume up.
- Power button + Home button + volume up/down.
- Power button + volume up + volume down.
In the list of options that opens, select "wipe data / factory reset" → "Yes - delete all user data" → "reboot system now". The device will reboot and the settings will be reset.


There is another way to reset the engineering menu settings, but it requires superuser rights. Using any root-enabled file manager, navigate to the root directory of the system, and then delete all or part of the contents of the folder data/nvram/apcfg/aprdcl and reboot.

Files in a folder aprdcl just responsible for the settings of the engineering menu. It is not necessary to delete all files at once. If you screwed up, say, with the audio settings, to restore the original settings, it is enough to delete the files that have the audio string element in their names. And one moment. Regardless of how you reset it, always back up your personal data and apps as they can all be lost.
Some smartphone owners complain that they can’t hear the interlocutor well, music is played quietly through the speaker. There are several ways to increase the speaker volume on Android. Volume swing is not the only possible method.
Smartphone owners who have difficulty distinguishing the interlocutor's words during conversations will be helped by information on how to increase the volume on Android through the engineering menu. In it, you can adjust the volume of the conversational speaker, headphones.
Initially, the engineering menu is hidden from users. This is explained by the fact that it is necessary only for experienced smartphone owners who fully assume responsibility for possible problems with the electronic device.
The engineering menu is available only for owners of smartphones on the MediaTek processor. To activate it, there are special codes that may differ depending on the brand of the device. 
You need to enter the codes as a regular number or USSD request. There is another way to call the engineering menu - using special applications.
- The most popular is MTK Engineering Mode.
- There is another free application - "Launching the MTK engineering menu".
The choice of method will practically not affect the algorithm of actions, how to increase the volume of the speakers. After entering the engineering menu, you need to enter the MTK Settings section, then select Hardware Testing Audio. After that, a list consisting of 8 categories will open. Of these, 5 are categories for increasing or decreasing the volume of sounds.
- Normal mode. In it, the phone works constantly when no peripheral devices are connected to it.
- Headset mode, its activation occurs when you connect speakers or headphones.
- Hands-free mode, android starts using it when nothing is connected to the smartphone and the user switched to speaker mode when calling.
- Hands-free headphone mode. The mode is activated when a person switches to loudspeaker mode with headphones connected to an electronic device.
- Volume during a call. Its activation occurs when a person is talking to someone in normal mode and no additional devices are connected to the phone.
In any of the above categories, when selected, several sections will open.
- Microphone.(Mic)
- The first and, in some smartphones, the second auditory speaker. (Sph, Sph2)
- Sid - it is not recommended to change the values of this parameter, otherwise you can achieve the effect when a person during a conversation will hear himself, and not the interlocutor.
- media regulation. (Media)
- Adjust the volume level of incoming calls. (Ring)
- Some smartphones have a radio volume setting. (FMR)
Examples
For example, if the interlocutor can hardly hear you, you need to increase the volume of the microphone.
To do this, select Mic and the maximum Level, which indicates the maximum volume swing step, then change the values \u200b\u200bin the Value section, thereby increasing the volume of the microphone. After that, press Set. If the Setting success window appears, the values have been changed and you can test them.

If a person’s smartphone does not have a high volume of incoming calls, you need to do the following. You will need to go to the engineering menu of the electronic device, go to the Audio section, then go to LoudSpeaker and select the Ring value. After that, for each step of the volume swing, you need to increase the values. It is not recommended to set the maximum, for example, at a maximum of 160, it is advisable to set no more than 156. Otherwise, the speaker will make wheezing and noise during a call.
Finally
After any changes to the Value values, do not forget about the Set button, otherwise the actions will not be fixed and applied. Also, after applying the new settings, some smartphones need to be rebooted and only then tested the new values.
Experienced smartphone users recommend overwriting the standard values before making any changes. This will return everything to its place in case of unsuccessful adjustment of the volume of the smartphone.
If the article was useful to you, do not forget to bookmark (Cntr + D) so as not to lose it and subscribe to our channel!
Good day!
Recently, there have been a lot of questions with the BIOS regarding the brand of Lenovo laptops. The fact is that on laptops of this brand (on some models) there is a rather non-standard entry into the BIOS (because of this, even those users who do not have a first laptop sometimes get into a stupor).
In general, you may need to change BIOS settings for a number of reasons. For example, if you need to install Windows, to get information about the hard drive, laptop serial number, turn on / off some device (say, a sound card or function buttons).
In this article, I will consider several possible options for entering the BIOS on laptops of this brand. I think the article will be useful to all users who have encountered this problem ...
Ways to enter the BIOS
1) Standard "hot" keys for entry
On the vast majority of laptops of this brand - the button should work F2 or F1(you need to press immediately after turning on the laptop. Model range: ThinkPad, IdeaPad, 3000 Series, ThinkCentre, ThinkStation).
In some models - may require pressing a combination of buttons Fn+F2(e.g. in G50) .
Addition. The F12 key (Fn + F12 - entering the Boot Menu) is very rare - to enter the BIOS (Lenovo b590 model). I recommend trying it as well.

If you failed to log in this way, read the following recommendations.
2) Special recovery button "with an arrow"
Some Lenovo laptop models have special buttons on the device to enter the BIOS. We are talking, for example, about these: g505, v580c, b50, b560, g50, g500, g505s, g570, g570e, g580, g700, z500, z580, Z50, B70 and others.
When they are turned on, they may not react at all to your pressing the F2 buttons. To enter the BIOS, in this case, you need to use a special button Recovery (with arrow) . You need to press it instead of the power button (i.e. when the laptop is turned off).
The button is located Recovery on the body of the device, next to the power button (on some models, this button is located on the side).


After you click on this "arrow" button, the laptop will turn on and you will see a small service menu (usually consists of several items): Normal startup (normal boot), Bios Setup (BIOS settings), Boot Menu (boot menu, for example, to boot from a flash drive without changing the boot queue), etc.

After your choice bios setup- you will go to the most common BIOS settings (as in other laptops) and you can set the necessary parameters.
If you have a blue ThinkVantage button on the body of the device - then you need to press it immediately after turning on the laptop - while the greeting is still on and the brand of the device manufacturer is shown (see photo below).


4) A hole instead of a recovery button and ThinkVantage...
A number of Lenovo laptop models do not have any buttons at all, but there is a small hole on the side of the device (usually where the power is connected).
For example, the Lenovo 100 laptop does not have a recovery button (which has an arrow) at all. There is a small hole (the same arrow next to the hole). The button itself is located in this hole, in order to press it - you need to use, for example, a paper clip or a knitting needle.

Manufacturers, apparently, are trying to exclude accidental button presses - after all, the vast majority of users have to enter the BIOS very rarely.
About some glitches...
1) Some laptop models do not allow you to enter the BIOS if it is running on battery power. I can not say that this is a 100% glitch - but the setting is very controversial. To check for sure - connect the device to the network and try entering the BIOS using the methods described above.
2) The Lenovo v580c model sometimes has a very unpleasant glitch: if you cleared the disk and installed a new Windows, the BIOS entry buttons will stop working for you.
To enter the BIOS again (instruction for advanced users!) - turn off the laptop, then unplug it from the mains, remove the battery. Next, remove the cover and remove the small battery from the mat. fees. After 5-10 minutes - assemble the device.
When you turn on the BIOS will be loaded automatically to set the basic settings. You need to open the "Startup" tab: in the item with the "UEFI / Legacy boot" setting, there are three options (Both, UEFI Only, Legacy Only) - you need to select "Both". In the "UEFI / Legacy Boot Priority" item, you need to set "Legacy". Next, save the settings and restart the laptop. Everything should work as expected.
Suggestions on the subject are welcome...
That's all, good luck!