For novice users, installing windows and programs is a rather laborious process, so we will consider installing an unlicensed assembly like ZVER, because. the process of installing windows and programs in this case will be automated to the limit and require minimal actions from the user. Windows-xp assembly ZVER is intended for installation on computers with a processor from 1100 MHz, from one to four cores, (32 bits), with 500 MB of RAM. up to 3.7 GB. , with DVD drive. (when installed on more modern computers, part of the power will not be used, when installed on weaker ones, the work will be noticeably slowed down). Initially, it is necessary to set the boot priority from the drive in the BIOS of the computer - to do this, enter the BIOS settings, for which, immediately after turning on the computer, press the DEL, or F2, or other key on the keyboard (the way to enter the BIOS is usually indicated on the initial screen immediately after turning on). Using the arrow keys and the ENTER button on the keyboard (for older computers, other keys can also be used to set boot priorities - for example, plus and minus, or page up and page down - see the prompts on the screen), find the BOOT menu item, set it first ( FIRST) the boot device is the drive, the second is the hard drive. For older computers, select ADVANCED, set priorities - FIRST-CD-ROM, SECOND-HARD DISK. If there is more than one hard drive in the computer, then before installation, only one should be left - the one on which Windows will be installed, for which disconnect the connectors from the remaining hard drives (all switching inside the computer should be performed with the power turned off), otherwise it will be necessary to additionally set the priority hard drives (hard drives can be reconnected after installing Windows), it is also recommended to disconnect the card reader, if any (remove the card reader connector from the motherboard) and remove the flash drives, if they were inserted. To exit the BIOS, press F10 (exit with saving changes) or ESC (exit without saving changes). In case of erroneous user actions - incorrect settings in the BIOS, the computer may not turn on or work incorrectly (even failure is possible - for example, when trying to overclock the processor). To cancel changes to BIOS settings, you must reset the BIOS - i.e. return to factory default settings. To do this, on the mat. board, find the BIOS reset jumper jumper (usually located near the battery), with the computer disconnected from the network, put it in the CMOS CLEAR position for a few seconds, then return the jumper to its place, turn on the computer. If the jumper cannot be found, then with the computer turned off, remove the CMOS battery for a while (from several minutes to a day, depending on the capacitance of the capacitor installed in parallel with the battery), then reinsert the battery. After setting the priority, install the ZVER disc into the DVD drive. Before installing Windows, it is recommended to check and, if necessary, restore the hard drive using the Victoria program. It is also recommended to check the RAM using the memtest program (the check programs are located on the ZVER disk, they are launched from the boot menu). To install Windows, you should choose a hard drive that has the least wear and the highest speed. To install windows and programs in the boot menu (it appears for a few seconds), select the item - automatic installation of windows, press ENTER. Installing windows and programs takes about 3-4 hours. During the installation process, you will need to set the volumes of partitions (logical drives) of the hard drive - using the prompts on the screen, delete all partitions of the hard drive, then create - drive C - recommended volume, depending on the total capacity of the hard drive - from 12000 MB to 25000 MB, drive D - all the rest of the capacity. It is not recommended to create only one section - because. in this case, working on a computer will not be very convenient. One partition is created only if a small hard drive is used - less than forty GB, or if a separate physical hard disk is used for Windows. Then the installer will prompt you to choose formatting drive C - choose to format in NTFS (FAT formatting is used for very small drives - no more than a few GB). Also, during the installation process, some more prompts will appear - no action is needed, the default settings will be selected. After an automatic reboot, the boot menu will appear again - you don’t need to select anything, by default it will boot from drive C, the installation will continue. After installing Windows, after a while a menu will appear asking you to select programs - if you are not sure, then you also do not need to take any action, the set of programs required by the user for the first time will be automatically installed - various office applications, codecs, plugins, browsers, players, etc. .P. The USB GUARD program will be installed as an antivirus to prevent viruses from entering from flash drives and disks. It is recommended to install an antivirus - for example, avast, NOD or another (free avast antivirus can be found on the Internet on the website of the avast manufacturer - when registering for an arbitrary mail address, a trial registration for a month will be given). After installing windows and programs, remove the ZVER disk, restart the computer, go to the device manager - make sure that all the drivers are installed and the computer devices are recognized correctly. If drivers are not installed on any device (they will be marked with an exclamation or question mark), then install the driver assembly disk into the drive, following the instructions on the screen, install the drivers, then restart the computer. Then install the drivers for the printer, MFP or other external devices connected to the computer. To do this, use disks with drivers from the device kit, if there are no drivers, find drivers on the Internet, on the websites of the manufacturers of these devices. After installing Windows, enter BIOS, install the hard drive as the first boot device, save changes and exit. If additional hard drives were disabled, then connect them. Format drive D and other drives, if any. Create folders on drive D - for example, IMAGES, DOCUMENTS, MISC, MUSIC, VIDEO, PHOTO or others. After installing all the necessary programs, games and drivers, defragment drive C. The defragmentation program should be run for each hard drive every few months - this will reduce hard drive wear and increase speed. The disk error checker can be run as needed, such as after a sudden power outage. Go through the control panel to the screen settings, set the required resolution and frame rate. Set the desired desktop background, set the desired screen saver and the time for the screen saver to appear, as well as the time to turn off the monitor and put the computer into sleep mode. Then, in accordance with the instructions of your provider, connect the computer to the Internet. Through the start menu - programs - install on the desktop shortcuts to the programs you most often use - for example - WORD, browser shortcut, NERO EXSPRESS and others. Games should not be installed on drive C, which will be offered by default, but on drive D (if available) or another, in a separate folder, for example, in the game folder. It is also recommended to enable the system recovery option (start menu-control panel-recovery). in the event of a system failure, it will be easy to return the system to its previous state. To restore the previous state, you should run the recovery program through the start menu - control panel - recovery. Or, immediately after turning on the computer, press F8, select the SAFE MODE item in the menu that appears, boot into safe mode and repair system damage. Windows should be reinstalled if the system disk is replaced, or if the system is significantly damaged, for example, by a virus.
The article deals with AMI BIOS. For motherboards with AWARD/PHOENIX BIOS and UEFI/EFI, this step will look different. We boot into the BIOS (immediately after the computer has turned on and the image has gone to the monitor, press the Delete button on the keyboard, (on laptops and some motherboards there is F2 or ESC) and select the "BOOT" tab (boot).

Set opposite 1st Bootdevice (1st boot device) CD / DVD drive * (by pressing enter and selecting from the list). After that, you need to save the settings and reboot (in this case, by pressing the F10 button and confirming with the Y key).
* - if you made a bootable flash drive, then select it
Installing windows 7 from bootable dvd
To install Windows 7, we need a license disk. First of all, you need to decide on the bit depth of the x32 or x64 system. First of all, the bit depth affects the maximum possible amount of memory used (RAM and video memory). A 32-bit system will not see more than 4096 MB of memory, and it will not be able to work fully at all with more than two gigabytes. On x64 systems, 1.8412^12 MB is available. In addition, some new software versions require only the Windows x64 operating system. (32-bit applications run on a 64-bit system in x86 emulation mode at almost the same speed as in native environment).
As a rule, everything install windows 7 ultimate (maximum), however, there is no significant difference between the versions for the home computer. It is best to install through the BIOS (booting from the disk) and format the disk that will host the operating system. In the event that there is only one logical disk on the hard disk, and there is important information that is undesirable to delete, you can carry out a new installation without prior formatting. However, it is recommended to split the hard drive into at least 2 logical disks. About 100 GB is needed for the operating system and application programs. The system can be installed on 40GB, but you will have to regularly clean up files and programs to free up space for system needs.
We reboot the computer with the DVD disc inserted inside with the Windows 7 installation files. When the text "Press any key to boot from CD or DVD" appears on a black background, quickly press any key to start booting from the disk. After that, a window will appear:

If this is the original windows 7 installation you can click the "install" button If you need to fix the failure in the system, then you should click "System Restore". If the distribution kit is non-original, very often at the next stage a window for choosing operating systems pops up. You can choose from the following versions: Home Basic, Home Premium, Professional, Ultimate, and Starter for the x86 distribution. For a user who bought a Windows 7 license, you need to select the version that is written on the sticker pasted on the computer:

You should know how home versions differ from each other:
| Version name: | Initial | home Basic | home extended |
| Purchase conditions: | Only for OEM licenses | Retail and OEM licenses (Emerging markets only) | Retail and OEM licenses |
| End of support: | 13.01.2015 | 13.01.2015 | 13.01.2015 |
| 64 bit version: | Not | Yes | Yes |
| 2 GB | 8 GB | 16 GB | |
| No domain support | No domain support | No domain support | |
| Join only | Join only | Yes | |
| Windows Aero interface: | Not | Basic theme only | Yes |
| Multiple Monitors: | Not | Yes | Yes |
| Not | Yes | Yes | |
| Not | Yes | Yes | |
| Desktop Manager: | Yes | Yes | Yes |
| Windows Mobility Center: | Not | Yes | Yes |
| Not | Not | Yes | |
| Windows Media Center: | Not | Not | Yes |
| Additional games: | Not | Not | Yes |
| Windows XP emulator: | Not | Not | Not |
| Not | Not | Not | |
| Not | Not | Not | |
| Not | Not | Not | |
| Domain connection: | Not | Not | Not |
| Ability to move to: | Not | Not | Not |
| Not | Not | Not | |
| AppLocker: | Not | Not | Not |
| Not | Not | Not | |
| branch cache: | Not | Not | Not |
| Direct Access: | Not | Not | Not |
| Not | Not | Not | |
| Not | Not | Not | |
| Not | Not | Not | |
| Not | Not | Not |
Versions for work:
| Version name: | Professional | Corporate | Maximum |
| Purchase conditions: | Retail, OEM and volume licenses | Only for corporate licenses | Retail and OEM licenses |
| End of support: | 14.01.2020 | 14.01.2020 | 13.01.2015 |
| 64 bit version: | Yes | Yes | Yes |
| Maximum RAM size for 64-bit versions: | 128 GB | 128 GB | 128 GB |
| Windows Recovery Center: | Yes | Yes | Yes |
| "Homegroup" function, creating and joining a group: | Yes | Yes | Yes |
| Windows Aero interface: | Yes | Yes | Yes |
| Multiple Monitors: | Yes | Yes | Yes |
| Fast User Switching: | Yes | Yes | Yes |
| Change desktop picture: | Yes | Yes | Yes |
| Desktop Manager: | Yes | Yes | Yes |
| Windows Mobility Center: | Yes | Yes | Yes |
| Improved handwriting recognition and multitouch: | Yes | Yes | Yes |
| Windows Media Center: | Yes | Yes | Yes |
| Additional games: | Disabled by default | Disabled by default | Yes |
| Windows XP emulator: | Yes | Yes | Yes |
| EFS data encryption system: | Yes | Yes | Yes |
| Printing based on location information: | Yes | Yes | Yes |
| Ability to act as a remote desktop host: | Yes | Yes | Yes |
| Domain connection: | Yes | Yes | Yes |
| Ability to move toVista or XP under Windows 7 license : | Yes | Yes | Yes |
| Support for multiple hardware processors: | Yes | Yes | Yes |
| AppLocker: | Not | Yes | Yes |
| BitLocker and BitLocker To Go: | Not | Yes | Yes |
| branch cache: | Not | Yes | Yes |
| Direct Access: | Not | Yes | Yes |
| Subsystem for running Unix applications: | Not | Yes | Yes |
| Multilingual User Environment: | Not | Yes | Yes |
| Booting from the Microsoft Virtual PC VHD image file: | Not | Yes | Yes |
| Launch snap-ins lusrmgr.msc (Local Users and Groups), gpedit.msc (Local Group Policy Editor), secpol.msc (Local Security Policy): | Yes | Yes | Yes |
Therefore, we choose the distribution kit that we need (if there are options with the bitness of the system, then the choice depends on the factors indicated above).
We accept the license agreement and then select the installation method - full installation.
Next, we mark up the hard drive (the "disk settings" button)

If the hard disk has not been allocated, then click create and set the desired disk size (in this case, a small 100Mb disk with the system files necessary to boot the system will be additionally created)

If the disk has already been partitioned, then select the one on which the operating system was previously, click format, after completion - select this partition and click next.


Options for updating the operating system via the Internet. If you use a connection with limited Internet access, it makes sense to disable automatic updates altogether.
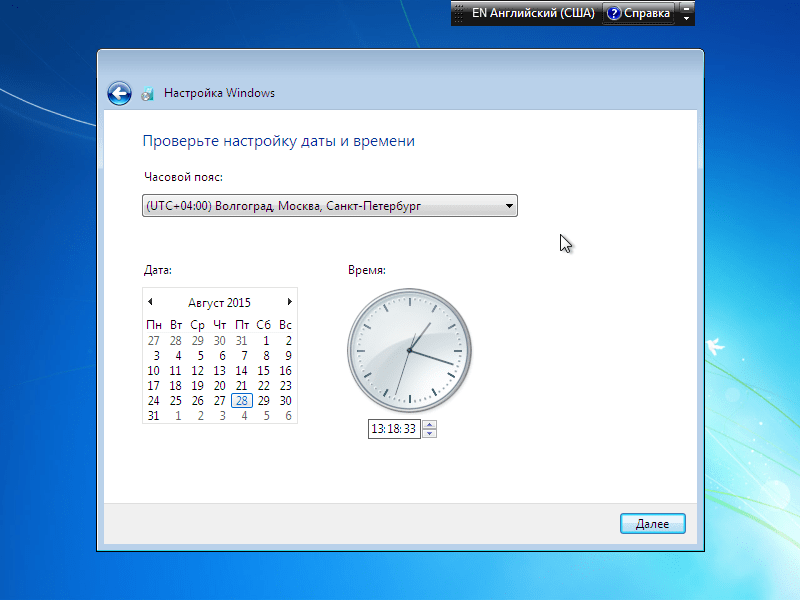
Choose time and timezone

We select the type of network, if local access to this computer is not provided, then it is better to choose a public network

It remains to activate the system and install the drivers. Everything!
We also provideWindows installation services with departure across Minsk.Installation prices
Read 12045 once Last modified on Saturday, 02 March 2019 17:46
In today's article, I would like to show you that installing Windows 7 on a computer is easy. You may even notice that in this guide, I'm not so much explaining the steps to install Windows 7 as simply showing them. As far as everything is clear, the developers have done for a novice user. If you're ready, let's get started.
What we need:
- Windows 7 disc
- A computer
- Forty minutes of free time
Installing Windows 7
Training:
To install on a Windows 7 computer, we need to run the installer, which is located on the installation disk. To do this, it is necessary that at boot time, the computer boots from the CD drive. Boot priority is configured in the BIOS. Since there are many BIOS versions, it is impossible to describe its settings for each computer. If you don't know how to get into the BIOS on your computer, you can read how I did it on one of my laptops in the article "" or read the article. After you set up your computer, turn it on.

Upon completion, a window will appear with a choice of system language, time format and currency, keyboard layout.

If everything suits you, leave it as it is and click the "Next" button.

In the next window, just click "Install"

Accept the license agreement and click "Next"
The next step is to select the Windows 7 installation type.

Since we need to install Windows 7 and not reinstall it, we need the option "Full installation (advanced options)"
The hard drive setup program will launch.

Now we need to create two partitions (but in the end there will be three of them): one system for Windows, the second for your documents, music, images, and other files. Click "Disk Setup"
Select "Create" to create a new partition.

This will be the system partition, which is known to everyone as "Disk C". It is recommended to allocate 50 GB for it. But we enter 51300 MB in the "Size" field (in one Gigabyte there are 1024 megabytes, 50 * 1024 + 100 = 51300).

Why another 100 MB? Now you will know. Click "Apply".

At this point, a warning will appear stating that Windows will create an additional partition for its needs. It will take 100 MB. We agree.
After the operation is completed, two partitions will appear for 100 MB and 50 GB.

Do you understand why we indicated 100 MB more? So that after Windows creates its partition, for drive C, an even number remains. But if you do not bother with even numbers, you can not calculate everything up to a megabyte.
Now let's create a partition for our files. We poke the mouse on an unoccupied place and click "Create" again.

We do not touch the "Size" field, but simply click "Apply". After that, the same partition needs to be formatted.

We have created all the partitions, now we select a 50 GB partition for the system to install on it


We just have to wait until the installer unpacks the files and installs the components. After installing the updates, the computer will restart (During the download, do not press anything). When the installation of Windows 7 is complete, the computer will restart again.
User setting:
Now enter the username and computer name.

We create a password.

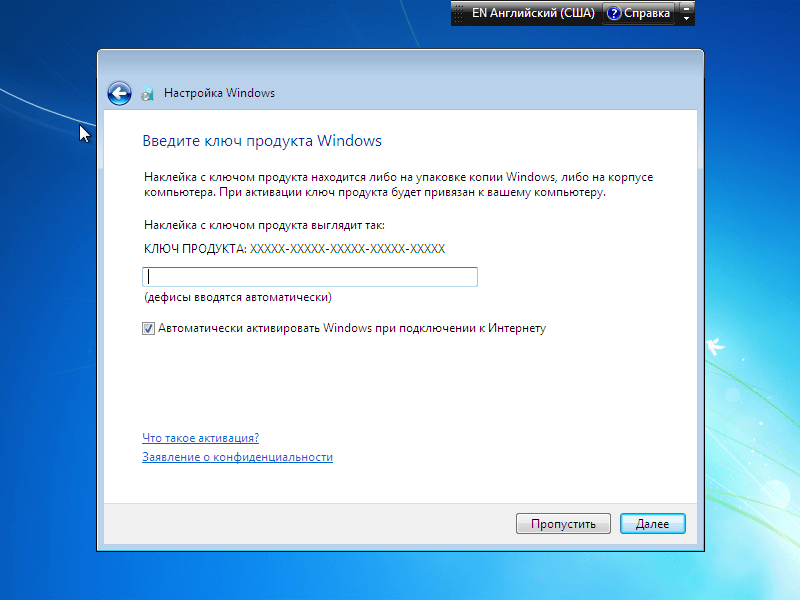
Now by entering the Windows activation key.

The next step is to choose a security level.

Read each item and choose the one that suits you, but I usually choose "Defer decision" and adjust these options later.
Check the time and date setting.

And it remains to wait until the desktop of our own newly installed operating system loads.

This completes the installation of Windows 7 on the computer. If something became unclear to you in the course of reading, write in the comments, I will be happy to help.
Previous postNext post
Friends, good afternoon! In this article, we will talk with you about how to correctly install Windows 7 on a computer.
As you remember, I already told you about. Those of our readers who have already read that article will be familiar with most of the installation and system configuration steps. In any case, I will dwell on the main stages in more detail.
Installing windows 7 on a computer. Why Seven?
In my opinion, each user should keep up with the times and take advantage of the innovations offered by the leading software developers. This is especially important when the question concerns the operating system.
Unlike its predecessor (OS Vista), the "seven" quickly won the hearts of users around the world. On the Internet you will find a huge amount of information about the benefits of Windows 7, but I recommend putting the "seven" only if the hardware capabilities of your computer allow you.
Minimum system requirements required to successfully install windows 7 on a computer:
- 32's bit ( x86) or 64's bit (x64) processor with a clock speed of 1 GHz or higher;
- 1 GB or 2 GB RAM ( RAM) for 32's and 64's
- 16 GB or 20 GB gigabytes of free space on the hard disk (hard drive) for 32- x and 64's bit systems, respectively;
- DirectX 9 graphics device with WDDM driver version 1.0 or higher.
But I can assure you that with the specified requirements, working on a computer will be, to put it mildly, not comfortable. Based on practice, I advise you to use multi-core processors with a clock frequency of 2 GHz and no less 3 GB RAM. I will talk about the size of the system partition a little later.
- In the installation video, I tried not to burden you with trifles. This is just an object lesson - where to reap.
We carefully watch the video “installing windows 7 on a computer”, take notes, if necessary. And please write in the comments if something is not clear or you have additional questions.
Link to download the video lesson to your computer.
Learn more about the important steps to install Windows 7 on a PC
- 1. BIOS setup. The first thing to do is to change the BIOS boot order to “ boot from optical disc". To do this, when loading the OS, you must press “ F2”, or “ DEL”, and go to the tab “ BOOT”, where, by pressing the “+” or “-” key, edit the boot order so that the entry “ CD Rom Drive” was at the very top.
Keep in mind that the window shown in the figure may differ depending on the BIOS version and your drive must support DVD-ROM discs.

We save the settings.

Press the “F10” key to exit the settings. When the computer restarts, the message “Press any key to boot from CD…” will appear. You must press any key to start booting from the installation disk.
If you do not have an OS installed on your hard drive, booting from the CD will start automatically.
- 2. Setting language options. In the first window that appears, you must specify: the language to be installed, the time and currency format, and the default keyboard layout. In the first two fields, you must specify "Russian". What to indicate in the third window, decide for yourself.

For most users, I suggest installing the Russian layout. For example, it is more convenient for me that the US layout is the default. It all depends on which language you use most in your applications.
- 3. Selecting a partition for installing Windows. This section is the most important in the installation process. Here you need to select the hard disk partition where the system will be installed. If necessary, you can delete, create or format disk partitions.

It is very important to determine the size of the system partition. It must be taken into account that all programs will be installed on the system partition, so you can calculate the approximate amount of disk space.

I recommend creating a 20 GB partition on computers that are used to access the Internet, work with office applications, watch videos and listen to audio. If you like to play modern games or you need to work with a large number of special programs, then I advise you to create a partition of at least 50 GB.
- 5.First launch of Windows 7. After all the components are installed, the system will prompt you to restart the computer, followed by the launch of Windows 7.

- 5. Disabling services. After successful installation, disable "Windows Update", "Windows Firewall" and "Security Center" in the Services section of the Computer Management window.
Knowing how to install Windows 7 is still relevant today, despite the fact that Microsoft has already released both the Eight and the Ten. After all, this operating system rightfully claims to be the "people's" after XP. And this is really a wonderful operating system, which can be attributed to the last classic, where there have not yet been bold experiments with the interface.
Before starting the installation
First you need to set in the BIOS settings the place from where we will install. There may be several options here:
- From the system disk;
- From a flash drive;
- Having received the necessary files over the network;
- And also from an external drive.
But, as a rule, Windows 7 is installed from a disk. Therefore, this option will be considered. However, for a flash drive, for example, the sequence of further actions described here will be similar.
Immediately after starting the computer, you will need to hold down the F12 key. However, for different computer models, the BIOS exit key may be different - if F12 does not work, then read the messages on the screen or refer to the documentation.
Attention! Before installation, you should save all your important data: after the installation of the operating system begins, all of them will most likely be erased.
Installing Windows 7
Next, the built-in installer of the Seven will start. Unlike previous operating systems, it will immediately start working in graphical mode. The user will be prompted to select the system language from a drop-down menu. We also specify some other language parameters here. However, as a rule, everything can be left at the default value. 
Click on the "Next" button. Here you can immediately either select the "Install" option, or - just below - "System Restore". The second option can be useful if the old version of the Seven refuses to work normally. So there is a chance that the system will be able to restore its normal operation.

Check the box indicating that we agree to all the terms of the License. 
And select "Full installation of Windows".

Next, you will be prompted to select the partition where the operating system will be installed. In this case, we will receive a warning that all data on it will be erased.  If there is only one section, then there is no special choice. If there are several of them, then it will be possible to put the Seven next to some other OS. If you select the “Disk Setup” item, then it will be possible to create another one inside one partition of the hard drive - and install the Seven there.
At the bottom of the screen, you will need to specify exactly how many megabytes we will allow the operating system to use. If you select too little, then Windows 7 will simply refuse to continue with the installation. So don't be too greedy. 
Once the partition has been created, you will need to click on the "Format" item. At the end of formatting, select the created partition and click on "Next".
Now it remains only to observe how the installer does its job. No special action on the part of the user is required. Unlike previous versions of Windows, there are no laudatory messages in Seven about how good the new operating system is, how great it will now work in it, and the like ...
During installation, the computer may restart several times and even “think for a long time”. Everything is fine, you should not be afraid of this. If you do not have the most powerful machine, then the installation can be really delayed. 
After the final reboot, you will be prompted for a user account name. You will also be prompted to create a password to log in. You can create it, or you can skip this item. 
The next step will ask for the License key. It is stored on the disc label or in the separately supplied documentation. So in no case should you lose it: otherwise, Windows 7 will simply refuse to work. 
You can also start updating the OS, or you can postpone the decision to update "for later." 
It remains to set the system time, indicate the type of network from which the Internet will be accessed. And by clicking on the "Next" button, Windows 7 will begin its work. 
You can start to fine-tune the settings. 
If you know how to install Windows 7 on your computer, you can save on the services of an operating system installation wizard and help your friends in difficult situations. In addition, you can not be afraid of the most daring experiments: after all, in which case the OS can simply be reinstalled.


