To boot from the disk and install, you need to go into the BIOS of your computer, for this you need to reboot and press the DEL button almost immediately, on some motherboards it is replaced by the F2 button, even less often with some other buttons.
After the BIOS has opened, you need to install the boot from your OS media (DVD or flash - depending on what media you use to install Windows 7). This section can be found in different sections - it depends on the manufacturer of the motherboard and BIOS, but it necessarily contains the word BOOT: look for FIRST BOOT DEVICE, BOOT or BOOT DEVICE. As soon as you find it, install your medium there in the first place - either a DVD or a fLash disk - depending on what your Windows installer is on.
After that, exit BIOS by saving changes (F10 key, then Y (confirmation of saving changes)).
If everything is done correctly, then after restarting your computer you will see:
- if you have an installer on DVD, you will see the inscription " Press any key for load from CD ..."(press any key to boot from CD). Having seen this inscription, you must click on any key, otherwise the Windows installation will not start.
- if you used a flash drive, the installation will start immediately
Start Windows 7 installation.
If the installation has started, you will see the following picture:
Figure 1. Installer Windows 7 copies files from media for further OS installation.
After the installation window will appear Windows 7 :

Figure 2. Beginning of installation windows 7: Select the language, time format and layout to install.
Here we select the options you want, or leave everything unchanged and click Next).
The following window appears " install". We press the button.

Figure 3. Beginning of installation windows 7.
Here you can read the license agreement Microsoft and press the button again Further"(Figure 4).

Figure 4. License agreement for use windows 7.
The installer will now prompt you to select an installation type.
- A system update will allow you to install windows 7 on top of an existing operating system.
- A full installation will allow us to select an existing partition to install or re-partition the hard drive. The system will be installed cleanly, so this option is more acceptable for us.
Therefore, we will choose " Full installation (advanced options)"as shown in Figure 5.

Figure 5. Selecting the type of operating system installation.
After proceeding to the full installation, we will be presented with a list of hard drives on which you can create or select partitions for installation. In Figure 6, you can see a disk of size 35 Gigabyte.
Personal experience suggests that for section with windows 7 it is better to use a partition with a volume of at least 50 gigabytes t - so to speak " for the future".

Figure 6. Selecting a hard drive for further installation windows 7.
Going to the hard drive on which the installation will be performed, the operating system will offer you a list of the partitions created on the disk. In our case, no section has been created yet, so we click on the " create"(Figure 7) after which we indicate the volume of the section being created (Figure 8) and click on the button" to apply".

Figure 7.
Figure 8.
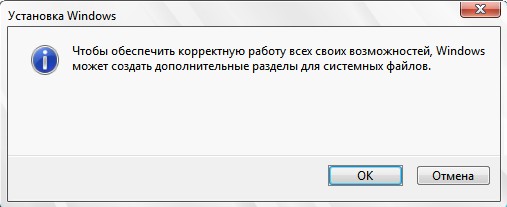
After that the installer windows will inform us that an additional partition will be created to store system files windows(figure 9)

Figure 9.
Now you can click on the " Further", then the installation of windows 7 will start (copying all system files and the process of setting up the OS).
As before, you can follow the steps of copying and installing the operating system (Figure 10)

Figure 10. Installing windows 7.
After completing the installation of OS components, the computer will restart. At this point, you must delete DVD disk or Flash drive from the computer, as the installation will continue from the hard disk to which the necessary files were copied.
After rebooting, you will see a window with the completion of the installation windows(figure 11)

Figure 11.
In a few minutes, the installation will be completed and the initial configuration of the operating system will start.
When the setup process comes to an end, you will be prompted to enter a username to create your account, as well as a computer name for subsequent network identification (under this name, your computer will be visible on local networks windows) (Figure 12).

Figure 12. Entering the username and network computer name for the installed system.

Figure 13. Setting a password for an account (optional).
The next step is to activate your version windows with the help you received from the site Microsoft(or another Internet resource from which you downloaded the distribution kit windows 7) key.
It is advisable to activate your copy the first time you connect to the Internet windows 7.
If at the time of installation you do not have a license key(picture 14) - you can click "Further", after which the initial setup will continue OS, but you will need to activate windows within 30 days. Because windows 7 rc available to users for free, license keys for installation are published on many sites, and you can also get the key on the site microsoft, together with the product distribution kit.

Figure 14. Entering the windows 7 license key.
The next step will be to offer to accept the recommended settings. windows 7(Figure 15): Automatic installation of important updates, etc.
In this case, it is better to select the item "postpone the decision" after which you will be able to make a decision on automatic updates in the future, as well as select the operation parameters Internet Explorer(if you use this browser).

Figure 15. Selecting the initial settings for windows 7.
Now it remains to check the time zone and date (Figure 16).

Figure 16. Setting the date and time.
In case if windows detects and successfully installs network adapters, then you will be prompted to select the type of your network: read the proposed options and select the option that suits you best (Figure 17)

Figure 17
After completing this process, the system will become available for operation (Figure 18). Installing windows 7 will be finished.

Figure 18. Desktop of installed windows 7.
Download Very high quality version of Windows 7- simultaneously 32 and 64 bit, with a bunch of skins you can right here:
For technical reasons, this assembly is currently not downloaded, but you can download it in the format of a flash drive:
This version from comrade Idimm, everything unnecessary is cut, everything you need is left, everything together weighs 4 gig, uploaded to a fast file sharing service, it was installed on several dozen machines, no glitches, problems with drivers, etc. were observed on this assembly. So I strongly recommend downloading this image, albeit an old one, but the updates can always be downloaded by the Windows itself, and you will have 32 and 64 bit sevens on your disk at the same time, which is very handy.
So you have learned all the basic information on how to properly install WINDOWS 7 on any computer, if you have any questions, or some point seems incomprehensible to you, please write in the comments or on the forum.
Partially taken from esate.ru
In this guide, you and I will install Windows 7 Ultimate (Windows 7 Ultimate)... The instruction also applies to other editions of the "seven", such as Home Premium, for example.
The most correct way to install Windows 7 is to do the so-called clean install... As you can see for yourself, this is not difficult. Before proceeding with the installation, make sure that your computer meets the system requirements for Windows 7. If you do not have all the necessary drivers for your hardware, we recommend that you download and upload them to a disc or flash drive before installing Windows 7.
To start the Windows 7 installation disk, you need to set priority (or sequence) of device boot... That is, it reads from the CD-ROM first, and only then from the HDD. Go to settings BIOS and make sure the initial boot comes with CD-ROM / DVD-ROM(Boot> Boot Device Priority> 1st Boot Device> CDROM).
Insert the Windows 7 installation disc into your DVD-ROM and turn on (or restart if you already have one) your computer. Windows 7 will start loading and a status bar will appear in front of you.
In the next window, you will need to select your language, time zone and keyboard layout (input method). Select the settings you want and click Further, to continue.

We read and accept the terms of the license agreement. We press Further, to continue.


Select the partition where we will install Windows 7. If you need to format a partition (as this implies a clean installation), select Disk setup. Note: Be careful with formatting, as all data in the selected partition will be deleted. Push Further.

After all the preparatory settings, the Windows 7 installation process will begin. The system will start copying all the necessary files to the hard drive.

At a certain stage of the installation, your computer, for the first time, will reboot. You can go back to BIOS and put the primary priority of booting from the HDD. After rebooting, the installation will continue from the hard drive.

In the next step, you need to specify Username and computer name... Then press Further. Note: the account you create here is the main one for the entire system and has all the rights and privileges.
Security Settings. Create a password if you need one. We also recommend that you provide a hint for the password, in case, suddenly, you forget the password itself.

We enter the key from Windows 7. If you leave the field blank and click Further, your system will run for 30 days in trial mode. You will need to activate Windows within 30 days, otherwise you will not be able to access the system after the trial period.

Set the security settings for your system. Option Use Recommended Settings- the best option.

We select the network settings.

Windows will finish configuring your system and restart your computer. After the final reboot, the desktop of your new OS will appear in front of you. Congratulations, you have successfully installed Windows 7!
Hello site administrator remontcompa .ru, I have a question for you - how to install Windows 7 on a new computer, that is, on a blank hard disk without partitions? Surely there are some rules and if you do not follow them, problems will surely arise that you want to avoid. George.
Installing Windows 7
Hello friends! Installing Windows 7 on your desktop computer or laptop from a disk, as well as from a flash drive, should not be accompanied by any difficulties after reading our article. We have prepared a detailed description of each step for you and have attached many illustrations. After going through all the installation steps with us, next time you will install Windows 7 without assistance.
- First, the official Windows 7 64-bit distribution can be downloaded from the official one.
- Secondly, if you have UEFI BIOS and you want to install Windows 7 to a GPT disk, but don't know how to do it, read our article.
- Thirdly, if you bought a new laptop with Windows 8.1 and want to install Windows 7 instead, then all the manipulations with the UEFI BIOS and the process of further installing the system.
- Fourthly, if you have problems installing Windows 7, refer to our article -.
- Fifth, if you do not have a floppy drive, you can use our instructions and.
- Sixth, if you install Windows 7 from a USB flash drive, then you should know that Windows 7 does not support USB 3.0 (ports are usually blue), if your USB 3.0 flash drive, insert it into a USB 2.0 port.
So, the last preparations before installing the operating system. What's the first thing to do?
If you are installing Windows 7 on a hard drive with existing partitions, then you need to copy all your data from the partition to which you will install Windows 7. During the installation process, this partition will be formatted and information from it will be deleted.
If you are installing Windows 7 on a blank hard drive, then you do not need to do anything, just read the article on.
In general, there is nothing complicated in all this, at the very beginning of the boot we press on the keyboard, in most cases these are the F2 or Delete keys, entered the BIOS, here we need the "Boot Sequence" or "Boo t" section. BIOS is basically of two types, this Ami BIOS window, we will consider setting it up in our article, if the window has a different interface, then you have an Award BIOS, how to work in it is written in our article "BIOS boot from disk ".
As we can see, the hard disk is set as the first boot device - HDD: PM-MAXTOR STM3, select the first item 1st Boot Devise with the arrows and press Enter.
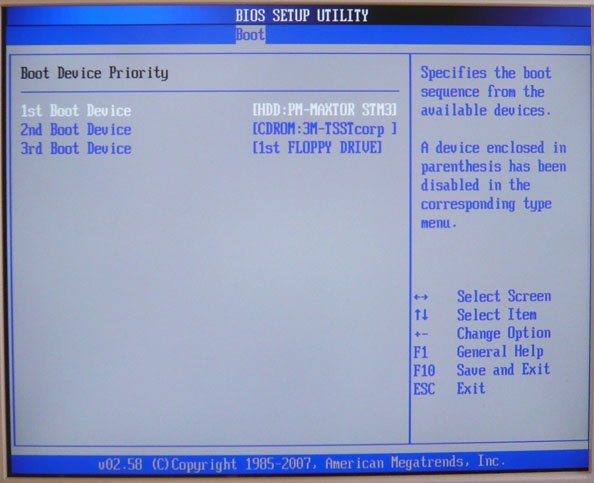
In this menu, we will set the CD-ROM as the first boot device (First Boot Device), select it using the arrows on the keyboard, then Enter.

So the first floppy drive, and the second turned out to be a hard disk, that's what you need.

Save the settings (press F10) and reboot.
If you have correctly set the boot in the BIOS from the floppy drive and you have an installation disk with Windows 7 in it, then the next time you boot the computer, we will be prompted on the monitor to boot from the Windows 7 installation disk - Press any key to boot from CD or DVD... We press any key on the keyboard, keep in mind if you do not have time to press it within a few seconds, the system will go into reboot and everything will start from the beginning.

The process of installing the operating system begins, we are patiently waiting

Here you need to select the system language.

Install

We accept the terms of the agreement

Choosing a complete installation

In this window, we see the space of my 500 GB hard disk ( Disc 0) divided into two sections (Section 1 and Section 2). The hard drive has an already installed Windows 7 operating system, I personally don't need it and I want to reinstall it. Before installing, I will delete all existing partitions on the hard drive and recreate them. In general, there is a rule, if you want to avoid errors during the installation of Windows 7, it is better to delete all existing partitions before installing and recreate them or install the operating system directly into unallocated space.
Select with the left mouse Disc 0 Section 2 and click on the button Delete.


Select with the left mouse Disc 0 Section 1 and click on the button Delete .


The old sections are deleted, we create new ones.
Select with the left mouse Unallocated disk space 0 and press Create.

In this window, you need to select the volume of our future disk (C :), Windows 7 will be installed on it. Let's choose a size of 200 GB, I think this will be quite enough. We press Apply.

For Windows 7 to work correctly, you need to create a 100 MB hidden partition with download files.
Therefore, on the offer "To ensure the correct operation of all its capabilities, Windows can create additional partitions for system files" click OK.
We've got a hidden partition on Disk 0 Section 1: System Reserved(100 megabytes in size) with Win 7 download files.
A second Partition 2 has also appeared, it will be the system disk (C :), its volume is 196.1 GB.
We transform the unoccupied space into a section. Select it with the left mouse and click Create, this will be our disk (D :).

Apply

We will install Windows 7 on Disk 0 Partition 2: (future drive C :), select it with the left mouse and press the Next button.
How to Reinstall Windows 7. A detailed description of reinstalling Windows 7 from start to finish.
To reinstall Windows 7 for Dummies, we need:
- Download Windows 7
- Burn Windows 7 to a disk or flash drive with Windows 7
- Put in bios First Boot Device - Cd-Rom or USB
- Install Windows 7
Step # 1 Reinstall Windows 7. Burn Windows 7 disc
So let's say you bought a laptop with Windows 7, or you just want to try it out and then buy it. First, you need to download the Windows 7 image. Look carefully which Windows 7 you need to download so that the key that is on the laptop fits. Usually the key is located either on the laptop or under it. For example, like this: Windows 7 basic OEM 32-bit (x86). Look for Windows 7 basic OEM 32-bit in the Internet in order for your key to fit! Since the distribution of Windows is illegal, we are not allowed to upload here the original iso images with Windows 7. (Or - (Google search for MD5))
After downloading the Windows 7 ISO image, you need to burn it to disc.
To do this, download the program for burning our image to the Portable ImgBurn disk
After the Windows 7 ISO image and our ImgBurn program are loaded successfully:
- We take a blank DVD + -R | RW and insert into Dvd-rom
- ImgBurn -> click Browse-> choose our Windows ISO image, press Open
- Set the minimum speed and start recording
- After the disc is burned, a window will pop up that the disc has been successfully burned, press OK... And your DVD-ROM will automatically open with the burned Windows 7
Step # 2 Reinstall Windows 7. Put the First boot device CD-Rom in BIOS
So, after Step 1, we have a disk with Windows 7. At this stage, our task is to get into the BIOS and set the disk with Windows 7 installed to boot initially. To do this: Reboot or turn on the computer and press the delete key (there are others options such as F1, F2, F8, Ins.)
The initial splash screen should usually show which key to press to enter the BIOS
As a result, we have to get to the blue screen of the BIOS, in our case it looks like this
We expose the first download from the Disk for this we go (with the usual arrows) to Advanced Bios Features -> First Boot Device select CD-Rom press Enter, then Esc, go to Save & Exit Setup press Enter, then Y and again Enter.
Note: if you have a different BIOS, the essence does not change. The main thing is to find First Boot Device and select CD-Rom
After 2 points, the computer reboots itself and if you did everything correctly, then when you reboot, an inscription will appear on a black background Boot from Cd / Dvd:
And after a while Press any key to boot from Cd ..
(press any key on your keyboard to boot from disk) press the key. If a black screen appears with the Windows 7 installation strip, then at this stage you did everything right
Step # 3 Reinstall Windows 7. Format the partition. Installing Windows 7
After the window popped up. We are waiting for 5-7 minutes before the window with the choice of language appears. We select the language settings as you wish, and then click Further
Click "Install"
We wait 5-7 minutes, after which a window will pop up, tick the box with the "License Terms", click Further
Choose "Full Installation"
We select our disk, after which, click "Disk Setup"
Selecting an item "Format"
Attention! (warning about deleting data from drive C. Everything will remain on D):
This action will delete all your files from the given partition, disk C: /
After the appearance of "Copying Windows files" we can safely go and drink coffee, since no action is required from us within 10-20 minutes
We are waiting until a window appears where we will be asked to enter a username. Then enter the name
Password (we don't have to enter but just click on)
Enter the product key (if you want to enter it later, you can click "Next")
We choose one of the three update points at will! We recommend the first one!
It remains to choose a time zone, which we do.
We are waiting for 2 minutes, after which a magic window appears with Windows 7. I congratulate you, Windows 7 has been successfully installed!
How to reinstall windows 7 for dummies. Additional articles
- Automatic driver installation
- Is it realistic to put Windows 7 64bit Ultimate on a 2 gb flash drive
- Which Windows to choose 32-bit or 64-bit
- Where to download Windows 7 32 ⁄ 64-bit? Which version of Windows 7 should I install?
- How to install / reinstall Windows Xp from disk
- How to install / reinstall Windows Xp without a disk (from a flash drive)
- How to install / reinstall Windows 7 without a disk (from a flash drive) + UEFI
- How to install / reinstall Windows 8 from disc
- How to install / reinstall Windows 8 from a USB stick + UEFI
- How to install / reinstall Windows 10 from a USB stick + UEFI
- How to install / reinstall Windows 10 from disc
Hello! This is the first article on this blog and I decided to devote it to installing the operating system (hereinafter simply the OS) Windows 7. The era of the seemingly unsinkable Windows XP OS is coming to an end (even though about 50% of users still use this OS), which means a new era is coming - the era of Windows 7.
And in this article I would like to dwell on the most important, in my opinion, points when installing and first setting up this OS on a computer.
And so ... let's get started.
1. What should be done before installation?
Installing Windows 7 begins with the most important thing - checking your hard drive for important and necessary files. You need to copy them before starting the installation to a USB flash drive or external hard drive. By the way, perhaps this applies to any OS in general, not just Windows 7.
1) First, check your computer for compliance system requirements this OS. Sometimes, I see a strange picture when they want to install a new version of the OS on an old computer, and they ask why they say there are errors and the system behaves unstable.
By the way, the requirements are not so high: 1 GHz processor, 1-2 GB of RAM, and about 20 GB of hard disk space. In details - .
Any new computer on sale today meets these requirements.
2) Copy * all important information: documents, music, pictures to another medium. For example, you can use DVDs, flash drives, service (and the like), etc. By the way, today you can find on sale, with a capacity of 1-2 TB. Isn't it an option? More than affordable.
* By the way, if your hard disk is divided into several partitions, then the partition on which you will not install the OS will not undergo formatting and you can safely save all files from the system disk on it.
3) And the last thing. Some users forget that you can copy many programs with their settings so that they can continue to work in the new OS. For example, after reinstalling the OS, many people lose all torrents, and sometimes hundreds of them!
To avoid this, use the tips. By the way, in this way, you can save the settings of many programs (for example, when reinstalling, I additionally save the Firefox browser, and I do not have to configure other plugins and bookmarks).
2. Where to get the installation disc
The first thing we need to get is, of course, a boot disk with this operating system. There are several ways to get it.
1) Purchase... You get a licensed copy, all kinds of updates, a minimum number of errors, etc.
2) Often such a disc is included with your computer or laptop. True, Windows, as a rule, presents a stripped-down version, but for the average user its functions will be more than enough.
3) The disc can be made by yourself.
To do this, you need to buy a blank DVD-R or DVD-RW disc.
2.1. Writing a bootable image to a Windows 7 disc
First, you need to have such an image. The easiest way to do it is from a real disk (or download it online). In any case, we will assume that you already have it.
1) Run the Alcohol 120% program (in general, this is not a panacea, there are a huge number of programs for recording images).
2) Select the option "burn CD / DVD from images".
3) Indicate the location of your image.
5) Press "start" and wait for the end of the process.
In general, in the end, the main thing is that when you insert the resulting disc into a CD-Rom, the system starts to boot.
Important! Sometimes, the CD-Rom boot function is disabled in the BIOS. Next, we will take a closer look at how to enable booting into Bios from a bootable disk (sorry for the tautology).
3. Configuring Bios to boot from CD-Rom
Each computer has its own kind of bios, and it is unrealistic to consider each of them! But in almost all versions, the basic options are very similar. Therefore, the main thing is to understand the principle!
When the computer boots up press the Delete or F2 key immediately (By the way, the button may differ, it depends on your BIOS version. But, as a rule, you can always recognize it if you pay attention to the boot menu that appears in front of you for a few seconds when you turn on the computer).
And yet, it is advisable to press the button not once, but several times, until you see the BIOS window. It should be in blue tones, sometimes green predominates.
E if your BIOS not at all like what you see in the picture below, I recommend that you read the article about, as well as the article about.
Control here will be carried out using the arrows and the Enter key.
You need to go to the Boot section and select Boot Device Priorety (this is the boot priority).
Those. I mean, where to start booting the computer: let's say, immediately start booting from the hard disk, or first check the CD-Rom.
So you will add a point in which the first thing will check the CD for the presence of a bootable disk in it, and only then go to the HDD (to the hard disk).
After changing the BIOS settings, be sure to exit it, saving the entered options (F10 - save and exit).
Note. In the screenshot above, the first thing to do is to boot from floppy (now floppy disks are less and less common). Next, it is checked on the bootable CD-Rom, and the third thing is to load the data from the hard drive.
By the way, in day-to-day work, it is best to disable all downloads except the hard drive. This will make your computer run a little faster.
4. Installing Windows 7 - the process itself ...
If you have ever installed Windows XP, or any other OS, then you can easily install 7-ku. Here, almost everything is the same.
Insert the bootable disc (we already burned it a little earlier ...) into the CD-Rom tray and reboot the computer (laptop). After a while you will see (if you have configured the BIOS correctly) a black screen with inscriptions ... See the screenshot below.
Calmly wait until all the files are downloaded and you will not be prompted to enter the installation parameters. Next, you should see the same window as in the picture below.
A screenshot with the OS installation agreement and agreement acceptance, I think there is no point in inserting it. In general, before the step on the disk layout, you go calmly, along the way, reading everything and agreeing ...
In this step, you need to be careful, especially if you have information on your hard disk (if a new disk, you can do whatever you want with it).
You need to choose hard disk partition where Windows 7 will be installed.
If there is nothing on your disk, it is advisable to divide it into two parts: on one there will be a system, on the second data (music, films, etc.). It is best to allocate at least 30 GB for the system. However, here you decide for yourself ...
If you have information on the disk- proceed extremely carefully (preferably even before installation, copy important information to other disks, flash drives, etc.). Deleting a partition may make it impossible to recover data!
In any case, if you have two partitions (usually the system drive C and the local drive D), then you can install the new system on the system drive C, where you previously had a different OS.
After selecting a partition for installation, a menu will appear in front of you, in which the installation status will be shown. Here you need to wait without touching or pressing anything.
On average, installation takes from 10-15 minutes to 30-40. After this time, the computer (laptop) may be restarted several times.
Then, several windows will appear in front of you, in which you will need to set the computer name, specify the time and time zone, enter the key. You can just skip some of the windows and adjust everything later.
Network selection in Windows 7
Completing the Windows 7 installation. Start menu
This completes the installation. All you have to do is install the missing programs, customize the applications and do your favorite games or work.
5. What do you need to install and configure after installing Windows?
Nothing ... 😛
For most users, everything works right away, and they do not even think that something needs to be additionally downloaded, installed there, etc. I personally think that at least 2 things need to be done:
2) Create or USB stick.
3) Install the drivers on the video card. Many then, when they do not do this, they wonder why they start games or some do not start at all ...
Interesting! In addition, I recommend that you read the article about, after installing the OS.
PS
This completes the article about installing and configuring the seven. I tried to present the information in the most accessible way for readers with different levels of computer skills.
Most often, installation problems are of the following nature:
Many are afraid of Bios like fire, although in fact, in most cases, everything is simply configured there;
Many people write the disc incorrectly from the image, so the installation simply does not start.
If you have any questions or comments, I will answer ... I always take criticism normally.
Good luck to all! Alex ...


