Since the launch of the final version of Windows 10 from Microsoft, millions of users have already been able to appreciate all its advantages and disadvantages thanks to the campaign, during which all owners of the licensed version of Windows 7 and above were able to upgrade absolutely free of charge to the version of Windows 10. More precisely, this is not the final version, Microsoft plans to present it as a service, so the "ten" will be finalized, supplemented.
Despite the heated debate about surveillance and possible flaws, in the end, most users noted that the version was actually a success this time.
Self-installation of Windows 10 from a USB flash drive: detailed instructions
Everyone in the period from July 29, 2015 to July 29, 2016 could get this product for free while maintaining a perpetual license. And if you couldn’t do this or didn’t want to for some reason, but still decided to install the “top ten” on your computer or laptop now, and want to do it yourself, then this article will be very useful.
Before installation, copy important files to a safe storage
First of all, you should worry about the safety of your data on your computer before you start installing Windows 10 from a USB flash drive. Copy everything important to removable media or burn it to a disk.
Make sure your computer meets the minimum system requirements for Windows 10. You can view the minimum requirements on the Microsoft website.
Now let's move on to the most interesting: create a bootable USB flash drive.
- To do this, we need a USB flash drive with a capacity of at least 4 GB. First of all, it needs to be formatted.
- Insert the flash drive into the USB port.
- Format the flash drive in the standard way.

Create a bootable USB flash drive using MediaCreationTool
We go to the official website of Microsoft. Click on the "Download tool now" button to download the special MediaCreationTool utility to create a bootable USB flash drive.
- We start the program.
- We accept the terms of the license agreement (it is advisable to read it).

- In the next window, mark the item "Create installation media for another computer" with a marker.

- Then uncheck the "Use default settings" checkbox. Choose the language, version and bit depth. We press "Next".

To save the license, you need to choose the same version that you had. Otherwise, you will need a license key.
Bit depth does not matter for license activation, but if you have less than 3 GB of RAM, then installing Windows 10-64 bit from a USB flash drive will take longer. Yes, and the system itself will slow down, so it is better to choose the bit depth taking into account the available equipment. For RAM more than 4 GB, the 64-bit version is suitable.
- Next, select the media - mark the item opposite the USB flash memory device. And click "Next".
- We check that the desired flash drive is selected and again click "Next".

- We are waiting for the completion of the creation of a bootable USB flash drive.
No other changes or settings need to be made. At the end of the recording, the program will notify you about this with a corresponding message in the utility window.
Clean install of Windows 10 after update
If you upgraded during the free period, then you still have the old system on your system drive, saved in a folder called Windows old. The ability to roll back and return to the old system when upgrading existed only 30 days after the upgrade. At the end of this period, this feature is no longer available, so the Windows old folder has become useless and only takes up space on the hard drive.
A complete reinstallation of the system will remove all unnecessary and unnecessary files that can slow down the system. Don't worry if your computer went through the activation of a new system during the update. With a clean installation, even with full formatting, the license will be preserved, since the digital key is attached to the equipment. After it is activated by itself the first time you connect to the Internet.
Configuring boot from a USB flash drive in BIOS

If this is your first installation of Windows 10 from a USB flash drive via BIOS, then you should know that you need to set the boot priority from the USB flash drive. We turn on the computer, or reboot it if it is turned on, and begin to vigorously press the F2 or Delete key. Depending on the hardware, the BIOS entry key may differ. But for most computers it's Delete, and for laptops it's F2.
Which button on your computer is responsible for loading the BIOS can be seen in the message during the loading of the operating system, during the POST test.
"Press del to run setup"
A window like this should load.

Navigation in the BIOS is carried out only by arrows, and some more keys on the keyboard.
- We move to the boot section (Boot).
- In chapter boot device priority set the boot priority from the flash drive.
- And also in the section hard drive as a hard disk from which the boot will be made, we also select a USB flash drive.
Starting the installation from a Windows 10 flash drive
We overload the computer. If everything is done correctly, then on the initial screen you need to press any key when the message appears: "Press any key to boot from CD or DVD_".

- Next, a language selection window will follow, leave Russian everywhere and click "Next".
- In the next window, you can start system recovery, or install, click on the button in the center of the "Install" screen.

Windows Activation: License Agreement Terms
- The next window to enter the Windows 10 key will appear on the screen. If you upgraded to Windows 10 from Windows 7 or 8 earlier on this computer, you just need to click the Skip button. Activation will take place the first time you connect to the Internet. Or enter the key, if any.
- Next, you need to accept the terms of the license agreement, respectively, before reading it.
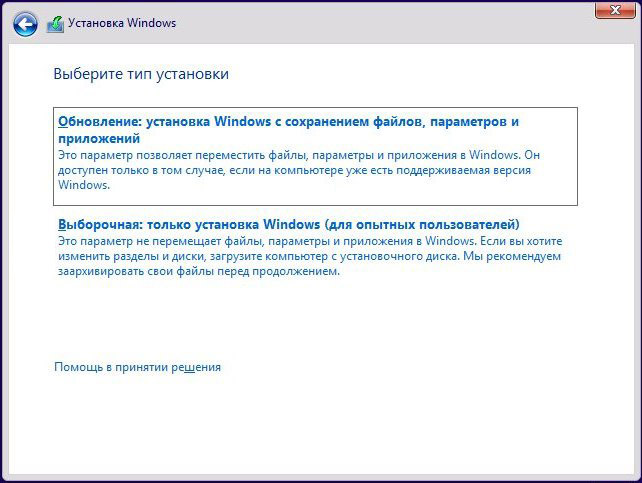
- The next step is to select the installation type, you need to select the second option "Custom installation". The update option does not need to be selected, in this case all your data on the system drive will simply be moved to the Windows Old folder. Nothing will be deleted. Do you need a clean install? Therefore, we choose the second option - the custom installation of Windows 10 from a USB flash drive to a computer.

Formatting the hard drive
- In the next window, you will see several partitions - more than you have disks on your computer, these are system reserved disks that you do not need to touch, you only need the partition where your old system is located. You can determine this by volume. To save everything that you have stored on other logical drives, you need to format only one partition - drive C.
- We click on it, then on the "Format" button, again select our section where the installation will be made and click on the "Next" button.
Or you can completely delete all partitions if the installation of Windows 10 via a USB flash drive is done with formatting the entire hard drive. And then create the required number of them again.

Installing Windows 10
Then the installation process itself will begin - copying files, installing components, updates. There are five stages in total. The more powerful the PC, the faster Windows will install. Here you will only need to be patient, as the whole process can take about 40 minutes (give or take). After installation is complete, the computer will restart. No buttons need to be pressed, but at the time of reboot, you need to remove the USB flash drive from the slot.
Installing Windows 10 from a USB flash drive to a laptop is no different from installing it on a computer or netbook. Differences can only be in the power of the equipment.
Windows 10 settings: the last stage of installation
After restarting, the computer may seem to freeze for a few minutes or more, depending on how powerful your computer is. Don't be afraid, don't try to overload. The further configuration process will start automatically when the system has configured all the parameters.
If you have any network cards or Wi-Fi adapters, the computer will ask you to connect to the network, you can do it right away or skip this step.
At the next stage, you will again be asked to enter the product key, this can also be done later. If the equipment where the installation is being performed has already been updated to Windows 10, click "Skip this step".
Settings
At the last stages of installing Windows 10 from a USB flash drive, settings should be configured. If you click "Use default settings", then there is nothing wrong with that. But there is an opinion about the likelihood of surveillance, that is, about collecting information about the user in order to provide him with contextual advertising. If you do not want to disclose data about yourself to anyone, then the collection of information can be turned off by clicking on the "Settings" link. There you can disable everything that may seem suspicious or unwanted. Read carefully and disable all those options that you do not need.
Create an account
After setting the parameters, the next step is to create a Microsoft account. If you are connected to the Internet, then in this step you can create, or if you already have an account, then enter your login and password.
Final installation step
The next step in installing Windows 10 from a USB flash drive is the next setting of parameters, it is accompanied by messages on the screen, which periodically changes the background color. Here, you will have to be patient, since this setup can take half an hour, and more than 40 minutes. It is not recommended to turn off the PC or force restart the computer. Be patient - wait.

That's all! "Windows" is installed, it remains to install the driver. Moreover, it is advisable to download them from the official websites of the manufacturer of your equipment. Windows, of course, will install standard drivers automatically, but in some cases they are not suitable, and they must be installed specifically for the existing equipment.
If at any stage you have an error when installing Windows 10 from a USB flash drive, then you need to contact the official website of Microsoft in the support section. There is a base with various error codes and their descriptions.
So, you have decided to refresh your personal device with a brand new “Windows 10” instead of “seven” or “eight”? No problem, you can do it without difficulty, no additional subsections need to be created. We simply create a bootable flash drive, then format the system partition of your hard drive and effortlessly install the operating system on your device. System requirements are not high, similar to the "seven".
Create a bootable USB flash drive to install Windows 10
The Windows 10 image takes up about 4 GB of free space, so it is better to take a flash drive from 8 GB. It is also necessary to take into account that all available information from your media will be deleted. To perform this procedure, there are many programs. The best option would be the Rufus program. Utility in Russian, download and launch. Next, in the “Device” item, we need to select a USB flash drive.
- Select the file of your image using the corresponding button.
- We set the remaining parameters and press the "Start" button.
- The system warns that the data will be destroyed, we agree.
- After the image is mounted, press the "Close" button.
- The bootable flash drive has been created. Next, we figure out what needs to be done in order to start from it. To do this, we put the computer on reboot and visit the BIOS blue screen.
2) Change the boot priority of Windows 10
To enter the BIOS immediately after starting the computer, press "F2" or "Del" on the keyboard, depending on your device model. In our case, press "F2" and go to the item "Boot". Using the F6 button, move the flash drive to the very top. If you didn’t succeed with entering BIOS, I recommend reading the article “How to enter BIOS settings”.
- Now the USB flash drive is in the first queue when loading. Press "F10" to save the settings.
- Next, we restart the computer. Almost immediately after the reboot, the screen will appear in English "press any key to boot from ...". This means that you need to press any key to boot from the drive.
- Now the drive menu is loaded, where we select the necessary section "Install Windows 10".
- Select the hard disk partition you need and click on the "Format" button.
- The hard disk partition is formatted, then click on the "Next" button.
The installation of the operating system has started, "Ten" will be loaded almost automatically, you just need to fill in the required fields relating exclusively to you. After the installation is completed, a window will appear where there will be several operating systems. This means that your seven has not disappeared anywhere and now, when you start the device, you can choose where you want to boot from, from the tenth version or from the previous one.
Download Windows 10 from the official site
The download is done using the Windows 10 Installer app. After downloading the MediaCreationTool installer, you need to create a bootable DVD or USB flash drive. Check out the instructions: How to create a bootable DVD, follow the link, and How to create a bootable USB flash drive.
- Download || Windows 10 - 32 bit version
- Download || Windows 10 - 64 bit version
Installing Windows 10 from a USB flash drive or DVD
- To install Windows 10 from a flash drive, insert the USB drive into the computer, turn it on, and immediately after the system board logo appears on the screen, press the F12 button (for reliability, it is worth repeating several times).
- After that, a boot menu should appear, which will list the drives installed on the computer. Use the arrows on the keyboard to select the line DVD or USB drive, press Enter.
- If a message like Press Any Key To Boot From CD or DVD, press any button within two or three seconds after the inscription appears - otherwise the computer will try to boot from the hard drive. In practice, this is convenient - in the future, you do not have to worry about a disk forgotten in the drive.
If everything is done correctly, the system will automatically launch the installation program. You just have to follow her instructions exactly.
Windows comes in seven major versions:
- Home - basic version for PC, laptop and tablet users;
- Pro - version for PC, laptops and tablets with features for small businesses;
- Mobile - version for smartphones and small plans;
- Enterprise - a version for a larger business with advanced features for corporate resource management, security, and so on;
- Education - Enterprise option for educational institutions;
- Mobile Enterprise - a variant of the corporate version, adapted for mobile devices and touch with enhanced security;
- iot Core is a version for a variety of computer devices such as terminals, robots, and so on, with specific functions, for example, for use in payment terminals based on Windows tablets.
It is better to choose from the first three versions - Home, Professional and Enterprise. Their purpose is fully consistent with the name. At one time, "advanced" users recommended the professional version to everyone, even for home use - they say that it works more stable and is updated more often.
However, in the case of Windows 10, you won’t get any special advantages from the professional version at home: you simply won’t be able to use the special tools included in it. One more question remains - 32-bit or 64-bit? Definitely the second, since the 32-bit one is not able to work with more than 3.5 GB of RAM.
How to install Windows 10 on a PC or laptop
Then the computer will offer two options: a typical installation (in this case, the OS will be installed on the main hard drive) or custom. If more than one hard drive lives in the belly of your PC, but several (for example, the main hard drive and a fast SSD), using this option you can install Windows 10 on any of them. If your computer has only one hard drive and one partition (which is usually the case when installing on a “clean” computer), then you won’t have to choose anything.
The next window is the "Install" button, which should be clicked.

After starting the installation process, the system will prompt you to select a color scheme for the design of the Desktop, and give the computer a name - the main thing is that it does not coincide with the account name (we will configure a little later).
If you purchased Windows 10, enter your product key. If you got it as a free upgrade, click "Skip" or "I don't have a key", and if you don't have a key, you can skip entering the product key (In recent versions of the installer, using the I don't have a key button). As a result, the system will be installed, but will not be activated.

Read the license agreement and accept the license terms, click "Next".

- Update: Installation with saving all parameters: programs, files of the previous installed system.
- Custom: Performs a clean install of Windows 10 without keeping the previous OS files. During installation, you can partition disks, format, thereby clearing the computer from the files of the previous OS.


Further, depending on the availability of the key, enter, or click "Do later". The next screen is dedicated to fine-tuning security and network access settings. The easiest way is to click on the Use default settings button and leave the default settings.
Vinzhovs will warn you that it will send certain data about the system operation to the Microsoft server (do not worry, no one is going to copy your documents and other personal data).

If this does not suit you, click on the Configure button, and deal with the parameters separately. In particular, sending data to a Microsoft server can be disabled in the Options menu. All other items (turning on the built-in antivirus, software firewall filter and the availability of the computer on the local network) should be left as is. If you are installing Windows on a laptop, the PC will immediately prompt you to connect to a wireless network, since you will need Internet access in the next step.
As it turned out, installing Windows 10 is not at all difficult ...
No matter how carefully you treat your operating system, sooner or later it will still have to be reinstalled. In today's article, we will tell you in detail how to do this with the OS using a USB drive or CD.
The entire process of installing the operating system can be divided into two important stages - preparation and installation. Let's take them in order.
Media preparation
Before proceeding directly to the installation of the operating system itself, you need to prepare a bootable USB flash drive or disk. To do this, you need to write the installation files to the media in a special way. In this case, you can use different programs, for example,. We will not dwell on this point now, since everything has already been written in a separate article.
OS installation
When all the information is written to the media, you will need to do the following:
- Insert the disk into the drive or connect the USB flash drive to your computer / laptop. If you plan to install Windows on an external hard drive (for example, SSD), then you need to connect it to the PC as well.
- When rebooting, you must periodically press one of the hot keys that is programmed to start boot menu. Which one - depends only on the manufacturer of the motherboard (in the case of stationary PCs) or on the laptop model. Below is a list of the most common. Please note that in the case of some laptops, you also need to press the function button along with the indicated key fn.
- As a result, a small window will appear on the screen. In it, you must select the device from which Windows will be installed. Set the mark on the desired line using the arrows on the keyboard and press "Enter".
- Note that in some cases the following message may appear at this stage.

This means that you need to press absolutely any button on the keyboard as quickly as possible to continue booting from the specified media. Otherwise, the system will start in normal mode and you will have to reboot it again and enter the Boot Menu.
- Then you just have to wait a bit. After a while, you will see the first window in which you can optionally change the language and regional settings. After that press the button "Further".
- Immediately after that, another dialog box will appear. In it, click on the button "Install".
- You will then need to agree to the terms of the license. To do this, in the window that appears, check the box next to the specified line at the bottom of the window, then click "Further".
- After that, you will need to specify the type of installation. You can save all personal data if you select the first item "Update". Note that if you are installing Windows for the first time on a device, this feature is not useful. Second point - "Selective". We recommend using it, since this type of installation will allow you to fine-tune your hard drive.
- This will be followed by a window with the partitions of your hard drive. Here you can redistribute the space as you need, as well as format existing chapters. The main thing to remember is that if you touch those sections on which your personal information remains, it will be permanently deleted. Also, do not delete small sections that "weigh" megabytes. As a rule, the system automatically reserves this space for its needs. If you are not sure of your actions, then simply click on the partition where you want to install Windows. Then press the button "Further".
- If the disk was preinstalled with an operating system and you did not format it in the previous window, then you will see the following message.

Just click OK and we move on.
- Now a chain of actions will start that the system will perform automatically. At this stage, nothing is required of you, so you just need to wait. The process usually takes no more than 20 minutes.
- When all the steps are completed, the system will reboot on its own, and you will see a message on the screen stating that preparations are underway for launch. At this stage, you also need to wait a while.
- Next, you will need to pre-configure the OS. First of all, you will need to specify your region. Select the desired option from the menu and click "Yes".
- After that, in the same way, select the keyboard layout language and press again "Yes".
- The next menu will prompt you to add an additional layout. If you don't need it, click the button "Skip".
- Again, we wait for a while while the system checks for updates that are needed at this stage.
- Then you need to choose the type of use of the operating system - for personal purposes or for an organization. Select the desired line in the menu and click "Further" to continue.
- The next step is to sign in with your Microsoft account. In the central field, enter the data (mail, phone or), to which the account is linked, and then click the button "Further". If you do not have an account yet and you do not plan to use it in the future, then click on the line "Offline Account" in the lower left corner.
- After that, the system will prompt you to start using your Microsoft account. If in the previous paragraph we chose "Offline Account", press the button "Not".
- Next, you will need to come up with a username. Enter the desired name in the central field and proceed to the next step.
- If necessary, you can set a password for your account. Come up with and remember the desired combination, then press the button "Further". If you don't need a password, then leave the field blank.
- Finally, you will be prompted to enable or disable some basic settings in Windows 10. Set them up as you wish, and then click on the button "To accept".
- This will be followed by the final stage of system preparation, which is accompanied by a series of text on the screen.
- In a few minutes you will be on your desktop. Please note that the process will create a folder on the system partition of the hard disk "windows.old". This will only happen if the OS was not installed for the first time and the previous operating system was not formatted. You can use this folder to extract various system files or simply delete it. If you decide to delete it, then you will have to resort to some tricks, since it will not work in the usual way.
PC Motherboards
laptops
Please note that manufacturers change the assignment of keys from time to time. Therefore, the button you need may differ from those shown in the table.


System recovery without drives
If for some reason you do not have the opportunity to install Windows from a disk or flash drive, then you should try to restore the OS using standard methods. They allow you to save the user's personal data, so before proceeding with a clean installation of the system, it is worth trying the methods below.
This concludes our article. After applying any of the methods, you just have to install the necessary programs and drivers. You can then start using your device with the new operating system.


