Detailed step-by-step instructions for setting up the WDS function on a TP-Link TL-WR841ND router to combine two Wi-Fi networks. You will learn how to connect your router to the wireless network of another router and share its Internet. Let's say a signal from someone else's Wi-Fi network is caught near the window, but in the back of the room it is no longer possible to connect to it. You can install a router on the windowsill, connect to it using WDS and distribute the Internet to your devices in your apartment or office. Screenshots are taken using the example of the TL-WR841ND router hardware version v8. However, this manual will help you when configuring WDS on other similar TP-Link routers, such as TL-WR740N, TL-WR741ND and others. The settings are almost the same.
What is WDS and what is it for
WDS (Wireless Distribution System) Is a technology that allows your router to connect to the Wi-Fi network of another router and distribute the Internet. Those. both connection and distribution are performed using a Wi-Fi module. WAN and LAN ports may not be used at all. Accordingly, routing is not needed to connect two wireless networks using WDS.
When to use the WDS feature
First, the WDS technology is worth trying if you are unable to configure the signal relay in the "" mode. For example, the network is unstable (the repeater is disconnected from the main router's network).
Secondly, the Universal Repeater function is usually only available on access points, while WDS mode is very often supported on regular routers. In particular, WDS is included in the factory firmware of the mega-popular TP-Link TL-WR841ND router. Therefore, if you have a second router lying around, you do not need to buy an access point with the Universal Repeater mode. Hopefully chewed.
Cons of WDS
- When using WDS, the data transfer rate over Wi-Fi between the main router and the secondary router is reduced by about 2 times.
- The master router must use a permanent wireless channel. If you select AUTO, the remote router will lose communication with it when the channel is changed.
Configuring WDS on a TP-Link TL-WR841ND router
Well, since the purpose of this instruction is to configure Internet relaying from a remote access point using the WDS function on a TP-Link TL-WR841ND router, let's proceed to its main part.
Plug the cable into any LAN port of your router and connect to your network card in your computer or laptop. You can also, but you will have to reconnect to the network many times.

- Turn on your TP-Link router and go to it.
- Configure your router's Wi-Fi network. Please select SSID, set security mode WPA2-PSK, set encryption AES (CCMP), set a strong security key and save the settings. All this is described in our instructions.
- Now you need to establish a connection with the main router. Check the box WDS... Additional settings will appear. Click the button Search or Survey:
 Select from the list another Wi-Fi network whose Internet connection you want to relay by this router:
  Specify the channel that the remote router uses, then the security key of the remote wireless network, select WDS1 and save the settings. This is how the page should look Wireless Settings when saving settings:
  If you don't know the channel number, it doesn't matter. Just leave AUTO and after pressing the button Save the router will suggest the channel you want. It's up to you to press OK:
  After that, the parameter Channel will change to the desired one and you will have to click again Save.
I repeat: on the main router you need to select a specific channel. If you use automatic channel selection, the communication between the routers will soon be interrupted.
- Turn off DHCP... This is necessary so that the devices that connect to your router receive the Internet from the main - remote router:

- Now one last thing: go to settings Local Area Network (LAN)... It is highly recommended to change the IP of your router here. Set an IP from the range of the main router and save the settings. For example, if the main router has an IP of 192.168.1.1, then assign the secondary one 192.168.1.250. Only the last octet should differ, and most importantly, the IP address should be free:
 If you do as we advise, you will be able to enter the settings of both the main (remote) and this (your) routers when they are combined into one network.
 Attention! If the network does not work the first time, you can manually assign a static IP to your own, or go back to the settings of your router.
- After pressing the button Save agree to reboot the router for the settings to take effect. Disconnect the cable from the LAN port. Now nothing should be connected to any port of the router.
After about a minute after rebooting, connect to your Wi-Fi network from any device - phone, laptop or tablet. You must be able to access the Internet from a remote router.
Thus, you can create a wireless bridge with any router, access point, and even a phone or tablet in mode.
When it becomes necessary to connect more than one gadget to the network, you need a wi-fi router. Routers allow you to distribute the Internet to multiple devices at the same time. There are many models of such consoles, and this section will provide detailed instructions on how to connect a tp link router.
If the device was purchased recently and has not yet been used, before connecting a TP-Link router to a computer, you need to check the package contents. The set-top box must be accompanied by a power supply, USB cables and instructions.
After the product is unpacked, you can start preparing it:
- Connect the set-top box to the network and check that all indicators on the panel light up.
- Connect the router to the PC using a cable marked "Ethernet", inserting it with one end into the yellow connector of the set-top box, and with the other into the network port of the computer.
- Connect the cable from the cord intended for connecting to the Internet to the blue connector of the router.
On a note. If, after turning on the router in the network, the indicators do not light up, you need to press the "Power" button located on the back of the device. When they become active after activating the power, you do not need to touch the key.
Presetting a connection in Windows
When the TP-Link Wi-Fi router is ready for use, you need to change the connection settings in the network menu of the operating system.
This must be done in the following sequence:
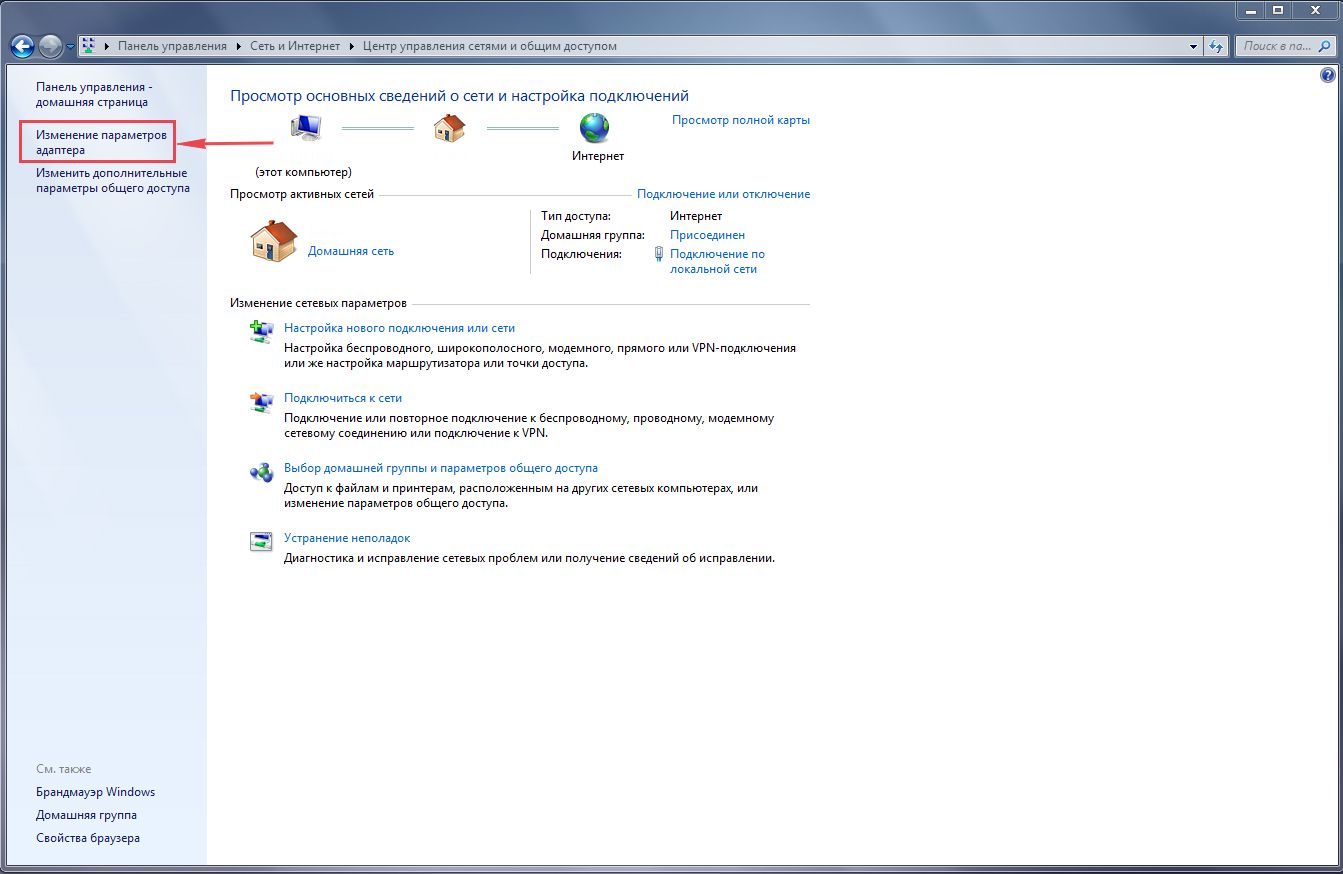
- Go to the control panel through the start button.
- Go to the network control center, and go to the sub-item for changing adapter data.
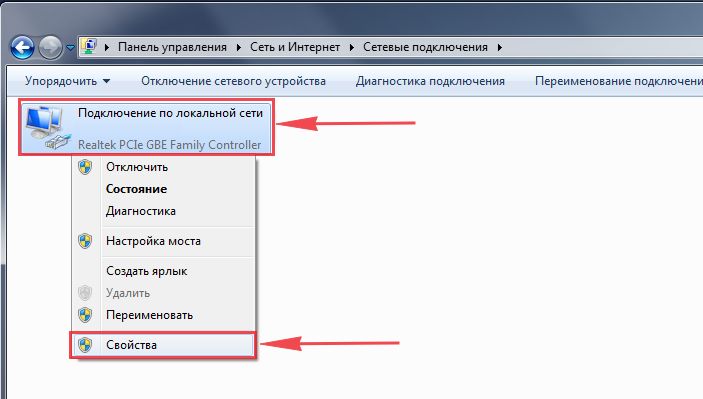
- Find the active network, display the menu by clicking the right mouse button and select the properties sub-item.
- In the window that appears, click on the inscription "Network" and move to the protocols of the Internet versions.
- Activate commands to automatically obtain IP and DNS server addresses.
- Move to the alternative configurations tab and set the automatic configuration mode.
- Confirm the changes by clicking the "OK" sticker.
After making the necessary settings, you need to access the router interface, acting in this order:
- Launch an internet browser and wait for the page to load.
- Register in the address line "192.168.0.1" or "tplinklogin.net".
- Enter the data in the default login and password section. Most often this is the "admin" combination.
On a note. If the indicated combinations are not suitable, you can view the device identification data on the label, which is glued to the bottom of the case.
Step by step guide how to set up TP-Link router

After entering the device menu, you can go to the router settings.
To do this, you need to observe the following algorithm of actions:
- Find the "Wan" section in the network menu and click on it.
- View the list that opens and select the wan connection type.
- Set up a connection with a provider. Here you will need to select the type specified in the contract. It can be PPPoE, L2TP, PPTP, Static IP, or Dynamic IP.
- Enter the user identification data specified in the same document.
- Confirm the change in the settings, and check the activity of the Internet connection.
On a note. If the contract with the provider is lost, you can find out the login and password by contacting the technical support service. After the user gives his passport data, the information will be provided.
Setting up a Wi-Fi network on a TP-Link router
When the Internet connection is established, you can proceed to the final stage of work - the Wi-Fi settings.
To do this, you need to do the following:
- Go through the control panel to the wireless connections subsection, select the settings tab. In the English-language version of the interface, these items are designated as "Wireless" and "Wireless Settings".
- Set the name of the network and select your region.
- Leave the default data unchanged and confirm the settings.
- Select the wireless security tab and set the encryption type to "WPA / WPA2".
- Enter the invented access code and confirm the new parameters.
Advice. To protect the router interface and exclude third-party intrusion, it is better to change the identification combinations that give access to administrative settings. To do this, go to the system tools tab and select the "Password" sub-item. Then you will need to enter new keys and save them, and then restart the device.
Possible connection and configuration problems

Usually, connecting your TP-Link WiFi router by yourself is straightforward.
But in some cases, the following problems may arise:
- The computer does not recognize the set-top box. In this case, you need to connect the router to another gadget or reboot it.
- The router interface does not open. Some device models are incompatible with the Google Chrome browser, in which case it is advisable to sign in from another gadget.
- Settings menu does not load. In this case, you will need to check the parameters of the wireless connection, the IP and DNS addresses should be set in automatic mode, as evidenced by the checkboxes installed opposite these items. If they are removed, you need to put them back on.
- I cannot enter the menu at the address indicated on the router panel. In such situations, the reason may be that the data is entered incorrectly, or it was changed after installing the STB. In the first case, you will need to check the correctness of the recorded combination, and in the second, to “roll back” the settings to the factory settings by pressing the “reset” button on the panel and holding it for 10-15 seconds. After that, when entering, the data specified on the device panel is indicated.
- After setting up the set-top box, access to the Internet was not obtained. The reason for such a nuisance may lie in problems on the part of the provider. To confirm or deny this, you need to connect the PC to the network directly and check the activity of the connection. In other cases, you will not be able to access the Internet because the cables are incorrectly connected or damaged, and you need to replace them. If that doesn't work, the router might be malfunctioning.
Before proceeding with configuring the router, let's check the settings of the local network connection. For this:
Windows 7
Click on " Start", "Control Panel".
Then click on " View network status and tasks".

LAN connectionProperty".
Then select from the list " Internet Protocol Version 4 (TCP / IPv4)"and click" Property".

"and" ", then press the button" Ok".

Windows 10
Click on " Start", "Parameters".

Then click on " Network and Internet".


In the window that opens, we see " Ethernet". Click on it with the right mouse button, select" Property".

Then select from the list " IP version 4 (TCP / IPv4)"and click" Property".

In the window that opens, you need to check the boxes " Obtain an IP address automatically" and " Obtain DNS server address automatically", then press the button" Ok".

Connecting a TP-Link TL-WR841N router to a computer
The next step is to connect the router TP-Link TL-WR841N to your Laptop or Personal computer (PC). To do this, you need to connect the cable that the provider led you to the blue port of the router (that is, this is the cable that goes to your apartment, house, office, etc. from outside), and the cable that came with router, one end to one of the four ports, which are marked in yellow on the router, and connect the other end to your laptop or PC. And yes, don't forget to plug in the power cable.

TP-Link TL-WR841N router authorization
So, we connected the router, now you need to get into its web interface through any browser (be it Google Chrome, Mozilla Firefox, Internet Explorer, etc.). To do this, open the browser and type in the address of the router in the address bar: 192.168.0.1 and press the button " Enter"on your keyboard (in older models of this router, this address may be: 192.168.1.1 ).
- Username - admin
- Password - admin
So, we drive in the data and press " entrance"


Configuring the Tp-Link TL-WR841N router
And finally we got to the web-interface of the router and now you need to configure the equipment. The first step is to secure the wireless network by setting a password for wi-fi. Then you will need to find out what type of connection is used to access the Internet, it is PPTP, L2TP or PPPOE. You can find out by calling your provider (this is an organization with which you have concluded an agreement for the provision of Internet services). So, let's start configuring the router.
Setting up a password for wi-fi
I bring to your attention a Video instruction on setting up a password for wi-fi on a router Tp-Link TL-WR841N
Let's also consider in writing and illustratively setting a password for wi-fi on a router. Tp-Link TL-WR841N.
Select the tab " Wireless mode"and we get into" Wireless Settings". Here it is necessary in the column." Wireless network name:"come up with and specify a name for your wireless network, this name will continue to light up when you connect to the network. Then select" Region:" - Russia... After that we press " Save".

Next, go to the menu in the " Wireless Security". Here we will configure the password for the wireless network invented above, for this we select the type of encryption." WPA / WPA2-Personal (Recommended)"and then below in the" PSK password"we come up with and drive in a password. Then we press" Save".

After we pressed " Save"an inscription will appear above this button, indicating that the settings have been saved and now we need to restart the router. What we do by clicking on the" click here"by sending the router to reboot. After rebooting, the name of your wireless network will appear in the network settings of your computer.
PPTP setup
PPTP on the router Tp-Link TL-WR841N using the example of the Tp-Link TL-WR1043ND router.
Let's also write and illustrate PPTP on the router Tp-Link TL-WR841N.
Net", then " WAN".
V " WAN connection type:"choose" PPTP / PPTP RussiaUsername:") and password (in the line" Password:IP address / Server name:
Connect automatically NOT Connect on demand
Save".

Configuring PPTP with Static IP
Let's consider the connection setup PPTP with static IP on the router Tp-Link TL-WR841N.
So go to the menu in the tab " Net", then " WAN".
V " WAN connection type:"choose" PPTP / PPTP Russia", below you will be asked to indicate the username (in the line" Username:") and password (in the line" Password:").
Static IP addressIP address / Server name:"), ip-address (in the line" IP address:"), subnet mask (in the line" Subnet mask:"), the main gateway (in the line" Main gate:") and DNS (in the line" DNS: All of the above data is provided to you by the provider (the organization that conducted the Internet for you).
All these data are usually prescribed in the contract with the provider. If for some reason you could not find them, you need to call your provider's hotline and find out how you can get them.
After you have entered all the necessary data, check the box next to " Connect automatically"(This setting will keep the Internet connection constant, so if you have NOT unlimited tariff, I recommend ticking the box next to " Connect on demand", that is, the Internet is connected only when you start using it).
After all the manipulations with the settings, press the button " Save".

L2TP configuration
Let's consider the connection setup L2TP on the router Tp-Link TL-WR841N.
So go to the menu in the tab " Net", then " WAN".
V " WAN connection type:"choose" L2T / L2T Russia", below you will be asked to indicate the username (in the line" Username:") and password (in the line" Password:"). You will also need to specify the server ip-address (in the line" IP address / Server name: All of the above data is provided to you by the provider (the organization that conducted the Internet for you).
All these data are usually prescribed in the contract with the provider. If for some reason you could not find them, you need to call your provider's hotline and find out how you can get them.
After you have entered all the necessary data, check the box next to " Connect automatically"(This setting will keep the Internet connection constant, so if you have NOT unlimited tariff, I recommend ticking the box next to " Connect on demand", that is, the Internet is connected only when you start using it).
After all the manipulations with the settings, press the button " Save".

Configuring L2TP with Static IP
Let's consider the connection setup L2TP with static IP on the router Tp-Link TL-WR841N.
Usually, a static IP address is provided to legal entities, or as an additional service to the basic tariff for individuals.
So go to the menu in the tab " Net", then " WAN".
V " WAN connection type:"choose" L2T / L2T Russia", below you will be asked to indicate the username (in the line" Username:") and password (in the line" Password:").
Since the connection uses a static IP address, you check the box next to " Static IP address", then specify the server ip-address (in the line" IP address / Server name:"), ip-address (in the line" IP address:"), subnet mask (in the line" Subnet mask:"), the main gateway (in the line" Main gate:") and DNS (in the line" DNS: All of the above data is provided to you by the provider (the organization that conducted the Internet for you).
All these data are usually prescribed in the contract with the provider. If for some reason you could not find them, you need to call your provider's hotline and find out how you can get them.
After you have entered all the necessary data, check the box next to " Connect automatically"(This setting will keep the Internet connection constant, so if you have NOT unlimited tariff, I recommend ticking the box next to " Connect on demand", that is, the Internet is connected only when you start using it).
After all the manipulations with the settings, press the button " Save".

PPPOE setup
I bring to your attention Video instructions for setting up the connection type PPPOE on the router Tp-Link TL-WR841N using the example of the Tp-Link TL-WR1043ND router.
PPPOE on the router Tp-Link TL-WR841N.
So go to the menu in the tab " Net", then " WAN".
V " WAN connection type:"choose" PPPoE / PPPoE Russia", below you will be asked to indicate the username (in the line" Username:"), password (in the line" Password:Confirm the password: All of the above data is provided to you by the provider (the organization that conducted the Internet for you).
All these data are usually prescribed in the contract with the provider. If for some reason you could not find them, you need to call your provider's hotline and find out how you can get them.
After you have entered all the necessary data, check the boxes next to " Dynamic IP address" and " Connect automatically"(This setting will keep the Internet connection constant, so if you have NOT unlimited tariff, I recommend ticking the box next to " Connect on demandConnect on schedule
After all the manipulations with the settings, press the button " Save".

Configuring PPPOE with Static IP
Let's consider the connection setup PPPOE with static IP on the router Tp-Link TL-WR841N.
Usually, a static IP address is provided to legal entities, or as an additional service to the basic tariff for individuals.
So go to the menu in the tab " Net", then " WAN".
V " WAN connection type:"choose" PPPoE / PPPoE Russia", below you will be asked to indicate the username (in the line" Username:"), password (in the line" Password:") and password confirmation (in the line" Confirm the password:"). Since the connection uses a static ip-address, you check the box next to" Static IP address", then specify the ip-address (in the line" IP address:"), subnet mask (in the line" Subnet mask:").
All of the above data is provided to you by the provider (the Organization that conducted the Internet for you).
All these data are usually prescribed in the contract with the provider. If for some reason you could not find them, you need to call your provider's hotline and find out how you can get them.
After you have entered all the necessary data, check the box next to " Connect automatically"(This setting will keep the Internet connection constant, so if you have NOT unlimited tariff, I recommend ticking the box next to " Connect on demand", that is, the Internet is connected only when you start using it, or" Connect on schedule", that is, the Internet works at a certain time specified by you).
After all the manipulations with the settings, press the button " Save".

Changing the password of the web interface
I bring to your attention Video instructions for changing the password on the web-interface of the router Tp-Link TL-WR841N using the example of the Tp-Link TL-WR1043ND router.
Resetting the password of the web interface
In case you put a password on the web-interface of the router and forgot it, I suggest you watch the Video instruction on resetting the password of the web-interface on the router Tp-Link TL-WR841N using the example of the Tp-Link TL-WR1043ND router.
Firmware upgrade
I bring to your attention Video instructions for updating the firmware on the router Tp-Link TL-WR841N using the example of the Tp-Link TL-WR1043ND router.
Connecting a computer to wi-fi
After connecting and configuring the router, you need to connect the computer to a wireless network (wi-fi), consider connecting to wi-fi in two operating systems, this is Windows 7 and Windows 10:
Windows 7
Video instruction

Sultan

Connect automatically" and press
"Connection".


Windows 10
Video instruction
In the lower right corner of the desktop, we find the wireless network (wi-fi) icon, click on it with the left mouse button.

A window pops up with a list of available wireless networks. We choose a wireless network, in my case it is a network " Sultanova"(You choose the network that was named when).

After selecting a network, check the box next to " Connect automatically" and press " Connect".


We are waiting, perhaps a couple of seconds and you are connected to your wireless network.

Determining the network settings of the Internet service provider
Before connecting a router, you need to know what network settings are needed to connect to the Internet.
The most common types of network settings are:
- Dynamic IP- dynamic settings, issued automatically by DHCP
- Static IP- static settings, entered manually
- PPPoE- Internet access is provided via PPPoE protocol after entering username and password
It is assumed that you have Windows 7 installed, the provider's cable is connected to the computer, and Internet access is configured.
Go to "Change adapter settings".

Right click on "Local Area Connection" and select "Properties"

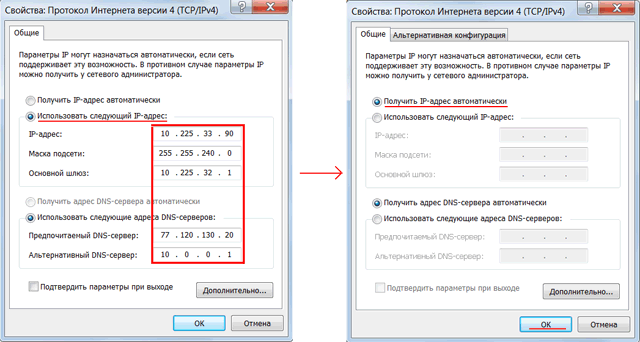
Click on "Internet Protocol Version 4 (TCP / IPv4)" and the "Properties" button.

- If you have selected the item "Use the following IP address" and there are numbers, then write down all settings Are the static settings of the provider ( Static IP). Then select "Obtain an IP address automatically" and click "OK".
- If you have selected the "Obtain an IP address automatically" item, then you will receive the network settings automatically - these are the dynamic settings of the provider via DHCP ( Dynamic IP).
There are providers that block Internet access by MAC address (see the agreement). In this case, you need to configure the router so that it has the same MAC address that is registered with the provider.
To find out the MAC address of the network card, click "Start", in the "Find programs and files" window, write the command cmd and press Enter.

We write the command in the console ipconfig / all and press Enter.

We are looking for "Ethernet adapter Local Area Connection ..."

In field " Physical adress»Shows your MAC address of the network card. We rewrite it.
Connecting and configuring a TP-Link router
To configure Wi-Fi router Tp-Link we need:
- provider cable (Triolan, MaxNet, Vega, Volya, Airbites, or others without vpn);
- computer or laptop;
- a TP-Link router that will distribute the Internet via Wi-Fi to a laptop, TV set with Wi-Fi, a tablet or smartphone.
Let's connect the equipment as follows:
- plug the power supply into the "Power" router connector;
- connect the ISP cable to the blue WAN port of the router;
- connect the computer to the router using a network cable to any yellow LAN port;
- the rest of the devices (laptop, tablet, TV with Wi-Fi, smartphone) will be connected wirelessly via Wi-Fi.

Let's move on to configuring the router.
Open Internet Explorer and enter 192.168.1.1
Attention! The proxy server should not be specified in the browser settings
In the window that appears, enter the username admin and password admin.

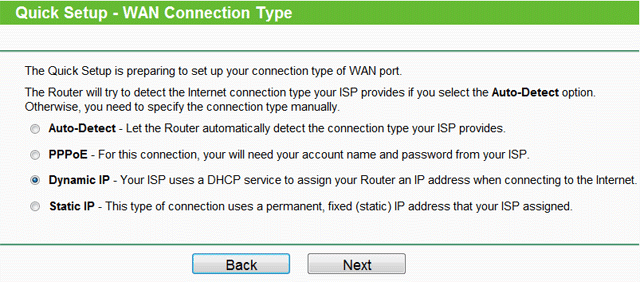
On the left in the menu, select the quick setup wizard Quick Setup and press the button Next.

Dynamic IP— automatic network settings of the provider via DHCP
If you get automatic network settings, then choose Dynamic IP and press the button Next.
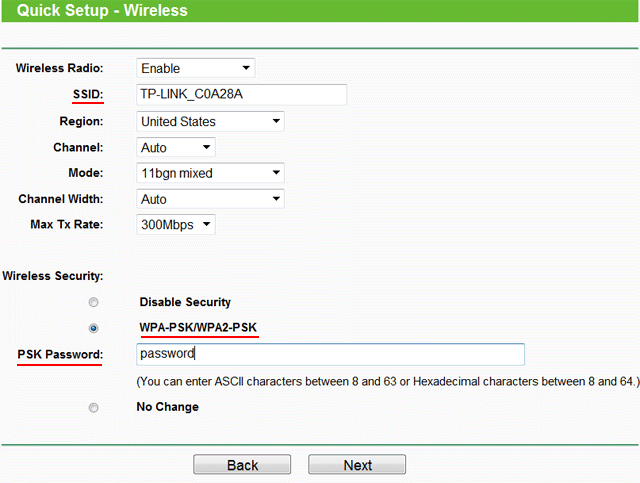
In field SSID
In chapter Wireless security specify the type of encryption WPA-PSK / WPA2-PSK
In field PSK Password:
Finish.

Network - MAC clone.
In field WAN MAC Address enter the MAC address.
Alternatively, click Clone MAC Address if in the field Your PC's MAC Address

Static IP— provider's static network settings
If the network settings need to be entered manually, then select Static IP, press the button Next.

Enter the settings:
- IP Address(IP address)
- Subnet mask(Subnet mask)
- Default gateway(Main gate)
- Primary DNS(Preferred DNS Server)
- Secondary DNS(Alternative DNS Server)
- and press Next

In field SSID enter the name of the access point for connecting via Wi-Fi.
In chapter Wireless security choose the type of encryption WPA-PSK / WPA2-PSK
In field PSK Password: enter the password to access the Wi-Fi access point. The password must be at least 8 characters long.
The next window indicates that you have successfully completed the configuration. Push the button Reboot and wait for the router to reboot.

If the provider blocks access by MAC address, select on the left in the menu Network - MAC clone.
In field WAN MAC Address enter the MAC address.
Alternatively, click Clone MAC Address if in the field Your PC's MAC Address the required MAC address is found.
PPPoE— Internet access by user and password
If Internet access is provided via PPPoE after entering the username and password, then select PPPoE.
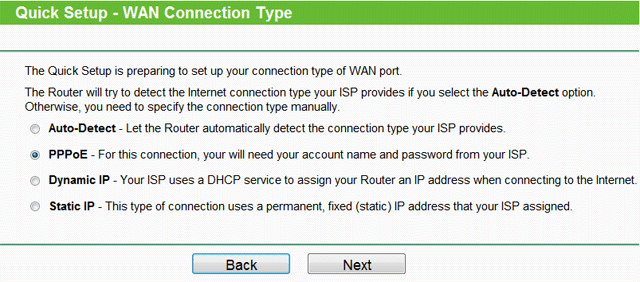
Enter the settings:
- User Name:(Username)
- Password:(Password)
- Confirm Password:(Confirm password)
- and press Next

In field SSID enter the name of the access point for connecting via Wi-Fi.
In chapter Wireless security choose the type of encryption WPA-PSK / WPA2-PSK
In field PSK Password: enter the password to access the Wi-Fi access point. The password must be at least 8 characters long.
The next window indicates that you have successfully completed the configuration.
Push the button Reboot and wait for the router to reboot.
TP-Link router security settings
To prevent anyone other than the administrator from entering the settings of the router, you need to change the password to enter the settings.
To do this, select on the left in the menu System Tools - Password and enter the settings:
- Old User Name: old username, enter admin
- Old Password: old password, enter admin
- New User Name: we enter a new username, you can leave admin
- New Password: enter a new password
- Confirm New Password: confirm new password

After that we press the button Save to save the password.
Connecting your laptop to the Internet
We will connect the laptop to the Internet via Wi-Fi.
To do this, in the lower right corner of the monitor, select the control icon for wireless networks. After updating the list of wireless networks, our network should appear in it. Select it and click the "Connect" button.

In the next step, enter the password to connect to the Tp-Link router via Wi-Fi.

Enter the password that you specified in the field PSK Password: in the router settings. After that, the Internet will appear on the laptop.
You can connect devices that support Wi-Fi operation to the Tp-Link Wi-Fi router, for example, TV, netbook, tablet, smartphone. To do this, select the Tp-Link access point in the device and enter the password.
Password recovery for entering TP-Link router settings
If you have forgotten the password for entering the settings of the Tp-Link router, you can restore the factory settings and password.
To do this, on the back of the router, hold down the Reset button for 8-10 seconds.
In this article, I will explain how to set up a TP-LINK router. Specifically, we will talk about configuring the router TL-WR841ND, but since the admin panels of all routers of this company are very similar, you can configure another TP-LINK's router. This will not be a mega-overview of all the capabilities of the router, because there are a lot of them. I will consider only those tabs that are needed by an ordinary user to set up a router for home.
Of course, you can configure the connection using the disk that comes with the router, but unfortunately this does not always work. Therefore, I prefer to do the configuration manually. Moreover, the setup takes 10-15 minutes.
So the first thing you need to do is find out your connection type and Internet connection parameters (IP address, subnet mask, login, password). Usually, this data is provided by the provider along with the connection contract (agreement). If you have not found them or have lost them, then you will have to contact the provider's technical support service to get them.
Let's say there is data. Now let's start actually setting up the router.
1. We connect to the router
Plug in the power cord of the router and connect it to the network. Press the power button on the router.
Then insert the network cable (included with the router) one end to the network card of your computer, and the other to the LAN port of the router (yellow).

2. We go to the admin panel of the router
Now when the router is physically connected to the computer and the network connection between them is configured, you need to open any browser (Internet Explorer, Opera, Firefox, Chrome) and enter the address of the router in the address bar (for TP-LINK, by default, this is 192.168.1.1).
Then a window will appear in which you need to enter your login and password to access the admin panel (by default, Login: admin and Password: admin).

In general, the factory login and password are generally always indicated on the bottom of the device.

Therefore, even if you have another router, even from another manufacturer, then look at the sticker at the bottom of the device.
If you entered everything correctly, you will see the start page of the admin panel:

On the right - a column of sections, in the center - the contents of the section and the fields where we will change the settings, on the right - a little help, but unfortunately for many it will not help much. she's in english.
Do not rush to be intimidated by a lot of sections, but most of them are for experienced users and for fine-tuning the router. In order to simply force the router to connect to the Internet and then distribute the Internet over Wi-Fi and over a local network, 3-4 tabs are enough.
3. Configuring an Internet connection
To configure the Internet on a TP-LINK router, go to the Network section (in the right column in the admin panel). Next, go to the WAN subsection
I hope you have already learned your settings for connecting to the Internet. In Ukraine (and indeed in the CIS), the following four connection methods are most often used by providers: Dynamic IP, Static IP, PPPoE, PPTP. Select your connection type in the drop-down list (in the center at the top) and go to the appropriate tab below:
Dynamic IP connection type
For this type of connection, you do not need to enter anything. Just select it from the list. For some providers, it may be necessary to enter the addresses of the DNS servers, but in most cases this is not required.

Then click on the Save button.
Connection type Static IP
For this type of connection, you need to enter your IP address, subnet mask, gateway address and possibly the addresses of DNS servers. You can find out all these settings from your provider.

When you have entered all the addresses, do not forget to click on the Save button
PPPoE connection type
For this type of connection, you need to enter a username, password and confirmation password. Also, for the CIS, you will most likely have to put the Static IP dot in front of the Secondary Connection and enter the IP address and mask.
If you want the router to always be connected to the Internet (usually it is better to put it this way if you do not have a megabyte traffic meter), then you need to put a dot next to the Connect Automaticaly item

PPTP connection type

If the provider binds to the MAC address of the network card (a unique address that the network equipment possesses), which is mainly relevant for the Dynamic IP and Static IP connection types, then you need to additionally go to the MAC Clone subsection and click the Clone MAC Address button. In this case, the MAC address of the router will become the same as the MAC address of the network card and the provider will not detect that you have installed the router.

4. Set up a Wi-Fi network on TP-LINK
To configure a Wi-Fi network, we need 2 subsections. First, go to the Wireless section and the Wireless Settings subsection.
Here you just need to select your country from the list and enter the SSID. You need to come up with a unique identifier so that it does not accidentally coincide with the network identifier of your neighbors, otherwise failures may occur. Usually it is enough to add the apartment number to the network name (for example TPLINK33)

Let's briefly consider the rest of the parameters (in most cases, you do not need to change them):
Channel - the choice of the radio channel, if the devices do not connect well to the wi-fi network, then you can try to specify the channel explicitly (I usually choose 6 or 11)
Mode - the choice of the standard, if you do not have devices that can work according to the 802.11n standard (what standard the device can work according to is usually indicated on the box or in the documentation on the wi-fi icon), then you can put bg mixed.
Channel width - width of the data transmission channel.
Max TX Rate - maximum transmission rate.
Enable Wireless Router Radio - enables and disables the wireless module on the router (i.e. enables and disables wi-fi)
Enable SSID Broadcast - allows you to enable or disable the visibility of the wi-fi network, if this option is disabled, then you can connect to the wi-fi network only knowing its identifier (SSID), but this network will not be found in the usual wi-fi search.
Enable WDS - this option is needed to expand the coverage of an existing wi-fi network.
After finishing the configuration, do not forget to click the Save button
5. Configuring the security of the Wi-Fi network
To configure the network security settings, go to the Wireless section and the Wireless Security subsection.
Here you can configure the encryption method and password. I recommend choosing WPA2-PSK encryption method. You can leave the encryption type as Automatic. The most important thing is to come up with a more complicated password (containing letters and numbers), 10-15 characters long. You still have to enter it only once on each new device, and for those who want to guess the password for your network, a complex password will become a more significant obstacle than a simple one. (For example, put something like ERG345tr4R).

After you have set up the password for the wi-fi network - do not forget to click on Save
6. Set up a local network (if necessary)
To set up a local network on a TP-LINK router, you need to go to the Network section and the LAN subsection. Here you can set the IP address of the router. From the same range of IP addresses, the router will distribute addresses to devices connected to it. You don't have to change anything in this section.

7. Setting the administrator password
And finally, to ensure complete security, change the administrator password on the router (agree with the admin password - it doesn't look reliable). This password is used to enter the router admin panel.
To do this, go to the System Tools section, Password subsection. Enter the old username (admin) and password (admin), and below enter the new name (you can leave the same) and password (but be sure to change it).

8. Reboot the router
You have probably already noticed that when you click on the Save button, the following inscription appears at the bottom:
This inscription says that you need to reboot the router to make changes. Click on the words click here and in the window that appears, click the reboot button. The router will reboot with the new settings.

9. Connect and work
Well, the configuration of the router is complete. Now you need to connect a cable to it through which the provider provides Internet access. (To the blue port on the router). Up to 4 PCs or laptops can be connected to the yellow ports.

10. Purpose of router indicators
And finally, let's look at what the indicators on the top panel of the router show.

First indicator. - Power (power indicator) - shows whether the router is on or off.
The second indicator - System (system indicator) - normally blinks, if it just lights up - the route is initializing or an error has occurred, if it is off - then a system error has occurred.
The third indicator shows the state of the Wi-Fi network. Blinking when wi-fi is on and off when off.
LEDs 4 through 7 - Shows the status of the LAN connection. Lit - the cable is connected, but there is no network activity, Blinking - data exchange between the router and the PC, Off - no connection.
The eighth indicator - Internet - shows whether the Internet connection is active. On - the Internet is connected, Blinking - there is a connection or data exchange, Off - the Internet cable is not connected.
The last indicator shows the status of the QSS (Quick Secure Setup) function. This function is used to quickly connect devices to the router. It is mainly used to connect TP-LINK cards to a wi-fi router.


