In fact, almost all hard drives of any type should work fine on any motherboard with a SATA II/III interface, which is 99% of all existing models. The exception is M2.PCIe SSDs, and these hard drives require an appropriate interface on the motherboard.
Thus, compatibility is determined only by the presence of an interface on the motherboard. Or, in other words, any hard drive with SATA is compatible with any chipset.
Features of installing an OS on an SSD
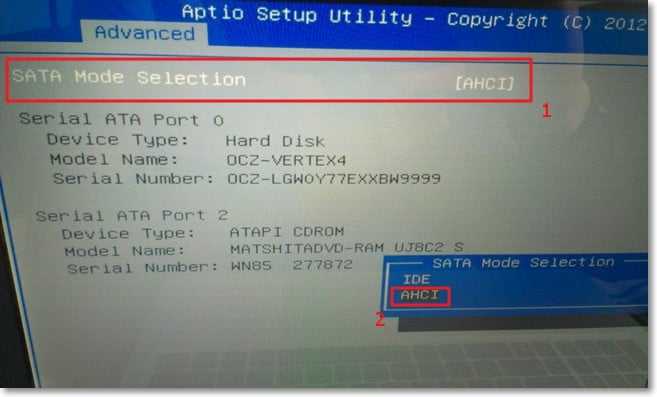
The standard procedure for installing an operating system on an SSD differs in only a couple of steps.Step 1. Before installing in the BIOS, it is advisable to switch the SATA mode option to "AHCI" mode. This option allows you to enable extended host controller mode for the standard IDE/SATA chipset controller. If set to "IDE", drives will be accessed using a mechanism similar to a regular IDE controller.
In simple terms: your storage device usage in IDE mode will be slightly limited, but it is guaranteed to work. However, this technology is morally obsolete, because it was really needed in the days of Windows 2000\xp. But, nevertheless, in all motherboards this mode is set by default as a tribute to memory.
"AHCI" value unlocks the SATA II/III host controller. In this mode, any hard drive is faster, but there is one feature for SSD. In IDE mode, there is no option to activate Trim, an operation that extends the life of your SSD. The fact is that multiple overwriting of memory blocks can lead to a decrease in device performance, and for this Trim notifies the system about data blocks that are no longer contained in the file system and can be used by the drive for physical cleaning.
Step 2. After activating the AHCI mode, you need to change the boot device from the CD-\DVD-drive\image to a USB flash drive and install the OS the way we always did.
What can be the problem when installing the OS
Often you can meet this situation: when connecting an SSD to SATA II, the BIOS detects a storage device, but does not see the memory, and when connected to SATA III, it sees the memory, but cannot detect the device.There are two ways to solve this problem.
1. Motherboard firmware
The fact is that when new SSD models are released, new architectures and technologies are used, which cannot always be considered a "right away" board. On your board manufacturer's website, you can find the latest update for your model and update the firmware.However, it is worth remembering that the process of updating the motherboard firmware is a direct access to the memory of the board with low-level commands. Any power failure can "destroy" your board, so make sure your power supply is stable. You can ask your friends, for example, for a UPS in such a case.
After the update, in most cases the BIOS will detect both the memory and the storage device.
2. Installing the operating system by migration
This method is safer, simpler, and in case of an error, your data will remain safe and sound. It doesn't matter if your SSD chipset sees it as a device or not, since all the work will be done by a special boot system that will access the disk exclusively as memory. The idea of the method is as follows: there are two or more hard drives, one of which is the system one, and the second one is empty or will be formatted.A special pre-boot OS that will be loaded in RAM will force-copy all data from the physical Windows partition to a new blank hard drive (no matter HDD or SSD).
As a result, we will get a new, copied hard drive, and when we install it on a new PC, we will get exactly the same as on the original PC, down to the system and desktop configurations.
Question: why are both memory and device needed during installation, and when starting / copying, one of the components is enough?
The fact is that these are features of the operating systems themselves. When installing the OS, the drivers are automatically configured for all devices that the system can find, and if it finds a discrepancy somewhere, it enters a “stupor”. When copying with migration, this problem does not exist.
It is important to remember that you cannot migrate an operating system from one logical partition to another on the same hard drive. To perform this operation, you must have two physical hard drives.
There are two ways to migrate an operating system from one disk to another: using standard Windows tools or using utilities. In the first case, you will have to mess around with the command line, in the second, the utility \ program will do everything for us. Choose any. This may be a program from the manufacturer of your SSD, or it may be a third-party development.
Examples of popular OS migration utilities
The most popular utility is Acronis True Image WD Edition. After installation, you need to select the "clone disk" option, select the source disk and destination disk, and wait for the process to complete after several reboots.

There is also the O&O SSD Migration Kit, which also copies Windows to an SSD.
Another free program in Russian that allows you to easily transfer the OS from your hard drive to a solid state drive or to a new HDD is Aomei Partition Assistant Standard Edition. To transfer, follow the same steps as described above.

The choice of the most convenient program is up to you.
After successfully installing the system, return to the BIOS, select the SSD drive as the operating system reader. It doesn't matter if the BIOS sees it as memory or as a device, Windows will start successfully. The old hard drive can be formatted or removed.
Outcome
When choosing an SSD, you should not think about whether it will fit your motherboard. Of course it will. Choose a device according to its characteristics, price, type of memory, your personal preferences. And the problems that were described in this article can overtake anyone, regardless of which SSD you purchase. And, fortunately, all these problems are solvable.We have talked about the numerous advantages of the so-called solid-state (SSD) devices many times. Switching from a classic magnetic disk to an SSD will speed up your computer to such an extent that the difference will be noticeable, so to speak, with the naked eye, that is, without the help of specialized tests. We are talking about ultra-fast copying of files, instant launch of the operating system and applications, including heavy games and graphics programs such as Adobe Photoshop.
And despite this, many users are still afraid to take this extremely useful step. They, of course, have their own rationale, rooted in some of the still unresolved weaknesses of SSD technology. However, with careful planning, and with the willingness to spend a little of your personal time and effort, they can be easily neutralized. Here's how.
Divide and Conquer
It's no secret that in order to get the most out of an SSD device, it must be used as a system drive. In other words, the operating system must be installed on it.
When running, Windows (and any other operating environment) makes a large number of accesses to the system drive. Due to its high speed, an SSD drive can reduce the time of these accesses by several times and speed up the overall system performance by several times.
Unfortunately, the lightning-fast response of this class of drive still comes from the too high price per gigabyte of space. As a result, most users get a device with a very high speed and a relatively limited (by today's standards) capacity - often in the range of 120 to 250 GB.
This is further complicated by the fact that the performance of an SSD gradually degrades as its capacity fills up. This is due to the specific features of the technology for recording and storing information that is used by this type of disc. Therefore, in order to get the maximum that an SSD is capable of, it is recommended to keep at least 30-40 percent of its capacity idle.
Most operating systems, and especially Windows, love to write whatever they want to the system partition. As a result, if you let the operating system decide for itself where to save files and install applications, you may receive a warning about the lack of free space on the system drive.
It makes the most sense to install only the operating system (Windows) and a few important programs that you work with every day on the SSD - say, Microsoft Office, Adobe Photoshop, Skype, antivirus software. But in this case, a reasonable question arises: “Where to keep everything else?”
One option is to connect a regular hard drive in addition to the solid state drive. This is the ideal solution for bulky programs and files, which, however, do not necessarily need the high speeds provided by an SSD. This includes a collection of music files, digital photo albums, digital movies. If you are an avid gamer then this could be most games. In principle, you can install only the game that you are playing with at the moment on the SSD, and leave the rest of the collection on the HDD.
But what if you have a laptop and its design does not allow you to install a second drive? In this case, you can save your files and install applications on an external hard drive. If using a bulky HDD seems far from the most practical solution, then use a USB flash drive. Today, the market offers models with impressive volume and super-compact dimensions, which are incredibly small and almost invisible when connected to a laptop's USB port.

Of course, there are certain inconveniences in storing some of the information on an external medium, because it must always be carried with you. If you forget your USB flash drive or external HDD at home, you will forget everything that is stored on it.
Move Programs
Now that you know the pros and cons of storing files on an SSD and an additional drive, it's time to say a few words about how to put it into practice.
The easiest and fastest way is to select an alternative drive instead of the default location during the installation of the corresponding application (usually the Program Files folder on the system drive). But how to move already installed programs without spending precious time reinstalling them?
Some applications, such as Steam (a client that manages a library of games distributed through Valve's digital service of the same name), offer a quick and easy solution for just that. In particular, Steam allows you to move all your installed games with a few clicks.
Just open the settings menu, find the "Downloads" section, click on the "Steam Library Folders" button and change the default system partition to a new location. The Steam Agent will take care of the rest of the work and move all downloaded and installed games to the new location you specified.

Unfortunately, not all installed programs can be moved as easily, and if you simply copy their folder to another disk or partition, they may stop working correctly, or even stop working altogether. Fortunately, Windows has a solution to this problem - the so-called "symlinks" (symlinks). They are created using a special system command, and their purpose is to "deceive" Windows that the program is installed on a certain (disk) partition, when in fact it is located on a completely different one.
Let's say you have a program installed in the C:\Programs folder. Move it to another drive in a folder with the same name: D:\Programs. To create a symbolic link between two folders, you can use the mklink command, which works on the command line. In our specific example, the command would be:
mklink /d C:\Programs D:\Programs
After executing the command, Windows will have a symbolic link between the two folders, i.e. the program will be on the D: drive, and the operating system will think that it is on the C: drive.
Move system folders
As you know, Windows organizes all user files in special folders called Libraries. They are designed to store music and video files, digital images and documents.
Although these folders are located on the system drive by default, they can be easily moved to any drive and even to external media.
As already mentioned, this is an extremely simple operation. Find these folders on your system drive where they were created by default during Windows Setup (C:\Users\Username). Then right-click on the one you want to move, select Properties, Location, Move, and select the directory where you want to move the folder. After that, the moved folder will still appear in C:\Users\Username, but all the files it contains will actually be written to the alternate drive you specified. You can move all of your Libraries folders - Music, Videos, Pictures, Documents, and Downloads - with this simple process.

Keep Clean
Transferring non-essential files and applications is a big first step, but not enough if you want to keep at least 30-40% of the SSD's capacity idle. After you start using it actively, it will slowly but surely be filled with files, some of which are completely unnecessary. We are mainly talking about temporary files created during the operation of various programs, which are not always deleted after they are closed; browser cache and unzipped installation files.
For example, two large, competing companies that make GPUs - AMD and NVIDIA - regularly release updated versions of their drivers. They can be downloaded and installed automatically, but not all users know that before that they are written to a special folder on the system drive - usually C:\Nvidia or C:\AMD. Over time, the size of this folder increases significantly, since new versions are released almost every month, and each of them "weighs" several hundred megabytes.
As for other causes of "disk pollution" - they can be easily eliminated with the help of a small, but very useful and completely free program, which I have already mentioned many times on the pages of the site. It scans and removes all unnecessary temporary and buffer files, old system libraries, obsolete archive entries of the operating system, and so on from the disk.
If after all this it turns out that the space on the SSD is still low, check what exactly is taking up space using another small and free tool: WinDirStat. It will tell you who is the culprit of occupied valuable gigabytes.
Limit the number of entries
In addition to the high price per gigabyte, there is another reason why many people are still reluctant to look towards solid state drives - their relatively limited lifespan. The technology on which they are based provides a certain number of write cycles, after which the flash memory chips that make up the SSD wear out and the device stops working. However, SSD manufacturers are constantly trying to increase their lifespan and have recently made significant progress in this regard.
A recent independent study by Tech Report proved that even budget SSD drives can easily provide 1 PB writes, i.e. 1 petabyte or 1000 terabytes. That's 4-5 years of uptime, which puts current-generation SSDs on par with hard drives, which typically have an active life of about 6 years.
Despite this, it makes sense to take some precautions to minimize the percentage of disk wear and ensure a longer life for the disk.
For example, you can limit the number of writes to it by simply disabling some programs (all browsers and tools such as Adobe Photoshop) from using the disk buffer. To do this, you need to enter the settings menu of the corresponding program and specify an alternative partition or disk for writing temporary files (cache).
Never defrag your SSD! This is not only unnecessary, but also a dangerous operation that can shorten the life of the disk.
Defragmentation is a remnant of another era of technology and a system for organizing files on a hard drive. For SSD technology, which already provides several times faster file transfer speeds, defragmentation becomes completely unnecessary and even dangerous, since this process involves repeated read and write cycles, which, as already mentioned, can significantly reduce the life of an SSD. drive.
Have a great day!
Hello! Decide to prepare an article in which to talk about how to properly install Windows 7 on an SSD drive, and how to configure Windows 7 on an SSD drive after installation so that it works for a long time and without problems. I recently bought a laptop, took an Asus K56CM and immediately bought an OCZ Vertex 4 128 GB SSD drive for it, I really wanted to feel all the speed that an SSD gives.
In our case, the laptop / computer model and SSD drive does not matter, my instructions can be said to be universal. I will write what needs to be done immediately after installing an SSD drive in a computer and how to configure the operating system after installing it on an SSD.
If this is your first time dealing with SSDs, then you're probably wondering why there is so much attention to setting up the operating system for these drives compared to conventional hard drives. I will now explain everything in simple terms.SSD drives have a limited time to failure compared to hard drives. Simply put, they have a certain number of rewrites. Now I will not say what this number is, it is different and what is true and what is not, it is difficult to understand. For example, for my OCZ Vertex 4, it was written in the specifications that the time to failure was 2 million hours. And the operating system during operation writes a lot, deletes and writes again various temporary files, etc. Services such as defragmentation, indexing, etc. serve to speed up the system on ordinary hard drives. And they only harm SSD drives and reduce the lines of their service.
In fact, installing windows 7 on ssd almost no different from installing on a hard drive. But after installation, you will need to make some settings in the work of Windows 7, but there is nothing complicated there either, we will do everything using the utility SSD Mini Tweaker 2.1.
What should I do before installing Windows 7 on an SSD drive?
Well, first you need to install an SSD drive in a laptop or on a computer, it doesn’t matter. I will not describe this process. There is nothing complicated in this, and this is a topic for another article. Let's say that you have already installed a solid state drive, or it has already been installed.
If you use a regular hard drive next to the SSD drive in your computer, then I advise you to disable it during the installation of Windows 7, this is so that you do not get confused when choosing a partition for installing the OS, but this is not necessary.
All that needs to be done before installation is to check if our solid state drive is working in AHCI. To do this, go to BIOS, if you don’t know how, then read the article. Next, go to the tab “Advanced” and choose the item SATA Configuration.

Select the item, a window will open in which we select AHCI(if you had another mode enabled). Click F10 to save the settings.
You are now ready to install Windows 7. Installing to an SSD is the same as installing to a hard drive. I just want to give you one piece of advice:
Try to install the original image of the Windows 7 or Windows 8 operating system. I advise you to install only one of these operating systems, because only seven and eight can work with SSD drives. Do not use different assemblies, and if you install the assembly of Windows 7, or Windows 8 downloaded from the Internet, then try to choose an image that is close to the original.
Installing the operating system. You may find the following articles helpful:
After the operating system is installed, you can proceed to Windows setup for SSD.
Setting up Windows 7 to work with an SSD drive
More precisely, Windows 7 will work anyway, our task is to make sure that our solid state drive lasts as long as possible and without various errors.
As I wrote at the beginning of the article, to optimize Windows for a solid state drive, we will use the SSD Mini Tweaker utility. You can disable all unnecessary options manually, but in the SSD Mini Tweaker program, all this can be done in a few clicks. Manually, you will need to disable only the indexing of files on local drives.
We need to download SSD Mini Tweaker first. Download version 2.1 from the link below:
The program does not need to be installed, just extract from the archive and run.
Launch the SSD Mini Tweaker utility.
You can mark all the items with checkmarks, more precisely it is not possible but necessary. I checked all the items, except that you can leave only SuperFetch, disabling this service can increase the startup time of programs. Check the boxes for the required services and click the button. "Apply Changes". Almost everything, in the same utility there is an item “Manually”, which means that you need to manually disable services. There are two of them, scheduled disk defragmentation and indexing the contents of files on the disk.

If scheduled defragmentation turns off automatically after the changes we made, then file indexing on the disk must be turned off manually on each local partition.
We go to "My computer", and right-click on one of the local drives. Select "Properties".
A window will open in which you need to uncheck the box. “Allow the contents of files on this drive to be indexed in addition to file properties”. Click "Apply".
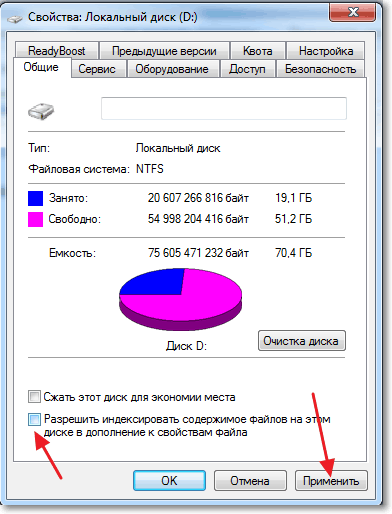
Another window will appear, click "OK".

We are waiting for the completion of the process.
When you do this procedure on drive C, then most likely a message will appear stating that you do not have rights to modify system files. I just pressed “Skip everything”, I think that eli skip a few files, then nothing bad will happen.
That's all, setting up Windows for a solid state drive is finished. You know, many say that these are different myths, you don’t need to turn off anything, etc. Maybe so, but if it was invented, then it means it is necessary and I think that in any case it won’t hurt.
It seems that he wrote everything he wanted, if you have additions, comments, or something is not clear, then write in the comments, we'll figure it out. Good luck!
More on the site:
Updated: February 7, 2018 by: admin
SSD drives (also called "solid state") are no longer a curiosity for a computer user. So how to connect an SSD drive to a computer, since you have become its proud owner?
SSD (Solid-State Drive), which roughly translates as "solid-state storage device", which replaces the HDD (or "hard" disks, "winchesters") is a non-mechanical chip-based memory unit. Due to the much higher read and write speeds, it can significantly improve the performance of your personal computer or laptop.
I will say right away that installing a solid-state drive is not much different from installing an HDD (“hard drive” or “hard drive”, as they are also called). And if it is different, it is a less demanding installation option. Why? Because SSD drives:
- unlike HDD, they do not have a movable rotating element;
- due to their design, they do not heat up and do not make noise;
- smaller (2.5" versus standard 3.5" HDD);
- more durable and less capricious to mechanical damage.
 Some SSDs come with a special 2.5-inch to 3.5-inch adapter plate (metal or plastic), which is designed to install the drive in a standard HDD bay. There are adapters from 2.5 to 5.25 inches, in case we want to install a new disc in the slots for CD / DVD drives. In some modern computer cases, manufacturers have begun to provide special slots for SSDs. If such a slot is not provided, there is no adapter in the kit, or all disk bays (slots) are occupied, you can place our SSD disk in any convenient place inside the system unit. You can fix the disc using, for example, simple vinyl clamps.
It is not recommended to use sticky tapes or double-sided tapes - such fastening will not be reliable.

So,
- turn off the power of the computer;
- remove the side panel of the system unit;
- We take out our new SSD drive from the box. *I note that if the disc is brought from the cold, then you need to let it warm up to room temperature. We save the packaging (just in case);
- We select the installation location for the SSD, fix it, connect the SATA cables to the motherboard. We are trying to use a SATA 3 6 Gb / s cable, but if you have no SATA 3 ports and cables, then you can connect an ordinary SATA cable to SATA ports.
The maximum performance of an SSD drive will be ensured when it is connected to a SATA 3.0 or higher connector at speeds up to 6 GB / s. On the board, it usually differs from others in black and the corresponding markings. In the absence of any designations for SATA 3.0, you should familiarize yourself with the documentation for the motherboard.
Then we connect the power supply from the unit (PSU), close the system unit and start the computer.
SSD drives do not tolerate overheating well. Therefore, when installing a new SSD drive, it will be useful to take care of upgrading the cooling systems. You can install for this, for example, the simplest additional fan in the side parts of the system unit. This wind blower will perfectly cool not only our new SSD drive, but also an ordinary hard drive.
BIOS setup and OS installation
Before starting the installation of the operating system on the SSD (it is preferable to do a clean installation from scratch), we enter the BIOS (basic input / output system) of your computer. The most common entry into the BIOS is by pressing the Delete key, the F1, F2 keys are used somewhat less frequently.
Consider an example of setting up the BIOS to work with an SSD on an ASUS UEFI BIOS:
We go into the advanced settings of the Advanced Mode system;
We move to the Advanced / SATA Configuration settings and look at the connected devices. It is necessary that the SSD be connected to the first SATA 3, and the HDD to SATA 2;
Be sure to remember that you need to put the SATA controller in AHCI mode;
Then we go to the Boot / Hard Drive Priorities section and install our new SSD as the first boot drive. If this is not done, the system will continue to boot from the HDD;
We save all our settings and do a reboot by pressing the F10 key. We make sure that the solid state drive is listed first among the boot HDDs. To install Windows, you can leave the CD / DVD drive as the first boot. Or we use a one-time primary boot from CD / DVD via the F8 key on ASUS boards.
On many Internet resources, unfortunate experts recommend copying, transferring, cloning or restoring from an image and the like the C:\HDD drive with an already installed OS when installing an SSD. This is by no means recommended. Get ready to install the OS from scratch after you put a new SSD drive on your computer. After all, when the OS is installed on the HDD, then all services are launched to work on the HDD. If we are transferring a system that is designed to work on an HDD to an SSD, then the vast majority of services will not only not help improve the performance of the OS and computer, but will only contribute to the rapid wear of the new SSD. In order for the SSD drive to work properly and for a long time under the control of our operating system, we definitely need to install it from scratch and on a blank SSD drive.
We set the basic time and language settings and reach the selection of partitions and disks for installing the OS;
After we saw our unallocated SSD (Disk 0), select it to install the system and click "Disk Setup";
You do not need to format the disk. Click the "Create" button and create a partition for the entire available size of the SSD;
Then click "Apply". The system requests 100 MB for its needs - we agree;
We indicate in which partition the system should be installed, in our case, on Disk 0 Partition 2, because Partition 1 is reserved by the system itself and it will not work to install the operating system on it;
Then we start the installation of the operating system itself.
After completing the installation of the operating system, do not forget to install all the necessary drivers that come with our motherboard - from the disk or from the manufacturer's website.
When a new SSD drive is installed in a computer, and the system is installed on it, and we see that everything works, it is worth thinking about optimizing the operating system to work with a flash drive.
Conclusion
In order for our new SSD drive to serve us as long as possible and not fail ahead of time, it is worth following certain rules when using it - to increase the resource of working capacity, it is necessary to leave at least 10-15% of free space on the disk.
During the entire process of using an SSD drive, you need to constantly ensure that the latest drivers for the SSD drive are installed in the system. You can usually find them on the SSD manufacturer's website. As a rule, with each subsequent firmware update, the number of drive capabilities is also updated, and its service life increases. In order to check the resource of our SDD disk, it is best to periodically run programs to detect disk errors and the amount of resource used - for example, software such as SSD Life.
Connecting an SSD as the main disk in many cases will significantly speed up the operation of the operating system installed on it, access to documents and main programs, and save you from some previously necessary operations, for example, the need to regularly defragment the disk. If, of course, the machine is old enough, the processor is single-core, the RAM is less than 4 GB, and the motherboard was released more than 6-8 years ago, then upgrading a regular computer only by installing an SSD will not give noticeable results, but 100% will give a second life to a laptop or netbook.
SSD hard drives are the future of computing. Their speed is an order of magnitude higher than that of classic hard drives and significantly speed up any computer.
Before you buy such a hard drive, you need to know how to connect ssd and prepare it for optimal performance. It should be noted that, according to the principle of installation, the latest hard drives are not very different from the installation of the previous generation of drives. But there is still some difference.
Distinctive features of solid state drives.
Before, how to connect ssd drive to computer you need to clearly understand its features and differences.
Key Features SSD storage are as follows:
- No rotating parts or components.
- The absence of any noise.
- There is no significant heating even under extreme load.
- Minimized size (so-called 2.5-inch form factor).
- Perfectly transfers vibration and fluctuations.
By its principle of operation, a solid state drive is similar to a conventional flash drive, but far surpasses it in reliability and speed.
How to connect the hard drive to the system unit? It's very easy if there is a special adapter plate that allows you to mount it in a regular bay intended for standard drives. Modern cases have specialized bays that were originally designed for SSD drives.
Steps for connecting an SSD drive to the system unit.
The best thing, connect drive in several successive steps. Thus, all possible risks can be avoided.
- Step 1: Turn off the power.
It is necessary to completely de-energize the system unit and unplug the power cable from the connector. It is advisable to wait five minutes for the static electricity to dissipate.
- Stage 2. Preparation for installation.
You will have to arm yourself with a long Phillips screwdriver. It is necessary to remove two side walls (usually you have to unscrew four bolts). Then you should find the hard drive basket. In the vast majority of cases, it is located at the bottom on the same level as the power supply.
- Stage 3. Direct installation
This is where you need an adapter bar that allows you to mount an SSD drive in a 3.5-inch block. It only takes 4 screws, a little dexterity and patience, and the hard drive will be fixed. It should be noted that all connectors must be outside, since in the future you will have to connect the hard drive with two wires.
- Stage 4. Connection
The drive is connected by two cables: a power cable and an information bus. Connect to motherboard information bus. It is a narrow cable with a small latch on the underside.
Cable with a wide connector - power. It comes from the power supply and it is not difficult to find it. Both cables should be connected all the way so that they do not hang out in the connectors, but sit firmly.
Important! If the motherboard has connectorsUSB 3.0 then you need to connect to them. This will increase the speed of the drive. Finding 3.0 connectors is easy. They are painted in bright colors (blue, red, green) and stand out against the background of the portsUSB 2.0
- Stage 5. Completion of work.
In the future, you need to close the covers, screw them on and connect the power. Then you can turn on the computer and start partitioning and formatting the hard drive.
InstallationSSD disk in laptop.
This procedure is more laborious, it requires more knowledge and skills, but it can also be done independently.
First of all, the laptop must be unplugged and the battery removed. Then you have to remove the back cover (or a special cover that covers the hard drive). It can hold from 4 to 8 bolts.
You should evaluate the situation, since in some laptop models the hard drive is installed on a sled and removed with them, while in other models it is mounted on special stationary mounts.
If sleds are used, then they must be removed and rearranged on a new hard drive. If they are not there, then it is enough to remove the old hard drive, and you can install a new one.
There are no cables in the laptop, and the power and SATA connectors are fixed firmly, so you should insert the hard drive carefully so as not to damage them.
After the SSD drive is installed, you can close the lid of the laptop and turn it on. In the future, you can install the operating system using the installation CD or a specially prepared flash drive.
Do not doubt that you will be able to cope with the work yourself. It is not as complicated as it seems at first glance. As a reward, you will have a fast operation of the device as a whole.