For the SUFD to work correctly, you must:
1. The presence of the operating system Windows XP or Windows 7, since support for newer versions of the operating system Windows, as well as other operating systems in the SUFD is absent. All settings described below apply only to Windows XP and Windows 7.
2. Install Java version 6.17, Java 7.67 The required settings for each version of Java for correct work with the FMS are indicated below. Do not install 64-bit Java, even if you have a Windows x64 operating system. Be sure to disable Java update if you installed version 6.17 or 7.67!
Do not put Java on top of old Java, otherwise there may be problems with signing documents. First, you need to remove the installed version and only then install a new one.
3. Install Mozilla Firefox... If you have Java 6 installed, then you need to install Mozilla Firefox earlier than version 18, for example, version 16. In other cases, it is better to install Mozilla Firefox one of the latest versions, but definitely less than 52 version, since Java support is disabled in it and subsequent versions. For example, version 51.0.1 is suitable. Mozilla Firefox The required settings for the correct operation of Mozilla Firefox with the FMS are listed below. Do not install the 64-bit version of Mozilla Firefox, even if you have a Windows x64 operating system, as 64-bit versions lack support for many plugins, including Java. Be sure to disable the Mozilla Firefox update! It is recommended to use Mozilla Firefox browser to work with the SUFD-portal. All other browsers (Opera, Google Chrome, Internet Explorer) may not work correctly with the FMS portal.
4. Install CryptoPro 3.6.
5. Install Continent AP 3.5, a certificate for the AP Continent and make sure it connects to the server.
6. Install the root certificate from www. roskazna. ru from the section GIS-> Certification Center-> Root Certificates
7. Install personal certificates of SUFMS users.
8. Add to the file "C: \ WINDOWS \ System32 \ drivers \ etc \ hosts"two lines:
10.54.200.66 s5400w03.ufk54.roskazna. local s5400w03
10.54.200.66 sufd. s5400w03.ufk54.roskazna. local sufd
If you have Windows Vista or Windows 7 , then before making changes to the file hosts you need to copy it to another place, for example, to the Desktop and edit it already there. After saving the changes, the edited file hosts copy it back to the "C: \ WINDOWS \ System32 \ drivers \ etc \" folder and replace the old file with it.
9. Check that the website opens in Mozilla Firefox 10.54.200.66:28081
If a message appears that the server was not found, then you must perform the following actions:
a. You need to find out if the Windows operating system is using the hosts file you edited. To do this, you need to run the command line: Start - Run, in the window that opens, enter the cmd command and click [OK].
b. A black window will open (this is the command line) in which you need to write "ping 10.54.200.66" (without quotes) and press.
c. If the message "Node 10.54.200.66 was found during ping test. Please check the node name and try again", then Windows does not see the file you edited. Try copying the edited hosts file to the "C: \ WINDOWS \ System32 \ drivers \ etc \" folder again and replace the old file with it.
Configuring the listed application software:
Checking installed Java version:
1. Go to Control Panel - Java - This is the version of Java you have installed.
2. You must go to Control Panel - Java - Java - and make sure there is only one row each in both tabs.
3. If there are two or more of them, then several versions of Java are installed. It is necessary to uninstall all versions after Control Panel - Add or Remove Programs(In Windows Vista / 7 Java is removed under Programs and Features).
5. Install Java.
Note: Any version of Java listed below works.
Java7
1. Go to, uncheck the box and reply to the message that appears.
2. On the "Security" tab, lower the slider to the "Medium" level.
3. Go to the "Advanced" tab, scroll down the list to the "Mixed Code ..." section and put a full stop next to the words "Disable verification (not recommended)". Click.
Java6 Update 17
1. Go to Control Panel - Java - Update, uncheck the box and reply to the message that appears.
Mozilla Firefox
You can also use Mozilla Firefox 3.6, but its configuration will be slightly different from the one described here.
1. Go to Tools - Options and on the "Content" tab, uncheck the "Block pop-up windows" item. Click.
2. Go to and on the "Network" tab, click the [Configure] button opposite the "Connection" item. In the "Connection settings" window that appears, select the "No proxy" item and click.
3. Go to Tools - Options - Advanced and on the "Updates" tab, select "Never check for updates." Click.
4. In the address bar, type "about: config" and press on the keyboard.
5. Press the button [I promise I'll be careful!].
6. Find parameter " extensions. blocklist. enabled"and change the value to" false"by double clicking on this line.
7. Go to Tools - Addons
8. In the "Extensions" and "Plugins" sections, find all the lines that mention Java and make sure they are enabled (if there is a "Disable" button, then the plugin is enabled). If Java plugins are disabled, then they need to be enabled. If instead of the button there is a drop-down list, then select the "Always include" option.
9. Restart Mozilla Firefox
Note: These settings for Java and Mozilla Firefox programs are identical for different versions of Windows (XP, Vista, 7, 8), but unlike Windows XP in other versions of Windows, due to the security system being triggered, the settings may not be saved. Therefore, it is advisable to re-enter the settings of these programs and check that the changes you made have been saved.
Technical requirements
Java - Installation and Configuration
Mozilla Firefox - Installation
Connection to the SUFD-Portal
Creating and sending a document in the SUFD-Portal
Typical mistakes
Technical requirements
To work with the AWP DUBP Portal, it is necessary that the following technical requirements are observed at the workplace:
1. There is access to the Internet with an access speed of at least 128 kb / s, 512 kb / s or more is recommended for comfortable work.
2. At the workplace from which the work with the Portal will be carried out, the operating system must be installed:
2.1. Windows 2000
3. At the workplace from which the work with the Portal will be carried out, additional software must be installed
3.1. SKZI "Continent-AP" (provided by the FC body)
3.2. CryptoPRO CSP CIPF version 3.0 or higher (provided by the FC body)
3.3. Antivirus protection tools
3.4. Internet Explorer browser version 8 or higher or Mozilla Firefox version 3.6 and higher, it is preferable to use Mozilla Firefox browser, because when using this browser there are fewer signing errors
3.5. Java versions 7.67, 7.71, 7.75 etc with disabled option Mixed code, but not higher than version 7.80
3.6. Installed a certificate of the certification center (provided by the FC body)
Java - Installation and Configuration
Distribution version 7.67 : http: //java. com/ ru/ download/ manual. jsp# win
Additionally, you may need to install:
After installing Java, be sure to disable verification:
for this - go to “ Control Panel”And open Java,


Set parameter: Medium.
Only after that Java is ready to work !!!
For information, "clear cache" - temporary files in Java:
Go to tab: General ;
Mozilla Firefox - Installation
On the latest versions of Mozilla Firefox, the developers have abandoned the automatic launch of the Java plugin, as it has security issues. To enable the plugin, follow these steps:
1. Click on the red plugin icon in the address bar and a message box will open.
2. At the bottom of the message window, click on the drop-down menu to the right of the "Enable all plugins" button and select "Always enable plugins on this site".

Connection to the SUFD-Portal
To work in the SUFD Portal, you must consistently perform the following steps:
Establish a secure connection using the Continent-AP program.
Launch Internet Explorer or Mozilla Firefox browser.
Enter the link in the address bar:
The Registration window will open:

Attention! If the username and password are entered incorrectly 3 times , then, the user will be blocked for 10 minutes.

All work is done using the menu tree. In it, by opening branches, you need to select documents for work.
All buttons may not fit on the screen; to access the hidden buttons, use the arrows to move to the desired side:

Creating and sending a document in the SUFD-Portal
Log in to the SUFD-Portal system using the link:
http://10.67.200.12:28081
For successful authorization you need
establish a connection to the Continent-AP !!!
Only after that you can start working in the SUFD-Portal.
Before creating a document, you need to make sure that you have selected the correct organization role. Changing the role of the organization is done by choosing from the pop-up list in the upper right corner of the working window.
To create and send a document, you need to do the following:
There are several ways to create a document in the system by clicking the appropriate button:
Create a new document
Create a copy of the document
After the completion of sending, you can control the passage of the document by tracking the status in the "Status (name)" column.
Typical mistakes
Question: How to view information from settlement documents in the SUFD?
Information from the settlement documents in the SUFD is included in the statement, you can print it by opening the statement for viewing and select all files in the attachment container and press the "print" button.
It is necessary to check the Continent-AP connection again, if it is successfully established, the shield-shaped icon in the lower right corner next to the clock should turn blue.
Question: My account has been locked.
If you entered your credentials incorrectly three times, your account will be blocked in accordance with the security policy within 10 minutes. After the expiration of this period of time, it is necessary to repeat the authorization.
Question: If you get an error while opening the document:


We go to the PPO "SUFD-Portal" by typing in the address bar:
http://10.67.200.12:28081
An authorization window will open. After that, you need to go to the IE browser menu item "Service" - "Internet Options".

The "Internet Properties" window opens. 
Go to the "Security" tab, select "Trusted sites" and click the "Sites" button. 
![]()
The "Trusted sites" window will open, in which you need to uncheck the box "For all sites in this zone, server verification is required (https :)"

When installing the old version of the SUFD, which I can download from the site from here, no problems arose. Installation proceeds normally in automatic mode. Therefore, there was no point in describing the installation of the SUFD in the old version. The new version of the SUFMS is also installed normally in automatic mode, but after that it refuses to work.
This is due to the fact that the installation package of the old and new versions includes different Java. If the old Java was not required to be configured, then the new one is not so simple. In this article, I will show you how to install a FMS and configure Java.
So let's get started. As I said, the installation is the simplest, so I'll just show the whole process in the pictures. Run the installation file and the sequence of your actions can be seen in the pictures below:


The SUFMS is installed, now let's start configuring Java. Immediately it is necessary to make a reservation that the Java configuration is described in the instructions for installing the SUFMS, which our department wrote for its clients. This applies to the Chelyabinsk region. I will reproduce this instruction here. It contains the ip-address of the SUFD-portal in our department, so I see no reason to hide it here. For other regions, I think it will be enough just to replace this ip-address with your own.
So, go to the computer control panel and run Java (Fig. 14):


On the "General" tab, go to "Setting" (Fig. 15), then "Delete Files ..." (Fig. 16). Leave the "Trace and Log Files" and "Cashed Application and Applets" checkboxes as they are and click "OK" (Fig. 17). Go to the "Security" tab and click the "Edit Site List" button (Fig. 18):


Here you need to enter the ip-address of the SUFD portal, if you are in the Chelyabinsk region, then enter the one shown in Figure 18, if you are from another region, enter your own. Next, you need to import the certificate, for this we press the "Manage Sertificates ..." button (Fig. 18) and get into the next window, where you need to import it:


In fig. 19 in the "Sertificate type" field, select "Signer CA" and click the "Import" button. Choosing a certificate. If you downloaded the archive with the SUFMS installation program from my website, then the certificate is in the archive. After import, click the "Close" button. That's it, now the main thing is not to forget about the first time you sign some document in the SUFD, a window will appear, as in Fig. 20. Be sure to check the "Do not show this again for apps from the publisher and location above" checkbox and click "Run". That's all!
And finally ... If you liked this article and you learned something new from it for yourself, then you can always express your gratitude in monetary terms. The amount can be anything. This does not oblige you to anything, everything is voluntary. If you nevertheless decided to support my site, then click on the "Thanks" button, which you can see below. You will be redirected to the page of my website, where you can transfer any amount of money to my wallet. In this case, a gift awaits you. After a successful money transfer, you can download it.
4. The organization installs on a dedicated computer a means of cryptographic information protection (CIP) CryptoPro version 3.6.
Note: The CryptoPro version 3.6 CIPF distribution kit and the license is provided by the Federal Treasury by power of attorney. Installation / removal of the CryptoPro CIPF is carried out by the specialists of the Organization according to the "Software Installation Instructions.doc".
5. The organization installs the Continent-AP software on a dedicated computer.
Note: Continent AP software is provided by the Federal Treasury. Installation and configuration of the Continent AP software is carried out by the specialists of the Organization according to the instructions given in the file "Software installation instructions.doc". In the Win7 OS the Continent-AP software version 3.6.7.0 is installed.
6. The Organization should define a list of officials who, by virtue of their official duties, will have a production need for direct work in the online SUFD.
Note: At the beginning of the implementation of the application software "ASFK Portal for DUBP" (SUFD-online), the specified list of persons is determined by the Orders for authorizing electronic digital signatures issued by the Organization in the course of connection to the FC EDMS and work in the FC EDMS.
If necessary, the list can be adjusted by issuing a new order by the Organization, similar to the existing orders in the part of the FCS EDMS. A certified copy of the new Order must be submitted to the Federal Treasury. The summarized information on the revised list (full names of employees, positions) must be submitted to the Federal Treasury body for the formation of accounts (“establishments”) in the PPO “ASFC Portal for DUBP”.
7. The Organization must produce ES keys for the employees of the Organization mentioned in the updated list (see clause 6). Note: ES keys are produced by the specialists of the Organization according to the instructions "Create ES.doc keys" located in the archive. The ES key generation program is provided by the Federal Treasury, and is available for download at. When generating ES keys in the program, it is recommended to set the extended purpose of the public key certificate according to the maximum possible option (This will minimize the likelihood of ES keys alteration due to possible errors when empowering employees of the Organization).
8. Employees of the Organization must receive logins and passwords in a timely manner to log into the SUFD-online.
9. At the workplace where the work with the SUFD-online will be carried out, the root certificate of the Federal Treasury and personal electronic signature certificates of the employees of the Organization must be installed in accordance with the instructions below.
II. Installation of EP for SUFD-online
To install the electronic signature for SUFD-online, you must perform the following steps:1. Go to: Start -> (Settings) -> Control Panel -> open "CryptoPro CSP" -> "Service" tab -> "Install personal certificate" button
2. The "Personal Certificate Installation Wizard" window opens, click the "Next" button.
3. In the line "Certificate file name", click the "Browse" button and select the user's ES key certificate that you want to install. This certificate can be located on a removable disk (flash drive, you were thrown off when issuing the ES key certificate in the security department), or the user's ES key certificate can be downloaded from the EDMS (see below).
4. Having selected the certificate of the user's ES key that needs to be installed, click the "Next" -> "Next" button. In the line “Name of the key container”, press the button “Browse”, the window “Select the key container” opens, where you need to select the key medium on which the electronic signature of this user is located and press the button “OK”. In the "Personal Certificate Installation Wizard" window, click the "Next" button. In the next window, when you select the certificate store, click the "Browse" button and be sure to select the "Personal" -> "OK" store. In the next window, click the "Next" -> "Finish" button.
Unloading the certificate from the EDMS.
In order to unload the ES key certificate from the EDMS, you must perform the following steps:
Go to EDMS -> Administration -> General -> Remote AWPs.
In the “Remote AWPs” window that opens, on the left side of “Automated Workstations”, select the line with the name of your organization, while the names of all cryptoprofiles of AWPs of users of this organization will be displayed on the right side of the “Settings for AWP Crypto Profiles”. Double-click (with the left mouse button) on the name of the crypto-profile of the required EDS subscriber - the "Cryptographic Profile Settings" of the selected E-Signature user will open. In this window, in the "Certificates" tab, we look through all the lines with the records and find the line with the record in which the Status is “active”, the Key is “working” and the validity period has not expired yet. Click on this line with the right mouse button and in the menu that opens, select the "View certificate" item. The "Certificate" window opens. In this window, open the "Composition" tab and press the "Copy to file" button. The "Certificate Export Wizard" window opens. In this window, click the "Next" button and in the next window that opens, click the "Next" button.
In the "File name" line, click the "Browse" button, the "Save As" window opens. Select the folder where you want to save the ES key certificate file or save it to the desktop by assigning a name to the certificate file and clicking the “Save” button. The next window "Certificate Export Wizard" will indicate where the selected ES key certificate will be saved, press the "Next" button. In the next window, click the "Finish" button. Upon completion, the "Certificate Export Wizard" will display a window with the result "Export successfully completed", click the "OK" button. In the previously specified folder where the ES key certificate file was saved, or on the desktop, the ES key certificate of the required user of the organization will appear.
Working with SUFD-online
III. How to work with the AWP DUBP Portal
To work in SUFD-online, you must consistently perform the following steps:1. Establish a secure connection using the Continent-AP program.
2. Launch the Internet Explorer or Mozilla Firefox browser (for browser version requirements, see section 3.4 of the Technical Requirements section). In the address bar, enter the link issued by the UFK
http://10.68.200.12:28081/
The Registration window will open.
3. In the Registration window it is necessary to enter the username and password issued in the UFK, and click the OK button. If the login and password are entered incorrectly 3 times, then the user will be blocked for 10 minutes.
4. After authorization, a working window will open, in which there will be a tree of documents on the left. All work is done using the menu tree. In the menu tree, by opening the necessary branches, you must select the documents you need for work. 
5. To work with documents, use the buttons located in the upper part of the screen:
| - Import documents | |
| - Export selected documents | |
| - Create a new document | |
| - Open a document for editing | |
| - Create a copy of the document | |
| - Delete document | |
| - Signature | |
| - Signature verification | |
| - Signature removal | |
| - Documentary control | |
| - Cancel Submission | |
| - Send | |
| - View changes in the status of a document / directory record | |
| - Print document | |
| - Print scroller | |
| - Search | |
| - Refresh the list of documents |

6. The main sequence of actions when working with documents in the SUFD-online:
- Document creation (by manual entry, import or copying)
- Carrying out documentary control, elimination of errors, if necessary
- Signing the document first with the second, then with the first signature
- Sending a document
IV. How to create and send a document on the AWP DUBP Portal
Creation and sending of documents to SUFD-online is carried out sequentially:1. Before creating a document, you must make sure that you have selected the correct organization role.
Changing the role of the organization occurs by selecting from the list, called by the button above the document tree.
 |
2.1. Create a document in the system. There are several ways to create a document by clicking the corresponding button:
1) Manual input
2) Import
3) Copy
To see the created document, refresh the list by clicking the button.
A document created in any of the three ways has a transfer status and a Draft business status.
The following operations are available on a document with this status:
editing
deletion
documentary control
2.2. Further, the document must go through confirmation of entry - documentary control. In this case, the details of the document are checked for compliance with the reference data - preventive control, as well as control of the document amounts (the sum of the lines must be equal to the total amount) and dates - blocking control. To perform documentary control, you need to position the cursor on the created document in the list of documents and click on the button on the toolbar.
2.3. If a document with the “Entered” status needs to be edited, then the transfer status is first rolled back by clicking the button to “Draft”. After that, editing, saving of the document and documentary control are performed.
2.4. Next, you need to sign the document (approve). To approve a document, the user must have a signature certificate, and the document must have the “Entered” transfer status.
To sign a document, select the corresponding document in the list of documents and click the button.
In this case, the document's approval status changes (to “Approved”), the transfer status and business status do not change.
Information about signatures can be viewed on the "Signatures" tab of the information panel located at the bottom of the screen, after updating the list of documents.

After signing, the document receives the approval status "Approved" or "Partially approved".
The document receives the status "Partially approved" if it is not signed by all the necessary EDS. In this case, it is necessary to overlay the missing EDS on the document.
2.5. In the next step, the document can be sent.
To send a document, select the required document in the list and click on the button.
The selected document is being sent. In case of successful sending, the document is transferred to the "Sending" transmission status.
Further, the status of the document changes in accordance with the statuses assigned to the document on the FC side.
After the completion of sending, you can control the passage of the document by tracking the status in the "Status (name)" column.
V. Frequently asked questions when working with SUFD-online
1. If the error "Failed to process the script" appears when opening or signing a document:
for Mozilla FireFox browser
You must click on the "Settings" button and select "Allow pop-up windows for ..."
for InternetExplorer browser

You need to right-click on the warning bar and select "Always allow pop-ups for this node"
2. If a security warning appears when opening or signing a document:
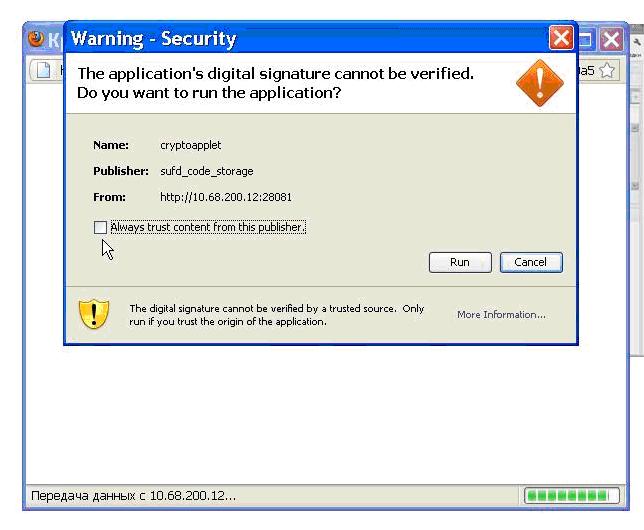
It is necessary to check the "Always trust content from this publisher" checkbox and click the "Run" button.
3. An empty window "Cryptographic operations" appears:
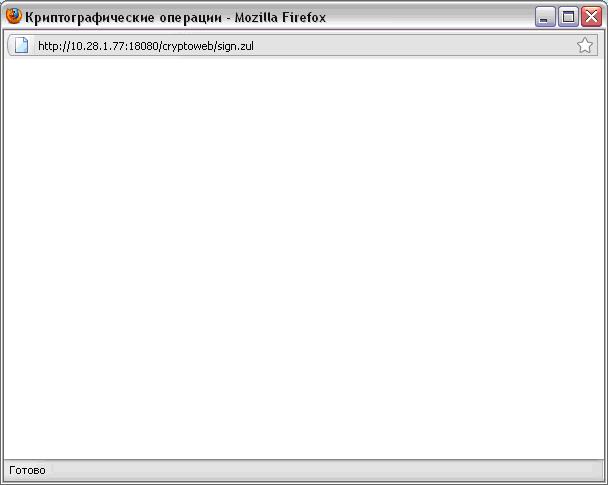
This means that Java is not installed on the workstation or Java software is blocked by the browser (FireFox). Solution options:
a. Go to FireFox, type about: config in the address bar
then in the extensions.blocklist.enabled filter set Value = false (double click on the line)
menu - Tools - Add-ons - Java Toolkit -> enable
menu - Tools - Options - Content tab -> uncheck Block pop-ups
restart FireFox
Or
b. install Java Version 7
since there is no security certificate for this version, it will ask whether to block an unsigned application. Refuse to block.
If the window is empty and black, it means that Java is not installed correctly, you need to reinstall it.
4. If a window appears with a message that the certificate was not found:

a. EDS certificate is not installed on the user's computer: you must install it in accordance with the instructions in the file "Installing EDS for the SUFD.doc Portal" and the video "00_Certificates.exe"
B. the ES certificate is not registered on the server: you must contact the security department of the UFC
5. If after clicking the "Sign" button a window appears with an error:

The system does not have a certificate of the Authorized FC Center. You need to open the file "UC 05.24.2016.cer" (or "New root certificate - install! .Cer" - in a new package of documents) and, by right-clicking on the certificate file, select "Install certificate".
6. When signing, the security system issues a message:
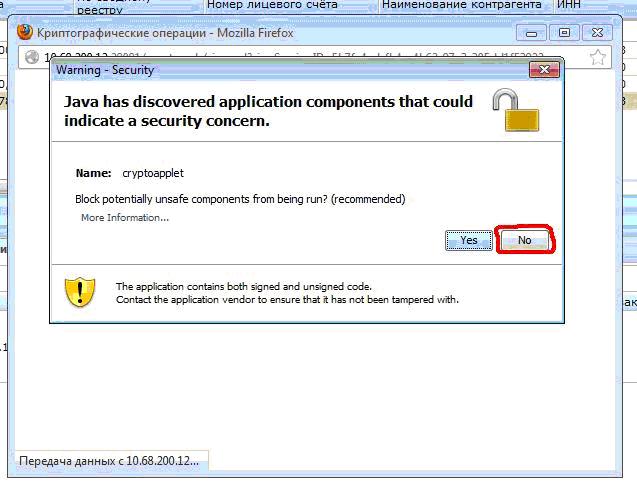
This question should always be answered "No" (No).
7. When signing a document, a window appears with a script error message:

It is necessary to tick the "Do not ask this question again" box and click the "Continue" button.

To view it, you need to click ok and in the window that appears, click on the blue square

View errors in the drop-down list

9. Where to look for the statement and the PP attached to it
In the menu item operational reporting - reports10. How to print the statement and the attached PP
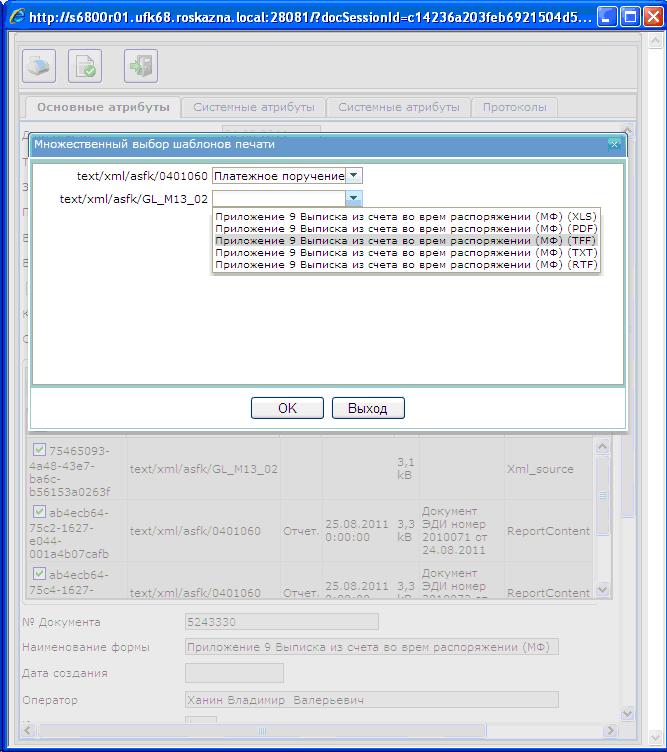
It is necessary to select it in the list, click the button and in the attachment block click on the square in the guid column so that everything in the attachments turns gray. Then click on the printer in the "Attachments" section.
In the window that opens, select templates for printing documents:
11. When creating or importing documents, new records do not appear in the table
Forgot to click the Refresh document list or Apply filter button12. When working with the Portal, the error “Create socket error“ got out
Security server has stopped working13. When entering the portal, an organization sees the name of another organization.
The organization was not tied to the login.14. The following message appears

Temporary problems on the Portal. Exit the portal for a while.
15. Old TFF format (file format not supported)
it is necessary to update the program from which you unloaded or set the required format in it (description of formats is posted at the address in the Documentation block)
16. When overlaying electronic signature on a document, the browser requires the installation of a plug-in.
The Mozilla Frefox browser has been automatically updated, you need to install the Java software of the corresponding version: download JavaThe old version of Java must be removed through Control Panel - Add or Remove Programs.


