To install Windows, you need either a bootable disk with a distribution kit or a bootable flash drive. Flash drives have recently been very popular and convenient, so it is more expedient to boot from them.
There are many ways and applications for creating bootable USB drives. The easiest way to do this is with the Ultraiso program.
This is a very functional and at the same time easy-to-use software tool.... For its functioning, you must first perform the installation by downloading the distribution package of the program, as well as prepare an image of the operating system.
Why make an installation USB drive
Often, during the functioning of the operating system, unforeseen situations occur, as a result of which the operating system either does not load at all, or works with critical failures. It is impossible to completely protect yourself from such situations, so you need to know how to behave.
At best, operating system problems can be corrected through the built-in Windows restore function, which naturally needs to be launched if this option is present.
In a situation where this is not possible, you should try to boot through the installation disc or installation flash drive.
An extreme situation arising in the absence of a backup copy of the operating system and user data implies its reinstallation. Based on this, you should always have an OS image. It can be used for a new installation, restore an old OS, or reinstall it.
In most situations, the Windows distribution is saved on a DVD. But the likelihood of data loss on a DVD disc is significant due to the fact that it is subjected to physical stress. After all, only one small scratch can make the disc unusable.
A flash drive is devoid of such a drawback, so it is more advisable to save the operating system on it. In this case, the process of installing Windows from a USB drive is similar to the process of installing from a DVD. An additional advantage of a USB flash drive over a DVD is its more compact size.
We need
To create a bootable USB drive, in addition to the data carrier itself, you will need an operating system image and a specialized program with similar functionality. There are many such programs, but we will consider the UltraISO utility, which must first be downloaded and installed on your hard drive.
It is designed specifically for working with iso images and writing them to storage media, allows you to make bootable disks, flash drives. The undoubted advantage of the utility in question is the friendly Russian-language interface.

In addition to the formation and recording of image files, it also allows you to make changes to disk images. Its important feature, which is of great value, is the ability to create bootable media - disks and flash drives. In addition to this, the utility is able to convert image files to ISO format if the existing OS disk image is saved in a different format.

A certain drawback of this utility can be considered that it is paid, but there is a trial period for free use. You can use the UltraISO version of the program free of charge with a certain limitation.
It is important to know that all information from the flash drive must be saved to another safe place, since all data will be destroyed when creating the installation flash drive.
Video: bootable USB flash drive using Ultraiso
If there is no OS image
Situations often occur when the operating system image is missing. The solution to this problem is quite trivial. It can be created either using the Windows installation disc, or through specialized programs, of which there are a great many, some of them are completely free.
The sequence of actions is as follows:

Create a bootable USB flash drive via UltraISO
Let's consider the sequence of steps for creating a bootable Windows 8 USB flash drive from an ISO image. Bootable USB drives with previous operating systems are created in the same way without visible differences.
Algorithm:

At the end of these steps, it is recommended to make sure that the image of the Windows OS to the USB drive is correctly formed. When you open it, the saved image of Windows 8 will be displayed. The sequence of actions for creating an image of the Windows 7 OS is similar and does not contain significant differences.
It is important to know that to install Windows in the BIOS, you need to set the boot order of various devices. You need to start the download attempt from the flash drive.

The need for a bootable USB flash drive arises periodically. The reason for such a need may be failures in the operation of the operating system itself and interruptions in the work of "hardware". No one has the opportunity to protect themselves one hundred percent from such problems, and the presence of a previously created bootable flash drive will help to solve the problems that have arisen without time losses and significant labor costs.
There are several basic ways to make a bootable disk or USB stick.
The main ones are:
- using specialized programs such as UltraISO;
- by standard Windows tools via the command line console.
Even the most untrained user can easily create a bootable USB flash drive with Ultraiso, since the program is very clear and convenient.
In this article, we will tell you in detail how to quickly and easily burn an ISO image to a USB flash drive (USB flash drive). This is usually necessary to create bootable USB drives with Windows XP, 7, 8, 10 or Ubuntu (Linux) operating systems, so that you can then reinstall a computer or laptop using it. But the described method can be used to write any .ISO image to a flash drive, since it is one of the most versatile and fastest.
What is necessary?
To create a bootable USB flash drive with Windows, Ubuntu or another image, you must have the following prepared:
- USB flash drive (USB flash drive);
- Any ISO image;
- A cup of tea or coffee and 15 minutes of your time.
Burn disk image to USB flash drive
1. Preparing a USB flash drive
Prepare a working USB flash drive on which there are no important files for you, since all files will be deleted during the image recording process. On average, flash drives are 4 GB or 8 GB should be sufficient for an average ISO image from Windows, Linux, or other image. But it is advisable to check and compare the size of the image and your flash drive, for this, right-click on the image and select "Properties".
2. ISO image
 Any ISO image will work for recording. If you want to create a bootable USB flash drive for installing Windows or Linux operating systems, then it is advisable to download images from the official websites of the developers in order to avoid various errors during installation and operation.
2.1 Download ISO images
If you already have a downloaded image, you can skip this step.
- The original Windows images are Windows 7, Windows 8.1, Windows 10, and Windows XP is no longer officially available for download from the official website.
- Original Linux images - Ubuntu 16.04.1 / 14.04.5, Mint 18.1.
Or use your favorite torrent trackers. 🙂
For recording and editing images, we recommend the UltraISO program, which does not take up much space, is fast, convenient and easy to use, correctly writes images to a USB flash drive, so that Windows or Linux OS images automatically become bootable, from which immediately after recording you can install Windows or Linux. , install and proceed to burning the image. The program is completely free for 30 days.
4. Recording an image using UltraISO
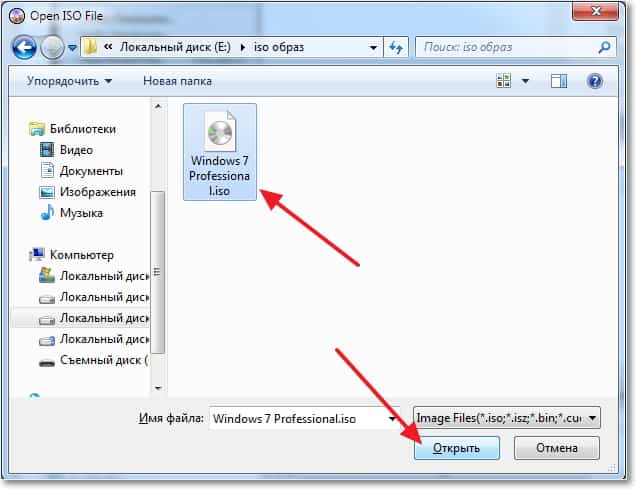
Run the program and open the ISO-image, for this go to the menu File> Open(CTRL + O), or just double-click on the image file.

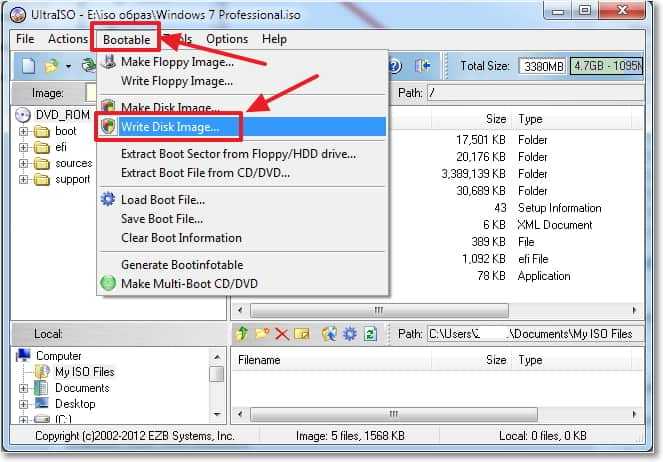
Insert the USB flash drive into your computer or laptop and go to the menu on Boot> Burn Hard Disk Image ...

4.1. Correct formatting of the flash drive


Attention! Formatting will destroy ALL data on the flash drive. Click "OK" to start formatting, "Cancel" to cancel it.

4.2. Writing an image to a USB flash drive
To start burning the ISO image to a USB flash drive, follow the directions in the following screenshot. Select your flash drive, recording method "USB-HDD +" and click "Burn".

Do not interrupt recording an image to a USB flash drive, on average, recording an image of 4.5 GB takes 10-15 minutes, it all depends on the speed of the flash drive and your HDD / SSD drive.

Boot image recording completed! Now you can restart your computer and start installing the operating system if you captured a Windows or Linux image.
If something is not clear, write in the comments below, we or one of our readers will definitely answer you!
The times when a computer was booted exclusively from a floppy drive, due to the absence of a hard drive in its design, have long since sunk into oblivion, but boot disks have by no means lost their relevance. They only began to be used less often for other purposes. This publication aims to prove that creating a bootable USB flash drive is quite a feasible task for UltraISO, and to describe this process as thoroughly as possible.
Bootable flash drive can be created via UltraISO
A computer that does not have a hard drive is simply impossible to imagine, such simply do not exist in nature. Therefore, the Windows operating system, for example, is installed on the hard drive and is loaded when the computer is turned on from it. This means that a starter disk is not needed at all.
Such discs are used in two cases.
First: you can boot from it and, if you have the appropriate software on it, restore a crashed Windows or save data on a crumbling hard drive. There are an abundance of distributions of this kind of reanimators on the network. By starting the computer from them, it becomes possible to format or modify any partitions of the hard disk (access to the system partition from Windows is limited), copy data from a non-working machine, when the same flash drive is most often used, test hardware and achieve other goals.
The second, probably the most important use of a bootable USB stick is actually installing a new operating system. Clearly, a computer without an Axis is nothing more than a pile of iron. The system is installed cleanly, if there is no way to restore an old one, damaged for any reason, as well as on a newly purchased computer when its hard drive is empty.

Problems with CDs have led to the fact that reasonable people try to abandon their use. They really were know-how at the time, but the reduction in the cost of their manufacturing processes led to an unacceptable loss of quality. Yes, if you make CDs using gold and using the appropriate technology, then it is guaranteed that data can be stored on them for more than a hundred years. In practice, this time does not exceed several months, well, or years, if you keep them as the Sultan's bride. Therefore, the question of how to make a bootable USB flash drive became the only correct one (no one remembers CD anymore).
What to write on an UltraISO bootable USB flash drive
Generally speaking, it makes no difference to the program what exactly will be recorded. The process boils down to writing a previously prepared image to disk, which UltraISO considers flash memory. But to create a bootable variant, it is necessary that the recording source is the image of the starting disk.
The fair question "where to get it", as usual, will be answered by Google, or Yandex, whatever you like. On the net you can find images of any "resuscitators" and operating systems, including cracked ones. But you have to be careful here. Not everything that is frivolously on the network is suitable for recording and may contain viruses and worms.

Therefore, it is best to take an already tested image from friends to create a bootable UltraISO flash drive or use a friends working CD to burn it. If this option is not possible, then Google will help.
UltraISO and how to create a bootable USB flash drive from an image
It should be noted right away that the popularity of UltraISO among users may not be entirely justified. There are programs that perform the same functions and, as many argue, are more convenient to use. Moreover, this software is absolutely free. But due to habit, many use UltraISO, and it is inconvenient to talk about paid programs in the post-Soviet space even to the well-known Gates.
So, it is assumed that there is an image and the program itself is installed, and there is a flash memory in the USB connector, at least 4 GB in size.
IMPORTANT. The amount of memory may be less, but most often images of various operating systems created from DVD are recorded. Therefore, four "hectares" will be needed.
You can first format the flash drive in the FAT32 system, although this happens anyway during recording.
After launching the program, we get to the main window, where we click on the "Open" item in the "File" menu and specify the image file. Most often, a bootable Windows 7 USB flash drive is created using UltraISO, so the file you are looking for will be called win7.iso or something similar.

Considering that a USB flash drive for UltraISO is just a disk, select "Record a hard disk image" in the "Boot" menu and set the required parameters in the window that appears. Here you need to specify the target disk (flash memory), the recording method set by default USB + HDD +, and the name of the image will already be set. All that remains is to start the process with the record button and enjoy the confident operation of the program.
No image, but there is a distribution on CD / DVD
If you have a CD, there is no need to first create an image of it, although this is possible and quite often in demand. You can create a bootable USB flash drive from the distribution directly, bypassing this stage. The algorithm of actions is no different from that described above, with one exception. Instead of the "Open" item, in the "File" menu you need to select "Open CD / DVD". Next, we proceed as in the case of the image.
There is only a folder with the copied distribution
In this case, you need to go through the chain "File", then "New", then "Bootable CD / DVD image". In the window that appears, specify the bootfix.bin file located for Windows 7 and 8 in the boot folder. At the bottom of the window that appears, the folder containing the installation files is selected. You need to select the files (not the folder) and drag them to the top of the window. Further, everything is knurled: "Bootstrapping", "Recording a hard disk image" and so on with one exception. The Image File Name field must be blank.

It was mentioned earlier that UltraISO has many alternatives for creating bootable USB drives. But people who are accustomed to working with this particular software will never give up on it. After all, this is a really reliable application that has won the sympathy of a huge number of users.
That told how to create a bootable USB flash drive with Windows 7 in the Windows 7 USB / DVD Download Tool. This is an official program from Microsoft and it seems to work well. But a comment appeared that it was impossible to create a bootable USB flash drive with this program. Maybe so, anything can happen, so I'll write another way that you can create a bootable USB flash drive with Windows 7. And this time we will use a good program UltraISO, I have written about her more than once on the blog, in various articles.
I think that there is no need to tell us why such a bootable flash drive is useful to us, if you are reading this article, then most likely you are interested in the question of how to create it, and not why it is.
In this way, you can create a USB flash drive not only with Windows 7, but also Windows XP, and Windows 8. Anyway, you can burn any image, any bootable disk, for example Dr.Web LiveCD. Well, if you have already changed your mind about creating such a USB flash drive, then the image can be written to disk without any problems, I wrote about this in the article.
How to create a bootable USB flash drive with Windows 7?
We need:
- UltraISO program. You can download it on the Internet in a couple of minutes, just type the query “Download UltraISO” in the search engine. After you download it, you need to install it. The installation is the most common, but if you don't know how, then read the article. The program is paid, but when you start, just select "Trial mode"... And if you want, you can buy it.
- A disk image with Windows 7, or any other image that you want to burn to a USB flash drive. This image must be in the format .iso, I hope you have already downloaded it.
- Flash drive size minimum 4 GB(this is for Windows 7, if you want to burn a small image, then 1 GB will be enough). The flash drive will have to be formatted, and this will destroy all the files on it, so you need either a blank flash drive, or copy all the information from it to your computer in advance.
If everything is ready, then let's get started.
Launching the program UltraISO(there should be a shortcut on the desktop and in the start menu). I will show on the example of the English version, since I have a problem with the Russian version, all menu items are displayed in an incomprehensible font. But there is nothing wrong with that, everything is clear there and so.
The program has opened, now we need to select the .iso image of the boot disk in it, in our case with Windows 7. Click “File”, and select “Open”.

Find our image, select it and click "Open".
Now our image is open in the UltraISO program, it remains only to write it to a USB flash drive. Click and select “Write Disk Image ...”.
A window will open in which we need to specify some settings. Look what would be opposite “Write Method:” has been set to “USB-HDD +”. And opposite to “Disk Drive” the USB flash drive we needed was selected.
Now we still need to format the flash drive and we can start recording. Click the button “Format”... Don't look at the fact that I have a 1 GB flash drive, I just don't have more space at hand. You must have a flash drive of at least 4 GB.

A small window will appear in which we will format our USB flash drive.
Formatting the flash drive will destroy all files on it. So save them to your computer beforehand.
Only needed in paragraph "File system" select NTFS, and click "Start".

A warning will appear, click "Ok".

 That's it, a formatted flash drive. Close the window "Formatting" by clicking on “Close”.
This article describes the key feature of the UltraIso program. A bootable USB flash drive can be created with it without problems. It is the algorithm for performing this operation that will be discussed below.
In what cases can you not do without such a flash drive?
To begin with, let's define the cases when this important UltraIso feature cannot be dispensed with. A bootable flash drive allows you to install an operating system on a computer that does not have a CD-ROM drive. First of all, these are some ultrabook models and all netbooks. But, again, this does not mean that this method cannot be applied to a stationary personal computer (not every system unit now has a CD-ROM drive) or a laptop. In general, it is a one-stop solution for all cases. All modern computers, without exception, are equipped with a YUSB connector. So there will be no problems with connecting a flash drive. At the same time, the speed of installation of the operating system will be several times higher. Data from a flash drive is faster to transfer than from a CD. Therefore, this method of installation is the future.

Choosing an image
Before making a bootable UltraIso USB flash drive, you need to select the correct installation version of the operating system. Its demo version can be downloaded from the Internet. In this case, it is recommended to use the * .iso format (that is, the file must have such an extension). If necessary, it can be made from a CD. To do this, install it into the drive, launch UltraIso, press "F8" and, following the instructions, create a copy of the installation version of the operating system on the hard disk. It is important that the source of the installer is autoloaded. Although rare, there are times when this important option is missing from the installation version. Therefore, it is imperative to pay attention to this.

Which version of the program is better?
UltraIso comes in two versions. The first one is demo and free. Some functions are not available in it, but the ability to create bootable flash drives is present. The second version is paid. She has more options, but her purchase is not justified to create such a flash drive. Therefore, most users are advised to take the first UltraIso modification.

Installing UltraIso
First you need to download and install UltraIso. it is impossible without this stage. First you need to download this program from the official website. The rest of the versions are not recommended to be used, as their performance leaves much to be desired. Then we launch the downloaded installer. Following the instructions of the wizard, we install this program on our local computer. There is no need to perform any additional configuration to create a bootable device. Then UltraIso is ready to go.

Create a bootable flash drive with UltraIso
How to create a bootable USB drive? After completing the installation, the order of performing this operation will be as follows.

At the end of the manipulations, the process can be considered complete, and now you can easily install the operating system from the flash drive. Do not forget that the size of the flash drive must be larger than the operating system installer. That is, if the image is 4.4 GB, then the drive in this case must be at least 8 GB. This nuance must be taken into account without fail. Otherwise, it will not be possible to create a bootable drive, and the operating system will display a corresponding message.
Preparing to install the operating system

In the next step, you no longer have to use the UltraIso program. The bootable USB stick is already ready. But in order to start the process of installing the operating system, you need to properly configure the BIOS of a personal computer. We install the prepared drive into any of the rectangular connectors of a personal computer. Further, when you turn it on, you need to pay attention to the inscription: Press X to setup. In this case, "X" will be the key that must be pressed to enter the basic settings of the personal computer. If at the stage of testing the equipment, the logo of the motherboard manufacturer is displayed, then you need to press "Esc". It is not always the first time that it turns out to find out the key to enter and have time to go into the BIOS. Therefore, if you do not have time to press, and the operating system starts loading, then you need to restart the personal computer and repeat the operation of entering the basic settings, already knowing the necessary information. Then, using the navigation keys (they show arrows), go to the Boot menu item. In it we find the First Boot item. Point the marker at it using the down arrow. At the next stage, using PgUp and PgDn, we tell the PC that the first boot source is, for example, a bootable USB flash drive Windows 7. UltraIso has already placed an image on it, and it is ready for the installation process. The volume label will be the same as previously set. Once this manipulation has been completed, press F10. Then you should be prompted to save the changes. We answer it positively. After that, the PC will restart and boot from the flash drive will start.
Installation
The installation process from such an operating system drive is identical to exactly the same procedure from a CD, made in the same UltraIso program. The Windows bootable USB stick is an exact copy of it. When the PC starts booting, press any key when the corresponding message appears. Then we set the language, country, monetary units and Click "Next". At the next stage, click on "Install". In we select the one for which we have a key. Then we agree to the terms of the license agreement. To do this, check the box at the bottom of the window and click the "Next" button. At the next stage, select the type of installation: full or update. Then we select the logical partition on which the OS will be installed. If necessary, format it using the appropriate command. Further, all operations are performed automatically until you need to set the name of the PC. Enter it and click "Next". If necessary, set a password for protection. Then you need to enter the registration key. You can skip this step, but then you will have a trial version for 31 days. Then we select the security settings, time and system date. Then we set up a local area network. The final step is to install drivers and application programs.

Summary
This article describes one of the most important features of the UltraIso program. A bootable flash drive with it is made without problems, and even a novice user can solve this problem. To do this, it is enough to follow the previously described steps, and you should not have any problems with this procedure. So feel free to take it and do it.


