To install Windows, you need either a bootable disk with a distribution kit or a bootable flash drive. Flash drives have been very popular and convenient lately, so it makes more sense to boot from them.
There are many methods and applications for creating bootable USB flash drives. The easiest way to do this is with the Ultraiso program.
This is a very functional and at the same time easy to use software tool.. For it to function, you must first complete the installation by downloading the program distribution kit, and also prepare an operating system image.
Why make an installation flash drive?
Often, during the operation of the operating system, unforeseen situations occur, as a result of which the operating system either does not load at all or operates with critical failures. It is impossible to completely protect yourself from such situations, so you need to know how to behave.
In the best case, operating system problems can be fixed through the built-in Windows recovery function, which naturally needs to be launched if this option is present.
In a situation where this is not possible, you should try to boot through the installation disk or installation flash drive.
An extreme situation that occurs when there is no backup copy of the operating system and user data involves reinstalling it. Based on this, you always need to have an OS image. It can be used for a new installation, restoring an old OS, or reinstalling it.
In most situations, the Windows distribution is saved on a DVD. But the likelihood of data loss on a DVD disc is significant due to the fact that it is subject to physical impacts. After all, just one small scratch can render the disk inoperative.
A flash drive does not have this drawback, so it is more advisable to save the operating system on it. In this case, the process of installing Windows from a USB drive is similar to the installation process from a DVD. An additional advantage of a flash drive over a DVD is its more compact size.
We will need
To create a bootable USB drive, in addition to the data carrier itself, you will need an operating system image and a specialized program with similar functionality. There are many such programs, but we will look at the UltraISO utility, which must first be downloaded and installed on your hard drive.
It is designed specifically for working with ISO images and recording them on storage media; it allows you to make bootable disks and flash drives. The undoubted advantage of the utility in question is its friendly Russian-language interface.

In addition to generating and recording image files, it also allows you to make changes to disk images. Its important feature, which is of great value, is the ability to create bootable media - disks and flash drives. In addition to this, the utility is capable of converting image files to ISO format if the existing OS disk image is saved in a different format.

A certain disadvantage of this utility is that it is paid, but there is a trial period for free use. You can use a version of the UltraISO program free of charge with certain restrictions.
It is important to know that all information from the flash drive must be saved to another safe place, since all data will be destroyed when creating the installation flash drive.
Video: bootable USB flash drive using Ultraiso
If there is no OS image
Situations often occur when the operating system image is missing. The solution to this problem is very trivial. It can be created either using a Windows installation disk, or through specialized programs, of which there are a great many, some of which are completely free.
The sequence of actions is as follows:
- you need to run the UltraISO utility as a user with administrator rights;

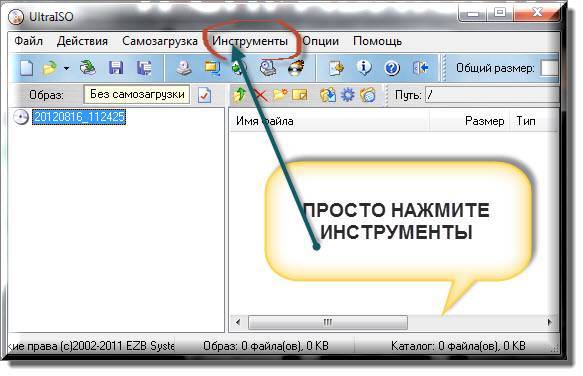
- in the utility window, select “Tools - Create OS image”;
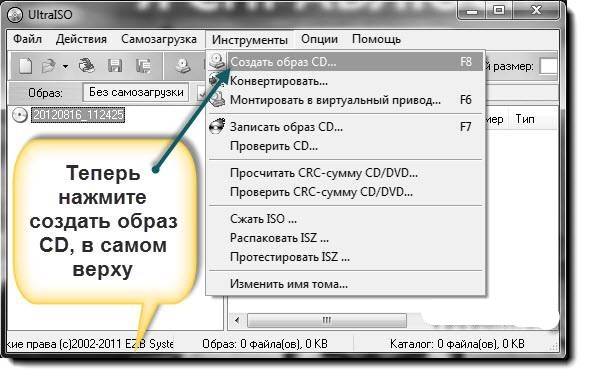
- Next, you should confirm your choice by clicking the “Make” button.

As a result, the image recording process starts, where upon completion of recording the program will offer to open the image. It is recommended to refuse this action.
Create a bootable USB flash drive using UltraISO
Let's look at the sequence of steps to create a bootable Windows 8 USB flash drive from an ISO image. Bootable flash drives with previous operating systems are created similarly without any visible differences.
Algorithm:
- you should run the UltraISO utility as a user with workstation administrator rights;
- at the top of the utility window you need to click the “Open” button;

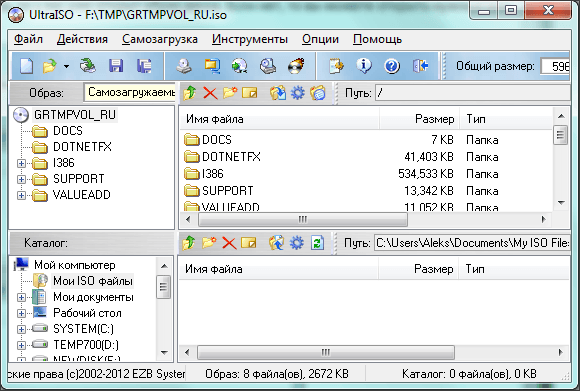
- in the explorer that opens, select the required (previously saved) operating system image (in our case, Windows 8 Pro) and confirm the action by clicking on the “Open” button. In this case, an image of the operating system will be displayed in the right half of the utility window;
- Insert the flash drive into the appropriate slot, which will later become bootable. Its volume should not be less than 4 GB, otherwise the OS image simply will not fit on it. It is also important that it is formatted with the FAT32 file system. It can be formatted immediately before recording the image, either using standard Windows tools or using UltraISO;
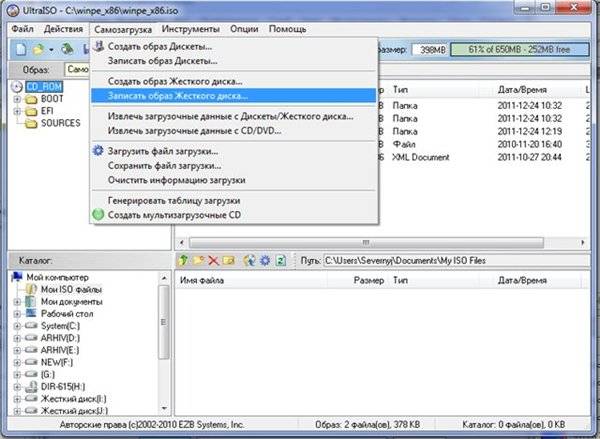
- then in the active application window you should select “Boot”, and then in the context menu select the menu item “Burn hard disk image...”;
- After opening the window, you need to check that you have selected the correct disk to create the installation media. It is important to make sure that the flash drive corresponds to the correct letter of the alphabet;
- On the “Recording Method” tab, you must check "USB-HDD+", and then either format the storage media or record the Windows OS image;
- if the external storage medium has already been pre-formatted, then you should click on the “Burn” button;

- A “Hint” window will open with a warning about the possible loss of all data on the USB drive. In this window you need to click on the “Yes” button;

- Then the stage of forming the OS image on the flash drive begins. An installation flash drive for Windows is being created. The length of time it takes to create installation media depends on the performance of your workstation. After some time, the OS image will be written to the flash drive. A message will appear in the window that opens, informing you that the installation media generation process has been successfully completed;
- When you finish creating the installation drive, it is recommended to close the utility.
At the end of these steps, it is recommended to make sure that the Windows OS image is correctly formed on the USB drive. When you open it, the saved Windows 8 image will be displayed. The sequence of actions when creating a Windows 7 OS image is similar and does not contain any significant differences.
It is important to know that to install Windows in the BIOS, you need to set the boot order of various devices. You need to start attempting to boot from a flash drive.

The need for a bootable USB flash drive arises periodically. The reason for this need may be failures in the operating system itself and interruptions in the operation of the hardware. No one can protect themselves one hundred percent from such problems, but having a pre-created bootable flash drive will help solve the problems that arise without time loss and significant labor costs.
There are several basic ways to make a bootable disk or flash drive.
The main ones:
- using specialized programs such as UltraISO;
- using standard Windows tools via the command line console.
Even the most untrained user can easily create a bootable USB flash drive with Ultraiso, since the program is very clear and convenient.
In order to do this, you need a boot disk or bootable flash drive.
Almost everyone now has a flash drive, so it’s easier and more convenient to make a bootable flash drive.
There are many methods and programs to create a bootable USB flash drive, for example Windows 7 USB DVD Download Tool.
One of the most popular programs is Ultraiso.
First, you need to download and install Ultraiso, download the image of the operating system that needs to be installed to your hard drive and insert the flash drive into the USB connector.
When all this is done, you can proceed:
Stages of writing an image to a flash drive
Launch the Ultraiso program. Please note that it must be run with administrator rights.

Now we need to open the image of the Windows operating system, which we will write to a flash drive. To do this, select Open from the File menu.

You can also use the keyboard shortcut Ctrl+O.
Open the folder with the Windows image, select it and click on the Open button.

When the image file is open, in the Boot menu, select “Burn Hard Disk Image”.

We select the flash drive on which we will write the Windows image (in my case), the recording method is usually suitable. When everything is selected, click on the Record button.

All information on the flash drive will be deleted. We confirm this and click on the Yes button.

The process of writing an image to a flash drive takes several minutes. You can drink tea :)

At the end, a message will appear indicating that the recording is complete.

To close the window, click on the Back button, then you can close the program. The bootable USB flash drive has been successfully created.
The first and most important step when starting to work with a new computer, without which further steps will be impossible, is, of course, installing the operating system. We will work with the operating system from Microsoft – Windows. Previously, everything was simple - you bought or made a disk with Windows yourself, inserted it into the drive, and it went away. However, over time, disks, due to their inconvenience, size and volume, began to fade into the background and by 2018 they had almost completely disappeared from people’s lives. Also, the disk drives gradually began to disappear from computers; stationary stations were less affected; the main blow fell on laptops. Nowadays there are a minimum of models in which a disk drive can be found, and most often these are budget solutions. Inconvenient and bulky disks have been replaced by flash drives or simply flash drives. They are smaller, they have more volume, they are more convenient in everything.
Just like disks before, flash drives are now used as a storage device when installing an operating system, by creating a “Bootable flash drive”. To create it you need to use one of several programs. One of them, and probably the most popular, is UltraIso.
Creating a bootable USB flash drive from an image
So, let's consider the first option for creating a bootable USB flash drive via
UltraIso and operating system image. For this, we need:
- Operating system image.
- Flash drive.
Requirements for a flash drive: capacity from eight gigabytes, four gigabytes may be enough, but not in all cases, so once again it’s better to play it safe and simplify your life in the future. The flash drive must be empty, since when UltraIso is running, all data will be erased in any case. The flash drive must have the NTFC file system; UltraIso will not work with others.
Having all of the above freely available, you need to launch UltraIso, select “File” in the menu that opens, and then “Open” in the window that appears. Then you need to specify the location of the OS image file on the disk and click “Open” again. The screen will show the files located inside the operating system image, but for the average user they still mean nothing, so you can close the window with peace of mind.
The next step is to go to the main menu of the program and select the “Boot” option, after which the user will be able to select the “Burn hard disk image” function. There may be differences in translation for Russian localization, but the general meaning of the phrase and action must be the same. Next, you will need to select a drive that will be turned into a boot drive, in our case it is a flash drive. In the same window, it (the flash drive) can be formatted in advance. The default recording method is USB-HDD+, and you should leave it as it is optimal.
Click on the “Record” button...
When you select these functions, a warning will appear on the screen about full formatting (deleting all data) from the specified drive, in our case it is a flash drive, even if you have already formatted it in advance. It is for this reason that the flash drive should be empty and not contain important data. After the user agrees to create a bootable USB flash drive, you will have to wait a few more minutes, usually up to ten. And now, after the program has finished running, you will receive a completely ready flash drive for use and installation of the operating system on another device.
Creating a bootable USB flash drive using a DVD disc
It often happens that the user may have a disk with Windows in his hands that needs to be installed on a laptop that does not have a disk drive. However, there is a desktop PC that already has a disk drive. And again UltraIso comes to the rescue, because using it you can create a bootable USB flash drive directly from the disk. And so, to create it using a DVD, you need almost the same as for the previous method. Namely:
- DVD with operating system.
- UltraIso installed on your computer.
- A flash drive with requirements similar to those for a flash drive in the first option.
First of all, launch the program and select “File” again. But this time we next select the function not just “Open”, but “Open CD/DVD”, after which the user is only required to provide the path to the drive with the disc containing the operating system inserted into it.
After which the actions are repeated with the first method one to one. We will again need to select the “Boot” function, after which we will need to select “Burn hard disk image.” Then we again agree to fully format the flash drive and click “Burn”. After a short time, we receive a flash drive ready for use.
Creating a bootable USB flash drive without images
The last method, although very rarely used, due to its non-typical nature, also has a place. Sometimes it happens that the user does not have either a DVD with the operating system or the usual ISO image, but there is a distribution kit that contains all the necessary files to install Windows. In this situation, you need to use UltraIso again. After all, with its help it is possible to make a bootable USB flash drive from ordinary files. And again you will need an empty flash drive of eight gigabytes.
Launch UltraIso, as always, select “File” and click on “New”. Then we click on “Bootable CD/DVD image” and the user will be prompted to select a download file. This is the "bootfix.bin" file, which is located in the "boot" folder (for Windows 7 and above). After this, you need to transfer the data from the folder with the operating system distribution to an empty field. Sometimes it happens that at this stage the red “New image is full” indicator lights up. In this case, you need to click on it and select the size of 4.7 gigabytes (the volume is equal to a DVD disc). Further actions completely repeat the actions in the first two cases. Having done them, you will need to wait a few minutes, and the bootable flash drive is ready.
At this point, the main methods of creating a bootable flash drive via UltraIso have exhausted themselves. There are also other ways, but usually these should be enough.
Video
Sooner or later, every user is faced with the need to reinstall Windows. But what to do if your CD/DVD drive is broken or you don’t have one at all. There is only one option left, but for this you need to create a bootable USB flash drive.
You can burn an image to a disk or flash drive using many different programs, such as Alcohol, Daemon Tools, Nero or UltraISO. Today I want to dwell in detail on the latter. It has a number of advantages, but the main thing is that it is quite simple and intuitive to use.
I will look at the process of recording an image using Windows 7 as an example, but other versions of the OS are recorded in a similar way.
Beginning of work.
First of all, we launch the program on behalf of the Administrator, otherwise the system will not allow you to perform any actions. To do this, right-click on the program shortcut and in the menu that appears, click Run as administrator.
After launching the program, you need to add a system image, which we will write to a USB flash drive.
To do this, click menu "open", as shown in the first screenshot and proceed to creating a bootable ultraiso flash drive.

An Explorer window will appear in front of us, with the help of which we need to specify the path to the place where our file is located. This image can then be written to a flash drive.
I have already prepared a Windows 7 image in advance, but you can download it from any torrent tracker.
Please note that you need a file with the extension .ISO, not .EXE.

Confirm your image selection by clicking the button "open", after which the program window will display a list of all used OS files.
Under no circumstances should you consider deleting or renaming these files. Otherwise, various errors may occur during the installation process.

Preparing an image for recording
Then we connect the flash drive to the computer and wait until it is detected by the system.
The device must be formatted in the FAT32 file system format. But if you didn’t do this, don’t worry. The program will automatically do all the necessary manipulations. If your device contains files that are valuable to you, copy them to any other medium. After formatting, all data will be deleted.
After saving all the important data, the time has come to record the image. To do this, in the program window, click on the item, and in the list that opens, select “Burn a hard disk image...”.

In the next window you need to select the disk where your image will be written. After making sure that your flash drive is selected, proceed to the next steps.
Paragraph "Recording method" must be installed on "USB-HDD+", A "Hide Boot Partition" - "No".
If you have previously formatted the flash drive, then press "Record" and if you forgot to do this earlier, then "Format".

Formatting a flash drive
As previously mentioned, the flash drive must be formatted in FAT32 format. As a rule, this format is offered by default, but it is better to check it yourself.
After these manipulations, click "Begin".

Formatting a USB Drive
A window will immediately pop up warning you that all data on the flash drive will be deleted. We agree with this and click on "OK".

When the process completes successfully, a corresponding window will appear.
If the message says that "formatting NOT completed"- this means the flash drive is damaged, so I advise you to take another one, or find out what the problems are with this one, and then start the process again.

Formatting success message
Burning an image
After formatting the flash drive, it's time to burn the image to it. To do this, click "Record".
A window will pop up again warning that all data stored on the media will be destroyed. We agree with this and click "Yes".

The process of creating a multiboot ultraiso flash drive will begin, which will take some time.

Wait for the process to complete, upon completion of which a notification will appear in the logs "Recording complete". This means that our flash drive with the Windows 7 image has been successfully created.

Since we won’t have to use UltraISO in the future, we can close the program.
If you reconnect the flash drive to the computer, you will see something like the one in the screenshot.

This is how the flash drive with the image is displayed
Depending on the image, its name may differ from this. The picture shows just an example of the final version.

Burned Image Files
Windows 8 or Windows 10 are recorded in the same way.
In order to boot from our flash drive, you need to go into the BIOS. In the settings of which you need to set the priority of booting from a USB drive.
To do this, restart your computer and press the key Del. In certain BIOS versions, it is possible to enter by pressing F1 or Tab.
The settings interface of the BIOS itself may differ, so I will not describe this process in detail.
Creating a bootable Windows USB flash drive using UltraISOIncreasingly, modern laptops are being produced without an optical drive. Over time, floppy drives and optical disks will disappear altogether, just as floppy disks have already disappeared. Due to the lack of a drive, it is impossible to install the operating system from the disk. In this case, you have to use bootable for installation. In this article we will talk about how to make a bootable USB flash drive using UltraISO.
Step No. 1. Create a boot disk image.
In order to create a bootable USB flash drive, we need a boot disk image in ISO format. If you already have an ISO image, then you can skip this step and go straight to the next step.
Insert the boot disk and run the UltraISO program. Next, on the toolbar, you need to click on the “Create CD image” button or press the F8 button on the keyboard.
After this, the “Create CD/DVD image” window will open in front of you. Here you need to select the folder in which you want to save the resulting image. You also need to make sure that the created image will be saved in ISO format.


Once the process is complete, you will see a message asking you to open the created ISO image.

Click “YES” and proceed to creating a bootable USB flash drive via UltraISO.
Step No. 2. Create a bootable USB flash drive using UltraISO.
In order to make a bootable USB flash drive via UltraISO, we need to open the disk image. If you clicked on the “Yes” button after completing the creation of the ISO image, then you already have a disk image open. If not, then you can open the disk image you need using the "Open" button.

After opening the disk image, files and folders should appear in the UltraISO program window.

After this, a window will open in front of you through UltraISO. Here you need to select a flash drive and click on the “Burn” button.

It should be noted that when creating a bootable flash drive, all data located on the flash drive will be deleted. A special window warns about this. To start the process of creating a bootable USB flash drive, click on the “Yes” button.


After completing this process, you will receive a bootable USB flash drive ready to use.
In addition to UltraISO, you can use other programs to create a bootable USB flash drive. For example, Novicorp WinToFlash, UNetBootin, Windows7 USB/DVD Download Tool and others.