In order for the computer to start not from a hard drive, but from a USB drive, it is necessary. Such a flash drive is used for system recovery, password reset and other "rescue" missions. But how to choose a carrier if it is not displayed in the BIOS settings? You can solve the problem yourself. Provided that the drive is working and data is being read from it.
How to fix the problem: BIOS does not "see" the USB flash drive?
Check if USB device support is enabled. How to do this depends on the motherboard model. After turning on the computer, the message “Press [key] to enter Setup” will appear at the bottom of the screen. Click it to enter the BIOS. And look for a menu that has "USB" in its name.
New BIOS versions
You can work with new BIOS versions using the keyboard and mouse. Also "comes across" support for the Russian language. You will quickly understand the parameters. But even if it is not there, you will be able to configure the boot order and run through a USB flash drive.

Award-BIOS
After starting the BIOS, do you see two lists on a blue background? Then you have the Award version. Navigating the menu by clicking the mouse will not work. It can only be configured using the keyboard. Below or on the side there will be instructions on which buttons to press for this.


Now let's take a look at boot priority.

When you're done with the drive, return the previous BIOS settings.
AMI-BIOS
The BIOS AMI interface has a gray screen, blue font and a number of tabs at the top. The information block is on the right. Mouse control is also not available.

Now you can change bootloader options:

Phoenix-Award BIOS
The Phoenix-Award BIOS also has a gray screen. Information about which keys to press is located below and is highlighted in green. If the computer does not boot from the drive:

UEFI
Have you enabled USB support, but for some reason the flash drive is not in the BIOS? The problem could appear due to UEFI - a mode that "protects" the bootloader from malware and extraneous code. This module will start the operating system even if you have configured the BIOS correctly. What to do? Disable UEFI.
The settings depend on the motherboard manufacturer. First way:

Second way:

After working with the media, re-enable "boot protection".
Need a "correct" flash drive
Maybe it's the flash drive itself. More precisely, in the way it is written. If you copy information directly to it, nothing will work. But why is it necessary to create a "bootable" drive? To run it, you need some "software script". Without it, the system will not understand what, in general, to do with the carrier.
To create a bootable USB flash drive from the LiveUSB utility:
- Insert the drive into the slot.
- Run the installer.
- Select your Flash media from the list.
- Confirm the installation.
- Now through this drive you can "reanimate" the system.
To install a third-party OS, you need a ready-made ISO image and a burning program. For example, UltraISO or Rufus. Consider the second one:
- Insert the drive into the USB port.
- Run the program.
- Check the box "Create boot disk".
- Click on the button in the form of a disk.
- Specify the path to the image.
- Click on "Start".

You can create a bootable USB drive using Windows tools.

If the BIOS does not "see" the bootable USB flash drive, the problem may not be in it, but in the settings. You don't have to throw it away early. Try changing the BIOS configuration first.
Flash drives in our time have become an indispensable tool for storing and transferring information to a PC. Most personal computer users use flash drives to install Windows or Ubuntu. This is due to the fact that you do not need to burn the image to disk, but you need to install directly from the USB flash drive.
In addition, now most laptop and computer manufacturers, such as Acer and Lenovo, are releasing desktop and laptop computers without optical drives, which further popularizes installing Windows from a bootable USB flash drive. When installed in this way, many laptop and desktop users have situations where the BIOS does not see the bootable flash drive. In this article, we will try in detail to deal with writing an image to a USB flash drive, and also deal with the BIOS settings for the correct installation of Windows and Ubuntu.
If you are faced with the fact that when you restart your PC, your USB flash drive is not detected, then the first thing you need to do is make sure that the flash drive is really bootable. The fact is that just copying files to it is not enough.
Moreover, if you have an “absolutely working” bootable USB flash drive, since you have already installed the system from it many times, then we are forced to disappoint you: currently there are several types of boot systems and A flash drive that works on one PC will not work on another.. To succeed in this case, the system must be rewritten differently.
Therefore, the main part of the article contains detailed instructions for correctly burning a bootable USB flash drive using various software. The following article contains recommendations for setting up different types of BIOS.
Properly creating a bootable USB flash drive for Windows
First of all, to create a boot disk with Windows, you will need a flash drive with a capacity of 8 GB or higher. You ask why such a volume is needed. The answer is simple, now the installation files of modern operating systems have a volume of more than 2–4 GB. In these examples, we will deal with creating a bootable USB flash drive on such popular operating systems:- Windows 7;
- Windows 8.1;
- Windows 10;
To create a bootable USB flash drive for Windows 7, you need to download a licensed image. You can download it on the official page www.microsoft.com/ru-ru/software-download/windows7. To write the image to a USB flash drive, you will need a proprietary utility Microsoft Windows USB/DVD Download Tool, which can be downloaded from www.microsoft.com/en-us/download/windows-usb-dvd-download-tool. After installing the utility, you can start creating a bootable USB flash drive. After starting the utility, a window will appear in which you need to specify where the image is located.
After clicking the Next button, you will be taken to the device selection window for recording the image.
In this window, you must press the USB device button, after which you will proceed to the selection of a USB flash drive.
After selecting the required flash drive, click the Begin copying button. The process of copying the installation files to the USB flash drive will begin. Also, be careful, as all previously stored files on the USB drive will be erased.
The inscription in the last window " Status: Backup completed" will mean that your bootable flash drive is ready.
To install Windows 8.1, you need to download the official utility Media Creation Tool See http://windows.microsoft.com/en-us/windows-8/create-reset-refresh-media. After running the utility, you will be taken to the OS version selection window, in which you need to select the language, version and bit depth of the operating system.
The next step is to select a Windows recording device. In our case, this is USB flash drive»
The next step will give you the opportunity to select a flash drive.
After that, the next step is to download and write files to the drive. Just like with the previous example, all data on the flash drive will be erased. 
The last window will notify you that the installation media is ready.
To make a bootable flash drive for Windows 10, you need to download the utility Media Creation Tool from this page: www.microsoft.com/en-us/software-download/windows10. If you run the utility on Windows 7 or 8, the program will offer you two options: update or create installation media. You need to choose the second option.
The step of creating a bootable drive will be similar to the example for Windows 8.1.
Correctly creating a bootable USB flash drive for Ubuntu 15
For Ubuntu 15, download the UNetbootin utility from https://unetbootin.github.io. After starting the program, you must select the options as in the figure below and click the OK button.
In the final window, you will be prompted to restart your computer or laptop and boot from a USB flash drive.
BIOS setup for booting from a USB drive
Consider an example of booting a UEFI BIOS from a USB drive. For example, we will use the MSI motherboard - A58M-E33, which has the latest version of the UEFI BIOS. To enter the UEFI BIOS settings of the A58M-E33 motherboard, you must press the F11 key when starting a laptop or desktop computer. A boot menu will open in front of you, in which you need to select a flash drive, in this case it is “KingstonDataTraveler 2.0PMAP”.
You can also set it in the options so that the flash drive is loaded immediately from the BIOS. To do this, press the Delete key when loading. You will be taken to the main menu of the UEFI BIOS.
Then go to the menu Settings\boot" and put the flash drive in the first place, as shown in the figure below.
Now your system will boot from the selected flash device. But if your PC or laptop has UEFI and the system does not see the bootable flash drive, it means that the image was written incorrectly, or "Safe boot" mode enabled(how to fix, see the section below "How to configure UEFI to ...").
Booting from a USB drive on older computers
On older versions of BIOS, you can also boot from a USB drive. For example, to boot from an old Acer laptop, you must press the F2 key at startup. Once in the Acer laptop BIOS, go to the menu " BOOT».
Now after saving, your Acer laptop will boot from the flash device. This old BIOS configuration is installed on most Acer laptops. Therefore, with other older models of Acer laptops, the setting will be similar.
USB drive for UEFI computer
If you buy a new computer or laptop now, it will definitely support UEFI BIOS. There are many benefits to using the new UEFI BIOS, so the bootable flash drive must be UEFI capable.
If you create a bootable USB drive for Windows 7, 8.1 using Media Creation Tool, then the UEFI system will support it. And with utility Windows USB/DVD Download Tool for Windows 7, this option will not work.
Let's consider the option of creating an installation flash drive with UEFI support for Windows 7 systems. To do this, download the program from https://rufus.akeo.ie Rufus. Please insert the USB stick before starting the program. After launching the Rufus utility, select the Windows 7 image. You can do this by clicking on the DVD icon. The program window will look like this.
If all the points match, as shown in the figure, then feel free to press the Start button, after which the recording of files will begin.
After writing the files, you can use the flash drive to install Windows on a UEFI system. You can also use Rufus for systems with regular BIOS. A notable feature of the Rufus program is the fast speed of writing an image to a drive.
After reading this material, you will be able to create bootable USB flash drives for Windows and Linux-like operating systems. And you will not have questions such as why there is no flash drive in the BIOS or why Windows does not support the UEFI system.
How to configure UEFI so that the computer sees a bootable USB flash drive
There are some peculiarities of installing Windows 7 or XP on a Windows 8 or 10 PC. The latest versions (8 and 10) are set to UEFI and GPT partition table while the previous ones used MBR disk partition.
UEFI has a new feature Safe boot”, ensuring the security of the system boot. A new level of security blocks booting from external devices such as USB flash drives and CD drives.
Therefore, even if you make an exceptionally correct bootable USB flash drive, it still will not appear in the boot menu when you restart your PC or laptop.
To eliminate this cause, you can do the following:
- Make sure that your USB bootable flash drive is configured to work with UEFI (how to make such a flash drive correctly was described above).
- Disable "Safe boot", and change "Boot Mode" to "CSM/Legacy BIOS Mode".
Working with bootloader settings requires experience, we do not advise beginners to perform such actions. We also recommend that you first save all important data, as they may be lost.
To disable "Safe boot" follow these steps:
- Restart your computer or laptop and enter BIOS.
- Go to page " BIOS Settings».
- In the BIOS security settings, set the option " Safe boot» to the value « Disable».
- Option " boot mode» translate into value « CSM(Compability Support Mode)/Legacy BIOS" or " CSM Boot»- possible different options.
- Make sure USB is first in the boot sequence settings" boot order».
- Exit BIOS and save changes Save and exit».
Related videos
Installation with Rufus
8 reasons why the computer does not see the flash drive
Today I will tell you how to enable booting from a USB flash drive in the BIOS of various manufacturers. It doesn't matter which version you have, the order of gestures will be as follows:
1. We insert our bootable USB flash drive into the USB port of your computer. I recommend inserting it into the port located directly on the motherboard, i.e. from the back of the system unit.
2. Turn on the computer and press the key Delete(or F2) to get into the BIOS. Depending on the manufacturer and BIOS version, other keys (Esc, F1, Tab) may also be used, so you need to carefully read the prompts on the screen.
In BIOS, we can only navigate through the tabs using the keyboard.
Below I will describe this process in detail using the most used BIOS versions as an example.
Attention! Remember that if you are installing the operating system from a USB flash drive or CD and have selected a boot device in the BIOS, and not in the boot menu, then after the first automatic reboot of Windows, you must enter the BIOS again and return to boot from the hard drive. If this is not done, autoload from a USB flash drive or CD will work again, and Windows will again begin the first stage of the procedure. installation.
Configuring Award Bios to boot from a USB flash drive
Award Bios:
First, let's check if the USB controller is enabled. We go to "Integrated Peripherals". We go down with the arrow on the keyboard to the item “USB Controller”. Press the “Enter” key and in the window that appears, select “Enable” (also using “Enter”). Opposite “USB Controller 2.0” should also be “Enable”.
 Exit this tab by pressing Esc.
Then we go to "Advanced BIOS Features" - "Hard Disk Boot Priority".Now in my example, the hard drive is in the first place, and the flash drive should be.
 We stand on the line with the name of our flash drive (Patriot Memory) and raise it to the very top using the “+” key on the keyboard.
 Exit here by pressing "Esc".
Configuring AMI Bios to boot from a USB flash drive
If, upon entering BIOS, you see such a screen, then you have AMI Bios:
 First, let's check if the USB controller is enabled. Go to the tab "Advanced" - "USB Configuration".
 Opposite the items “USB Function” and “USB 2.0 Controller” should be “Enabled”.
 If this is not the case, we stand on this line and press the “Enter” key. From the list that appears, select “Enabled” (also using “Enter”).
Then exit this tab by pressing “Esc”.
Go to tab "Boot" - "Hard Disk Drives".
 Now I have a hard drive in the first place, but I need to put a USB flash drive here. We become on the first line, press “Enter” and in the window that appears, select our Patriot Memory flash drive.
 It should be like this:
 We leave from here through "Esc".
Select "Boot Device Priority". Here, the first boot device must be a USB flash drive.
 Press Esc.
Then we exit the BIOS, saving all the settings made. To do this, go to "Exit" - "Exit & Save Changes" - "OK".

Setting up Phoenix-Award Bios to boot from a USB flash drive
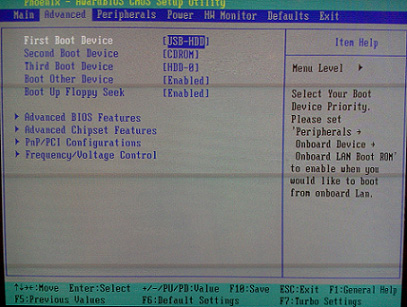
If, upon entering BIOS, you see such a screen, then you have Phoenix Award BIOS :
 First, let's check if the USB controller is enabled. We go to the “Peripherals” tab - opposite the items “USB Controller” and “USB 2.0 Controller” should be “Enabled”.
 Then we go to the “Advanced” tab and opposite “First Boot Device” we set “USB-HDD”.
 After that, exit the BIOS, saving the changes. To do this, go to "Exit" - "Save & Exit Setup" - press the key "Y" - "Enter"
 That's practically everything you need to know in order to boot from a USB flash drive. In my article, I described the process of setting up the Bios of the most popular versions: Award and AMI. The third example shows Phoenix Award Bios, which is much rarer.
In different versions of the BIOS, the described procedure may be slightly different. But the main thing is that you understand the principle of tuning itself.
By the way, I would also like to add: in order to choose which device to boot your computer from, it is not necessary to change the settings in the BIOS. You can call up a special menu immediately after turning on the computer to select boot devices (this can be done by pressing F8, F10, F11, F12 or Esc). In order not to guess with the keys, we look carefully at the monitor immediately after turning it on. We need to have time to see an inscription like this: “Press Esc to selest boot device”. In my case, it was necessary to press “Esc”.
As a rule, such problems are detected when trying to boot from a specific Flash drive. If your computing device does not see the USB flash drive in BIOS, then most likely you have not made the necessary changes to the basic system of the computer, or your removable storage device is simply not bootable. However, let's take a closer look at such a confusing situation "the flash drive is inserted into the PC, but does not work properly."
Is your USB Flash Drive OK?
Of course, you can suffer for a long time and conduct unsuccessful experiments in the BIOS system itself, which in the end will turn out to be a waste of your valuable time. Because the flash drive may simply be inoperable. To be convinced of the opposite, try enlisting the help of a test device - insert a "capricious" USB flash drive into another PC.

And in general, check if the (seemingly faulty when booting the PC) storage device is seen in the Windows environment. That is, whether USB memory is determined in the operating system itself. If not, then the Flash Drive needs to be repaired. Perhaps everything will be resolved after using a special software tool, for example, a proprietary flash drive recovery utility from its manufacturer.
Priority BIOS settings or what, where and how ...
- Insert the flash drive into the USB port of your PC.
- Restart your computer.
- Enter the BIOS using the corresponding button on the keyboard (for those who do not know how to do this -).
- Depending on the version of the underlying microsystem, the name of the section in which the connected flash drive is displayed may be different than the “BOOT” tab discussed below. And yet, be guided by the abbreviated values \u200b\u200bof “USB” when searching for the required partition in the BIOS.

- We set the boot from the flash drive.
- Also check if the USB hardware controller is disabled.

- Save and restart your computer.

It's great if the USB Flash Drive is detected and the PC goes into boot mode from a USB flash drive. Otherwise, skip to the next section of this article.
USB flash drive boot properties
Let's say you want to install an operating system whose distribution is written to a removable storage device. However, in order for the USB flash drive to be defined as a bootable drive, you must make it such. In other words, in the process of writing Windows installation files, you must use a special utility, for example, "Rufus" (to download, click here ). Only in this case will the flash drive really become bootable.
Storage device hardware incompatibility
In some situations, the system BIOS does not see the flash drive due to the outdated interface of the memory device itself. Make sure your USB stick is not a receiver of the "ancient" 1.1 standard. However, new flash drives with technological characteristics 3.0 may also not be perceived by outdated computer systems.

So, the detailed characteristics of your storage device can be found on the official technical support website - enter the model of the flash drive and read the information you are interested in. By the way, this action can help in solving problem situations related to any kind of malfunction of your USB device (meaning the presence of a specific recovery utility on the site).
Updating the BIOS of the system - as a solution to the "invisible" USB problem
Sometimes it is advisable to carry out the process of updating the microsystem BIOS software. How to do this is described in detail here. However, in modern computers, this operation is performed by a fairly simple method.
- Visit the technical support site for your motherboard.
- Download the latest BIOS version.

- Using a special flasher - flash the BIOS of your computer.
However, before proceeding with the implementation, albeit not difficult, but still very responsible operation "upgrading the version of the basic PC microsystem", carefully and in detail study the reference information on the correctly implemented update process (perhaps this will be an invaluable help for you - go to ).
Bootable USB incompatibility of outdated computer systems - there is a solution!
Let's call such computers "exotic". However, if you need to give your old computer the "boot from USB drive" properties, then follow the instructions below.
- Use this link - https://www.plop.at/en/bootmanager/download.html .
- Once you have downloaded Plop Boot Manager, burn it to a CD.
- Set the BIOS to boot from the optical drive.

- Further, after the “Plop” workspace of the utility is displayed on the screen, insert the USB drive into the appropriate slot (preferably the main one, which is located behind the PC system unit).

- Select in the bootloader window - USB.
Now your "old man" can use the flash drive as a boot drive.
Summing up
So, the author of this article is sure that after you have read the material of the presented article, you will certainly succeed. And yet, I would like to note one not unimportant fact: most users make mistakes only because they misunderstand the problem and resort to the sometimes meaningless advice of “dear Internet GURU”. At the same time, exposing your car to the critical danger of “complete failure”. Be smart when choosing one or another solution to your computer problems and your experience will always be productive!
The development of technology has significantly increased the amount of flash drives. During this time, CDs have completely disappeared from our lives, even Microsoft began to distribute Windows 10 on flash drives. But what to do if the BIOS does not see a bootable USB flash drive that has the software you installed.
Causes and remedies
There are not so many reasons, they are almost all related to the BIOS setup.
Important! First you need to make sure that the flash drive is working properly. Connecting to another computer or laptop, check if it is displayed.
Wrong image entry
The installation flash drive is created using special programs, it is not enough just to upload the file to the drive, it must be written correctly.
If you want to burn an image of Windows 7, then use the proprietary Microsoft utility.
For other versions of Windows and other programs, it is better to use UltraISO.

Settings in the BIOS
What to do if the flash drive is written correctly, but the boot from it does not occur? Most likely, the problem is in the BIOS settings.
Device startup order
Advice! Connect the drive to the USB port before doing the following. This will make it easier to find.

Download mode
The second reason may be that the flash drive is not visible in the Boot Menu due to a boot mode mismatch. Most devices support two boot modes: Legacy and EFI. If the BIOS is set to Legacy mode, and the flash drive is written for EFI (or vice versa), then the system will not be able to recognize it.
The only thing to do in this case is to specify the desired mode through the Basic Input / Output System.

USB port support
Sometimes there are situations when the PC does not see the USB flash drive through the USB 3.0 port when trying to install the system from it. This is most likely due to the BIOS configuration. To solve the problem, just rearrange the flash drive to USB 2.0.