Word 2010 is a text editor that allows you to create various types of documents such as letters, documents, flyers, faxes, and more. In this lesson, you will become familiar with the main menu ribbon and the new pop-up menu, how to create new documents and open existing ones.
Word 2010 is slightly different from previous versions. The toolbar is the same as in word 2007 and includes the Main Menu Ribbon and Quick Access Toolbar. Unlike word 2007 commands such as "open" and "seal" are located in the pop-up menu that replaces the Microsoft Office Button.
ribbon
The new main menu ribbon was first introduced in word 2007 to replace the traditional menu. The ribbon contains everything you need to carry out common commands. It contains numerous tabs, each of which contains several groups of commands. You can also add your own tabs which contain your preferred commands. Some groups have an arrow in the lower right corner, through which you can open more commands.
Some programs, such as Adobe Acrobat Reader, can add a separate tab to the ribbon. These tabs are called inline items.
To collapse and expand the ribbon
The ribbon is designed to meet your current needs and be easy to use. However, you can minimize it if it takes up too much screen space.
- Click the arrow in the upper-right corner of the ribbon to collapse it.
- Click the arrow again to expand the ribbon.

When the ribbon is minimized, you can temporarily bring it up by clicking on any tab. The tape will disappear again if you don’t use it.
Customize the main menu ribbon.
You can customize the ribbon by creating your own tabs with any commands. Teams are always located within a group and you can create as many groups as you like to organize your tabs. Optionally, you can even add commands to any standard tab by creating a custom command.
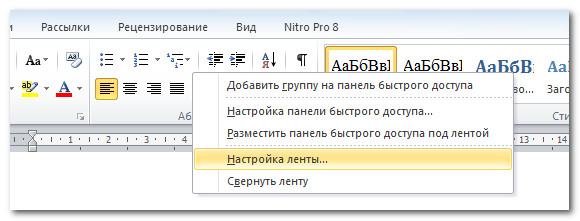
- Right-click on the main menu ribbon and select Customize Ribbon. A dialog box will appear.
- Click New Tab. A New Tab appears with a new group.
- Make sure you select a new group.
- Select a command from the list on the left, then select Add. You can also drag and drop commands directly from the group.
- When you're done adding commands, click OK.

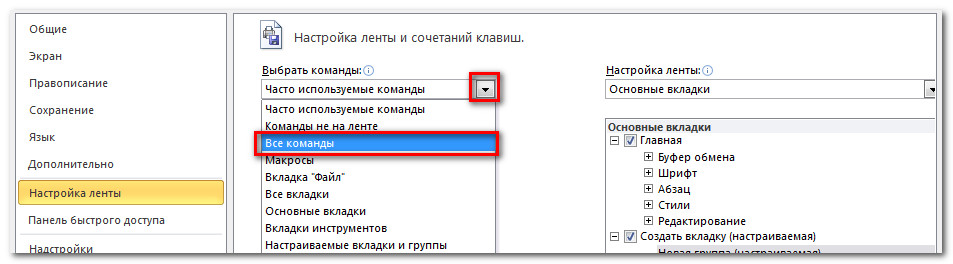
If you do not see the command you want, click Select Commands and from the menu that appears, select All Commands.
The pop-up menu contains various options with which you can save, create, print and share documents. It is similar to the Word 2007 Button Menu and the File Menu in previous versions. However, unlike a regular menu, it is full-page, making it easy to work with.
To bring up the popup menu:
- Click the File tab.
- Options are on the left side of the page.
- To return to the document, click on any tab on the ribbon.

The Quick Access Toolbar is located above the ribbon and allows you to quickly access common commands no matter which tab you are on. By default, it shows the Save, Edit and Redo commands. You can add other commands to make it convenient for you to work with.
To add commands to the Quick Access Toolbar:
- Click the arrow on the right side of the menu
- Select the command you want to add. The command will appear in the shortcut menu.

Ruler
The ruler is located at the top and left of the document. It allows you to accurately align your document. You can optionally hide the ruler to create more screen space.

To hide or show the ruler:
- Click on the Ruler icon in the scroll bar.
- Click the icon again to show the ruler.

Create and open documents
Files in a Word are called documents. To start a new project in word, you first need to create a new document, which can be either empty or template. You also need to know how to open an existing document.
To create a new document:
- Click on the file tab. A pop-up menu will open.
- Select create.
- Select a new document from the available templates. It will be highlighted by default.
- Click "create". A new document appears in the word window.

To save time, you can create a document from available templates that you can select in the New Document window. We'll talk about templates in the next tutorials.
To open an existing document:
- Click on the "File" tab. A pop-up menu will open.
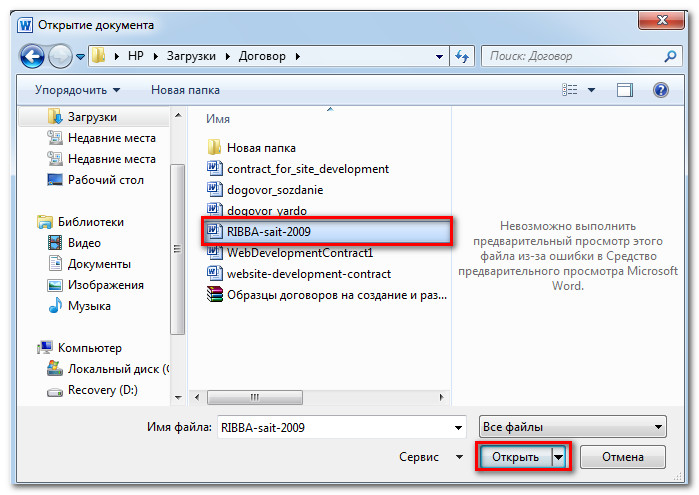
- Select "open". A dialog box will appear.
- Select your document and click "open".
If you have recently opened a document, you can open it from the Recent Documents list. Just click on the file tab and select recent.

Compatibility Mode
Sometimes you will need to work with documents that were created in earlier versions of the Word program, such as Word 2007 and Word 2003. When you open such documents, they will open in compatibility mode.
Compatibility mode has certain restrictions, so you will only have access to commands that were in the programs in which they were created. For example, if you open a document that was created in Word 2007, you will be able to use the tabs and commands in Word 2007.
There are many different programs in our computer. We use some of them often, while in others we work extremely rarely or never at all. But there are those in the computer that you just need to know and be able to use. And one of them is the Microsoft Word program.
Of course, if you use your computer only for games and communication on the Internet, then you can safely do without Word. But in this case, you can hardly be called a confident user. After all, a confident user is one who knows how to perform basic operations on a computer (create a folder, copy, delete) and work with popular programs, including Word and Excel.
By the way, when an employer requires an employee to know a PC, this means, first of all, knowledge of the Microsoft Word program.
What is Word
Microsoft Word is a program for printing text and composing documents. Simply put, it is used for printing.
You can type any type of text in it: article, document, abstract, term paper, diploma and even a book. Also in this program, you can beautifully design text - add a picture or photo to it, highlight parts of it with different colors, change the font, size of letters and much more. You can also create a spreadsheet, print an ad, or make a poster in Microsoft Word. Plus, what is printed can be printed out on paper, that is, printed on a printer.
Word is a white sheet of paper that you can type on straight away using your computer keyboard. Moreover, this is not one sheet of paper: if you need to print a lot of text, and it does not fit on one sheet, the program will automatically add more sheets. Also, the printed text can be edited: change the size of letters, font, style and much more. For this, there are special buttons in the Word.
How to open Word
Look at the Desktop, that is, at the screen of your computer. Perhaps you will see this icon on it:
This icon opens the Word program.
If there is no such icon on the desktop, click on the "Start" button in the lower left corner of the screen.
A list will open. Click on "Programs" (All Programs).
For working with textual information, special programs for preparing texts are very effective: the so-called word processors and text editors. Unlike a printing press, word processors make it possible to prepare any document in a much shorter time and with better quality.
Today there are hundreds of different text editors, and their number continues to grow. The functionality of various programs for preparing texts differs significantly, at the same time, most of them have many common properties.
The general functions that can be implemented by word processors include the following:
1) entering text into a computer;
2) text editing (replacement, insertion, deletion, etc.);
3) search for the necessary information in the text;
4) text formatting (setting the left border of the text, aligning the right edge, setting the indent position of the first line of a paragraph, etc.);
b) transfer and copying of text fragments;
6) highlighting parts of the text in a certain font;
7) breaking the text into pages with a certain number of lines and line spacing;
8) work with several documents at the same time;
9) printing text with a given density, quality, etc .; 10) saving text on disks.
The text editor Word is one of the most widespread text editors, which is largely due to its many advantages, which include, above all, broad functionality. It is difficult to find such a task in working with texts that could not be solved by means of Word. This editor is part of the Microsoft Office program group. In addition to it, it includes an Excel spreadsheet and an Access database management system, that is, the main programs that can be used to form workflow in institutions. Widespread use of Word is also facilitated by the built-in tools for converting files created by other text editors to Word files and vice versa.
There are several versions of Word for Windows, and each subsequent version is generally preview compatible and has additional features. Further material will be based on working with the Russian version 7.0.
To install Word in Windows, run the Start / Settings / Control Panel command. Then, on the Control Panel, select the Add or Remove Programs item, insert the CD into the drive and click the Install button. During the installation process, on screen h "there are instructions that you should follow. The installation options differ in additional features, and therefore in the programs that implement these features.
Microsoft Word editor windows
To start Word, you need to run the command Start / Programs / Microsoft Word, after which an editor window will appear on the screen.
The Word editor window has several standard elements. Some of them are constantly present on the screen, others can be called at the request of the user. Let's consider the purpose of these elements.
Title line. The top line of the screen is the standard Windows title bar. It contains the name of the program (Microsoft Word) and four buttons: one on the left and three on the right. The left button is the button for calling the control menu. The guide menu is typical for any Windows window. The first of the right buttons - Minimize - minimizes the window to an icon on the taskbar, the second - Restore - restores the normal window size, the third - Close - closes the window.
Menu bar. The menu bar is located under the title bar in the window and contains the following items:
File - provides for working with document files;
Editing - editing documents;
View - viewing documents;
Insert - allows you to make page numbering insert pictures, diagrams, current dates and times, formulas, links, footnotes and other objects into the document;
Format - provides for the formatting of documents (setting fonts, parameters, paragraph indents, creating a drop cap);
Service - service functions (spell check, set Wordy settings,
Table - for working with tables;
Window - for working with document windows;
Help - Help information about Word.
Each menu item has a corresponding submenu. To open the menu, press the Alt or F10 key. After that, one of the menu items will be selected in an inverse way. To select the desired menu item, use the horizontal cursor keys. To open the highlighted item, press the Enter key. At the same time, all these operations are more convenient to do with the mouse, by placing the cursor on the desired menu item and pressing the left button.
In the submenu, the desired item can also be selected in two ways: either using the mouse (for this, you need to place the mouse cursor on the desired item and press the left button), or using the keyboard (use the vertical cursor keys to select the desired item and press the Enter key).
There is an underlined letter e in the names of menu items. This allows you to immediately select the desired menu item by pressing the Alt + underlined menu letter. Near some of the submenu items, to the right of the name, there are designations of key combinations with which you can select the corresponding submenu item.
Some of the submenu items are grayed out. This means that they are currently unavailable (for example, you cannot edit the table if it has not already been created).
The Word text editor has another way to invoke commands. Right-clicking on the selected text or word will display a context menu that contains commands that can be applied to the selected object. The user can undo the action of the last entered command by performing the Edit / Undo function.
Toolbars. Below the menu bar are usually toolbars, that is, a series of buttons that, when pressed, perform a specific action. To press a button, you need to click on it with the left mouse button. When the cursor is fixed on a button, its name appears below it. The buttons duplicate the corresponding menu commands, but the buttons on this panel are much faster and more convenient to use.
Word has created several toolbars for the user. To select the required one, use the View / Toolbars command. In this case, a dialog box will appear on the screen, you can select the required panels from the list. By default, Word displays the Standard and Formatting toolbars. Some panels appear on the screen automatically when certain actions are performed (for example, the Drawing panel is displayed for drawing pictures). On the screen, the panels can be moved in a typical way for the Word environment - using the mouse.
Dialog window. Some commands require additional information to be entered. So, to execute the File / Open command, you need to define the drive or directory and the file name. To enter such information, dialog boxes are used that contain a number of elements: buttons, lists, checkboxes, radio buttons, input lines, which are arranged in thematic groups and are called fields.
Topic groups have headings that end with a colon. Moving from group to group is carried out either with the mouse or by pressing the Tab key. The group name can be selected by pressing the key combination (Alt + underlined letter in the field name). Moving within the group is carried out using the cursor keys. In the case of entering auxiliary information in the dialog box, check boxes and radio buttons are set, items are selected from the lists, and text is entered and edited in the input fields.
Checkboxes are small squares in which a checkmark appears after enabling. They turn on independently of each other.
The switches (shown as circles) are used when it is necessary to select one of several options (parameters). The selected radio button is distinguished from the others by a dark dot inside the circle.
Lists are used to select one of several options (for example, font). While the marker is inside this list, the list can be scrolled by moving the cursor. The list item is selected by pressing the left mouse button or pressing the Enter key.
A special form of list is single-line lists, in which only the first item is shown. Such lists have an arrow pointing down to the right. To view such a list, place the mouse cursor on the arrow and press the left mouse button or the Alt + right arrow key combination. After opening the list and selecting an item, the list is closed again. Some single-line lists where the items are numbers have two up and down arrows on the right. Clicking on the down arrow will decrease the value of the item, and click on the up arrow to increase it.
In the right part or at the bottom of the window there are buttons for controlling the dialog box.
The OK button (Enter key) closes the dialog box and pressing it confirms all the changes made, after that Word executes the command.
Cancel button (the Esc key cancels any changes made; the dialog box closes, but the corresponding command is not executed.
In addition to the OK and Cancel buttons, the dialog box, depending on its specific purpose, may have other control buttons.
It is not possible to display many dialog boxes at the same time. In this case, tab pages are used. Each tab has a name at the top. To open a tab, place the cursor on the name and press the left mouse button. Dialog boxes also have fields that end with a three-dot. When you select such a field, another window opens, in which you can also set certain parameters.
Not all users are aware of the ability to open a Word document online. Web services are the best alternative to full-fledged utilities today. Online editors of the most popular text application provide full access to all the functionality of well-known office programs. They will be especially useful for those users who do not work with this software due to hardware or software failures. Let's talk about the most popular and reliable Word services.
Word is a text file that is created in Microsoft Word utility. Currently, this product is considered the most popular, many users pay to install the official version from the manufacturer. The file created in this program is a complete imitation of an ordinary document printed on a piece of paper, so it's easy to work with it. Here you can write texts, edit, make plates and insert graphics.
The Internet today is almost anywhere in the world, so the urgent need to install office applications on a computer has disappeared. In addition, with online services, you do not have to think about updating the software, about the lack of a suitable font, creating a backup version in the event of a device freezing. Remote applications can easily cope with their tasks.
Open Word editor document online using Google Docs
According to many users, this free product is the best. It allows you to create and edit Word objects, and it also works with the .doc and .docx formats. It has a simple interface, so even a user with minimal knowledge can quickly figure it out. The functionality is wide, the editor has a lot of tools for formatting text, correcting errors in real time, inserting images, converting and exporting documents to other extensions.

The principle of working with Google Docs will be as follows:
- go to site;
- among the available formats, which are located in the top menu, choose the one you are interested in;
- by left clicking of the mouse, activate the "Open Google Docs / Sheets / Presentations / Forms" tab (whatever you choose);
- in a new window with a list of files available for viewing, changing, you can open any left mouse click;
- to create a new Word object, click on the "+" icon in the lower right corner;
- a menu will open with editing tools, the same as in the local release of the product;
- objects are saved automatically, to download, click "File / Download as" and find the required format in the list.
Resource capabilities
On the Google Docs site there are not only standard features, there are various interesting and useful additional options. For example, "Shared Access" - with its help, it is easy to edit Word online at the same time with other users, make an individual link or open access.
- Sharing is activated by clicking on the "File / Sharing" tab, then the name of your text project is entered and in the second window email users are indicated who will participate in working with the document;
- To get a link to a publication, open the "File / Publish" sections and find "Publish" in the window that opens, a link will be compiled in automatic mode. It can be copied, taken for posting on other sites;
- To configure access parameters, open the corresponding block, which is located in the top corner, on the right side, in a new window, tap on the "Advanced" tab and in the "Access levels" click "Change", and then select the protection level.
Useful content:
This is a special web package of MS Office Word applications, it has the same tools and functions as the standard installer program on a PC. In addition, the online service has the ability to modify texts simultaneously with other people.

The most remarkable thing is that you can work with the editor only after registering a Microsoft account. You can register here... After creating an account, the full capabilities of the service open, for this:
- go to Word Online website;
- choose one of the offered products;
- after confirming the choice, the desired program will be opened, in which all the tools of the traditional Office package are provided;
- the document is saved by sequential pressing "File / Save As", here you can upload the result to the Cloud in OneDrive, directly to your own computer in doc / PDF / ODT formats. Saving is done by clicking on the selected extension.
Co-authoring online, activated in the "Sharing" tab, it is located on the right side above the Word menu, in the form that appears, enter the email address of the user whom you plan to allow sharing.
A worthy tool that allows you to open a Word online for free, closing the top three. Its main difference from its counterparts is that it uses the familiar Word 2003-2007 interface. But you can't do without registration here either, you have to create a rollApp account. You can do it like this:
- first, go to site;
- secondly, in the list of programs look for "Office", in a new window with the left mouse click, start the selected editor;

- then a page will open on which you click "LaunchOnline";
- as a result, a section with information will be activated, where for registration it is necessary to mark the sub-item "Iamanewuser";
- after the registration process is completed, the editor menu of the Microsoft Office application we need will open;
- finally, in order to save the document, you should activate one of the possible storages (google drive / dropbox / onedrive / box).
This is how easy it is to open a Word document online from any computer. All you need is an internet connection. Thanks to such services, it became possible to work at any time, regardless of location.
Most of us have to work with documents, and it is clear that everyone wants to do it with the maximum convenience that only a quality editor can provide. There are many packages for working with office documents, this is LibreOffice, and OpenOffice and the same Ms Word. The first two are free, but that is where their benefits end; in all other respects, the product from Microsoft is far ahead of the competition.
There are many versions of Microsoft Office, the old ones are distinguished by low functionality, low system requirements and simplicity, while the new ones, on the contrary, are heavy and stuffed to the eyeballs with various buns that simply cause braking on old PCs. In order to get the maximum functionality and at the same time not wait out the thoughtful actions of the office, you need to choose the right version. Microsoft office 2007 is the same golden mean. You can download the Russian version of Microsoft Office 2007 for free at the very bottom of the page via a torrent or via a direct link, for now let's take a closer look at the office suite.
Description of MS Office 2007
Below we will tell you in detail why this edition is good, what its shortcomings are, we will learn how to use Office 2007 and install it. Let's also talk about the features that may arise in the process of work. This package includes several separate tools, among them:
- Word;
- Excel;
- OneNote;
- PowerPoint;
- etc.
There are many other components that are part of Microsoft Office 2007, which are not very popular, they are used only by a narrow circle of people, so we will mention them briefly.
Additional components for Microsoft office 2007:
- Access;
- Groove;
- InfoPath;
- Project;
- Publisher;
- SharePoint Designer
- Visio.
We proceed to a detailed examination of each of the programs, for clarity, we will not only describe them, but also accompany them with screenshots.
Word
The most popular among all the products that are included in the office suite from Microsoft is Microsoft Word 2007. In this case, only a small part of the general functionality is most often involved. There are a lot of additional options, you can configure the Quick Access Toolbar or hide ribbons, and in Office 2007 it has become really convenient to do this. Now, with just a few clicks, we can hide unnecessary tools and leave the ones we use.
Let's consider the program in more detail, and let's start with its menu, it is divided into 7 tabs. Since we installed the OfficeTab add-on, we have 8 of them.
home
This menu (tape) is divided into 5 blocks, this structuring is very convenient, the visual memory of a person is well developed, and you just get used to where to poke. In the first block we see tools for working with the clipboard, there is a large button "Paste", copy and cut, but it is much more convenient to use the hot keys, Ctrl + V, Ctrl + C and, accordingly, Ctrl + X.

Next, we have the basic text settings, these are font, size, zoom buttons, bold, italic, underline, uppercase, color and marker. In the lower right corner there is an arrow, pressing which will open the settings menu and allow you to configure the default text appearance and direction.

In the "Paragraph" block, you can adjust the text alignment, design bulleted and numbered lists (including multilevel ones), change the indent, line spacing or fill color. In the same way as in the "Font" section, using the arrow, you can set the default values.

The next block is Styles. Here you can set text size and color profiles for highlights, headings of different levels or quotes. The arrow in the lower right corner can open an additional menu with detailed settings.

And the last section of the Home menu includes basic editing tools. This is search, replace, or work with selection.

Insert
Here, like the previous point, we have several columns with different tools. There are 7 of them, these are:
- Pages.
- Table.
- Illustrations.
- Connections.
- Headers and footers.
- Text.
- Symbols.
The first paragraph has "Title Page", "Blank Page" and "Page Break". When you click on any of these buttons, a list of ready-made templates opens that will help you pre-format our document.

A little to the right is the tool for creating tables. In Word 2007, they are implemented very conveniently, literally everything is configured and it is done simply.

Pictures and other media objects are also easy to understand, for this there is a block "Illustrations". It contains pictures, clips, shapes, SmartArt, and charts.

In the "Links" section, the insertion of hyperlinks, bookmarks and cross-references is implemented. With the help of the latter, you can link two parts of the same document. For example, you can link a phrase to an object, picture, or diagram.

You can also customize headers and footers (add or remove them). There are tons of header and footer templates out there, and you can instantly number the pages.

The next block of the "Insert" menu is "Text". There are many different objects here that are inserted from templates. This is a simple inscription, and express blocks, and WordArt, and drop caps. You can also add a date and time or a signature, a small button in the lower right corner opens a menu of objects.

In the last block "Symbols", you can configure the insertion of formulas or special characters.

Page layout
Page Layout is divided into 6 main blocks. The first is Themes. By clicking on the button, we can see a number of ready-made templates and choose the most suitable one for ourselves. There are also a few more buttons that customize the colors, fonts, and effects of our theme. In this section, you can also activate automatic word wrap.

The next block configures page parameters, or rather: margins, orientation, size, columns, breaks, line numbers and hyphens.

In the "Page Background" section, you can customize the watermark, background color and border. Paragraphs are also regulated immediately.
Links
This tab is needed to fine-tune the work with links. All information is structured into blocks, there is: table of contents, footnotes, references and bibliography, titles, subject index and table of references. Using the same section, you can create an automatic table of contents in Word.

Newsletters

Peer review
The "Review" tab involves checking the text and making comments in case of errors. There are many other functions, but most often it is used for this. The verification algorithm in Microsoft Word 2007 is capable of learning, those words that it misinterprets for some reason are entered into the database using the context menu.

View
And finally the "View" section. It has a document view mode, for example, draft, outline or reading, setting additional panels, ruler, grid or document outline and zoom adjustment. Macros are also created in the same menu. Macro is a tool with which you can record any action so that the program can perform it automatically.
You can also use buttons to adjust the size of text and other content in your document. To do this, hold down the Ctrl key and rotate the mouse wheel.

To open the Word 2007 settings, click on the round icon in the upper left corner of the program.


How to remove reduced functionality mode in Word 2007
In the new version of Word, the developers switched to the Docx format; therefore, in older offices, such documents are opened in reduced functionality mode. To fix the inconvenience, you can open the main menu of the old version of Word and select the "Convert" item, then confirm the command. Done, you can work with the file even in Office 2003.
How to delete a blank page in Word 2007
In order to do this, you need to click on the page break icon, which is located in the "Paragraph" menu.


