Here you can download WinSetupFromUSB and updates of the tools included.
Please do not hotlink files, use this page if you want to post a link to the program. If you need to link to a specific version, you could use version number like this:
http: //www.site/downloads/#1-8
Note: A few antivirus programs keep detecting a couple of the included files as viruses. This is false positive... These vendors were informed numerous times and the serious companies such as DrWeb and Kaspersky, update their signatures to remove the false detection within a few hours after being informed. Others, such as McAfee, despite all the efforts and contacts, don’t do anything to update their signatures. For a few unknown ones, which use third party signatures, there is no way to contact them or they simply don’t respond. This program will never knowingly distribute any kind of malware.
(24 MB; 2171799 downloads)
Changes from version 1.7
- fixed issue with Windows 10 and recovery option not shown
- fixed issue with persistence file size not set correctly and tooltip for using persistence
- updated some the tools to their latest version- BootIce, ImDisk, WimLib
1) Windows 10 - single should work. Dual are NOT supported not
(24 MB; 1388080 downloads)
Changes from version 1.6
- disabled superfloppy check due to issues with latest Windows 10 builds
- increased input timeouts to 45 seconds
- fixed issue with Swedish locale and bcdedit
- added check if imdisk is an old version
1) Windows 10 - single ISOs created by Microsoft Media Creation Tool or downloaded from Microsoft should work. Dual ISOs made by the same tool (x32 and x64 in a single ISO) are NOT supported yet due to the changed structure. Such source can still be added using the previous versions which dump entire contents as they are, 1.0 beta8 for example. Limitations- such source needs to be added first, and any other sources of the same type, but not the same x32 + x64, has to be added using 1.6 beta 2 or later.
(24 MB; 1085303 downloads)
Changes from 1.6 beta2
- updated imdisk package for compatibility with latest Windows 10 versions
- Added Windows 10 in all GUI elements
1) Windows 10 - single ISOs created by Microsoft Media Creation Tool or downloaded from Microsoft should work. Dual ISOs made by the same tool (x32 and x64 in a single ISO) are NOT supported yet due to the changed structure. Such source can still be added using the previous versions which dump entire contents as they are, 1.0 beta8 for example. Limitations- such source needs to be added first, and any other sources of the same type, but not the same x32 + x64, has to be added using 1.6 beta 2 or later.
2) If program is run on latest Windows 10 builds, seconds source can no longer be added due to incorrectly detected superfloppy format of the USB disk. This is due to changed by Microsoft WMI call results or structure. Fix is being worked on and will be released as soon as it’s ready.
(24 MB; 395411 downloads)
Changes from 1.6 beta1
- Fixed missing EFI boot menu for Windows 10 sources
Note: Windows 10 - single ISOs created by Microsoft Media Creation Tool or downloaded from Microsoft should work. Dual ISOs made by the same tool (x32 and x64 in a single ISO) are NOT supported yet due to the changed structure. Such source can still be added using the previous versions which dump entire contents as they are, 1.0 beta8 for example. Limitations- such source needs to be added first, and any other sources of the same type, but not the same x32 + x64, has to be added using 1.6 beta 2 or later.
(24 MB; 214402 downloads)
(23 MB; 58852 downloads)
Changes from 1.5
- Added support for Windows Vista / 7/8 and above sources larger than 4 GB and FAT32 for EFI compatibility- credits. In other words, now is possible to use FAT32 formatted USB drive and add larger than 4 GB source, say Windows 10, to be able to boot in EFI mode. As this is new feature not yet fully tested, the first version is released as a beta. Any feedback is appreciated.
(22 MB; 1916890 downloads)
(22 MB; 541852 downloads)
Changes from 1.3
- added better handling of illegal characters for Linux / Other ISO source file name
- added advanced option for adding persistence partition for Linux sources. Each source has its own persistence space associated with it
- added better handling for Kon-Boot, source is to be added as ISO file using the Linux / Other ISO option
- added advanced option to add custom folder with boot critical drivers for NT6 sources (Vista and later). These drivers are added in boot.wim and loaded with DrvLoad before start of Setup, scratch space is increased accordingly. Only drivers for present devices will be loaded. Use it to add USB, SATA / SCSI or Chipset / USB drivers for example. Loaded drivers will be staged and available to the OS being installed. For non boot-critical drivers (Lan, WLan, Video etc.), have a look
- added internal check for NT6 sources with multiple boot.wim, only default osloader entry in BCD store and the corresponding boot.wim will be added
- fixed errors when USB disk was initially prepared with the auto-format option, and on next run of the program it may complain about missing MBR and partition table
(22 MB; 295001 downloads)
(22 MB; 69120 downloads)
Changes from 1.1
- Fixed bug where program running on Windows localized in other than English language would not add NT6 source
- Improved handling when program is placed and run from directories which contain special characters- `# $% ^ & () - + = ,; Single quote - ‘is not supported in program directory path and there is a check for that
- Added an advanced option for NT6 (Vista and later) sources to add Q-Dir File Explorer, which starts before Setup. This is useful to quickly browse disk contents and backup and restore files before launching Setup, rather than booting first in another OS to perform the same task. When Q-Dir is closed, Setup starts.
- BootIce updated to version 1.3.2.1
(22 MB; 198956 downloads)
(22 MB; 39387 downloads)
Changes from 1.0
- (U) EFI support for Windows Vista x64 SP1 and later 64 bits Windows. USB disk must be formatted in FAT32 as per EFI specifications to boot under EFI. To prepare USB disk running the program under Windows XP or 2003, which do not include bcdedit.exe, an active internet connection must be present in order to download it
- default auto-format file system has been changed to FAT32 for EFI compatibility
- Firadisk driver is now added to each XP 32 bits source, but disabled by default. A new option in DPMS and custom F6 floppy menus activates it. This should help loading SATA / AHCI / RAID drivers from virtual floppy on problematic machines
- NT6 sources boot menus are now handled by BOOTMGR
- fixed recognition of Windows 8.1 sources which contain INSTALL.ESD instead of INSTALL.WIM
- added check in boot menu for Linux sources to warn if PLoP is loaded. Linux sources would not work with PLoP loaded as it supports only read mode
- removed the ZIP archive as it seems some users tend to launch the program directly from the Windows zip folder view, rather than extracting all files and folders. A self extracting SFX archive is added instead
- updated wimlib to 1.5.3 which would also fix with the first 1.0 versions (downloaded before 14.Nov.2013) and NT6 sources
- various small bug fixes
(37 MB; 710840 downloads)
(22 MB; 65543 downloads)
Windows Vista and above Setup / PE may not start, command prompt may appear saying:
“A winpesh.ini file is present, but no commands were successfully launched. This could be caused by incorrect formatting or an invalid executable name. ”
or simply restarts. Please refer to for details and fix, or re-download the program if you downloaded it before 14.Nov.2013.
Changes from 1.0 RC4
- custom boot menu name when Linux / Other ISO is added
- when XP / 2003/2000 source is added and incorrectly the i386 folder is pointed as source directory, program uses its parent directory
- other small fixes and improvements
Previous versions
(37 MB; 48788 downloads)
(22 MB; 41530 downloads)
Changes from 1.0 beta8
- Ability to add multiple Windows Vista, 7, 8, Server 2008/2012 sources from ISO file... Use the same option to add PE2 (Vista / Server 2008) and above based utility. Thanks to synchronicity for his amazing
Installing operating systems using removable media has long ceased to be a big problem. If you do not have a blank CD / DVD at hand, or the drive itself is faulty or simply does not exist (for example, in netbooks and ultrabooks), then every second person currently has a 1-2 GB flash drive. So, after reading this guide, you can create a bootable USB flash drive with Windows XP (and not only) and thereby greatly simplify your transition from one OS to another.
What do you need?
- Download in advance Windows XP working iso image... It is advisable to choose the distribution that does not have any third-party modifications, which means that the probability of its instability is minimal. If the standard XP does not suit you, we recommend choosing the assembly from Zver.
- Removable disk (flash drive), at least 1 GB... Later, it will be completely cleared, so copy all important data from it.
- Program WinSetupFromUSB v.1.3... It can be downloaded absolutely free of charge on the official website of the developer.
Creating a bootable USB drive
There are several ways to prepare a removable disk for installing Windows XP from it. But, despite this, we will use the simplest program WinSetupFromUSB and after about half an hour we will get a ready-made bootable USB flash drive. You just need to follow these steps:

BIOS setup
Windows XP is slightly different in terms of installation from its siblings - Vista, 7 and 8. Therefore, you need to pay a little more attention to BIOS setup:
- The first step is to set the boot priority to the removable disk. Therefore, in the process of starting up the computer / laptop, press F2 or Del to get into the BIOS window.
- In the Boot section or in the Boot Device Priority list, put in the first place your bootable USB flash drive (depending on the manufacturer of the motherboard, the BIOS versions have significant differences, so these instructions are very general).
- Most modern computers work with S-ATA data transfer interface, while Windows XP has built-in drivers only for the outdated IDE. Therefore, set Storage Configuration to Compatible in BIOS.
- Save changes and restart your computer by pressing F10.
Installing Windows XP
- Having successfully booted from the removable disk, Windows XP will greet you. Following the instructions of the installer, press Enter (<Ввод>)

- Violation of the Microsoft product license agreement is punishable by law. So confirm by pressing the F8 button that you are confident in your own actions and continue with the installation of the system.

- This window contains the entire list of hard drives on which it is possible to install Windows XP (by default, only HDDs with IDE data transfer technology are displayed). Select the drive you want and proceed to the next step.

- Formatting the hard drive is mandatory, so make sure all your files are safe and only then select the third option “Format partition in NTFS”.

- After preparing the HDD and copying the necessary system files to it, the Windows XP setup program will proceed to the final processes. First, install the System Language and Input Methods.

- Please enter your username. The organization field can be left blank.

- Enter the serial code, which looks like XXXXX-XXXXX-XXXXX-XXXXX-XXXXX

- Select a computer name and set an administrator password (the latter is optional)

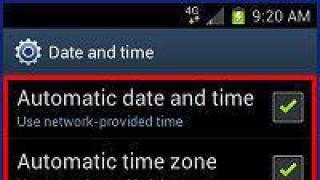
- Next, set up the date and time, as well as the time zone.

- Leave the network parameters as default

- If the computer / laptop is home, then leave it in the WORKGROUP. If the organization where you work has a domain network, check with your system administrator for information.

- Congratulations! Windows XP has been successfully installed and ready to go.

Bootable flash drives with ready-to-install operating systems are a very convenient and useful thing for any user. Having a few of these “little rescuers” in stock, you can quickly and easily help yourself or your friends / colleagues to restore a faulty Windows OS or install a new one for them.
Enjoy your use!
To create a multiboot USB drive using the WinSetupFromUSB utility, you need:
- computer with Microsoft operating system installed
- iso images of operating systems that are required for a multiboot USB drive, for example, MS Windows XP, 7, 10, Acronis Disk Director 11, Kaspersky Rescue Disk 10.
- WinSetupFromUSB utility
- a clean USB drive with a volume of at least 8 GB for the above iso images
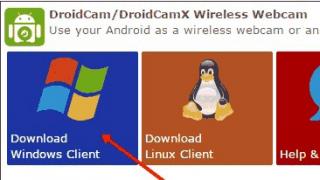
Program WinSetupFromUSB is designed to create a bootable or multiboot USB drive. You can download this program from the official website.
Fig. 1 Utility download page WinSetupFromUSB
Supported systems:
- operating systems Microsoft Windows XP / 2000/2003/7/8 / 8.1 / 2008/2012/10
- operating systems Linux / * BSD / * nix
- Ubuntu - 13.04 (32 and 64 bits) / 13.10 Server / 12.04.03 Server LTS
- Debian 7.1 Netinst i386, AMD64 / 7.2 / 7.6
- Linux Mint - 15 cinnamon dvd 32bit
- Mageia - 3 Dual CD
- CentOS - 6.4 LiveCD i386
- Fedora - Live Desktop 19 x86_64
- OpenSuse - 12.3 GNOME Live i686
- PCLinuxOS - KDE MiNime 2013.10
- SlackWare - 14.0 x86 DVD ISO
- OpenBSD - 5.3 Minimal, 5.3 Full
- m0n0wall - 1.34 CD-ROM
- ArchLinux - 2013.10.01-Dual
- Beini - 1.2.1, 1.2.5
- CloneZilla - 2.1.2-43-i686-pae
- DamnSmallLinux (DSL) - 4.4.10, 4.11.rc2
- Elementary OS - stable-amd64.20130810
- Gentoo - x86-minimal-20131022, amd64-minimal-20140313
- GParted - gparted-live-0.18.0-2-i486
- Inquisitor - v3.1-beta2 Live CD (x86), 3.1-beta2 Live CD (x86_64)
- Knoppix - 7.2.0 CD EN, Adriane 7.2.0F EN
- Manjaro - openbox-0.8.7.1-i686
- Ophcrack - xp-livecd-3.6.0
- Antivirus systems:
- Avast Rescue Disk
- Sophos Bootable Anti-Virus
- Other:
- Acronis True Image
- Acronis Disk Director
- HDD Regenerator 2011
- Memtest86 + - v5.01
- MS-DOS - 7.1
- Paragon Hard Disk / Partition Manager
- UltimateBootCD - 5.20, 5.26
1. Download the utility WinSetupFromUSB
2. Download iso images of operating systems that are required for a multiboot USB drive
3. Unpack the archive with the utility WinSetupFromUSB
4. Run the program WinSetupFromUSB
5. In the window that opens WinSetupFromUSB select the required USB drive from the drop-down list
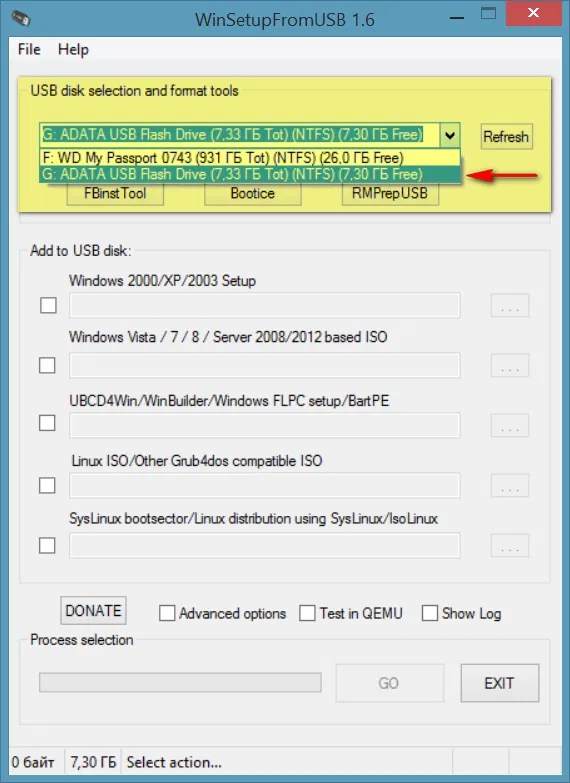
Fig. 2 Selecting a USB drive in the program WinSetupFromUSB
6. Set the checkbox in the checkbox AutoFormat it with FBinst to automatically format the USB drive.
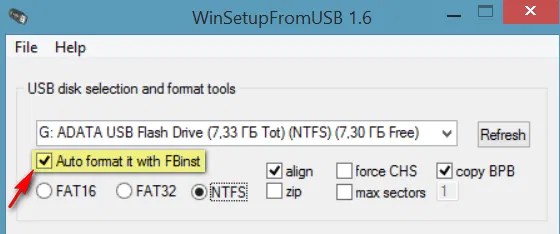
Fig. 3 Configuring automatic formatting of a USB drive in the program WinSetupFromUSB
If you have previously used this program to create a multiboot flash drive for this drive and it became necessary to add several more images of operating systems, the checkbox in the checkbox AutoFormat it with FBinst no need to install.
7. Select the required file system.
8. To add an operating system Microsoft Windows XP, you must first unpack the iso image of the system or mount it into a virtual drive, check the checkbox Windows 2000/ XP/2003 Setup and specify the path to the folder or drive in which the folder is located I386 .
9. To add an operating system Microsoft Windows 7 (or others) must be checked in the checkbox Windows Vista/7/8/ Server 2008/2012 based ISO and specify the path to the iso image of the required operating system.

10. To add an operating system Ubuntu(or another Linux operating system), you must select the checkbox in the checkbox Linux ISO / Other Grub4 dos compatible ISO and specify the path to iso the image of the required operating system.
11. At the end of the process of adding the required distributions, press the button Go.
12. After the creation of the multiboot USB drive is complete, in the Done pop-up window, click the OK.
13. To exit the program, press the button. EXIT.
14. To add distributions to the created multiboot drive the next time you start the program WinSetupFromUSB you must specify the desired drive, do not check the checkbox AutoFormat it with FBinst and indicate the path to them.
Found a typo? Press Ctrl + Enter
From time to time, each user has to reinstall their operating system. The easiest way to do this is with the so-called bootable USB stick. This means that an image of the operating system will be written to the USB drive, and then it will be installed from this drive. This is much more convenient than writing OS images to discs, because a flash drive is easier to use, if only because it is smaller and can easily be put in your pocket. In addition, you can always erase the information on it from a flash drive and write something else down. And the ideal tool for creating bootable USB drives is WinSetupFromUsb.
WinSetupFromUsb is a multifunctional tool designed to write images of operating systems to USB drives, erase these drives, create backups and perform many other functions.
To start using WinSetupFromUsb, you need to download it from the official site and unpack it. After the downloaded file is launched, you need to select where the program itself will be unpacked, and click the "Extract" button. The button "..." is used for selection.

After unpacking, go to the specified folder, find there a folder called "WinSetupFromUsb_1-6", open it and run one of two files - one for 64 bit systems (WinSetupFromUSB_1-6_x64.exe), and the other for 32 bit (WinSetupFromUSB_1-6 .exe).

Creating a bootable USB drive
To do this, we need only two things - the USB drive itself and the downloaded image of the operating system in .ISO format. The process of creating a bootable USB drive takes place in several stages:

By the way, the user can select several downloaded images of operating systems at once and they will all be written to the USB flash drive. In this case, it will become not just bootable, but multiboot. During installation, you will need to select the system that the user wants to install.
The WinSetupFromUsb program has a huge number of additional functions. They are concentrated just below the panel for selecting the OS image that will be written to the USB flash drive. To select one of them, you just need to put a tick next to it. So the "Advanced options" function is responsible for additional options of some operating systems. For example, you can select the item "Custom menu names for Vista / 7/8 / Server Source", which will imply the standard names of all menu items for these systems. There is also an item "Prepare Windows 2000 / XP / 2003 to be installed on USB", which will prepare these systems for recording to a USB flash drive and much more.

There is also an interesting function "Show Log", which will show the entire process of recording an image to a USB flash drive and, in general, all the actions taken after starting the program in stages. The item "Test in QEMU" means checking the recorded image after its completion. There is a DONATE button next to these items. She is responsible for the financial support of the developers. By clicking on it, the user will be taken to a page where it will be possible to transfer some amount of money to their account.

In addition to additional functions, WinSetupFromUsb also has additional subroutines. They are located above the operating system selection bar and are responsible for formatting, converting to MBR (Master Boot Record) and PBR (Boot Code) and many other functions.
Formatting a USB flash drive for boot
Some users are faced with such a problem that the computer does not recognize the USB flash drive as bootable, but as a regular USB-HDD or USB-ZIP (but you need a USB Flash Drive). To solve this problem, the FBinst Tool utility is designed, which can be launched from the main WinSetupFromUsb window. You don't have to open this program, but just put a tick in front of the item "Auto format it with FBinst". Then the system will automatically make the USB Flash Drive.

But if the user decided to do everything manually, then the process of converting to USB Flash Drive from USB-HDD or USB-ZIP will look like this:

In general, FBinst Tool is capable of performing a huge number of other tasks, but formatting in a USB Flash Drive is the main one.
Conversion to MBR and PBR
Another common problem when installing from a bootable USB flash drive is related to the fact that a different storage format is required - MBR. Often on old flash drives, data is stored in GPT format, and a conflict may arise during installation. Therefore, it is better to convert it to MBR right away. As for PBR, that is, the boot code, it may be completely absent or, again, not suitable for the system. This problem is solved by using the Bootice program, which also runs from WinSetupFromUsb.
It is much easier to use than the FBinst Tool. There are simple buttons and tabs, each of which is responsible for a different function. So for converting a flash drive to MBR there is a button "Process MBR" (if the drive already has this format, it will be inaccessible). To create a PBR there is a "Process PBR" button. Using Bootice, you can also divide the flash drive into parts ("Parts Manage"), select a sector ("Sector Edit"), work with VHDs, that is, with virtual hard disks ("Disk Image" tab) and perform many other functions.

Imaging, testing, and more
WinSetupFromUsb has another great program called RMPrepUSB that does a lot of things. This is creating a boot sector, transforming the file system, creating an image, testing the speed of operation, data integrity and much more. The program interface is very user-friendly - when you hover the mouse over each button or even an inscription in a small window, hints will be displayed.

Tip: When launching RMPrepUSB, it is better to select Russian immediately. This is done in the upper right corner of the program.
The main functions of RMPrepUSB (although this is far from a complete list) are as follows:
- recovery of lost files;
- creation and conversion of file systems (including Ext2, exFAT, FAT16, FAT32, NTFS);
- extracting files from ZIP to a drive;
- creating images of flash drives or writing ready-made images to flash drives;
- testing;
- cleaning the drive;
- copying system files;
- performing the task of turning the boot partition into a non-boot partition.
In this case, you can put a tick in front of the "Do not ask questions" item to disable all dialog boxes.
Winsetupfromusb is a utility for efficient work with data storage devices. It allows discs and also has some other functions. You need to download winsetupfromusb only from the official website (www.winsetupfromusb.com).
When downloading from third-party resources, there is a risk of downloading files with inappropriate content, which can lead to unpredictable consequences for the computer.
How to use the winsetupfromusb utility?
The main function of the utility is to create a bootable drive.
 After downloading the archive with the program, it must be unpacked into the desired directory. Then, in the folder specified during unzipping, you can see two .exe files, one of which is designed to run on a PC with x32 OS, and the other on 64-bit operating systems. Next, you need to open the utility corresponding to the current version of the OS. A window will appear in front of you, as in the picture.
It is directly the interface of the main utility. Here you need to select the drive that will be used to write the image to it - USB disk selection and format tools... Also, the Add to usb disk field indicates which operating system image must be recorded and the path to it. The rest of the parameters are optional. If you check the "Advanced options" checkbox, a menu will be displayed on the screen, allowing you to set additional functions. "Test in QEMU" - testing will take place in the Qemu shell, without the need to restart the computer and test on real hardware. "Show log" - a window will open showing the log of the utility's operation - all events: from the launch of the program to writing images to media. To record, you need to press "GO" and affirmatively answer the two subsequent warnings.
Related utility functions
In addition to the main function - creating a bootable drive, the program also allows you to format usb media, create a boot menu, copy iso images to disk.
As you can see in the picture above, there are three buttons under the field that indicates the selected removable storage device.
- FBinst Tool - when you click on the button, a menu of the utility used to work with usb media will open. With it, you can format drives, create backups, and restore their state.
- Bootice - this utility allows you to create a boot menu, split sectors into sections, format them and manage them.
- RMPrepUSB is a complete wizard for writing images to media. When you click on the corresponding button in the menu, the following window will appear:
 The wizard allows you to write images to USB, and vice versa, create images from a drive, makes it possible to work with partitions, making them active or removing activity. You can select the boot sector and its format, conduct a speed test.