Accounts. General information
By the type of authentication, all accounts can be divided into local and remote(they are Live ID, they are Microsoft accounts). Local users are authenticated locally. In other words, the account password is verified by your own computer. Remote accounts are authenticated by a Microsoft server. The advantage of a remote account is that when you use this type of account, your data is synchronized. Quite convenient - you can log in from different computers, and the personalization options remain the same.
Previously, this was only possible on a corporate network, where all computers are members of the domain, and authentication is performed on the domain controller. Now this opportunity is available to everyone, and the role of the "domain controller" is the Microsoft server. Your settings are saved on the remote server and synchronized with it when you change them.
According to "importance", user accounts are divided into two groups: ordinary users and administrators... The system must have at least one administrator, otherwise who will manage it? But there can be as many ordinary accounts as you like - at least not one, at least a hundred.
The administrator can control the computer, change parameters affecting the entire system, for all users, can install and remove programs, can create and delete other users. He can create a regular user and enable so-called "family safety" for him, which will keep track of which sites the user visits, what programs he launches, how much time he spends at the computer. Typically, family safety is activated for accounts of underage family members.
In previous versions of Windows, account management, including creation, was done using the Control Panel. In Windows 8, you cannot create an account in Classic Control Panel. The panel should now be used to create a user account Computer settings.
Creating a local account
To create a local user account:
Parameters click

A window will open Computer settings, choose Accounts

In the window Accounts push Other accounts


The window shown below will open, since we are creating a local account, then we select Sign in without a Microsoft account (not recommended)

In the next window, click Local account

In the window that opens, you will need to fill out a simple registration form: specify the username, his password and password hint, then click the button Further

In the next window, check the appropriate box if this is your child's account and click the button Ready

The account has been created.

If you don't have yours yet Live ID then you need to register Microsoft account.
To create a Microsoft account, your computer must be connected to the Internet, and you need to follow these steps:
Press the keyboard shortcut + I, in the panel that opens Parameters click Change computer settings
A window will open Computer settings, choose Accounts
In the window Accounts push Other accounts

The window shown below will open as we create Microsoft account, and it is assumed that we do not have an email address on the Microsoft server, then we select Register a new email address

In the opened window Create a Microsoft account you need to fill out the form: enter your last name, first name, come up with an email address, password and password hint, select a country, then click the button Further

A window will open Add information to protect your account, fill in the fields and click the button Further

In the next window Communication settings we enter characters, thereby confirming that a person, and not a robot, enters this computer. Optionally, check the boxes; if we want to improve the work of Microsoft services or want to receive special offers, we press the button Further

In the opened window Adding a user check the appropriate box if this is your child's account and click Ready

The account has been created.

The computer became personal again - this was the slogan of one of the laptop manufacturers in 2006. But how to add a user to Windows 10 and provide him with an account is a question that often arises today. Indeed, there are times when several people may need to work on one machine. In this case, it is best to create a new account. There is another example: many people work on their home laptop under an administrator account, which is not secure. It is better to do the work under the account of a separate created user.
Either way, creating a Microsoft account for yourself, family members, or colleagues is a good move and greatly improves security.
Create and administer
Many have already switched to Windows 10 for a long time, but do not know how to add an account for the reason that the interface has changed compared to previous versions. Some users might not have done this before. There is nothing new and complicated in this. If the user wants to share access to the computer with other people, he can give them the opportunity to have personal files, their browsers and desktop. In this, Windows 10, developed by Microsoft, differs from gadgets that work for Android and Ayos (we can say that at least gadgets have the ability to be personal).
So, if the PC owner has definitely decided to grant access, you need to create an account in Windows 10:
- select "Start";
- then you need to go to "Options" and find the item "Accounts";
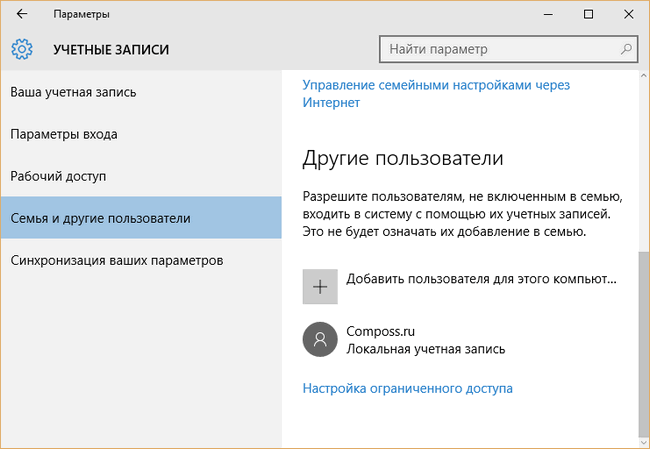
- you need to open a window and find "Family and other people" in the list or just "Other people" if you are using Windows 10 Enterprise.
If the person that the user is going to register has provided him with a Microsoft account, you need to provide his email address, select Next and click Finish.
Choose a way
If you do not have an account, then you need to spend a few minutes on the Microsoft website, since it will not be difficult to create an account. If the user does not want to do this, they should select "Sign in" without a Microsoft account (skipping the warning "not recommended"), and then select the item that says "Local". It is recommended to set the name of the user who will be authenticated, a temporary password, then you need to select "Next" and click on the "Finish" button.
Administration
Windows 10 standard local user registration is great for people who don't need to associate registration information with a manufacturer.
This method is also good for registering children who may not have an email address. Returning to the screen with the list of accounts, you can see the new added users. By default, such a local account has restrictions on installing applications, making administrative changes to the computer. If there are compelling reasons to grant a set of account rights for an administrator, then you must:
- click on the element;
- select "Change account type";
- switch the setting to administrator.
It is not recommended to distribute administrator rights without special need, since creating a user to work in safe limited mode will be enough for most cases. To remove an item from the list of accounts, select the "Delete" action in the context menu in the same way. The unnecessary account will be removed from the list, and this user will not be able to access the owner's computer. Thus, the question of how to add and administer users to Windows 10 is easy enough.
You create a new account during the installation process. But what if you want to add additional local accounts? Read on and we'll show you how to do it.
Why do you need to do this?
Millions of Windows users never create additional accounts on their computers, but use their primary accounts with administrative privileges. As practice shows, this is not secure, and users would need to get rid of this habit, or be lazy to create a new account, whatever you want.
Setting up a secondary, non-admin account for yourself and additional accounts for your kids (so that dubious downloads from malicious sites don't infect your computer) is a great idea and one of the important things that significantly increases the security of your machine.
You might prefer the online and synced features of Microsoft's online account, but we found many of the benefits of a local account that lacks the online bells and whistles and potential privacy concerns. A standard local account is great for people who don't want to associate their personal information with Microsoft, and it's also perfect for kids who don't need add-ons (and may not even have an email address to link to an account).
Let's take a look at the process of creating a secondary account in Windows 10.
How to create a new local user account in Windows 10
The first step is to access the Accounts menu. To do this, click on the search icon to the right of the Start menu and type "Accounts."
Select "Add, change, or remove other users" from the search results. Clicking on it will open the Accounts menu, as shown in the screenshot below. Alternatively, you can go to Start -> Settings -> Accounts, then select Family & Others to get to the same menu.

Select "Add a user for this computer". Microsoft has made it so that in the process of creating an account, you will be heavily carried away towards the online account instead of the local one. So let's be careful.
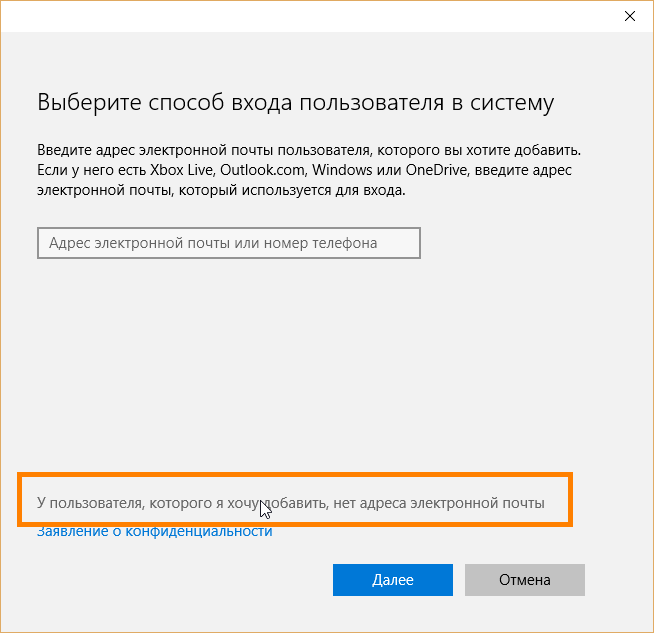
Ignore the prompts for your email or phone number. Instead, click on the link at the bottom of the window: "The user I want to add does not have an email address."

Since we don't have an email address, Windows will prompt us to create an online account. It is logical. But as we said, Microsoft is quite persistent that we create an online account instead of a local one, and suggests creating a new email address via @ outlook.com. But ignore this information and click on the link below "Add a user without a Microsoft account."
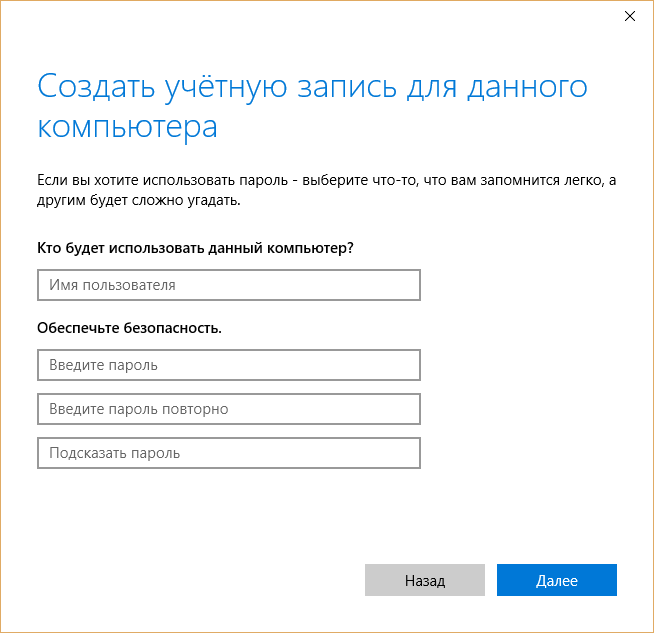
If anyone remembers, in Windows, ten years ago, the account creation screen looked very simple: just a username and password and nothing more. But now, as we can see, everything is different .. And you enter your username and password and click the "Next" button.
After clicking Next, you will be taken back to the account settings screen, and now, you can see the new account. By default, limited rights are set for the local account (there is no way to install applications or make administrative changes on the machine).
If you have a good reason to change the account type to a type with administrative privileges, click on the account, select "Change account type" and set "Administrator".

Alternatively, you can select Remove to remove an account that is no longer needed. If you need to make more changes (like child accounts or parental controls) be sure to check out for a closer look.
Many PC users often share their gadget with other users. Because of this, conflicts arise. Someone accidentally deleted a file, installed an unnecessary program, or performed some action that caused a system crash. To avoid such problems, it is worth adding a new user to the PC in Windows 10. About how to do this, consider all the existing methods.
Creating a new user in Windows 10 through the Settings section
The easiest way to add a user to Windows 10 is to use the options in the "Options" section. In order to add another account on Windows 10, you should do the following:
- Click "Start", "Options" and select the "Accounts" section.
- In the menu on the left, select the "Family and other people" section. Click "Add user for this computer".

- A new window will appear. The system will ask you to enter the user's name or phone number. If you want to create a new user in Windows 10 without specifying the account ownership of a specific person, you should click "I do not have the login information for this person."

- A new window will reappear. Click "Add a user without a Microsoft account".

- Next, you need to come up with a new username and enter a password and a password hint.

The creation of the new local user account is now complete.
Creating a new account via the Command Line
The second way to create a new user in Windows 10 is by using the command line. To do this, you need to do the following:
- Right-click on the "Start" icon and select "Command Prompt (Administrator)".

- The console will start. You need to enter the following command "net user UserName Password / add", where "Username" is the name of the new account, and the password is a combination of numbers. In an example, it looks like this.

- Press "Enter" to add a new user.

- Now, when you log in, you can select a different user.
Using Local Group to Add a New User in Windows 10
You can create accounts for users of one PC not only by the above methods, but also using the "Local groups and users" section.
- Press "Win + R" and enter "lusrmgr.msc".

- A new window will open. Highlight the "Users" section. From scratch, right-click and select "New User".

- A small window will appear. Enter the new username, password and confirm the password.

Added user. Login under the new record can be done in the standard way.
Adding a new user via the Run command
The last method for Windows 10 to get an account is to execute the command "control userpasswords2" in the "Run" window.

The "User Accounts" section appears. Click on the "Add" button.

A window for creating a new account will start, the same as in the method above (Create via the Parameters section). We enter all the data and follow the instructions. A new entry will be created.
For more information on how to add a new user to Windows 10, see the video:
Microsoft account - login and password for Windows, Skype, OneDrive, Office, Hotmail, Outlook, Xbox Live, Bing, MSN, Store (Microsoft Store), Windows Phone, Visual Studio. A user needs an account to access Microsoft services, applications, subscriptions, and devices.
Through the account, the user gets access to his data and settings from any device, applications and services become more convenient, and personal management.
A user can associate all their profiles on different devices with one account to easily manage their Microsoft account. A user can have multiple Microsoft accounts if they have created profiles in programs or services at different times using different email addresses and passwords. In this case, the control is performed by the account associated with this device.
The account has previously changed its name several times. The previous version of the account was called "Windows Live ID".
With the help of an account, the user can use applications and services, as well as take advantage of all the capabilities of the Windows operating system. With a local account in Windows, the user will not be able to use some built-in functions of the operating system, for example, will be unavailable for family safety.
Another advantage of using an account in the Windows operating system is linking the product key license to the account data. In the case of reinstalling Windows, after logging in with a Microsoft account (MSA), making an Internet connection, the operating system will be automatically activated on the computer. Therefore, I recommend that you sign in with your Microsoft account at least once on your computer. The system on the PC will be associated with an account, which will help to reactivate the system on this hardware without any problems.
I think that given the above, it makes sense to create a Microsoft account. A profile can come in handy in a variety of situations.
There are several ways to create a Microsoft account:
- directly from the Windows OS settings;
- on the official page of the Microsoft website https://account.microsoft.com/;
- from the program window or production service.
The user, having logged into his profile, from the account manages his Microsoft account:
- edits his user data: you can change the name of the Microsoft account, the email address, the phone number associated with the profile;
- changes or resets the password for the account;
- makes payments and issues invoices for products;
- controls devices:
- manages product subscriptions;
- changes privacy and security settings;
- manages family safety;
- searches for and blocks lost devices;
- gets help information to solve problems;
- if necessary, delete your Microsoft account.
When you sign in to a profile, your account settings are synced across all devices managed by that Microsoft profile.
Account in Windows 10: How to create an account on Windows
In this instruction, we will consider creating an account using the example of the Windows 10 operating system. You can create an account on Windows 10 from the system settings.
Prerequisite: to create a profile, you must have an Internet connection, because at the time of creating an account, a connection is made to the Microsoft servers to save and apply the settings.
Follow these steps to create a Microsoft account:
- Go to the Start menu, launch the Settings app.
- Open "Accounts", under "Your details" click on the link "Sign in with a Microsoft account instead."
- In the Microsoft Account window, if you already have a Microsoft profile, you will need to enter your email address, phone number, or Skype account. If you don't have an account, click on the "Create one!" Link. The process of creating a profile will take a little time.

- In the next window, enter your email address (any mailbox on Gmail, Yandex Mail, Mail.Ru, Yahoo, etc. will do), create a password for your account, and then select a country.
As a login from the account, you can use a new mailbox, instead of the existing email. To do this, click on the link "Get a new email address". You will be prompted to create an email.

- Next, it asks for your consent to display materials that are most relevant to your interests. If you are not interested in this offer, uncheck both boxes in this window.

- In the window that opens, you are prompted to enter the current password to enter the operating system to verify the authenticity of the user. The next time you sign in, your Microsoft account password will be used. Leave this field blank if you do not currently have a Windows logon password on your computer.

- The Create PIN window prompts you to create a login PIN that you can use instead of entering your Microsoft account password. The PIN code is saved on this device and is not sent to the Internet.

- In the Configure PIN window, enter the characters for the new PIN, and then confirm the PIN. The PIN must be at least 4 characters long.

- After applying the settings, you will go to the accounts section in the "Settings" application. Here you will see that the computer is signed in with a Microsoft account.

Creating a Microsoft account without using the Windows operating system works in a similar way. After creating his profile on the site, the user can log into the account on the computer by entering the data from his Microsoft account.
To change the parameters, or to apply the desired settings, you can log into your account on the official website using a browser from any device.
Sign in to Windows 10 with a Microsoft account
During, the system prompts you to enter data from your Microsoft account. If you want to use your Microsoft profile in the operating system, enter this information when installing the system. This can be done at any time from the installed Windows.
After starting the computer or upon rebooting, to enter the operating system, you will need to enter the password for the account or PIN, of the user's choice. The user can independently change the "Login" parameters "in the system by selecting the account password or PIN code to enter in the appropriate field.

If necessary, the user can do something else.
If you find it difficult to constantly enter your password every time you start the operating system, follow the link to read an article on how to log on.
Conclusions of the article
When working on a computer in the Windows operating system, the user can use a Microsoft account. After creating a profile, the user becomes available to the settings for managing personal data, privacy, security on all devices associated with a Microsoft account.


