EVGENY BUSHKOV
Detailed setup guide
thin clients based on Thinstation distribution and NX protocol
NX technology, developed by Nomachine, provides new opportunities for communication and can bring old computers to life as thin clients
Before proceeding directly to the description of NX, I will list some of the trends that are now becoming apparent to many. large companies our country:
- Computer hardware is getting cheaper and more affordable than before. Moreover, its productivity doubles every 1.5-2 years according to Moore's law. This leads to the accumulation of technology that has not exhausted its resource, but is already outdated.
- The client-server applications developed at enterprises by the programmers of the ACS departments during the perestroika years still work on old equipment, but no longer meet the requirements of the time.
- Modern software and operating systems cannot be made to work on computers with older processors (i386, i486, etc.).
- It is no secret that many organizations in our country have been illegally using many programs and operating systems that employees installed on their own initiative for a long time. At first this was considered as a matter of course, then it was justified by the financial situation. Now, when our country joins the WTO, the government is forced to hastily correct this situation, in this regard, the pressure on enterprises from the internal organs has increased with the requirement to abandon illegally used software and operating systems.
The contradiction between the second and third points is obvious: it is necessary either to find a way to effectively use the old equipment to perform modern tasks, or to abandon this technique. If there are sufficient funds, then the choice is clear. But what if there is no money or there is no way to write off such equipment, and it’s a pity to just throw it away? And how to solve the no less acute problem of the "license purity" of the programs used, which is mentioned in the fourth paragraph?
Terminal technologies come to the rescue, which make it possible to use old computers, and also partially remove the issues of "license purity" if you apply solutions based on Open Source products.
The magazine has already published several articles on working with the Thinstation distribution kit [,]. In this article, I will talk about the specifics of setting up and operating in my enterprise thin clients based on the Thinstation distribution and NX technology developed by Nomachine.
Until recently, in the world of terminal communications, there were few known successful network protocols high-level, capable of efficiently compressing and encrypting traffic between the thin client and the server. The most famous and popular ones are RDP from Microsoft and ICA from Citrix. Both protocols are used by servers based on MS Windows OS. I was interested in the possibility of using thin clients with Linux-based servers. Almost immediately, a small distribution kit was chosen as the basis for a thin client, a kind of Linux-constructor, Thinstation - as the most steadily developing and popular in our country and abroad. But with the choice of the protocol that would be responsible for communicating with the server, I had to tinker and experiment. I will list the main criteria by which the protocol was selected. First, we wanted to use as much as possible wide range old computers with processors starting from i486, with a minimum amount of memory, we have plenty of such equipment. Secondly, commercial products were swept aside: we did not want to incur additional costs. Third, it is necessary good support Russian and Cyrillic, as well as the presence of the usual way for users to switch between layouts - keyboard shortcuts
Finding a solution
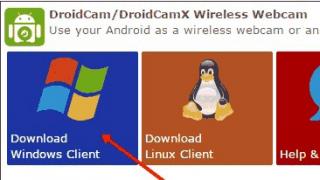
First of all, I drew attention to VNC as the most widespread and available in any Linux distribution, as well as being an easy-to-configure product. When you need to connect to a Linux server remote desktop from workstation Windows or Linux, the first thing that comes to mind is VNC. Download the latest Thinstation distribution, then unpack the resulting zip file in your home directory. Let's assume that the path to the distribution looks like this: ~ / thinstation. The build parameter file is located here: ~ / thinstation / build.conf. He has detailed comments. I will not go into detail about setting it up, as well as how to make the Thinstation image boot using a network card with a rubble microcircuit, this has already been written about in the above articles. I will briefly list the steps for configuring the client: edit ~ / thinstation / build.conf and create an image by running the script ~ / thinstation / build. Copy the finished image file ~ / thinstation / boot-images / etherboot / thinstation.nbi to the TFTFP server. Add an entry about the MAC address of the thin client network card to the dhcp.conf file of the DHCP server. In the TFTP server directory, create a file with settings for a given MAC address and / or edit the thinstation.conf.network file. My working system settings can be found in the listing in the "Configuring and Imaging Thinstation" section and in Fig. one.
In order to add the VNC client package to the image, uncomment the "#package vncviewer" line in the ~ / thinstation / build.conf configuration file. If the directory of the tftp server is in / tftpboot (like mine), then edit the file /tftpboot/thinstation.conf.network so that the lines appear in it:
SESSION_0_TYPE = vncviewer
SESSION_0_TITLE = "(! LANG: VNC"
!}
SESSION_0_VNCVIEWER_SERVER = 10.10.10.10: 5901
Replace the IP address 10.10.10.10 with the address of your VNC server.
Now let's check the image compiled with the new parameter in operation: turn on the thin client, wait for the Thinstation image to load and launch, connect to the VNC server. Please note that layouts are switched using the "Right Alt" key. Actually, it is not the VNC client that is to blame, but the Thinstation file from the keymaps-ru Cyrillic support package. In order not to fiddle with looking for a solution to the problem for a long time, I generated an xkb file on a configured SUSE-10.0 system as follows:
xkbcomp: 0 ru.xkb
xkbcomp -xkm ru.xkb ru.xkm
The xkbcomp utility converts the XKB layout description into one of the formats. The first command generates a dump of the current layout from the source, which is the X-display ": 0". The second command compiles the resulting file into a system-understandable binary. Replace the original file with our own:
cp -f ru.xkm ~ / thinstation / packages / keymaps-ru / x-common / lib / kmaps / xkb
After assembling the image, we get the normal switching of layouts by
Nomachine NX client support first appeared in Thinstation version 2.1 in 2005, and the latest is currently 2.2 and will be implied below. To build an image with the NX package, direct access to the Internet was previously required; in the latest versions of Thinstation, it became possible to specify the path to a file with the prefix "file: //". The client used and supported by the Nomachine NX distribution is still version 1.5.x, although enough time has passed since the release new version NX 2.0. In the build.conf configuration file, uncomment the "package nx" line, also at the end of the file, find the "param nxurl" line: indicate the path to the previously downloaded file, or leave it as it is (you need Internet access). Copy the resulting generated image to the tftp server directory, copy the thinstation.conf.sample file from the distribution root there, rename it thinstation.conf.network and edit: look for # SESSION_0_TYPE = NX and edit the lines related to this session ( here with number 0) by entering the required parameters.
We turn on the thin client and load it in the created way, check the performance. Progress is evident: "slideshow" is stopped on PCs with P-100, P-120 and higher processor. This is not what we would like to get as a result, so it will not be possible to use a PC with i486 processors here. We called such PCs "super thin" clients and defined them to work with DOS programs, using a bunch of FreeDOS and sshdos on the client side and Dosemu on the Linux server side. I will not talk about them in this article. Nevertheless, this is a good result, let's look at the hardware requirements from the developers of Thinstation and the NX client: the former recommend an i486 processor and 16 MB of memory, the latter - a processor with a frequency of 400 MHz or more and 128 MB of memory. The minimum required configuration for a thin client to work with the NX package is empirically determined by the P-120 processor and 32 MB of RAM. I tested some other clients, in particular, XRDP, VNC for DOS, but for one reason or another I could not find a real alternative to NX. Now it's time to take a closer look at NX technology.
Review and short description Nomachine NX
The NX architecture is a set of open source technologies and commercial tools designed to make networked computing easy and distributed. It consists of server software that allows any UNIX computer to become a terminal server, and clients for a wide range of platforms and operating systems. Nomachine chose the well-known and widely used X-Window system as the basis for the NX architecture, on which the GUIs of Linux and other UNIX operating systems are based.
Most of the available network solutions was not designed as a primary means for users to access the desktop. Protocols such as RDP and VNC are much simpler than X (and therefore well suited for thin clients), but their simplicity does not compensate for their lack of efficiency and functionality. For example, these protocols use the transfer of large amounts of image data to render a remote screen. Although RDP is a more efficient protocol than RFB (the protocol used by VNC), it was not originally developed for everyday use by network devices, but only as an extension to the OS. X-Window is a graphics subsystem (not an OS extension), and X applications interact with it using the X protocol, so the OS does not have a special layer responsible for broadcasting screen updates to the network protocol.
The main disadvantages of networks with X-terminals are redundancy and delays in the transmission of graphic data of the X-protocol. Since the advent of X-Window, the user's desktop has been overgrown with all sorts of graphical elements and effects that have increased the requirements for data networks.
In fig. 1 under the number 1 shows the traditional operation of the X protocol: there is no compression, the requirements for network bandwidth and latency are critical. Let me remind you that in the X-Window ideology, the X-server runs on the terminal, and on the terminal server - the X-client, which sends requests to the X-server of the terminal.
In the simplest case, you can run graphical applications using the -X option to the ssh command, for example, “ssh -X [email protected] firefox ". You can add the -C parameter for compression (using the ZLIB library). You can also optimize the speed of interaction between nodes, increasing the network bandwidth. But there is a limit above which an increase in throughput will no longer affect the speed of this interaction. The reason for this is the intensive exchange of requests / responses of modern X-applications.
NX employs three main methods to accelerate applications: compression, caching, and X-protocol excess traffic rejection.
All three methods combine to achieve a 70-fold improvement in remote X GUI performance while using the highest compression level on low-bandwidth, high-latency links (in the NX client settings, "modem" corresponds to maximum compression, and "lan" - no compression) ... In fig. 1 under number 2 shows the interconnection of NX components: compression / decompression and caching are performed on the NX Proxy modules, traffic passes between them using the NX protocol, the requirements for the quality of communication lines are minimal, and it is declared that it can work up to a speed of 9600 bps.
Similar to broadcasting X traffic through the nxagent, there is another agent ("nxviewer") that translates RFB / VNC traffic to the NX protocol. This improves the efficiency of connections by up to 10x compared to a conventional vncviewer linking a local X display to a remote one. VNC server... We will be convinced of this.
In fig. 1 under number 3 shows the possibility of simultaneous operation of different agents NX, RDP, VNC. At the same time, NX agents effectively translate foreign protocols into their own and then transmit traffic through the NX Proxy.
- NX Proxy- this component is just responsible for compression / decompression: in the client mode it encodes requests from X clients and decodes responses from the X server, in the server mode it is vice versa.
- NX Agent- the term "agent" is used to describe the component to which the generated image is transmitted before being transmitted to the network through the proxy.
- NX Viewer- a modified Nomachine regular VNC client that translates VNC / RFB traffic to the NX protocol.
- NX Desktop- RDP client that translates RDP traffic to the NX protocol.
Nomachine has opened the source codes for most of its developments and libraries, they can be downloaded by everyone from. Assemblies from Nomachine itself are available for all customers free of charge, there are also various options for assemblies of NX servers, supplied for a fee: annual subscription on NX Enterprise Server with unlimited users and 1-2 processors costs $ 1494, the most complete solution with load balancing and node management based on NX Advanced Server costs $ 3494. In addition, there is the NX Free Edition, which is free to download but has a limit on the number of simultaneous connections and users equal to two, so if there is a desire to administer a Linux server from home using a conventional analog modem, then this solution cannot be found better, safer and easier. I also note the presence of client versions of NX Client Desktop Edition for PlayStation 2 (when using Linux Kit), as well as NX Client Embedded Edition for Sharp Zaurus 5xxx and HP / Compaq iPAQ. They can also be downloaded for free. So, if you are on a business trip, and you only have a PDA with you, nothing prevents you from connecting and working remotely on your Linux server.
Building and running NX
In turn, based on open source, the community has developed a version of the NX server part called FreeNX, as well as KNX - a client for connecting to a server from under X. FreeNX is a set of shell scripts that, together with open libraries from NX form the backend.
When I first started working with NX, I used a PC running SUSE 10.0 as a server. As part of the distribution kit, FreeNX was already assembled, but, firstly, it was more than a year old, and, secondly, faced with the first difficulties in my work, I decided that it was time to assemble the server part from the sources myself. I will talk about the build from source version 1.5 as the most time-tested, and then I will clarify what features are available for the build of version 2.0 (2.1).
At the moment, the Nomachine site has uploaded the source code for the NX 2.0 version, this version is the recommended version by the company, and there is a special link to the source code for version 1.5 there. Download the latest versions of the following tarballs from the page: nx-X11, nxagent, nxcomp, nxcompext, nxdesktop (if you need RDP support), nxproxy, nxscripts, nxviewer (if you need VNC support). nx-X11 is version 4.3 of Xfree86 which has modified Nomachine X libraries. Some of the sources will be unpacked directly into the nx-X11 tree, so let's expand it first, the order in which the rest of the tarballs are unpacked is not important, the main thing is that they are all unpacked in the same directory. Download and unpack the FreeNX scripts from the address there. You will also need two patches, download them from here [,]. Our assembly directory will look like this:
- freenx-0.4.4
- nx-X11
- nxcomp
- nxcompext
- nxdesktop
- nxproxy
- nxscripts
- nxviewer
- freenx-lfs_hint.diff
- NX-lfs_hint.diff
To build, you need the following packages (you can install them from your Linux distribution): libjpeg-devel, libpng-devel, openssl-devel, netcat, expect. A description of the assembly can also be found here.
# Apply NX patch
patch -p0< NX-lfs_hint.diff
# Collecting X - the longest part, it can take up to an hour
pushd nx-X11
make world
popd
# nxproxy
pushd nxproxy
./configure --prefix = / srv / NX
make
popd
# Build RFB agent
pushd nxviewer
xmkmf -a
cp -a /usr/X11R6/lib/libXp.so* ../nx-X11/exports/lib/
make 2> / dev / null
popd
# Building the RDP agent
pushd nxdesktop
./configure --prefix = / srv / NX --sharedir = / srv / NX / share
make
popd
#All server part will be located in the / srv / NX directory, create some of the subdirectories
mkdir -p / srv / NX / bin
mkdir -p / srv / NX / lib
mkdir -p / srv / NX / man / man1
mkdir -p / srv / NX / share / doc
# Install the assembled libraries and agents
cp -a nx-X11 / lib / X11 / libX11.so. * nx-X11 / lib / Xext / libXext.so. * nx-X11 / lib / Xrender / libXrender.so. * / srv / NX / lib
install -m 755 nx-X11 / programs / Xserver / nxagent / srv / NX / lib
# Create an nxagent script that will manage all programs
cat> nxagent<< "EOF"
#! / bin / sh
NXCOMMAND = $ (basename $ 0)
export LD_LIBRARY_PATH = / srv / NX / lib: $ LD_LIBRARY_PATH
exec / srv / NX / lib / $ NXCOMMAND $ (1+ " [email protected]"}
EOF
# And install it:
install -m 755 nxagent / srv / NX / bin
# Install compression libraries and proxies
cp -a nxcomp / libXcomp.so. * / srv / NX / lib
cp -a nxcompext / libXcompext.so. * / srv / NX / lib
install -m 755 nxproxy / nxproxy / srv / NX / lib
ln -snf nxagent / srv / NX / bin / nxproxy
# Installing RFB agent
pushd nxviewer
make install DESTDIR = / srv / NX
mv / srv / NX / usr / X11R6 / bin / nxviewer / srv / NX / lib
ln -snf nxagent / srv / NX / bin / nxviewer
chmod 755 / srv / NX / bin / nxviewer
mv / srv / NX / usr / X11R6 / bin / nxpasswd / srv / NX / bin
popd
# Installing RDP agent
pushd nxdesktop
make install
mv / srv / NX / bin / nxdesktop / srv / NX / lib
ln -snf nxagent / srv / NX / bin / nxdesktop
chmod 755 / srv / NX / bin / nxdesktop
rm -rf / srv / NX / usr
popd
# Installing scripts
# Installing FreeNX
mkdir -p / srv / NX / etc
mkdir -p / srv / NX / var
mkdir -p / srv / NX / var / db
mkdir -p / srv / NX / home
mkdir -p / srv / NX / home / nx
pushd freenx-0.4.4
# Apply the freenx patch, basically the paths to match / srv / NX are corrected here
patch -p0< ../freenx-lfs_hint.diff
cp -a nxnode / srv / NX / bin
cp -a nxserver / srv / NX / bin
cp -a nxsetup / srv / NX / bin
cp -a nxkeygen / srv / NX / bin
cp -a nxnode-login / srv / NX / bin
cp -a nxloadconfig / srv / NX / bin
cp -a nxclient / srv / NX / bin
cp -a nxprint / srv / NX / bin
install -m 755 node.conf.sample / srv / NX / etc
popd
# Add user and group nx
groupadd -g 77 nx
useradd -c "FreeNX user" -d / srv / NX / home / nx -g nx -s / bin / bash -u 77 nx
chown -R root.root / srv / NX
chown -R nx.nx / srv / NX / home / nx
# Further, an important point, before starting, familiarize yourself with the command launch parameters: / srv / NX / bin / nxsetup –help.
# If you want to use key authentication for users, remove the –setup-nomachine-key parameter.
# For working with thin clients, nothing can be changed
/ srv / NX / bin / nxsetup --install --uid 77 --gid 77 --setup-nomachine-key
# Check if the NX server is running:
/ srv / NX / bin / nxserver --status
The answer should be something like this:
| NX> 100 NXSERVER - Version 1.4.0-44 OS (GPL) NX> 110 NX Server is running NX> 999 Bye |
Install the freenx config file:
mv /srv/NX/etc/node.conf.sample /srv/NX/etc/node.conf
Find the following line in the configuration file and uncomment it:
ENABLE_1_5_0_BACKEND = "1"
There you can also enable logging for the first time:
NX_LOG_LEVEL = 6
Now you can install the Nomachine NX client on any Linux computer (you can use KNX as well) or Windows and test the operation of the NX server. The server can be operated both in application mode and in remote desktop mode.
Thinstation customization and imaging
From the NX back end, we now move on to creating the Thinstation image. The distribution itself can be downloaded here. When assembling the image, we will try to reduce the number of modules and packages as much as possible, throw away all unnecessary ones. Since many computers selected as thin clients will have different hardware and peripherals, I would like to move individual packages beyond the common image for all. Thinstation has such an opportunity: pkg means to build as a separate downloadable package with the pkg extension, package means to be included in the general image. Packages lprng, sshd, samba-server and others are unambiguously compiled as loadable. You can specify all packages with X-drivers for video cards as pkg, but then when building the image, several additional packages that will need to be loaded by everyone, and as a result, the total size of the loaded data will be larger. Let's do it easier: we will specify one of the most frequently used video drivers, namely S3, as package, the rest - pkg. Modules can also be moved outside the kernel, but so far this feature has not worked correctly, and they take up very little space in the kernel. Below is my build.conf config file:
module serial
module intel-agp
module via-agp
module 8139too
module floppy
module vfat
module supermount
pkg xorg6-ati
pkg xorg6-i810
pkg xorg6-nv
package xorg6-s3
pkg xorg6-s3virge
pkg xorg6-sis
pkg xorg6-trident
package keymaps-ru
package nx
pkg lprng
pkg sshd
pkg samba-server
param rootpasswd pleasechangeme
param xorgvncpasswd pleasechangeme
param bootlogo false
param bootresolution 800x600
param defaultconfig thinstation.conf.buildtime
param basename thinstation
param basepath.
param knownhosts ./known_hosts
param localpkgs true
param fulllocales false
param bootverbosity 3
param nxurl file: //home/zhen/sources/nx/bin/nxclient-1.5.0-141.i386.tar.gz
If you will be printing to a printer connected to a thin client using lprng, you need to make a small modification to the thinstation / packages / lprng / etc / init.d / lprng file. To do this, replace the line:
echo "$ PRINTER_X_NAME: lp = $ PRINTER_X_DEVICE: wd = $ PRINTER_X_DRIVER: br = $ PRINTER_X_OPTIONS: lf = / var / log / spooler.log: sh: sf" >> / etc / printcap
echo "$ PRINTER_X_NAME: lp = $ PRINTER_X_DEVICE: wd = $ PRINTER_X_DRIVER: br = $ PRINTER_X_OPTIONS: if = / bin / lpf: lf = / var / log / spooler.log: sh: sf" >> / etc / printcap
The addition of local filtering saved me the printing ladder problem. In addition, I created the following script to test ~ / thinstation / packages / base / bin / my printing:
#! / bin / sh
echo PRINTER TEST to / dev / printers / 0 1> & 2
for i in 1 2 3 4 5 6 7 8 9;
do
echo PRINTER / dev / printers / 0 $ i> / dev / printers / 0;
done
echo -e \\ r \\ f> / dev / printers / 0
exit 0;
When it is not clear what exactly does not work, you can execute this script on the thin client console: / bin / my.
So that when the NX client connects to the server, a window with a warning about an unknown host does not appear every time, create a known_hosts file in the Thinstation root:
ssh-keyscan -t rsa nxserver_ip >> ~ / thinstation / known_hosts
For "nxserver_ip", you must specify the IP address of the NX server. Thus, the client will know about the digital fingerprint of the rsa key of the NX server during authentication.
After successfully completing the build, copy thinstation / boot-images / etherboot / thinstation.nbi and thinstation.nbi.zpxe, as well as all pkg files from thinstation / boot-images / pkg-packages to the / tftpboot directory on the tftp server. The thinstation.nbi.zpxe file that is being created did not work for me, in which case you can download the BootPXE535.zip file at the address, this archive contains a universal loader-native.zpxe loader, everything should work with it.
Thinstation's configuration files are well commented, but the configuration process itself and the sequence of actions are not always obvious, so some of the difficulties that I had to face, and the subtleties, I will still mention.
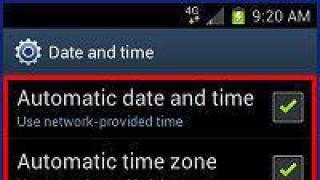
In fig. 3 shows the basic steps for putting a thin client into operation. First, add the MAC address information of the network card to dhcpd.conf. Do not forget to indicate the tftp-related settings in the subnet description, they are set by the "next-server" and "option root-path" directives. I have tftp and dhcp services on the same FreeBSD server, this makes them easy to customize. All configuration files are located in / tftpboot. Then in the thinstation.hosts file we write in order: an arbitrary host name (it is better that it includes information about the location of the terminal), MAC address, groups of which the terminal is a member, at the end of the line you can put comments after the "#" sign, for example :
otd146_57158 00e04d08d710 smb_flop_hard TUX1C monitor #very important PC
Here, in order: the hostname, in my case, consists of the department number and the inventory number, then the MAC, and then the listing of the names of the configuration files that will be used by this host.
Next, we create the thinstation.conf-MAC configuration file, I use the MAC address in the name, although you can use the IP address or the name from thinstation.hosts. Note that the MAC address here only uses capital letters... Groups are described in files called thinstation.conf.group-GROUP NAME. The thinstation.conf-MAC file contains the settings that apply only to this terminal and are not included in other groups. For example, all general monitor settings are described in the thinstation.conf.group-monitor file, and one parameter "SCREEN_VERTREFRESH" is moved to the thinstation.conf-MAC file. This is due to the fact that they are used different monitors, and you can change the setting of the frame rate of the screen, this and other parameters can be adjusted for each terminal or for all at once. The same goes for mouse settings. The default setting is for a PS / 2 mouse. If a mouse connected to the COM1 port is used, then two parameters "MOUSE_PROTOCOL = Microsoft" and "MOUSE_DEVICE = / dev / ttyS0" are specified, if to the COM2 port, then / dev / ttyS1 is specified in the second parameter.
The general configuration file /tftpboot/thinstation.conf.network is almost empty for me. All information from it is taken out in separate files group settings referenced in thinstation.hosts. Since two terminal servers are used with different versions of NX and each client uses only its own server, the configurations are placed in separate text files (NX and TUX1C), in addition, different Thinstation images are used. Also remember that thinstation.nbi and thinstation.nbi.zpxe file names are related: if dhcpd.conf contains the following line:
thinstation.nbi.zpxe ";
then the thinstation.nbi image will be used, in my case there are several images, respectively, and the entries in dhcpd.conf are different for each terminal.
NX2 build differences
Our system uses two NX servers. One runs NX, compiled from 1.5 sources, 1.5.x clients are used to work with it. The other is running NX version 2.0. Let me tell you what are the differences between the work and assembly of this version. The server has 64-bit Opterons installed, the SLES 10.0 x86_64 system is used. So I couldn't build NX on this server as it was in the case of NX 1.5 on a 32-bit system, even when I tried to explicitly specify the build for a 32-bit system:
make World BOOTSTRAPCFLAGS = "- m32"
Apparently, these are the features of the 64-bit system and its libraries. A little later on the Nomachine website, I found a note that says that source texts NX are designed for 32-bit systems, but they can be used on 64-bit systems as well. Since I still have a computer with SLED 10.0 x86 installed and the versions of all libraries, kernels and programs are exactly the same as those of SLES, I decided to build NX on it, and then transfer the directory with the result of the build by ordinary copying to a 64-bit system. So he did: everything worked as if nothing had happened. We download files with the same names as when building version 1.5, only with suffixes 2.0 (or 2.1). Everything compiles exactly the same as in the case of NX 1.5, with some exceptions: firstly, I did not apply the NX-lfs_hint.diff patch, and secondly, a new version of FreeNX 0.5 scripts appeared, which supports the new NX 2.0, its you can pick it up here, thirdly, the freenx-lfs_hint.diff file, which makes changes to the nxloadconfig file from FreeNX 0.4, does not fit the new FreeNX version, it needs to be edited. Here is the diff output showing the difference between the original and the edited nxloadconfig file:
|
Nxloadconf_orig 2006-07-01 22: 03: 39.000000000 +0500 |
So, to make a thin client from ordinary computer a lot of effort is not needed. For a minimal understanding of this article, you need to have at least a vague distant idea of:
As time goes on, the hardware becomes obsolete physically and morally, the management has no money to buy new computers in the organization, as usual, in this case there is an opportunity to "breathe life" into the museum trash. For a thin client any will do a rarity with a single core processor from 1 GHz and 128 MB of RAM, and the most important part is a motherboard with a network card that supports PXE booting. We will not need a hard disk or a floppy drive at all, we will make a real thin client, and not a pathetic parody! ;)
How to make a thin client from an old computer (method 2)
Preparation of a thin client and additional equipment.
Of course, first collect a more or less live unit from junk, as I said above HDD we will not need it at all, as for the drive and other peripherals, it all depends on the task at hand with which our thin client should cope, at work from the peripheral I only had a monitor, keyboard, mouse, USB devices the management considered it unnecessary (of course, except for the keyboard and mouse), since the desire to make the system more closed has surpassed the desires of the users (oddly enough, I agreed with them on this, all functions removable media replaces mail and internal file storage, and those who need to work with large files and performance from a PC were not transferred to thin clients at all). After making sure that the piece of hardware works, you need to configure the boot from the network card in the BIOS and disable all other boot methods. This is done in different ways for different mat. fees, but the essence boils down to one thing.
For the thin client to work, you need a server that will act as a remote workstation to which our thin client will connect. I will not dwell on all types of remote workstations in detail, we will focus on the most popular Terminal Server from Microsoft. We will assume that you already have a server on which it is deployed Terminal Server, for example, on Windows Server 2008 R2... If there is no need to connect users outside the organization, then we will consider setting up the connection only "inside". Let our terminal server have an internal IP 192.168.0.5.
DHCP
Now let's configure DCHP to distribute ip addresses to our thin clients and additional parameters... You can read how to configure DHCP on Windows Server 2008 here, for Linux Server here. In this article, I will indicate only what needs to be adjusted to the ready-made scheme.
To set up in Windows Server 2008 R2: go to area parameters

We select Customize parameters and add a parameter:
066 Hostname of the download server and indicate the IP address of our TFTP server (in our case 192.168.0.4)
067 Boot file name, write pxelinux. 0
and don't forget to restart the DHCP service.
Setting in Ubuntu Server:
Will be later
TFTP server
Settings, in Ubuntu Server 14.04 LTS... You can also use the tftpd32 program for Windows systems.
Thinstation distribution
Check out the possibilities this distribution you can visit the developer's website http://thinstation.github.io/thinstation/. In order to get a working distribution kit with the ability to boot from the TFTP server, you need to build it, I will not consider how this is done, but I will use the already assembled distribution kit with the ability to boot over the PXE network, the build version (mirror) compiled with the allmodules option (for this there is a separate thanks to nik0el ). Download the archive and unpack it, now we need to scatter the files. I will consider an example of a configured TFTP server in Windows Server 2008 R2.
Let's drop all files and folders as they are in C: \ TFTPRoot

Now let's proceed to the settings of the main files that you will edit for yourself:
thinstation.conf.network - responsible for the default connection settings for all thin clients
thinstation.conf.sample -
thinstation.hosts - Specifies individual settings
thinstation.conf.group -... - instead of dots, the group name is indicated ( [email protected]- resolution and frequency, user - the name of the thin client assigned in the thinstation.hosts file, etc.)
Below are the slightly edited parameters that are according to our ip addresses:
thinstation.conf.network
SCREEN = 0
WORKSPACE = 1SESSION_0_TITLE = "(! LANG: Terminal Server"!}
SESSION_0_TYPE = rdesktop
SESSION_0_SCREEN = 1
SESSION_0_RDESKTOP_SERVER = 192.168.0.5
SESSION_0_RDESKTOP_OPTIONS = "- u" user ""
SESSION_0_AUTOSTART = On # SESSION _ # _ TITLE = "(! LANG: Big Bad Server Donald"!}
#SESSION _ # _ TYPE = freerdp
#SESSION _ # _ SCREEN = 1
#SESSION _ # _ SCREEN_POSITION = 2
#SESSION _ # _ FREERDP_SERVER = 192.168.1.1
#SESSION _ # _ FREERDP_OPTIONS = "- u username -p password"
#SESSION _ # _ AUTOSTART = OffRDESKTOP_SOUND = Off
RDESKTOP_FDD = Off
RDESKTOP_CDROM = Off
RDESKTOP_HDD = Off
RDESKTOP_USB = Off
RDESKTOP_1394 = Off
RDESKTOP_COM3 = Off
RDESKTOP_COM4 = Off
RDESKTOP_SLOWLINK = On
RDESKTOP_COMPRESSION = On
RDESKTOP_COLOR_DEPTH = "16"
# RDESKTOP_DOMEN = mydomen
RDESKTOP_USB_NO_MOUNT_DIR = OnFREERDP_USB_NO_MOUNT_DIR = On # Mount USB Drive On / Off
FREERDP_USB = Off # Mount USB Drive On / Off
FREERDP_SOUND = On # Audio, On / Off
FREERDP_KEYMAP = 419 # Keymap number
FREERDP_CONSOLE = Off # Conect to console, On / Off
FREERDP_SLOWLINK = Off # Slow Network Link, On / Off
FREERDP_COMPRESSION = Off # RDP Compression, On / Off
FREERDP_CDROM = Off # CDROM Drive present, On / Off
FREERDP_CDROM_SATA = Off # SATA CDROM present, On / Off
FREERDP_FDD = Off # Floppy Drive present, On / Off
FREERDP_USBFDD = Off # USB Floppy present, On / Off
FREERDP_HDD = Off # HDD Drive present, On / Off
FREERDP_1394 = Off # FireWare HDD present, On / Off
FREERDP_COM3 = Off # Redirect COM1, On / Off
FREERDP_COM4 = Off # Redirect COM2, On / OffKEYBOARD_MAP = en_us
TIME_ZONE = "Europe / Moscow"
AUDIO_LEVEL = 67
AUTOPLAYCD = On
DAILY_REBOOT = On
CUSTOM_CONFIG = off
RECONNECT_PROMPT = menu
NET_TELNETD_ENABLED = On
SCREEN_RESOLUTION = "1024x768"
SCREEN_HORIZSYNC = "30-65"
SCREEN_VERTREFRESH = "75"
SCREEN_COLOR_DEPTH = "16"
MOUSE_PROTOCOL = IMPS / 2
MOUSE_RESOLUTION = 100
MOUSE_ACCELERATION = "1"
X_DRIVER_OPTION1 = "swcursor On"
PRINTER_0_NAME = parallel
PRINTER_0_DEVICE = / dev / printers / 0
PRINTER_0_TYPE = P
PRINTER_1_NAME = usb
PRINTER_1_DEVICE = / dev / usb / lp0
PRINTER_1_TYPE = U
thinstation.hosts
# NAME MAC GROUP #COMMENT # thinstation01 0013D409A812 [email protected] cdrom fdd usb # 192.168.0.21 user 000A5E1ADCAA [email protected] cdrom usb # 192.168.0.10
here we assign a name for the mac address of the thin client and specify the settings groups in the example this is a group with settings for the monitor, drive and usb ports.
Misadventure
Now make sure the servers are up and running. Start the thin client, after downloading the distribution kit and full launch a window for entering a username and password will open to enter our terminal server. In the example I used the rdesktop client to connect, and there are about 10 varieties of them that you can choose and customize for yourself.
There is a second method described in the article
Good day!
Relatively recently, a new version of the popular Thinstation thin client has been released, namely 2.5. And, of course, it carries both new buns and new rakes, plus a minimum of documentation for the new version.
In this article (and it is designed for newbies, especially for those who are unfamiliar with Linux) I will describe how to quickly assemble a thin client and make it safe enough to use it, using smart cards, the company's RDP client and a happy ending. Welcome!
Formulation of the problem
So, we have:
- Several pieces of iron, proudly called "thin clients". For example, a couple of dozen are no longer new HP HSTNC-001L-TC machines.
- A configured terminal server that thin clients will cling to. Let it be MS Windows Server 2003 or 2008.
And now what, in fact, do we want:
- Boot thin clients over the network (i.e. diskless).
- Support for thin clients MS RDP versions 6+ or even 7, because it is more secure.
- And not just MS RDP, but with TLS 1.0 support.
- User authorization using smart cards (i.e. forwarding a smart card from a thin client to a server).
Where do we start?
For diskless loading of our thin clients (and they will be loaded using the PXE protocol), we need to configure a DHCP server and a TFTP server. What it is, what it is for, how it boots over the network (PXE) and how to set it up is well written and detailed. As a TFTP server for Windows, I can recommend tftpd32, which can be downloaded. Despite the name, there are versions for the x64 platform.
Further, if you wish, you can read a little about Thinstation, and (under the list of downloads). Information can be found in Russian, although it is already somewhat outdated. It describes the creation and configuration of images of Thinstation version 2.2.2, much is relevant for 2.5. Directly to version 2.5 is only devoted so far. So, let's begin.
First build
Since Thinstation is based on Linux, it means that to build a thin client we need a computer with Linux installed (thanks, KO!). I was using Ubuntu 11.10. We also need to install Git (if it is not already there) and use it to clone a repository with an image generator for ourselves:
sudo apt-get install git
cd / home / user /
git clone --depth 1 git: // thinstation.git.sourceforge.net/ gitroot / thinstation / thinstation
cd thinstation
After the image generator is downloaded, you need to run the script:
./ setup-chroot
On first launch, this script will build the required packages and deploy all the infrastructure to further generate our boot images.
It's time to collect our first, so far "thick" image. This large image with support for a very wide range of hardware is needed to then generate a small profile to support our particular hardware. I want to note that this is one of the main advantages of the new version of Thinstation: now you do not need to manually compile a list of drivers that should be included in the image - it will be generated automatically by a script.
As the developers advise, the assembly should be done "inside chroot session", so from the script setup-chroot.sh do not exit (press only "Q" to hide the greeting message of the script) and write the following commands in the local console:
cd ts / 2.5
nano build.conf
In file build.conf uncomment the line “ package extensions". If you have the Internet through a proxy, then we will also uncomment the line “ param httpproxy"And indicate in it our proxy server settings (for example, like this:" param httpproxy user: [email protected]: port"), Save the file and continue building:
./ build --allmodules
We look at the long footcloth of the build script log, agree to download additional packages if he asks, and wait for the end of the process. Now we copy the contents of the directory “ /home/user/thinstation/ts/2.5/boot-images/pxe"(And this is our collected boot image) to the root of the TFTP server and try to boot the thin client over the network for the first time.
And here we can meet the first long-awaited rake. If your thin client has little RAM, then we return to editing the file build.conf and comment out some heavy package, for example “ #package chrome“, We repeat the assembly and see a decrease in the survey by almost 2 times. The download should now go.
Even then, with a probability close to 100%, the thin client will not be fully loaded. But we don’t need that. We are waiting for the loader to show us a picture with the inscription "Thinstation" and a progress bar. After that, press Ctrl + Alt + F3 and see a console with an invitation to enter. Introduce next pair Login: Password " root - pleasechangeme"And run the script:
This script will generate us profile files for the specific hardware of our thin client. There are usually two of them: " module.list"(A list of drivers for our hardware) and" vbe_modes.list"(Graphic modes). Now they need to be copied to the Linux machine. This can be done, for example, through a TFTP server (it must allow recording). In the thin client console, enter:
cd /
tftp -p -l module.list -r module.list 192.168.0.1
tftp -p -l vbe_modes.list -r vbe_modes.list 192.168.0.1
Where 192.168.0.1 is the address of our TFTP server. Let's go back to the Linux machine, create a folder there “ /home/user/thinstation/ts/2.5/machine/my_machine"And copy our two received files from the root of the TFTP server into it.
Scary Beast - Smart Card
- Actually, the smart cards themselves. For example, such.
- Devices for reading smart cards (card readers). For example, such.
- And of course, our terminal server must be configured appropriately to use smart cards for authentication. This server setup is a big topic. You can read about it separately. In addition, to support specific smart cards, the manufacturer's software must be installed on the terminal server. For the company cards I have chosen as an example Aladdin it is. At this stage, we will assume that we have already coped with the configuration of the terminal server and it allows users to log in using smart cards.
Now we need to find and build drivers for the card reader for Linux. We find drivers on the manufacturer's website, download and unpack:
cd / home / user /
wget http: // www.athena-scs.com/ downloads / asedriveiiie-usb-3.7 .tar.bz2
tar -xjf asedriveiiie-usb-3.7 .tar.bz2
cd asedriveiiie-usb-3.7
Read README and we see that for the assembly we need to install the PCSC Lite package (yes, I installed the latest version at that time ccid-1.4.5), and we also need the sources (with older versions not going).
We put PCSC Lite, copy the file into the folder with the sources of the drivers for the card reader usb.h from source libusb... Now we run the usual one:
./ configure
make
make install
Since Thinstation already contains the PCSC Lite package, we can simply copy our drivers into the Thinstation collector, like this:
cp -LR / usr / lib / pcsc / drivers / ifd-ASEDriveIIIe-USB.bundle / home / user / thinstation / ts / 2.5 / packages / ccidreader / lib / pcsc / drivers cp / etc / udev / rules.d / 50 -pcscd-asedriveiiie.rules / home / user / thinstation / ts / 2.5 / packages / ccidreader / etc / udev / rules.d
Everything is ready! Now the card reader will be detected and work normally when the thin client is loaded. In version 2.5, such perversions for working with smart cards, as for 2.2.2, are no longer needed.
RDP clients
Now a little about which client we will connect to the terminal server.
On the this moment The most famous clients for Microsoft RDP for Linux systems are rdesktop and its fork, FreeRDP. But! rdesktop does not support TLS 1.0, but FreeRDP does not know how to work with smart cards. And this causes frank sadness!
After a long search, another 2X RDP client was found. You can download it. It turned out that he can do all of the above, is free and also supports MS RDP versions 7.0 and is actively developing. Imagine my luck when I found out that this client is included in Thinstation!
The home stretch: configuring and assembling
Thorough configuration is a big topic, so we read in the section “ Config files"What is each file for and where it should be located. This article covers the configuration for Thinstation version 2.2.2. Here I will tell you about what has changed in the new version and give examples of my configuration files: build.conf, thinstation.conf.buildtime and thinstation.conf.network.
So, I comment on the parameters from the configurations in the examples:
build.conf:
- machine my_machine- remember, we generated a profile for iron and put it in the folder “ my_machine"? This is it!
- package xorg7-vesa- select the Xorg driver. This is where the problems arose, because the native driver for my SIS chipset did not fit and I had to figure out in practice which of the remaining would fit. Vesa works well with my chipset. You may have to select a parameter in practice.
- package ccidreader- PCSC Lite package, which will allow us to work with smart cards.
- package 2x, package alsa-lib- this is our wonderful RDP client. True, in practice, it was revealed that he needs the Alsa package to work, so we include it as well.
- param fastboot false- if this parameter is set to true, then our boot image will be split into a main and loadable part. Unfortunately, my network card refused to load a partial image, so we generate the whole image.
- param basepath config- indicates in which folder on the TFTP server the config files for clients ( thinstation.conf.network, For example).
- #param rootpasswd etc.- commenting on the parameters that set any passwords. If the root password is commented out, then no one, even if he cheatfully gains access to the Thinstation console, will be able to log in under the root. And this is good)
- param 2xurl- specifies where the 2X client will be downloaded from. It will be downloaded only once the first time you run the build script.
thinstation.conf.buildtime:
- DONT_VT_SWITCH_STATE = TRUE- will not allow the user to switch to the console via Ctrl + Alt + F3.
- DONT_ZAP_STATE = TRUE- will not allow the user to reinitialize via Ctrl + Alt + Backspace graphics mode and again get into the console.
And, finally, an example of describing how to start a session for a 2X client ( thinstation.conf.network):
SESSION_0_TITLE = "(! LANG: 2X" !}
SESSION_0_TYPE = 2X
SESSION_0_2X_OPTIONS = "-m MX -C -u user -p password -s ssl: // myTerminalServerIp"
SESSION_0_AUTOSTART = ON
- -m MX- client mode, MS RDP, full screen.
- -C- smart card redirect.
- -u user -p password- logically, user-password. But! We want to log in with a smart card, not a password! It's simple: the fact is that the current 2X client will not start without user parameters and password, but will spit you out the Segmentation fault. And this is complete nonsense. However, after lengthy conversations with the support service, they promised to solve this problem in the next release. In the meantime, we just write a non-existent user and password at random and calmly log in with a smart card, as if that's the way it should be.
- -s ssl: // myTerminalServerIp- the address of the server to which we will connect. ssl indicates that TLS 1.0 will be used.
We are finished with the configuration. Now we collect the client: run the script setup-chroot.sh and enter:
cd ts / 2.5
./ build
We add the resulting image to the root of the TFTP server. Also, in the root of the TFTP server, create a folder “ config"(The one that we indicated in build.conf) and copy the file into it thinstation.conf.network.
Everything is ready! We launch, check, see the terminal server login window and rejoice!
Part One: A Little Bit of Lyrics
The following text of the author does not claim to be the ultimate truth and it is not worth judging the average level of IT infrastructure in small companies of our vast country by it. The article was written based on communication with numerous acquaintances of IT-shniki (mainly at the level of "student" and "just from college"), who start their careers as an enikeys in small companies.
Let's imagine the average static office of a small trading firm from an IT perspective:
- several dozen weak computers for the secretary, managers, accounting and, of course, the main Boss;
- one-two-three machines performing roles:
- a windows domain controller (it is not uncommon for a company's network to lack even a domain, and all computers work in a single-rank network);
- file server;
- a mail server (instead of it, external free mail servers are sometimes used, ranging from mail.yandex.ru and gmail.com to ten-dollar hosting on N mailboxes);
- http proxy for filtering access to external resources and logging "where who goes" (often absent)
- a router / firewall at the border with an external network to restrict access to the outside and vice versa (often any entry-level SOHO router with a price of up to $ 100 is used as a border router, it also acts as a DHCP server (for dynamically distributing IP addresses to employee workstations);
- other things, the list of which can be quite long;
- several printers, often connected locally to employees' workstations and shared over the network using standard Windows tools (as an option, printers can be networked initially or connected via hardware print servers).
- in advanced cases - one terminal server (under Windows) for accounting (1C is running on it and there is also a database therein, and accountants, connecting to the terminal server through standard Windows tools(remote desktop), work with it on a terminal server (locally), which, firstly, gives more convenience, and secondly, speeds up the work of 1C itself (usually 1C with a base is installed on the computer of one of the accountants, and the rest are connected to it from their computers, working with a database shared over the network).
All this economy is connected into a single local area network through one / several cheap 100Mbps switches. And it works in a single NT / Active directory domain (although there are variants of peer-to-peer workstations without any domains).
All Windows machines usually have (although there are exceptions) some kind of antivirus installed. Often there are non-network versions of these programs (the same Avast), although, again, in more advanced (from the point of view of IT) offices, there are network versions of antiviruses with centralized management and updating of antivirus databases.
The above situations vary from case to case, since the configuration of the network, hardware and software is influenced by both the knowledge / skills / desires (and, importantly, laziness) of the system administrator (s) and the understanding of the bosses (represented by the main Boss) " what exactly is this our System Administrator does it when everything works fine anyway ”(the latter implies how much money is allocated for IT equipment and the salary of a future specialist). If little money is allocated (and this is usually the case - managers of trading companies are usually far from IT and have little understanding of what is happening there), then the enikeyschik who has gained knowledge goes to another company. Another student comes to the place of the departed, and everything is repeated over again.
I think it is unnecessary to say that in such offices, the system administration department consists of one person who combines a laying / maintenance engineer office network, the system administrator as such (that is, the very person who is responsible for the operability of the server park at the software and hardware levels and the introduction of new functionality) and enikeishik - the "errand boy" - who deals with solving problems for users, wiping mice, changing cartridges from printers and the like.
As a result, small companies often have a fairly diverse fleet of user machines ranging from pentium2 / 128Mb ram / 5Gb hdd to P4 Celeron / 1Gb ram / 80Gb hdd. On all machines, of course, Windows (98, 2000 and XP Home / Pro) and different versions of the software (the machines were installed at different times). It comes to the point that the anti-virus software on the machines is also from different manufacturers.
And on the hard lot of the system administrator (and part-time enikeys), it falls day and night to support this whole zoo. But iron sometimes breaks:
- fans begin to buzz disgustingly (they need to be cleaned and lubricated or replaced with new ones);
- power supplies fail;
- hard drives - pouring in;
- network cards (both built into the motherboard and external - stop working and need to be replaced);
- the rest of the iron usually flies much less often, but nevertheless flies too
If the hard drive fails (or motherboard computer), the operating system on a recovered machine often has to be rearranged from scratch in this or a very similar sequence:
- install Windows;
- install the necessary drivers (the entire hardware park is different - did you forget?), having previously determined the model of the motherboard in this machine and downloading the latest drivers from the Internet or finding the ones you need on your file server;
- we enter the machine into the domain (if configured);
- we install the necessary software (office, browser, mail client, total commanters, ICQs, jabbers, punto switches, etc.) - in the case of an Active Directory domain, some of the software can be installed automatically, but not everyone has it configured, and not everyone knows it opportunities;
- install an antivirus;
- plus additional dances with a tambourine, individual for a specific network of each organization around a new workstation;
After successfully completing all the points (this procedure takes about two hours), we report to the Boss that workplace the employee is saved and he can start work.
The happy owner of the restored computer sits down at his workplace, after which it turns out that (since the domain profiles were not relocatable or there was no domain at all, the link "my documents" led to the local drive C :, but about the fact that everything important is needed save on a network drive - on the server, the employee forgot):
- I had a folder here with important documents- where is she?
- I also saved photographs from Turkey there, can I restore them?
- there were many important shortcuts on the desktop and a hundred more documents - where did they go?
- My favorite sites are no longer in favorites (this is about bookmarks in the browser) - where can I find them now? etc…
Sound familiar? It's good if it wasn't the hard drive that flew, but just the motherboard. Or, part of the information on a crumbling disk can be restored. But all these procedures take up the system administrator's working time, which could have been spent with much greater benefit - playing a network shooter or ... learning IPv6 - after all, everyone is already switching to it and will switch to it very soon, addresses in the Ipv4 space have ended five years ago :)
As a result, support for the IT infrastructure of a small company for the system administrator turns, for the most part, into support of the operability of user workstations, namely:
- reinstall Windows;
- tune to new car all the necessary software;
- restore everything that was lost;
- install new programs for those in need;
- carry out preventive maintenance of the case (vacuum the dust in the system unit);
And in the remaining time (if the system administrator is not too lazy), you need to try to learn something new, upgrade the software on the server (s) and put a new network service into operation. Those. there is no time left for the main responsibilities (exactly what the system administrator should do most of the time).
How to get out of this vicious circle?
One of the options for solving the above problem is to abandon "thick" workstations (where it can be done) and switch to.
A "thick" workstation is understood as any computer with an installed OS, which processes most of the user information. Those. browser, office and everything else is performed locally on the user's workstation, system unit which buzzes under his table or somewhere nearby.
It must be understood that the requirements of modern operating systems (not necessarily Windows) keep pace with modern hardware - in other words, for relatively comfortable work In Windows XP, an old (but fully functional and relatively powerful) Celeron 800Mgz / 128Mb Ram / 10Gb HDD may not be enough. It is, of course, possible to work under a modern OS on such hardware, but this operating system and applications will slow down quite often - if only because of the small amount of onboard memory and the old (read - slow) hard disk.
A thin client, in short, can be defined as a diskless computer whose job is only to connect to a remote server and display the information received from the server on the screen. Typically such a server is called a Terminal Server or Terminal Server. All the processing of user information takes place on it (at the same time to which many - although not an infinite number - of thin clients can be connected).
Typically, thin clients are made on the basis of weak (and, accordingly, low-power) hardware - often this is a single motherboard on which everything is integrated. The processor and memory can also be tightly soldered to the motherboard. Some thin clients have a flash disk (inserted into the IDE connector of the motherboard) on which a specialized OS (WinCE or others) is flashed.
Comparison of the Clientron U700 Thin Client with a Standard Workstation Enclosure.
As a result, when the thin client is turned on (they are also called terminals), the OS is loaded from the built-in flash disk (usually it takes less than 30 seconds to load), after which a dialog for connecting to the terminal server appears on the screen. Some of these clients can only connect to Windows Terminal Server or Citrix Metaframe, others can also connect to terminal servers of other operating systems. In any case, the price of such solutions also includes the price of a WindowsCE license flashed onto a built-in flash drive. We talked about similar solutions earlier:
- Windows Terminal
- Thin client
- Windows Terminal
Of course, other companies have similar solutions. Including without an embedded OS (for which, in the case Microsoft Windows CE, you need to pay extra, and a penny flash disk, but it's worth it).
Terminal clients without a built-in flash-disk, when turned on, load the required OS image over the network, after which they spend the same couple of tens of seconds downloading. Then we are ready to work, which means displaying a menu with a list terminal servers to connect or automatic connection to one of the hard-coded terminal servers (depending on the settings) - the user will only need to enter a username and password. After entering it correctly, it enters its session on the terminal server and can start working.
The undoubted advantages of terminal solutions on specialized thin clients or correct self-assembled computers:
- lack of a hard drive (which get hot and break);
- no fans (only heatsinks are installed on the processor and power supply, which are enough to dissipate the heat generated during operation);
- low power consumption;
- theoretical low cost (during self-assembly, you can pick up very cheap components - after all, performance from hardware is not required; but manufacturers for specialized thin clients will ask twice as much)
- minimal time spent on maintenance (in case of a breakdown of such a piece of iron, it is enough to disconnect the broken one and connect a spare one - work for five minutes; and this is already the minimum downtime for the employee's workplace, as well as the minimum time spent on fixing the breakdown of the system administrator)
- all software for users' work is configured centrally on one (two / three / ...) terminal servers - this is much easier than maintaining a software zoo on "thick" workstations of employees
Do not forget about user data - the terminal does not store anything locally (all user data is located on remote servers). As a result, it is easy to set up automatic backup of everything and everyone and, in which case, restore the "accidentally deleted" document.
In general, there are a lot of advantages, but there are also disadvantages:
- in the event of a network failure, the workplaces of employees "turn into a pumpkin" (and employees on "thick" clients can continue to fill a document, for example, in OpenOffice);
- if the terminal server fails, the workplaces of employees again "turn into a pumpkin" (but this is solved by installing several - for example, two - terminal servers; if one of them fails, the second will replace it, or employees will simply reconnect to the second server manually)
- Thin clients are not suitable for everyone: for example, people who constantly watch videos or work actively with graphics (in Photoshop) or are engaged in layout of a magazine, it is better to do this on a local "thick" client (but thin clients are perfect for most other employees who need only a browser with the Internet, mail, creating and editing documents in Openoffice and working with 1C).
The last minus, which we will not consider here, is the licensing policy (if not a rip-off) on the part of Microsoft. Working on a terminal server running the OS of this well-known company requires a large number various licenses:
- Windows Server license
- CAL (Client Access License) - licenses for connecting to a Windows server and their number must be no less than the number of clients connected to the server (usually a Windows server already contains a certain number of such licenses - from five and more)
- licenses for working with a terminal server (their number must also be equal to the number of connected clients)
Do not forget about separate licenses for all software used (for example, for Microsoft Office) in an amount equal to the number of clients connected to the server. If client licenses for Microsoft Office can still be bypassed by abandoning this product and supplying it with a replacement in the form of, for example, OpenOffice, then getting rid of the terminal server itself, represented by Windows 2000/2003 TS, is somewhat more difficult :) Although this is possible in some cases ...
There is, however, one more "minus" (besides the fear of something new) that often stops you from implementing such solutions - for some reason, many people think that these thin clients should be bought (and they are not very cheap - from $ 200 and more). What to do with the entire fleet of already existing computers?
It is to answer the last question that this series of articles has been written. It will consider thin client software.
This small, but with many features and, importantly, OpenSource software, allows you to turn almost any ancient computers into thin clients. The minimum hardware described on his home site for the used hardware is Pentium 100Mhz and 16Mb of RAM. Oh yes, a hard / flash disk is not needed either - computers, when turned on, can download an image of a thin client (this is about twenty! Megabytes) over the network (although it is also possible to install the Thinstation client on a hard or usb disk). In this age of operating systems that happily gobble up gigabytes of disk space after installation, that's impressive, isn't it?
Thinstation is based on Linux, but to use it, you don't need Linux knowledge as such - you just need to set up dhcp and tftp servers on your network and configure them accordingly (both of these servers are also included in Windows Server products). Thus, even on a network where they know nothing except Windows, using the Thinstation client will not cause any difficulties.
Thinstation can work with the following terminal servers:
- Microsoft Windows servers via RDP or nxclient (Windows NT4TSE, W2k Server, W2k3 Server or Windows XP in single-user mode);
- Citrix servers via ICA protocol (on MS Windows, SUN Solaris and IBM AIX servers);
- Tarantella servers
- * nix-like servers using the X11 protocol;
- connection to VNC servers (tightVNC);
- connecting to SSH and Telnet servers;
In order to boot Thinstation over the network, the computer only needs a built-in or an external network card that supports the PXE standard (there are other options, but, for example, all built-in system board network cards work exactly on this protocol).
PXE stands for Pre-boot eXecution Environment - pre-boot execution environment. This standard was first implemented by Intel. The first sign of the presence of a PXE-BIOS on board the built-in network card is the "Enable Boot ROM" item next to the point for activating the network card in the BIOS. If the built-in network card does not support booting over the network (or is absent at all), you can use any external network card with the "Boot ROM" option (this issue will be discussed in detail later).
For now, let's take a quick look at the process of downloading the Thinstation client over the network.
- PXE network card requests DHCP server the following information: IP address, subnet mask, gateway, as well as the IP address of the TFTP server (on which the images are located in in this case, ThinStation) and the name of the image it will try to load.
- The DHCP server returns the requested information (noting that the IP address given to the client is occupied by such and such a client)
- The client connects to the TFTP server, the IP address of which was just given to him and downloads the PXE bootloader file from it (the name of which was again given to him by the DHCP server)
- The downloaded PXE loader is executed and, in turn, downloads a configuration file from the TFTP server, which contains the names of the Linux kernel files - vmlinuz and the image file system- initrd. These files are downloaded and control is passed to the Linux kernel.
- After unpacking and loading the Linux kernel with the mounted image of the file system, Thinstation again contacts the TFTP server to download the configuration files it needs (there, among other things, the addresses of the terminal servers to which you need to connect are written), after which it launches the required terminal client (in our in case it will be rdesktop) and expects the user to enter his login with a password to connect.
At first glance, the described scheme looks complicated. But in fact, setting it up takes half an hour or an hour and in the future it works completely autonomously. Booting a thin client from the moment of the first PXE request to the network (this moment coincides with the moment when the OS starts booting from the hard disk) takes 20 ... 30 seconds.
As noted above, Thinstation can work with different terminal servers. But in the coming articles, we are the easiest to implement (but once again I remind you about buying a set client licenses, necessary for official work), we will only consider a bundle of Thinstation with Microsoft Terminal Server.
First, we need to have a Microsoft Terminal Server configured. This server can operate both as part of a domain (in this case, it is more convenient to manage user accounts - they are common - especially if there are several terminal servers in the network), and outside the domain - in a peer-to-peer network. The second case differs from the first in that the necessary users will have to be created locally on each server and the current lists of users and their rights will have to be synchronized manually.
The second point of our program will be configuring DHCP and TFTP servers. The first one is in charge of the dynamic distribution of IP addresses for workstations, and also informs from which IP address (from which tftp server) and which file name the computer needs to download as a bootable image of the thin client. And the second - the tftp server - actually gives the thin client images and configuration files for them. These settings can be both global (for all diskless terminals on the network), and local - for specific groups of machines or single thin clients.
Both of these services can be raised both as part of a Windows server (by starting and configuring the corresponding services), or as separate daemons as part of a * nix server - we will consider this on the example of a server with Gentoo Linux installed.
And the third point is setting up client machines - transferring them to download over the network and considering standard pitfalls.
But more on that in the next articles of our cycle.
The introduction of terminal workstations (in the classic version or the newfangled VDI) brings many benefits for most companies. However, the large upfront costs of purchasing hardware and software / licenses can scare off potential customers of this solution. An important role in the total cost is played by the price of the terminal clients themselves - devices from which remote access to the terminal server is carried out.
It is clear that not everyone can afford branded thin clients, such as the HP T5735, the price of which is close to the cost of an average office computer; the option of reconfiguring existing user workstations is not always applicable, since it requires a lot of effort to disable all unnecessary programs and limited functionality, system support, installation of updates for the OS and antivirus protection. In addition, in the case of using Windows, you do not get rid of the need to purchase OS licenses. Sadly, however, there is an inexpensive and practical way out of this situation.
The ability to boot over the network (PXE - Preboot eXecution Environment) has long been firmly entrenched in all modern network cards. This technology allows you to get rid of the need to store any copy of the bootable OS on local media, and use only a network copy that is downloaded from the server every time you start the computer. PXE functionality is not limited to only client computers, if you wish, you can boot the servers in this way (yes, at least VMware ESXi). And perhaps the most popular client that supports network booting today is Thinstation.
Small but extremely functional thin client supports work with large quantity protocols remote access: Telnet, SSH, Microsoft RDP, Citrix ICA, X Windows and of course VMware View. Big advantage Thinstation is that it can be easily configured to suit your specific needs; if you wish, you yourself can build a boot image containing the necessary drivers, programs and configuration files.
In this article I will give an example of preparation similar image and configuring the PXE server to boot thin clients over the network that are used to connect to VMware View Manager.
Create your own image
First of all, we need a bootable Thinstation image. Of course, you can build it by hand, but it's much easier to use one of TS-O-Matic's online configurators. I am using the Denmark server as an example.
The configurator itself consists of several sections:
Hardware- allows you to specify the drivers that you want to include in the image.
Applications- defines applications (terminal clients, window managers, additional programs). V this section be sure to select a component vmview v Additional contributed packages.
Parameters- contains various settings (passwords for accounts, screen resolution, etc.)
Splash and Background - background image at the time of loading and while the client is running.
Load Files- loading a file with the required image configuration, if you do not want to specify everything manually.
After completing the settings, press the button. Build and wait for the system to create the desired image, and then press Write image.
On the download page, go to the section Build and download thinstation.conf.example- thin client settings file. Then go to section Etherboot and download the files thinstation.nbi and thinstation.nbi.zpxe.
Now is the time to edit the settings file. To do this, rename it, first, to thinstation.conf.network and then open in any text editor.
Find the section starting with the comment " # VMWare View options". Uncomment the necessary lines with the connection settings by removing the initial character" # "and also replacing" # "in each line per digit - a sequential number, starting from 0, under which this item will be present in the thin client menu.
As a result, you should end up with something similar to:
SESSION _ # _ TITLE- sets the display name in the thin client menu
SESSION _ # _ TYPE- type of access
SESSION _ # _ AUTOSTART- enable / disable automatic selection this option when loading the client
SESSION _ # _ VMVIEW_SERVERURL- the address VMware server View.
SESSION _ # _ VMVIEW_FULLSCREEN- work in full screen mode.
If you have a desire, you can still delve into the settings, fortunately, a lot is clear at first glance.
Server Tuning
After preparing the boot image, you will need to configure DHCP and TFTP on the server. I used Windows Server 2003 as a server.
The PXE client is booted using TFTP (running on UDP port 69). In Windows Server 2003, the TFTP server is part of Remote Installation Services, or if you have SP2 installed, Windows Deployment Services. So, if you do not want to bother with the installation below, just install one of these components from the Add / Remove Windows Components wizard, which will also install TFTPD, but do not perform the initial configuration of the services, but go straight to editing the registry and adding the root folders.
For the rest, there is a small instruction on how to manually install TFTPD.
First, you need to install the Windows Server 2003 Resource Kit. You can download it from here.
After that, insert the CD with the Windows Server 2003 distribution kit into the CD drive, open command console and run:
expand X: \ i386 \ tftpd.ex_% systemroot% \ tftpd.exe
X is assumed to be the letter of your CD drive.
After installing TFTPD, you will need to register it as a Windows service. Run the following command:
instsrv tftpd% systemroot% \ tftpd.exe -a "NT AUTHORITY \ NetworkService"
The -a switch allows you to specify the account under which the service will run. For security reasons, it is not recommended to run TFTPD from under SYSTEM.
Now create a folder, for example: C: \ TFTPRoot, which will be the root for your server.
Start the registry editor regedit and open the branch HKEY_LOCAL_MACHINE \ SYSTEM \ CurrentControlSet \ services \ tftpd... Inside tftpd create new section Parameters... Inside the section, create a Directory parameter with the REG_SZ type, as the value specify the path to the created root directory of the TFTP server.
Now start the service by running the service snap-in and finding tftpd there, or by typing in the console:
net start tftpd
Copy to root folder three previously uploaded files: thinstation.nbi, thinstation.nbi.zpxe and thinstation.conf.network.
When booting over the network, the PXE client sends a broadcast request in search of a DHCP server that could inform the client of the necessary network settings (IP address, subnet mask, Default Gateway, addresses DNS servers etc.). Additionally, the DHCP server can transmit settings from DHCP Option 60, 66, and 67, telling the client to download and boot from a specific server a boot image. If such settings are not passed, the client tries to send another broadcast request on UDP port 4011 in order to discover the PXE server (for example, the Microsoft WDS server is running). In our case, we will use the above options.
As a DHCP server I am using a standard server included in Windows Server 2003. I will assume that you have already installed the service you want, created a scope, defined a range of addresses and exceptions for it. For further configuration, open the DHCP management snap-in, click right click by server name and select Set Predefined Options.