Hello everyone. Good news for EaseUS software supporters - their Partition Master has been updated to version 12.9. The developers have made a number of fixes and improvements, making the program more stable, and also supplemented its functionality with support for operations with dynamic disks. Below we will talk about how to use this program. I already wrote earlier, now I propose to see how its individual functions actually work. But first, about the specifics of EaseUS Partition Master.
EaseUS Partition Master: How to Use
So, EaseUS Partition Master is a functional disk space manager for Windows.
This is an alternative to well-known products such as Acronis Disk Director or AOMEI Partition Assistant, with a classical organization of this type of software, with a user-friendly interface, with a modern format for presenting a software product and a convenient distribution scheme: basic functionality is free, advanced functionality is at an affordable price.
EaseUS Partition Master official page:

It is also a trial, which, in the case of purchasing a license key, turns into one of the more functional editions of the program.

EaseUS Partition Master Editions
EaseUS Partition Master has several editions:
Free - basic;
Professional - with additional features;
Server - Same as Professional, but with Windows Server support and RAID 5 recovery;
Unlimited - the same as Server, but with favorable conditions for purchasing a multi-user license;
Technician - Same as Unlimited, but with tech support and a free lifetime update.
For home use and small craft for providing computer assistance, the capabilities of the Free and Professional editions are quite enough.
EaseUS Partition Master Free Edition features
The main functionality supported by all editions of the program and supplied in the free edition of Free is as follows:
Support for many types of storage devices, in particular, SSD, HDD, RAID, USB drives;
Formation of the structure of partitions on the disk (a full range of operations such as: create, move, merge, resize, delete, assign letters and labels);
Overwriting data until it is completely impossible to restore it;
Formatting partitions in FAT, NTFS, ReFS, EXT2 / 3 file systems;
Recovering partitions;
Testing the surface of carriers;
Cloning disks and partitions;
Alignment of partitions and their accompanying optimization for SSD during other operations;
Converting disks from basic to dynamic (without the ability to operate them and convert back to basic);
Managing the types of partitions on MBR disks - converting primary partitions to logical and vice versa, making primary partitions active;
View full content of sections, including protected Windows technical sections;
Cleaning Windows from temporary and cluttering disk data;
Analysis of the used disk space;
Defragment HDD;
The ability to configure the program with password access;
Automatically shutdown the computer after long-term operations.
EaseUS Partition Master Professional Edition features
In addition to the mentioned basic functions, the Professional edition also provides:
Converting disks from dynamic to basic and vice versa;
Operations with dynamic disks - creating partitions, resizing them, moving, formatting, deleting, cloning;
Transferring the old Windows to another disk;
Converting the style of a disk partition from MBR to GPT and vice versa with the safety of partitions and data;
Create a live disk to work with computers without Windows (or when it does not start).
Let's consider how the individual operations directly take place using the EaseUS Partition Master.
How to create partitions on an empty disk
For example, one of the basic operations for managing disk space is partitioning a new hard disk. To form partitions, click on the unallocated space (Unallocated) on the tabular or visual map of the disk, and on the operation panel on the left of the program window ("Operations") select "Create partition".

Give a name to the section, activate the "Optimize for SSD" checkbox (optimization for SSD, ie alignment of partitions). Set the size of the section by dragging the slider on the visual map (or enter it in the table view at the bottom). Optionally, we can choose a file system other than NTFS, set a different letter for the partition, or choose a different cluster size. As a result, we press "Ok".

By the same principle, we distribute the disk space further: again click on the unallocated area and create partitions.

When all sections are created, click the "Aply" button to apply the scheduled operations.

How to reduce or increase the size of a partition
How do I reorganize disk space? In order, for example, to squeeze a new section between the existing sections, it is necessary to reduce one of these existing ones. It is desirable that the one to the left of the disk card, in this case, an unnecessary process of moving data is not required. Click the partition to be reduced and select "Resize / Move partition" in the operations panel.

On the visual map, drag the space slider to the left until the required amount of space is displayed in the column below "Unallocated Space After:" Next, set the checkbox for optimizing the partition for SSD. And we press "Ok".

To increase the size of one of the sections at the expense of the other, click on this very other section. On the operations panel, click "Resize / Move partition".

On the visual map, pull the slider to the right until the required amount of space is displayed in the column below “Unallocated Space Before:”. Next, let's use optimization for SSD. And we press "Ok".

Returning to the main window of the program, click on the section that you want to enlarge. Click "Resize / Move partition" again.

And pull the slider on the visual map all the way to the right. Optimizing for SSD. We press "Ok".

Apply the operation with the "Aply" button.
How to convert a hard drive from dynamic to basic
Converting hard drives from a basic type to a dynamic one is possible by means of Windows itself. But the reverse direction is not provided by the operating system. This functional gap is filled by third-party disk managers, including EaseUS Partition Master. Click on the dynamic disk, select "Convert to basic disk" on the operations panel. And we are waiting for the program to check the file system.

We apply the operation.

A reboot is required to apply the operation.
How to convert disks from GPT to MBR and vice versa
A disk partition style converter from MBR to GPT and vice versa from GPT to MBR is a must have functionality of any disk manager. The modern market demands more from this type of software - the ability to convert not only disks with user data, but also those with Windows. EaseUS Partition Master is able to convert styles of disk partitions without having to reinstall the operating system. In our first case, we have an EFI system with a typical structure - an NTFS "Recover" partition, an EFI partition with FAT32 and a 16 MB MSR partition. To convert a hard disk from GPT to MBR, in the program window, click on the disk to be operated on, select “Convert to MBR” on the operation panel.
And during the reboot, we enter the BIOS to set the Legacy or compatibility mode. After loading in Legacy mode, we will again briefly get into the EaseUS Partition Master window. The program will complete its operations and boot from the MBR disk.
Another example: converting a disk from MBR to GPT. We have a test system on an MBR disk with a typical structure - partitions "Reserved by the system" and system C. To convert a hard disk from MBR to GPT, in the program window, click the disk being operated, and select "Convert to GPT" on the operations panel.

The planned operation shows us the future structure of the disk: between the "System Reserved" and the system C partitions, a new 300 MB EFI partition with the FAT32 file system will appear. Click on "Aply".
As you know, many computers have only one hard drive and for safer data storage its better split into sections... Structuring this way will help you divide the disk into a partition containing Windows system files and a partition containing all other objects. That is, if the OS boot sector is damaged and operations related to its recovery are carried out, the risk of losing the data recorded on the disk is much less if it has already been partitioned.
You will also need to partition the disk if you want to create an encrypted or password-protected partition or if you plan to install two operating systems on one disk. But, despite the obvious advantage of partitioning a disk into partitions, many users store all files on an unpartitioned disk for a long time, and when they come to the conviction that the disk needs to be partitioned, not only the OS is written on it, but also a lot of other valuable information is stored, and if it is necessary to perform a breakdown, not only special software is needed, but also very reliable.
EASEUS Partition Master
Of the well-proven programs, I would like to recommend EASEUS Partition Master. This application has both commercial and free versions. To perform the basic actions related to partitioning a disk or, conversely, joining partitions, the free version is quite enough. Among the functions that are only included in a commercial program, the most valuable is a complete copy of the operating system to another disk. Unfortunately, the program is not officially translated into Russian, but a group of enthusiasts has created a crack on the Internet, which is highly recommended to use, since all operations related to disk partitioning, if performed incorrectly, can lead to the failure of the OS, and therefore did not happen, all actions must be deliberate. Also, the developers recommend not to perform more than 5 actions in the program at the same time. If you need to perform other operations, restart the PC, and only after making sure of a positive result, continue to work. You should also know that you can restrict access to the program by setting a password.
How to use EASEUS Partition Master
After installing EASEUS Partition Master, you will see an interface represented by horizontal and vertical menus, a horizontal panel with buttons for performing the most requested actions and a work area that displays the disks and partitions of your PC.
To divide a disk or partition, we first find it in the list of the workspace, select it by clicking on it with the mouse, click on the “Change / Move” button on the panel and in the window that opens, hooking the edge of the partition or disk indicator with the mouse in the right corner, we begin to move it to the left side of the window, reducing the size of the disk or partition. The filled part of the section is colored more intense green, and the empty part is colored light green. By reducing the size of the partition, we will see that we have a white area on the right, that is, an unallocated part of the disk, where we will create a new partition. To do this, simply click on "OK" in the window, make sure that a new line "Unoccupied" appears in the workspace, select it and press the "Create" button on the toolbar. In the window that opens, to confirm the intention to create a new section, click the "OK" button, and if everything is done correctly, it will be displayed in the workspace. Now we press the "Apply" button, restart the computer and get a new full-fledged section.
In addition to creating a partition, the program will help to combine several partitions into one, as well as make a complete copy of a disk or partition, convert a disk or partition to a logical one, and also restore a partition or disk if a copy was made earlier in the event of a Windows crash. Among the interesting functions of the program is the ability to hide a section, that is, move it to an unallocated area. The hidden section will become invisible to other users, but if necessary, you can retrieve it from the unallocated area at any time. In addition to the above features, it is worth noting the formatting of the partition, as well as the complete destruction of data recorded on the disk or partition.
Splitting a disk into several partitions is now not a difficult and dangerous operation. The software that you have at your disposal today will allow you to work with partitions easily and safely and, moreover, has very clear explanations of all operations.
Among the relatively small number of applications that are designed to work with hard disk partitions, it is distinguished by its simplicity. The application is released in three versions, one of which is free, and, of course, the most limited in functionality. The Home Edition does not have professional features, but will be usable in most cases. Let's consider it in more detail.
Since the app was still labeled as Manager and not Master, its interface hasn't changed much. A distinctive feature is that the structure of its interface is very similar to the structure of Windows Explorer. On the left side of the window, you will find all the necessary application options, while the main part of the window displays the existing disk partitions and information about them. The top of the app is filled with the main menu and toolbar, which contain many of the same functions.
As we mentioned above, EASEUS Partition Master Home Edition brings the main set of operations to the desktop. With this application you can create and delete partitions, resize them, or move them when they border on an unallocated area.
Deleting a section is a very simple task, since all the application will ask you to do is choose a way to delete it. Here you will need to indicate whether you want the data on this partition to be deleted so that it cannot be restored, and or whether you want the partition to simply be moved to an unallocated area. Creating a partition will take more time and effort as it requires choosing the partition type, file system, cluster size, and more importantly, partition size. You can determine the size of the partitions by entering the number of MB manually, or by defining this parameter by dragging the edge of the partition on the graphical diagram.
Increasing the size of a hard disk partition depends primarily on the amount of unallocated area available at the end and beginning; you can increase the partition only at the expense of it.
EASEUS Partition Master allow you to schedule multiple operations before they are performed. The program keeps them all pending, and only takes effect when you run them. You also have the option to cancel a scheduled action. Pending operations can be canceled one by one in the reverse order. That is, the latter can be canceled first. One of the positive aspects of the application is that the planned actions on the hard drive are immediately displayed in a graphical presentation.
During testing, we tried to change the original location of the partitions on the hard disk, despite the fact that there was data on the hard disk. These are not the safest operations, and making backups of your data is very good advice, but EASEUS Partition Master performed all operations without losing a single bit of information. Another important point is that for many operations you do not need to reboot the computer for the program, however, it depends on whether the partition is being used at the time of the operations or not. All operations on the system partition will require a reboot.
In addition to the fact that the program allows you to work with existing partitions, you also have the option to recover deleted disk partitions. The partition recovery utility, which is available in the program, tries to find deleted or lost areas in the unallocated area. You can carry out this operation automatically, or in manual mode, in which you will have full control over the process.
EASEUS Partition Master Home Edition contains a number of tools that provide additional options. These features include: deleting all partitions at the same time, copying a disk to another disk, and erasing content so that it cannot be recovered.
Positive and negative aspects
EASEUS Partition Master Home Edition is a very good and also free tool for working with hard disk partitions. The free version is limited by the fact that some functions are not active, for example, the function of creating bootable discs. However, these limitations shouldn't upset home users as the rest of the options are pretty good. You can perform almost all basic operations on partitions, and it will not become a very difficult task.
How to increase the C drive free program? A year ago, friends gave my wife a laptop for her anniversary, on which the volume of the C: drive was only 70 GB. Naturally, now there is practically no free space on the system disk, it is all crammed with programs and files. Explain to the other half that all personal data must be stored on the F: drive already tired. And then a wonderful idea came to my mind, what if we increase the C: drive in volume, at the expense of the second F: drive, because it is practically empty, and its total volume is 250 GB. It seems to me that if I reduce it in volume by 100 GB and attach these same 100 GB to the C: drive, then I will get exactly what I need. The total capacity of the C: drive will be 170 GB after this operation.
You have an article on this subject - but in it you give an example of working with the paid program Acronis Disk Director, apparently the program is actually worthwhile, but there may still be its free analogue.
And yet, as you already understood, the total amount of disk space of the laptop is 320 GB, which, according to you, should take the C drive on which the Windows operating system is located.
How to increase the C drive
Of course there is such a program, for example "EaseUS Partition Master Free Edition". This program is a hard disk partition manager, it can repartition the hard disk, that is, create, delete, reduce, increase and merge hard disk partitions, exactly what we need. The functionality of the program is even in English, but it is easy and pleasant to work in it, especially since the program is free. We have already published several articles on working with this program and they may be useful to you: and one more -.
- Read our new article -
- In my opinion, in your case, the C: drive should occupy 120-150 GB. Although in my activity I deal with different computers and with different sizes of hard drives, and I noticed that mostly users rarely choose the C: drive size more than 200 GB. Drive C: should not be large and contain important data, as it most often suffers from user errors, file system errors, viruses, and so on.
Our article is suitable for operating systems: Windows XP, Windows Vista, Windows 7, Windows 8.
We go to the official site http://www.easeus.com/download.htm
Click Download
Freeware Download

Download now

The installer of the program is downloaded to our computer, we launch it. Installation of the program is very simple, but there are several points that deserve your attention.
You can refuse to install the TuneUp Utilities 2013 optimizer, that is, uncheck the box.

You do not need to specify the mail, otherwise, once a week, you will receive various news and suggestions from the program developers by mail.

So, before starting the program, let's look at what we have in Disk Management, the situation is similar. Drive C: is a small 49 GB drive, and the second drive E: is much larger - 183 GB.


Let's, together with you, increase the C: drive in volume, at the expense of the E: drive, make them almost equal. Launch the EaseUS Partition Master Free Edition program.

In the main window of the program, select the E: drive with the left mouse and select the Resize / Move partition tool.

In the window that appears, using the delimiter, we separate the 65 GB space from the E: drive, which we will later attach to the C: drive and click OK.


Now select the C: drive with the left mouse and again select the Resize / Move partition tool.

Take the delimiter with the left mouse and drag it all the way to the right, by this we confirm our intentions to give all the free space for the C: drive and click OK.


The EaseUS Partition Master Free Edition program works in a pending operation mode, so that all our actions take effect, we press the Apply button.

The program asks to restart the computer, we agree - Yes.


The first action of the program is to separate space from drive E:

The second action of the program is to add space to the C drive:
For normal installation and operation of Windows 7 / 8.1 / 10, 20-25 GB of hard disk space is enough, but in practice, you have to allocate much more for the system partition, at least 50-60 GB, since in addition to the system itself, users also install packages different applications. But over time, this volume may not be enough.
In such cases, you can remove some of the programs, and then reinstall them, but this time on the D drive, but this is far from the best option. It is much easier to increase the size of the system partition by borrowing some of the disk space from other partitions. There are several ways to do this, but the fastest and most reliable is software. To expand the system partition, it is not at all necessary to use expensive applications like Acronis Disk Director, their free counterparts, for example, EaseUS Partition Master Free, will also do.
This program is powerful, convenient and simple. In addition to the Free edition, there is also a commercial version, but in this case we do not need it. The application can work with disks up to 4 TB, supports converting primary partitions to logical and vice versa, creating copies of partitions to transfer data to another computer without reinstalling Windows, viewing, dividing and resizing any type of partitions.
Additional features of the program include hiding and showing disks, completely deleting files, and checking the disk surface for bad sectors. There is no Russian language in EaseUS Partition Master Free, but it doesn't matter. The application interface is simple, and most of the operations are performed using intuitive graphical controls. To get to the Disk Wizard window, after installing and launching the program, click the “Launch Application” button located in the center.
In the larger right pane of the window, you will see a list of your partitions. It may also include a Windows Reserved Area without a letter (marked with an asterisk) and some unallocated space. So, to enlarge section C, we need to cut off a part of section D, and then "solder" it to section C. Right-click on section D and in the menu that appears, select the very first option "Resize / Move Partition".


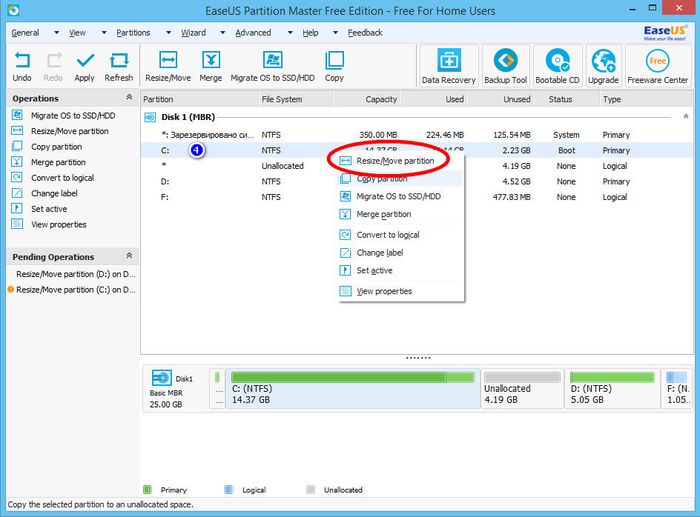


In the window that opens, drag the slider so that the resulting unallocated space borders on the system partition. Click OK. The same can be done without calling the additional wizard window by dragging the slider on the disk graphical view panel located at the bottom of the main window. We do the same procedure for section C, only this time we drag the slider to the unallocated space, thereby increasing the volume of the C disk. Click OK again, and then apply the new settings by clicking the “Apply” button.
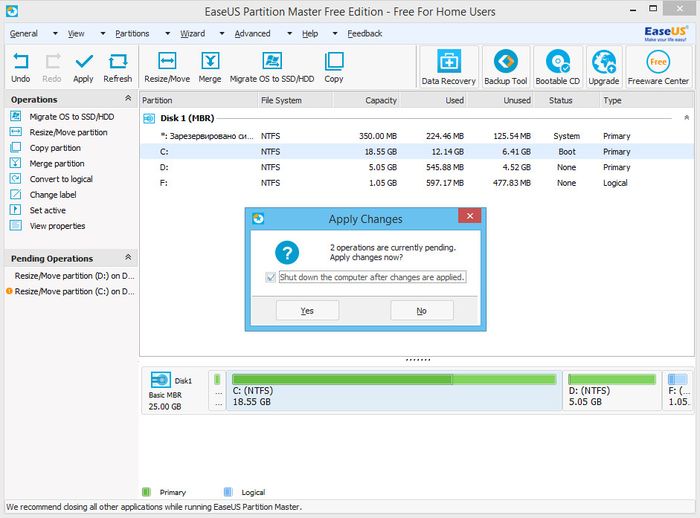
As soon as you do this, a window will pop up with a notification about the start of the operation. To prevent the program from asking unnecessary questions, check the "Shut down the computer after changes are applied" checkbox. Press YES and confirm the start of the procedure. The computer will reboot, and you will see a black window with the progress of operations, at the end of which the desktop will load. Wait until the procedure is complete and do not turn off the computer, even if it seems to you that it is taking too long. Otherwise, you risk corrupting the file system, preventing Windows from booting.
the program is available for free on the developer's website www.partition-tool.com/personal.htm. When installing, be careful, the free version of the application can install third-party software into the system.


