Despite the growing popularity of mobile-optimized Windows 8 and Windows 10, the good old "list" still enjoys the trust of users. Accordingly, the question “how to create a local area network connection on Windows XP” is still relevant for lovers of simple and understandable “classics”. Therefore, here we will look at how to set up a local network between windows xp and windows xp when connecting computers via cable.
How to connect a local network on windows xp?
To set up a local network on windows xp, you first need to connect computers using a network cable.

connecting the network cable to the PC network card
Direct connection over the local network Windows XP is created in the settings of each network computer.
The cornerstone of most do-it-yourself LANs is incorrect twisted-pair cable connections. Make sure that the cable is not “crushed” by the sofa or broken by the interior door, otherwise it may occur, or.
How to set up a network connection in windows xp?
To create a local area connection:
1. Go to your Windows XP in the "Network Neighborhood" section;

2. On the left side of the menu, from the list of possible tasks, select the "Display network connections" sub-item.
 This will allow you to identify the networks that are currently in use or just offline.
3. Select the shortcut for the local area network here, right-click on it and select the "Properties" menu item.

4. In the "General" tab at the end of the list there is a column "Internet Protocol TCP / IP" - double-click on this line to enter the menu for adjusting the IP-address parameters.
Here enter the following parameters: 
If the local area connection shortcut is inactive, then right-click on it and enable the network connection.
This completes the configuration of the local network windows xp windows xp on the first computer.
5. On the second and subsequent computers (when creating a network connection through a switch), the network interface card is configured in the same way.

Please note that the IP address of each networked computer must be unique. So, if on the first PC you installed 192.168.1.1, then on the second you can enter, for example, 192.168.1.2.
The correctness of the windows xp network connection settings can be checked using the Ping utility launched in the command line, which we talked about in the article: ""

This parameter is regulated through the "Control Panel" in the "System" tab. Next, go to the "Computer name" column and set the desired value. Each computer must have a sequential name: for example, comp 1, comp 2, comp 3, etc. Do not forget to title the name of the entire functioning working group - this will be required for the smooth exchange of information between functional nodes.
If you have two or more computers at home, it's time to start setting up access to the local network. You have already figured out the equipment and how to organize this access, and if not, then the articles from the “” heading will help you. Fortunately, you don't need to be a sysadmin to get things set up properly. With Windows XP, just enter a few parameters and the computer is ready to go. Let's see how you can do this.
The first stage of setting up a local network does not take much time. Right click on the icon My computer and select the command Properties... Go to the tab Computer name and click on the button Identification to start the Network Authentication Wizard.
In the first window of the wizard, simply click on the button Further... In a new window, select the option to connect to a local network. If your computer is connected to a small home network, select the radio button The computer is intended for home use and is not part of a corporate network.

After rebooting, you can proceed to the second stage of configuring the local network. Select a team Start-> My Computer and then click on the link network located in the left pane. Now click in the box Network tasks on the link Set up home or small network.

A wizard window will appear on the screen ... Click in the first window on the button Further... In the next window, the wizard will inform you about the possible options for network settings and the need to install the appropriate equipment on the computer before you start the procedure for connecting to the local network. Click the button again Further.
In the new window that allows you to select the method of connecting to the network, select the radio button This computer is connected to the Internet through a gateway or another computer on the network... Select this option for a typical home LAN star topology with a switch and a shared modem connection to the Internet. If the connection is made through another computer, then select the first switch, respectively.

If you select the radio button Other, then three additional options will become available, which are usually not used and the description of which speaks for itself, for example, "This computer has a direct connection to the Internet, there is no network yet."... After selecting the required option, click on the button Further.

In the next window, you need to specify the network name and give a description of the computer. Enter an arbitrary description of the computer in the field Description for example, "My Iron Super Monster" or "Conqueror of the Digital Universe." The computer's network name will be displayed in the folder network, and is designed to identify a computer on a local network. Enter a name in the field Computer name and click on the button Further.

In the new window, specify the name of the network workgroup to which the computer belongs. Enter the name of the team in the field .
All computers on the home LAN must have same working group name... You can leave the base name WORKGROUP, automatically indicated by Windows XP, unchanged, or choose your own name, not forgetting to specify it for other computers.
In the next window, the Network Setup Wizard will show you all the information you provided. If something is entered incorrectly, use the button Back to edit the appropriate settings. When everything is ready, click on the button Further... Windows XP will now automatically test your local network configuration and set up a network connection on your computer. Click on the button Ready.
You can change the computer's network name, its description, and the name of the workgroup without using the setup wizard. Click on the Start button, then right-click on the My Computer icon and select Properties. Go to the tab Computer name... In the description field, you can enter any textual description of the computer (it is not necessary to do this). The name of the working group is indicated in the same window. Click on the button Change and enter in the field Computer name the network designation of the computer, and in the field - the name of the working group.

It remains to configure a similar connection for other computers in the local network, in which you should use the services of the Network Setup Wizard described in this section.
Setting up the network configuration
Although the Network Setup Wizard automatically creates all the required network parameters, the properties of the network protocols may not match the current LAN configuration. In other words, the master does not always do his job perfectly well. If by opening the folder network, you will not see the icons of computers connected to the local network in it; you will have to change the settings of network protocols manually. This requires the following parameters:
- The IP address of your computer;
- Subnet mask;
- The IP address of the default Internet access gateway.
Open the folder network and click on the link Show network connections in the left pane Network tasks... A window will open containing icons of all network connections configured on the system. Double-click on the icon of the corresponding network connection to open the window with information on the status of the local network connection.

In particular, the window shows the duration of the active network connection, connection speed, activity (how many bytes of information were sent and received). All network connection parameters are presented in the same window on the tab Support... There you can find out the type of IP address (manually entered or assigned by DHCP), the IP address of the computer, the subnet mask, and the IP address of the default gateway.

Tab Support.

In addition, if you click on the button Details, you can get more information such as the physical MAC address of the network adapter. The window also contains a button To correct to fix some connection problems.
Click on the button Details to open this window.

Click on the button To correct to fix network connection problems. Sometimes it really helps :)
To make any changes to the LAN configuration, click on the button Properties... A window with the properties of the network connection will open.

To change the hardware settings of the network card, click the button Tune... Also, check the box When connected, display the icon in the notification area to display a special icon in the Windows XP notification area when connected to a local network.
Configuring TCP / IP parameters is the main step in making your local network operational. In the window LAN connection select item Internet Protocol (TCP / IP) and click on the button Properties... A window will open Properties: Internet Protocol (TCP / IP).

For a standard home network, we recommend these settings. Specify computer addresses in the range 192.168.0.2-192.168.0.50, i.e. the first computer gets the address 192.168.0.2, the second one gets 192.168.0.3 and so on. The address 192.168.0.1 is usually assigned to the main gateway on the network. Specify the subnet mask as 255.255.255.0. In many cases, this configuration is suitable for organizing the operation of a local network.
If the network setup wizard has completed its work, then the IP address of the computer is automatically assigned. Otherwise, you will have to enter the address manually. To do this, select the radio button and enter the IP address of the computer in the field Use the following IP address, and in the field Subnet mask- subnet mask. If your network uses a specific gateway, such as a router, enter its IP address in the Main gate... Entering the IP addresses of the primary and secondary DNS servers is usually optional (although sometimes required).
If you are using your computer on multiple networks, click the tab ... Here you can select the radio button to enter the alternate IP configuration parameters, including the IP address, subnet mask and default gateway, as well as preferred and alternate DNS servers.

Click on the button OK to save your changes. A computer restart is required for the changes to take effect. If all parameters were specified correctly, after reboot the local network will be activated and computers will be able to exchange data.
Now, in order to access the folders and files of another computer, you need to configure network access to remote computers, which is described in the article.
Microsoft Corporation, starting with Windows Vista, has changed the security policy of its systems with respect to the local network. The operating system seemed new, somehow too complex, and therefore many could not figure out how to open access to files on the computer. Today we will analyze how this is done using the example of Windows 8.1, but Vista and 7 have a similar system, and the difference is not fundamental. The local area network can also be used for subsequent creation , which will unite all multimedia devices of the house or apartment, or to share files with your phone or tablet.
In my opinion, this is very convenient when, without additional movements, you can play a movie from a computer, laptop or even a phone on a large TV screen or listen to your favorite music from a phone, on a speaker system without connecting additional wires, although this is already necessary ... But let's move on to setting up a local network.
Video instruction is available by link.
Step-by-step instruction
- For normal functioning of a local network, all computers on this network must be in the same workgroup; for a home network, let's take MSHOME. To install it, we need to go along the following path: open "Control Panel" - "System and Security" - "System" (you can also right-click on the "Computer" shortcut on the desktop and select "Properties" or the key combination "" ). In the window that opens, in the left column, select "Additional system parameters".

- In the window that opens, go to the "Computer name" tab and press the "Change" button. A dialog box opens in which we need to record a new working group. We register MSHOME (all in capital letters) and click OK. We close the system parameters by pressing the OK button and restart the computer.

- Further, it is advisable to configure a permanent IP for both computers. To do this, go to the "Control Panel" - "Network and Internet" - "Network and Sharing Center" - on the left side of the "Change adapter settings" window - select the network card, right-click and click "Properties".

- Before performing this step, read the notes below the screenshot. Select "Internet Protocol version 4" and click "Properties", fill in as shown in the picture.

P.S. If your local network is organized through a router with a DHCP server enabled - the IP address, the Default gateway and DNS Server can be left in automatic mode. This action must be done if you have two computers connected directly or DHCP is disabled on the router.
P.P.S. The value of the IP address must be different on computers within the same local network. That is, we specify IP 192.168.0.7 for this computer, and 192.168.0.8 for the next one.
- At this point, we begin to work with the folders that we will share on the network. I will tell you on the example of one folder, but you can open access to the entire local disk in a similar scenario.
First, we need to share the folder. It should be borne in mind that if the network is not limited to two computers (for example, some providers (Beeline) conduct the Internet in apartments on the basis of one large local network), it makes sense not to give the right to change the contents of the folder; if you are sure of the computers included in the local network, feel free to give "Full Control". So, open the properties of the folder we need, for this we right-click on the folder and select "Properties", open the "Access" tab and click the "Advanced settings ..." button.
- In the window that opens, put a checkmark "Share this folder", press the "Permissions" button and give the necessary rights to the folder; since this is an example, I give full access to the folder, but you put it at your discretion. That's what I did:

- Click OK to accept the changes, also click OK in the "Advanced Sharing Settings" window, then in the folder properties go to the "Security" section and click the "Change" button.

Next, we need to configure the visibility of the computer within the local network. To do this, go to the "Control Panel" - "Network and Internet" - "Network and Sharing Center" - on the left side of the window, select "Change advanced sharing options" and we will open profiles of sharing options. Here your task is that in all profiles you must enable "network discovery", and "file and printer sharing", and "sharing so that network users can read and write files in shared folders", as well as Disable Password Protected Sharing. We press to save changes.


The principle of creating a local network in any version of Windows (XP, 7, 8, 10) is practically nothing is not different... The exceptions are complex multi-layered corporate networks where multiple subnets, proxies and VPNs are used.
But in this article, we will look at how to create home network without resorting to buying expensive equipment, but using a regular switch or router with Wi-Fi support.
What is needed to create a network
First of all, to create a local network of a certain number of computers, we need equipment:
note: in the event that a direct connection will be used (i.e. we insert a twisted pair into both devices without using a router), then you will need not a standard cable, but cross— over unless modern network cards with MDI-X support are installed. In this case, the standard crimp method can be used.
How to create a local network
Now we proceed directly to the creation. First, we need to prepare:
- Install all the equipment in its place - computers, routers, etc.
- Crimp cable, if necessary.
- We do wiring, i.e. stretching the twisted pair cable to the equipment.
- We connect twisted pair equipment.
Costs note that when the connection is made and all devices are started, the connection connectors on the computers should shine... The same applies to routers with routers, only their bulbs are located on front panel... If any light is off, then the connection is made not properly.
When the connection is made, you need to configure the network in the operating system.
To start check working group, for which we go to the properties " Of my computer". You can not open properties, but use the combination Win+
R and enter in the window sysdm.
cpl.
On all devices working group must be is the same otherwise the computers won't see each other.
To change the group, just click on the button change and enter the name of the group. Name must be entered in Latin, and match on all devices. 
Then we look for network icon in the notification area and with its help we get to Network and Sharing Center.
Here we are interested in the link changing additional parameters, it is third from the left and will allow you to edit the sharing options. In each profile we select: Enable network discovery, auto-tuning and general access to files and printers. 
Scrolling page and below turn off shared access with password protection. All other settings can be left. Push Save change and exit.
This completes the setup. The network should work, but only if your router distributes dynamic addresses.
If a router was used, or the devices were directly connected with a cable, then a few more settings must be made.
Network settings
When direct connection or using a router, we need change ip-addresses of computers. For this necessary:

We will not describe what each setting is responsible for, since this is a fairly voluminous topic. It is enough to enter the addresses described above on all computers.
After making all the above settings, the network should work. However, keep in mind that a firewall or antivirus can completely block the network. Therefore, if nothing worked, check their settings or temporarily disable them altogether.
Local network via WiFi router
Setting up a network through a router is absolutely nothing is not different from what we described above.
If the device is configured to dispense dynamic addresses, the addresses do not need to be changed. Well, if the IPs static, you will have to use the previous section.
Also, there will be no difference between whether the device is connected with a cable or via Wi-Fi, in most routers the setting for the distribution of addresses is configured simultaneously and on wireless and on wired connection.
How to make shared folders
After everything is configured, you need to create shared folders to exchange information.
Setting up a local area network at home is not a whim, but a necessity if you use two or more computers. The main task of such a network is to connect PCs and create an opportunity for the user to conveniently use the resources of each of them, and not switch between computers. In this article, we will look at how to set up a local area network connection between computers.
For example, two devices will be used: a desktop computer based on Windows 7 and a laptop based on Windows 10. The list of instructions that will be in the article can be used on other Windows operating systems (8, 8.1).
Ways to connect computers on a local network
Today, you can connect via a local network through a router or directly. The first method is gaining popularity, and the second is already a relic of the past, although the time period has passed not so long. Let's consider schematically how the connection is made.
To begin with, let's consider the first scheme "directly". It only works when computers are connected to each other. Data transfer occurs in one direction only, i.e. either from the first PC to the second, or vice versa. At the same time, if one computer is connected to the Internet, then the second can be configured to provide it, but this is already inconvenient, because routers appeared.
Stationary computers are connected to the router, and mobile devices can receive data from the router or transmit it to it using a wireless network. Thus, using a router (usually they are immediately with a Wi-Fi access point), you can connect all devices in the house into one network and use the Internet from one access point, without interfering with each other at all.
We will now configure the local network according to the principle "through a router", therefore it is more convenient, more practical and more modern, and also not very difficult even for a novice user. How do I set up your router? Use the instructions from the manufacturer's website, now they are written very clearly and easily. Once you have configured your router, proceed with configuring your local network.
Please note that if you have been using the Internet through a modem for a long time, your stationary computer is connected to it, and the router is connected to the modem, you do not need to make additional settings. It is only important that a laptop or other PC is connected to the router using a wireless Wi-Fi network. Let's start configuring the network.
Setting up a local network on a stationary computer (No. 1)
To start using the local network, you must follow the instructions below:
- Go in "Start" - Control Panel - Network and Sharing Center ";
- Next, on the left side of the screen, select "Change advanced parameters ...";

- In this window, you need to put a checkmark in front of the items:
"Enable network discovery"
Enable File and Printer Sharing
Turn on sharing so network users can ...
"Use 128-bit encryption ..."
Enable Password Protected Sharing
"Let Windows manage homegroup connections"

- Push "Save changes"(it is important that you are logged in with “Administrator” rights);
- At this step, you need to join a homegroup, but we will create it on a laptop, so scroll through the article to the point, and then return here;
- When the password is received, you need to enter it in the required window. To do this, go to "Conductor", and then "Home group";
- Push "Join", put a checkmark in front of all components for which general access is provided and enter the password that was generated earlier (you had to write it down on a piece of paper);

- The password will be checked and the connection will start. Here you need to wait until everything is set up as needed;

- When the connection is completed, you will receive a message as in the window below, and if you repeat step 6, you will see the message "This computer is connected to a homegroup."


Setting up a local network on a laptop (# 2)
First of all, you need to do the same steps as on the computer number 1, namely points 1-4. Since we have Windows 10, to enter the "Control Panel", you need to go to "Search" and enter this request. After that, everything is done in the same way as with the first PC.
Now let's move on to creating a "Home Group" and further configuring the network:
Now, in order to make sure that everything works as it should, it is necessary to check the operability of the local network we have created, which we will now do in the next part of the article.
Checking network health
The main task of a local network, as we have already said, is the sharing of resources. Most often, such resources are faxes, scanners, printers, etc., as well as the files themselves on different PCs. We will not check the operation of the printer from different PCs, but this function should definitely become available after the above conditions are met.
Let's now check the network health using file transfer. To do this, let's create a shared folder on the laptop. Go to "Conductor" and then in "Net":
The computer named “Jenya” is our laptop, and the second computer “Evgeniy1” is the stationary one. By doing this, we have verified that the computers are indeed on the same network. Now go to Local Disk D and select a folder for public access, let it be, for example, "Abstract". Select it, press RMB, and then "Properties":
Therefore, you need to press "Access", and then "General access"... In the list of users, select the one who logs in to the system on computer # 1 under such and such a username. After that, you will receive a message that the folder is open for public access: 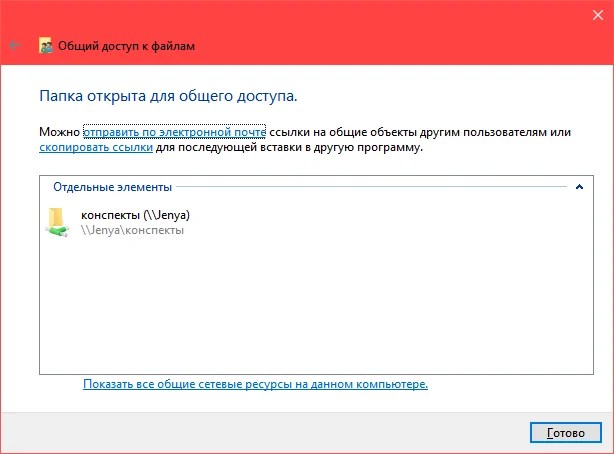
Now press again "Ready"... On computer no. 1, enter "My Computer" - "Network" and then select our Jenya computer. Now our folder "Summaries" has become available in the list of folders. It is important not to immediately go into this folder and check if everything was transferred - you need to wait about a minute after you closed the "Properties" window for the changes to take effect.
Windows 10 users sometimes get error 651 and the like when they connect. These are called "internet connection errors". This is due to the appearance of a software or hardware network failure ...


