Somehow I was faced with the question of buying a game TV set-top box for my children, but after some thought I decided to assemble a game computer just the size of these same set-top boxes - i.e. miniITX format. Firstly, games for PC are cheaper, and secondly, on PC you can play games for the game console that are not intended and that will never be released on consoles. In addition, I wanted the machine to combine the functions of a media server. Well, i.e. children to play with toys and watch cartoons / movies.
In accordance with this, I need a platform with a separate modern processor such as Core i3 / i5 and a modern discrete graphics card. The rest (hard drive, Wi-Fi adapter, remotes, joysticks, optical drive) to taste. No sooner said than done.
But, as it turned out, not everything is so simple. The last time I climbed into the system unit with a screwdriver was seven years ago and somehow I’m not very oriented in modern “iron” formats and technologies. As it turned out, assembling a miniITX computer turned out to be a non-trivial task with its own pitfalls. Looking ahead, I’ll say that I had to buy / change previously purchased components, work with a hacksaw and a file, and as a result I assembled two mini-systems - a gaming machine for children and a workstation for myself.
It is generally accepted that the lot of miniITX systems is HTPC and workstations that are undemanding to the graphics subsystem. Indeed, the assembly of a gaming machine causes some difficulties associated with the placement of a video card in the case and an optimal cooling system.
Any fool knows to start with a nutshell. Astrid Lindgren
Choosing a case
There are several types of cases for miniITX boards:- Barebone (these are square ones)
- Slim (thin cases with a thickness of 9-10 cm with the possibility of installing a low-profile video card)
- UltraSlim (thin cases up to 7 cm thick without the possibility of installing expansion cards)
barebones


Width 20-30 cm, length 32-36 cm, height 12-20 cm.
Perhaps the ideal body for our task. As a rule, a full-fledged ATX power supply with all the consequences is installed in such cases - active PFC, high efficiency, it can be replaced, since there are enough offers on the market. In such cases, you can install a full-sized video card and, as a result, more powerful compared to low-profile ones. In such cases, there are enough ventilation holes and it is possible to install a large low-speed fan inside, which has a beneficial effect on cooling during quiet operation. You can also install more than one hard drive.
The only negative is the size, or rather the thickness. Such a case can only be installed in one position and cannot be placed behind a monitor/TV or hung on a VESA mount. But on the other hand, you can put a cup of coffee and a saucer with cookies on it.
Let's look inside
Photo case Codegen SuperPower MX31-A1
Actually, everything that I wrote about above is present in it.
Choosing a video card
Pay attention to the space for the video card. The video card should not just be single-slot, but occupy exactly one slot. Most cards, although they are single-slot, take up more space due to the heatsink and fan. You can either look for an appropriate case, such as the more expensive Cooler Master Elite 120, or an appropriate graphics card, such as one of these:


ZOTAC GeForce GT 640 900Mhz PCI-E 3.0 2048Mb 1066Mhz 128 bit, XFX Radeon HD 7750 800Mhz PCI-E 3.0 1024Mb 4500Mhz 128 bit, InnoVISION GeForce GT 630 810Mhz PCI-E 2.0 1024Mb bit 3200Mhz respectively.
The developers of these video cards require the installation of a 400-watt power supply, which is quite feasible in the form factor of Barebone cases.
Slim Desktop Enclosures


Width 20-30 cm, length 32-36 cm, height 9-12 cm.
Similar in size to Barebone, only slightly thinner. This format already imposes some restrictions on us. Only low-profile graphics cards can be installed. Power supplies here, as a rule, are TFX 8cmX8cmX15cm or Flex 8cmX6cmX15cm with lower power than ATX (usually no more than 300 watts). The advantages include a smaller size than the Barebone and the ability to install both horizontally and vertically (usually, legs for horizontal installation are included). With a horizontal installation, you can no longer put a cup of coffee, because the ventilation holes will be blocked.
What's inside
Case photo IN WIN BP659
Cooling problems are immediately visible. The PSU fan blows into the case, and the vent on the opposite side is blocked by the graphics card. The case fan only cools the hard drive. Vertical installation is possible only on legs, otherwise the ventilation hole for the video card will be blocked. Be prepared for the case to heat up under load.
There are also cases in which the power supply is located not on top, but on the bottom, and the video card is located directly above it. For example Foxconn RS-224.
Also, some inconvenience can cause the use of a drive when the case is installed vertically. In some cases, a slim drive can be installed (Winsis Wi-08) 
Choosing a video card
We are also narrowing down the range of suitable video cards. The video card must be low profile and occupy one slot. Compared to full-sized video cards, such video cards are less powerful.


Point of View GeForce GT 630 810Mhz PCI-E 2.0 1024Mb 1066Mhz 128 bit MSI Radeon HD 6570 650Mhz PCI-E 2.1 1024Mb 1800Mhz 128 bit
Manufacturers of these video cards require a 300-watt power supply, which can already cause some difficulties, since a 300-watt power supply is the exception rather than the rule for this case format. In fact, even if the power supply works with an efficiency of 70% (~200 watts), this power will be enough for the normal operation of the machine:
- Intel Sandy Bridge processors consume 65 watts
- Intel Ivy Bridge processors consume 55 watts, and below 2900 MHz - 35 watts
- Video cards on the first two presented chips consume 65 watts, less powerful on the GeForce GT 610 chip - 35 watts
- Memory, fans and hard drive together ~20 watts
Ultra Slim Enclosures


Width 20-30 cm, length 20-34 cm, height 6-8 cm.
Cases of this type are smaller and lower than the previous ones. First of all, due to the fact that their main purpose is HTPC based on integrated CPU and GPU and workstations / thin clients. It is these cases that can be hung on a VESA mount on a monitor. These cases are not designed for the use of expansion cards (video cards) and picoPSU with a power of up to 90 watts act as a power supply. But there are instances with ATX-blocks with a power of 150-250 watts. As a rule, such power supplies have their own format and in case of failure it will be necessary to completely change the case. Due to the small size of the power supplies (~7cmX7cmX10cm), there is no need to talk about any voltage stabilization and high efficiency.
What's inside
Case photo LinkWorld LC-920-03B
Given the small size of the case, the cooling system looks very good. Air flows from the power supply do not pass through the case, but are blown down. Due to the upper and lower openings, when installing fans in them, the case will be very well ventilated. There is only a small problem with cooling the hard drive. The processor requires a low-profile cooling system.
Choosing a video card
Since there is no way to install a video card on a regular basis, we will have to resort to the services of a hacksaw and a file, and we will also need additional devices. With proper skill, the video card can be placed parallel to the motherboard through a flexible or angled riser.

To implement such an idea, you will need to choose a motherboard with the top location of the processor socket.


Unfortunately, with this approach, the video card blocks the southbridge heatsink, which makes it difficult to cool. When using a hard corner riser, the graphics card can be positioned lower under the motherboard, after moving the power supply to the right. If this succeeds and the power of the power supply allows, then you can also plug in a more powerful video card that occupies more than one slot. In the presented layout, only the compact ZOTAC GeForce GT 610 810Mhz PCI-E 2.0 1024Mb 1066Mhz 64 bit card will fit (photo above).
Is it possible to do without a discrete graphics card at all?
If you really want, you canThe graphics subsystem of modern Intel and AMD processors is quite capable of handling most modern games at low and medium settings at 720p resolution. You can also pay attention to motherboards with an integrated discrete graphics card. At the moment, it is the only one - ZOTAC Z68ITX-B-E with a discrete integrated graphics processor NVIDIA GeForce GT 430 for the LGA1155 processor. Intel Ivy Bridge support is available after flashing the BIOS. 
Instead of a conclusion
Performance and picture quality in modern games are quite subjective characteristics. Someone feels comfortable with the minimum settings and screen resolution, someone accepts only the maximum quality and performance. Of course, the solutions presented here are very much inferior to powerful gaming machines, but each of them is quite efficient for its own conditions.P.S. Used photos from Yandex.Market
Task: to assemble a small-sized home server with four 3.5-inch HDDs, as quiet as possible. It will serve as a NAS, backup server and torrent downloader.
Solution :
First, it was necessary to choose a motherboard. The standard options are mATX and Mini-ITX, both of which I have tried before.
The mATX form factor was rejected right away, it will not work with small efforts to make it compact. Existing cases for mATX boards are not designed for 4 disks, they usually put bad and noisy power supplies. It is difficult and expensive to make a compact and quiet power supply for such a system, since the power consumption will be more than 150 watts.
The Mini-ITX form factor gives you more freedom of choice, including low-speed Atom and Celeron processors, peppy mid-range Athlon processors, and powerful Core 2 Duo/Quad processors. The price varies greatly, but Atom is enough for my tasks. Such boards consume little power, take up little space and are usually not much inferior to mATX boards in terms of the number of functions. There are also disadvantages here: high prices, a slightly smaller number of connectors, a small selection.
Unfortunately, the choice of Mini-ITX boards on the Russian market is less than abroad, but this should not be surprising, given their low popularity. A good assortment is presented on Yandex-Market and in some companies specializing in small form factors. Here it is worth noting Anteks and Onyx (aka dont.ru). On foreign sites (linitx.com, mini-itx.com, idotpc.com) the choice is much wider.
I didn’t find a suitable low-power board with 4 SATA connectors, and I didn’t want to buy a sata controller with two and a separate one, the only PCI slot can still come in handy for something more useful, such as a Wi-Fi adapter.
I also wanted to make a home router out of a computer, so I was looking for a board with two ethernet connectors.
The choice was, although not great, but after googling, I found an excellent board with a dual-core Atom processor, a PCI slot, two ethernet connectors and, lo and behold, four SATA connectors. A great option: a low-power, but not quite weak processor, a full set of necessary connectors and just one fan.
Now I had to choose a body. For 4 hard drives, there was only one case, Chenbro ES34069, which looks as excellent as the board found, but quite expensive. After reading the forums, it turned out that he does not differ in silence.
Well, let's move on, you can buy another case and make room for 4 disks in it. At that time, I could only imagine how to place the disks, but this did not frighten me. After a thorough search, two small cases of suitable capacity were found: AOpen S180 and CFI GROUP CBI-A8989TG. Both resembled the cases of the first bareborn systems. According to the calculations, both were suitable, but I decided to take the case from Aopen, which was a little higher so that there was room in reserve. Subsequently, this decision turned out to be the only correct one, since everything would not have been packed so well in the second case. But first things first.
The power supply in the purchased case turned out to be extremely noisy and I decided to look for an alternative. Power supplies for Mini-ITX systems usually consist of two components - a power adapter, like laptops, and a converter board. The board converts the voltage output by the unit, usually 12 volts, into the required 3.3, 5, 12, -12 volts. According to calculations, the system had to consume up to 100 watts at the peak. The range of such fanless power supplies turned out to be very small. In Moscow, it was impossible to find a board and an adapter with an output power of more than 80 watts. Adapters 220 - 12 Volts with a power of 100 watts or more in Moscow are piece goods, trips to the markets and searches on the net yielded almost nothing. Only one company offered to bring a 120-watt power supply, but in an incomprehensible time frame. There was also a single board for 120 watts, also to order and in an incomprehensible time frame. I had to look on the foreign Internet. German and American stores offered such kits, there was even a good selection, but at a price of about $ 200 with delivery. Then I paid attention to automobile converters, in fact the same boards, only designed for floating automobile 12-24 Volts, and not stable 12. For such boards, it is much easier to find a power supply, because any from a laptop with a power of 100-120 watts will do. I had a power supply, and I found a similarly priced option on eBay. Great, I just had to wait for it in the mail.
Hard drives were chosen from the Barracuda LP series, they are cheaper and less heated than older 7002.11 and the like. However, during the tests it turned out that under loads they still heat up a lot and they would not be hindered by forced cooling. Between the disks it was necessary to make gaps for the free passage of air.
The purchased case had an iron carriage for attaching one 5-inch and two 3.5-inch devices. It was not possible to fix 4 disks on it well. But this task was perfectly handled by a metal carriage designed to install four drives in three 5-inch bays, which was presented to me by a friend. There was a place on it for attaching a fan; when installing disks, there were gaps between them, sufficient for blowing through.
In Leroy Merlin, there were iron corners and screws suitable for fixing the carriage in the body. The adapter board was fixed on specially soldered metal racks. The power supply that came with the case was removed, on the back wall of the case, in the place where the power supply fan and the 220 V connector howled, an impressive empty space formed, which had to be closed somehow. Using metal scissors, I carefully cut out a patch from a sheet of aluminum and attached it to the case. Now I had to make a tricky MOLEX-4 SATA power cable, since the power supply had only one molex connector. 20-pin power cable connecting mat. I soldered the board and the power converter from the cable from the old power supply.

The motherboard supported PWM fan speed control, and to purge hard drives, you had to buy a quiet fan, I had to go shopping and buy one PWM fan and one quiet one with a special resistor that slows down its slow rotation even more. I removed the regular fan on the motherboard radiator, deciding that the fan on the case would be enough. It turned out that one cooler blows on the disks, the second one drives this air out of the case, simultaneously cooling the processor and chipset. During the tests, the processor overheated and I came up with the idea of building a semblance of an air duct from a sheet of plastic. The drawing was brought up for several days, made out of paper, and as a result, with the help of scissors and glue, it was turned into a plastic casing for a radiator on a mat. board.
The easiest task was to buy memory. :) For the system partition, I bought an 8 GB flash drive and soldered an adapter to it to connect to the internal connector on the mat. board. The OS was installed on a USB flash drive, the computer was assembled. As a result, I assembled a quiet computer, where everything turned out to be quite compact, there was really little free space inside.
Now he is running Ubuntu 9.10, backups are made using snapback2 + rsync.


Final estimate
small test
Here are the results of unixbench and, for comparison, the results of tests of a desktop computer (Athlon X2, 2 cores, 2.5 GHz, 2 GB RAM) and a server based on Xeon 5500 (8 cores, 2.5 GHz, 48 GB RAM).
Results
I found the cheapest NAS for 4 disks on Yandex Market for 14,000 rubles (without disks). My computer came out a thousand rubles cheaper and certainly more powerful and functional. Of the minuses - a lot of time was spent, it was not easy to find details in my case, and, let's add here the risks of buying goods from abroad by mail.Thank you for your attention!
⇡ You can't (always) buy this in a store
Sentry is far from the only project to create a computer case using Indiegogo and Kickstarter crowdfunding services. At one time, such developments as DAN A4-SFX, NCASE M1 and NFC S4 Mini achieved resounding success. Carrying out successful campaigns allowed not only to release several small batches of exclusive products, but also to establish mass production. The same DAN A4-SFX can be purchased in online stores in Germany and England, and NCASE M1 and NFC S4 Mini can be ordered online on the official websites of these devices. A similar goal is pursued in Dr Zaber. After the completion of the crowdfunding campaign and the distribution of all purchased samples, the manufacturer plans to begin full-fledged mass production.
|
|
|


So it turns out that basically enthusiasts are trying to create as compact devices as possible. Because it's interesting to assemble a powerful gaming PC in a metal "box" with a volume of 7-10 liters. Sentry is positioned by the manufacturer as a Console-sized gaming PC case (case for a gaming PC the size of a console). Therefore, the device is compared with modern game consoles Xbox One and PlayStation 4. As you can see, Sentry is quite comparable in size to Xbox One.
| Name | Dimensions, mm | Volume, l | |
|---|---|---|---|
| 10 | NCASE M1 | 160×328×240 | 12,6 |
| 9 | SilverStone Raven RVZ02 | 87×380×370 | 12 |
| 8 | Fractal Design Node 202 | 82×377×330 | 10,2 |
| 7 | DAN SFX-A4 | 112×327×205 | 7,2 |
| 6 | Xbox One | 80×343×263 | 7 |
| 5 | 66×340×310 | 6,9 | |
| 4 | PlayStation 4 Pro | 55×327×265 | 4,8 |
| 3 | PlayStation 4 | 53×305×275 | 4,5 |
| 2 | Xbox One S | 51×295×228 | 3,4 |
| 1 | PlayStation 4 Slim | 39×288×265 | 2,9 |
In retail you will find a large number of compact cases. The table includes such popular models as the SilverStone Raven RVZ02. However, Sentry claims to be the smallest case that can still hold a full-fledged video card.
|
|
|
|
|
Dr Zaber Sentry vs Xbox One |
Dr Zaber Sentry vs PlayStation 4 |


⇡ Characteristics, design features, compatibility
The Sentry is a typical Slim Desktop form factor case. Such devices are well-deservedly popular for two reasons. First, they can be positioned both vertically and horizontally. The first option is well suited if the system unit will stand next to the monitor. The second option fits perfectly into the console concept, when the PC is located in a niche under the TV. Secondly, as I said, many Slim Desktop cases support the installation of full-fledged discrete graphics cards.

Sample number 179 came to me straight from Poland - at least, the plate with this number flaunts on the back wall of the case. The full list of Sentry characteristics is given in the table.
| A type | Slim Desktop |
| Dimensions (H × W × D), mm | 340×66×310 |
| Weight, kg | 3.5 (with stand) |
| Color | Black or white |
| Material | Galvanized steel, 1 mm |
| Regular cooling system | Not provided |
| Drive bays | Up to five 2.5"" |
| Expansion slots, pcs. | 1 |
| Motherboard compatibility | Mini-ITX (170×170mm) |
| I/O ports | 2 x USB 3.0 Type A |
| Power supply support | SFX, SFX-XL |
| Maximum length of the power supply, mm | 130 mm |
| Maximum CPU cooler height, mm | 47 mm |
| Maximum video card length, mm | 305 mm |
| Price | $222 (including shipping) |

The case arrived in a small cardboard box. You know, some gaming laptops with 15.6-inch screens have bigger packaging. The manufacturer did not deceive: Sentry, with its size, really easily fits in a backpack. I don’t know if LAN parties are still practiced among enthusiasts, but a system based on this case will be an excellent “camping” desktop. This is the goal set, in particular, by the developers of the NFC S4 Mini.

In addition to the case itself, in the cardboard box I found a complete set of fasteners, a stand for mounting the Sentry in a vertical position and legs for installing the device in a horizontal position, a flexible cable for connecting a video card, frames for mounting 2.5-inch drives, a cable with two USB 3.0 A-type connectors, as well as step-by-step instructions for assembling all this stuff into a single whole.

In a horizontal position, Sentry rests on four rubber feet, which are inserted into special grooves on one of the side walls. In the vertical - on a special stand. There is also a third installation method - wall-mounted.

Most of the screws have a 2 mm hex socket - a small L-shaped wrench for them comes with the case. I understand that the use of this fastener makes Sentry brutal and even more attractive, however, it is not very convenient to work with a thin imbus key, and after all, the power supply, the motherboard, and the video card are fastened with hex screws.
|
|
|


The appearance of the Sentry, by the way, is not for everybody. I like it because the case design is simple and strict. Campaign participants could choose one of two colors - in addition to the black modification, white was also available. In my opinion, the black version of the Poles turned out to be more practical. Only metal is used in the design of the device, namely millimetric galvanized steel, coated with structural powder paint. It should be noted that Sentry strongly resembles the NFC S4 Mini.
Both side panels of the case are perforated. On one side there is a ventilation grill for the video card, on the other - the motherboard and power supply.

There are also perforations on the top and bottom of the case. The use of the “colander” format design is quite justified: the dimensions of the device are small, but I want to install the hardware more powerfully. Looking ahead, I will say that after almost two months of using the Sentry, there was practically no dust accumulated in it.
On the front panel there is only a round power button (during operation, the key rim is highlighted in red) and two USB 3.0 connectors. I think not everyone will be satisfied with such a set of ports. At a minimum, the front panel requires a pair of 3.5 mm mini-jacks for connecting a microphone and headphones.

The USB ports on the front panel are connected with a detachable flex cable. This is done on purpose, because the pre-attached wire will complicate the process of installing the power supply.

Sentry is qualitatively "tailored" both outside and inside. Since we are dealing with a Slim Desktop case, all components are located in the same plane, but there is a separate section for the video card, its own section for the motherboard and power supply, and 2.5-inch drives (as a rule, only this format is supported). storage devices) are installed either in special baskets on top, like in Sentry, or in a separate "", like in Fractal Design Node 202.

Slim Desktop is a fairly versatile size for assembling a compact system unit. Cases of this form factor are perfect for creating a gaming PC, and for an office "typewriter", and for a small workstation. For example, Sentry allows you to install up to five 2.5-inch drives. To do this, however, you will have to abandon the use of discrete graphics and a 130 mm long SFX-XL power supply. Together with a video card up to 200 mm long, you can place up to three 2.5-inch memory. That is, Sentry can also act as a media center. When installing a longer 3D accelerator, only two drive slots remain available when using an SFX unit up to 100 mm long.
|
|
|


The length of the video card must not exceed 305 mm. Only dual-slot graphics adapters are supported. Initially, I planned to install two 120 mm 15 mm fans between the side wall and the 3D accelerator (to make the video card work more comfortably), but the idea turned out to be unsuccessful - there is sorely not enough free space in Sentry.

The device also has restrictions on the height of the installed graphics adapter. This file contains a large list of supported graphics cards. For Slim Desktop cases, I recommend taking the reference model, that is, a video card with a blower-type cooler.
The height of the CPU cooler must not exceed 47 mm. As a result, knowing all the limitations that Sentry has, you can start selecting a configuration for testing and assembling the system.
⇡ Assembly features and iron selection
In 2017, mini-PC fans have something to “profit”: at the time of writing, four platforms were considered relevant at once: LGA1151 for Skylake and Kaby Lake processors, AM4 for Ryzen processors, LGA2011-v3 for Haswell-E and Broadwell-E processors, LGA2066 for Skylake-X and Kaby Lake-X processors.
In fairness, I note that two of the four platforms do not offer a wide choice of motherboards. So, for Haswell-E / Broadwell-E (LGA2011-v3) and Skylake-X / Kaby Lake-X (LGA2066) processors, you will find only one motherboard for sale - both from ASRock. The most common, most proven, and perhaps the most successful option for a compact gaming PC is the LGA1151 platform for Skylake and Kaby Lake chips. Not so long ago, I studied the possibilities right away, with the help of which you can, among other things, overclock the central processor.

It's nice that with the release of Ryzen processors, AMD has also returned to the "big game". On sale you will find several mini-ITX boards for the processors of this company at once, which are suitable for our purposes. There will be no problems with choosing a cooler for socket AM4 either.
In the comments to the reviews of such cases, they often ask to build the most productive configurations on the basis of such devices. The desire is understandable, since the small size of the cases imposes its own limitations. Let's try. Back in January, I decided to build a gaming system based on Sentry with a 10-core Core i7-6950X, 32 GB of RAM, two SSDs and an NVIDIA GeForce GTX 1080 Ti.

There is only one mini-ITX motherboard for Haswell-E and Broadwell-E processors on sale - this. Therefore, we have to put up with all its design features. For example, the use of a server-type LGA-2011-v3 processor socket (Narrow ILM), coupled with the small size of Sentry, imposes serious restrictions on choosing a processor cooling system - there are not many coolers up to 47 mm high equipped with appropriate fasteners on sale. There was an option to use a maintenance-free water cooling system, but it disappeared due to the desire to install the GeForce GTX 1080 Ti. As a result, my choice fell on the Dynatron T-318 server model. This is an all-copper radiator, in addition equipped with an evaporation chamber. According to the manufacturer, the cooler is capable of removing up to 160 W of heat from the chip, but something tells me that we are talking about CPU cooling in a well-ventilated server rack, and not a 7-liter compact case.

In addition to the Dynatron T-318, a fan had to be chosen. Initially, I planned to test several impellers at once, and then choose the most suitable option, but in the end only the Prolimatech Ultra Sleek Vortex 12 model with a thickness of only 15 mm fit into the case.
In principle, there were no problems with the choice of other components. Sentry can easily fit any SFX format power supplies. A video card in such systems should be used with a Blower-type cooler, since a tangential fan blows heated air out of the case better.
Not so long ago on our website came out on self-assembly of the system unit. In the material intended mainly for beginners, I used components of the classic ATX size. In the case of Sentry and similar cases, you will have to choose hardware more carefully, but the principle of assembling computer devices remains practically the same.

The assembly algorithm looked like this:
- Installing the CPU, cooler, RAM and M.2 drive on the motherboard.
- Installation in the power supply housing.
- Installing the motherboard in the case.
- Connecting to the motherboard all cables from the power supply, case and drives.
- Connecting a flexible PCI Express x16 cable for a video card.
- Installing a SATA drive.
- Installing a video card.
- Installing a Prolimatech Ultra Sleek Vortex 12 fan.
As you can see, there is nothing difficult, however, during the assembly, I encountered two points. Firstly, the length of the 24-pin Corsair SF600 power supply cable was not enough. When designing the X99E-ITX / ac, ASRock engineers for some reason placed the connector on the top of the board, while it is usually soldered on the right side in mini-ITX motherboards. In the same place, as a rule, there are two DIMM slots for installing RAM modules. As a result, I had to use a 30 cm BitFenix Alchemy 24pin extension cable. Secondly, the ASRock X99E-ITX has an unfortunate location of the internal USB 3.0 connector. Again, its place is closer to the right edge of the PCB. In the case of Sentry, I had to connect the USB cable from the case through an adapter to the internal USB 2.0 port. Otherwise, a 120mm fan would not fit.

The Prolimatech Ultra Sleek Vortex 12 itself had to be installed on the Dynatron T-318 with the help of materials at hand, since no fastening system is provided. I managed to “fun” the impeller with the help of the greatest invention of the 20th century - adhesive tape.
It is interesting that in Sentry (and in another Slim Desktop case) it is quite possible to install a single-section CBO. True, in this case, you will either have to abandon a discrete video card, or use a short graphics accelerator. In the photo above, a Radeon R9 NANO with a length of 152 mm is installed in the system. The remaining space is occupied by the dropsy radiator.

MARCO CHIAPPETTA. Mean and green: How to build a quiet, efficient gaming PC. PC World
A fully assembled system unit has enough resources for future upgrades in terms of both physical space and power supply.
Any gamer dreams of owning a killer PC, but high-end components tend to take up a lot of space, generate a lot of heat, generate a lot of noise, and consume power faster than a thirsty teenager emptying a Coca-Cola bottle.
But modern processors allow you to build a fast system that will only make a barely audible rustling and have high power efficiency. And you don't have to rob a bank to do it. Here's how we did it.
Selection of components
When choosing, we took into account two main factors: energy consumption and noise level. Typically, components that consume less power require less cooling and therefore produce less noise. Therefore, where possible, we decided to look for components with reduced power consumption.
Frame
The case should also emit a minimum of noise. We stopped our choice on the NXZT H230 model worth 3600 rubles. The mid-tower case has two rather quiet fans and sound-absorbing side panels. The H230 is equipped with bays for three fans. To maximize air circulation, we removed another 120mm fan from the Fractal Design case.
.png)
The body of the NXZT H230 has sound-absorbing side panels.
Processor and cooler
The fourth generation of Intel Core processors, developed under the code name Haswell, is characterized by both a high level of performance and moderate power consumption. We decided to stop at the Intel Core i5-4670 model worth 9,000 rubles.
To reduce the noise level, it was decided to give preference to a quiet cooling system that uses an efficient radiator, complemented by a low-speed fan. The best offer for the price was the Xigmatek Prime SD1484 model costing about 1600 rubles. We chose her.
.png)
The massive Xigmatek Prime SD1484 heatsink reduces noise levels.
Motherboard and RAM
We wanted to equip our computer with a high-quality motherboard with passive cooling (again, to reduce noise levels). A good option for the price was the Gigabyte Z87X-UD3 model, offered for 6000 rubles.
Next, we looked for a dual-channel set of two DDR3-1600 memory modules with a total capacity of 8 GB with low power consumption. The maximum officially supported by the Haswell processor is 1600 MHz memory, and 8 GB is enough for most tasks. G.SKILL Sniper 8 GB bundle for 3400 rubles. requires a supply voltage of 1.25 V, which is significantly lower than the typical 1.5 V for equipment of this kind.
.jpg)
A good option for the price was the Gigabyte Z87X-UD3 model, offered for 6000 rubles.
Quiet and high-speed storage subsystem
There were no particular difficulties with choosing a solid state drive, but the 512 MB Crucial M550 model, sold at a price of 12,500 rubles, became one of the most expensive computer components. Solid-state drives have no moving parts, so they make less noise and use less power, and they're also much faster.
.png)
The ideal gaming PC should have a very quiet SSD.
Graphics board
We opted for the highly energy efficient NVIDIA Maxwell microarchitecture. The recently introduced EVGA GeForce GTX 750 Ti FTW with ACX cooling comes with two large but quiet fans. To increase performance, the video card has undergone overclocking.
.png)
NVIDIA GTX 750 Ti graphics card worth 5600 rubles. is very quiet, consumes little power and supports 1080p gaming.
Power Supply
The CPU and graphics card we chose combined consume less than 150W, so we decided on a 400-500W PSU with a large, quiet fan. The EVGA 430W 80 PLUS Certified model, which sells for under $1,500, leaves room for future upgrades.
.jpg)
We decided to stick with a 400-500W power supply with a large and quiet fan.
Together
There were no difficulties with the assembly of the system. The processor, graphics card and RAM are installed only in the connectors intended for them, and it is impossible to make a mistake here. The case contained the motherboard and drives, leaving enough free space for cables. We installed a fan on the front of the case, added a purchased cooler, and connected the cooling fans to the motherboard.
Follow our PC build guide and CPU cooler installation guide and you'll get it right the first time.
.png)
Proper cable management ensures good ventilation and a clear view.
listening to the silence
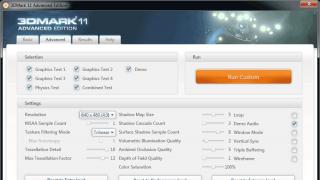
We tested system performance by monitoring power consumption and noise levels. In general, the performance was quite good. The relatively fast CPU, discrete graphics card and SSD helped the system score 7200 in PCMark 7, putting it ahead of many industrial assembly competitors.
The results of the 3DMark graphics test and Cinebench R15 CPU and GPU tests also turned out to be quite good, especially in the OpenGL test. The system handles games well at 1080p. It is especially pleasing that it continues to work quite quietly even under a decent load.
The power consumption of the computer, taking into account its high performance, also turned out to be at the level. Even under high load conditions, it did not exceed 144 watts.
The system cost us a lot, but it's fast, quiet and consumes moderate amounts of electricity, providing high performance without sacrificing environmental friendliness.
System cost breakdown
- Processor: Intel Core i5-4670, 9000 rub.
- CPU cooler: Xigmatek Prime SD1484, 1600 rubles.
- Motherboard: GigabyteZ87X-UD3, 6000 rubles.
- RAM: G.SKILL Sniper 8 GB (2x4 GB, DDR3-1600 with reduced supply voltage), 3400 rubles.
- Storage Subsystem: Crucial M550 SSD, 512 GB, RUB 12,500
- Graphics card: EVGA GeForce GTX 750 Ti FTW with ACX cooling, 5600 rub.
- Power supply: EVGA 430W 80 PLUS Certified, 1450 rubles.
- Optical drive: Samsung DVD-R, 800 rubles.
- Case: NZXT H230, 3600 rubles.
- Fan: Fractal Design Silent Series R2, 120mm, 350 rubles.
- Operating system: Windows 8.1 OEM, 3000 rub.
Total cost: 47 300 rub.
conclusions
System worth 47,300 rubles. It's not cheap, but you can save a lot of money by installing a smaller SSD, a cheaper motherboard and cooling system, and an older generation graphics card.
.jpg)
Tests have shown that due to the presence of a fast processor, discrete graphics card and solid state drive, our gaming PC has a very good performance.
Since I checked the performance of the stand in advance, it remains only to measure the temperatures of the central and graphics processors in the assembled form, as well as to fix the noise level of the system as a whole. Testing showed that the Radeon R9 Nano in the case turned out to be too ... stuffy. Apparently, the 85-mm fan of the video card does not suck air well through the grill on the side of the Elite 110. Without any intervention in the final assembly design, FurMark managed to keep the GPU temperature in the amount of 74-76 degrees Celsius by increasing the speed of the adapter impeller to 2900 rpm min (60% of maximum). In this mode, the PC I assembled was very noisy. The situation was corrected by installing an 80mm Noctua NF-R8 PWM case fan on the side wall of the case, coupled with a hard speed fix using ASUS software. As a result, the GPU heating indicators on the open stand and in the assembled form are almost equal. In games, the assembly began to work much quieter.
Under the load of LinX 0.6.5, the temperature of the central processor also increased noticeably. Everything is within acceptable limits, but an increase of almost 12 degrees Celsius directly indicates a flaw (savings?) of Cooler Master engineers. When installing a CBO that works on blowing, the body clearly lacks superchargers that operate on blowing. I suppose that air coolers of the Noctua NH-L12 and Thermalright AXP-100/200 level, coupled with a 120-mm Carlson case that blows air into the Elite 110's chambers, will perform better. In any case, the load that LinX 0.6.5 puts on the CPU is very high. Real applications and games are not capable of this. Plus, do not forget that the Core i5-6600K is overclocked to 4.2 GHz.