If the BIOS crashed on your PC or laptop, then this is by no means a reason to panic, although, of course, this situation cannot be called very pleasant. Nevertheless, in many cases, you will be able to cope with such a problem on your own and restore the performance of your PC or laptop without resorting to the help of computer specialists.
Suppose that you turn on the computer and instead of the usual picture of its loading, you see some kind of text error message, after which the computer stops loading. Or else you hear indicative of a BIOS error.
The first thing to do in this case is to restart your computer. Perhaps this error is associated with a failure of the BIOS, which occurred, for example, as a result of a power surge. If this method does not help, then this means that the problem really lies in some kind of hardware malfunction associated either with the BIOS itself, or with some other hardware component.
It should be borne in mind that not every error message that appears on the screen indicates a malfunction of the BIOS itself. Most of the time, text error messages are displayed when there is a problem with any other PC component, such as RAM, hard drives, or floppy drives. Read more about text error messages in a separate article. Therefore, you should carefully read the message displayed on the screen and check the hardware component mentioned in it.
However, if you see an error message that mentions BIOS (or CMOS), then it is most likely a BIOS-related malfunction. Also, in some cases, BIOS errors may be indicated by sound signals generated by the motherboard speaker. Information about which signals in which BIOS versions may indicate a BIOS malfunction can be obtained from the corresponding article on our website.
Solving problems with a crashed BIOS
If you are faced with an error, the source of which is indeed the BIOS itself, then first of all it is worth trying to reset the BIOS to its initial settings. There is a good chance that after resetting the BIOS to factory defaults, the BIOS error will disappear. You can read more about how to reset the BIOS settings and what you need to do in order to do this in the corresponding article on our website.
A BIOS error can often be associated with a discharged BIOS battery. Therefore, you should try to replace the battery with a new one. You can also read about where to find this battery and what you need to do to replace it in the article on our website.
But what if resetting the BIOS and replacing the battery do not help? Then you will have to resort to another method of restoring the faulty BIOS - to re-flash it. BIOS flashing is performed using a file containing the updated BIOS version. As a rule, a new version of the firmware can be downloaded from the website of your computer or motherboard manufacturer. There you can usually find instructions for the firmware itself.
As a rule, external media are used for firmware, on which the update file is written. The firmware itself is performed when the PC is rebooted. There are also programs that allow you to flash BIOS from under Windows without rebooting, however, in this case, most likely, they will not be useful to you, since, as a rule, in case of serious problems with the BIOS, the operating system cannot be loaded.
If all the methods described above did not help restore the BIOS to work, then you only have one thing to do - take the computer or motherboard with the faulty BIOS to a computer service center. Or purchase a new motherboard.
Conclusion
No computer is immune to problems associated with BIOS failure. And therefore, any user should know what to do in such a case, which is by no means pleasant. However, statistics show that physical failures of the BIOS chip are rare compared to failures of other components on the motherboard. Therefore, methods such as resetting the BIOS settings, replacing the battery that powers the BIOS, and flashing the BIOS on a PC or laptop in most cases will help to solve this problem. But if none of the above methods helps, then you have no choice but to take the computer to a service center.
Guess the riddle: it stands like a beehive hums. But smoke does not come from the chimney, because this is not a native plant, but a computer on which the BIOS is damaged. And he hums because he is only capable of this now. Without bios, it's just a bunch of lifeless iron. Is it worth worrying about this? Of course not. After all, now you have a great bedside table!
A system unit as a bedside table? Well, I do not! We know how to make it work. Today we'll talk about how to restore the BIOS if it crashed.
What leads to a BIOS flashing
In IOS and its "descendant" UEFI, which modern motherboards are stitched with, these are special computer programs necessary for the initial configuration and control of PC devices until the operating system starts. They are stored in special flash memory chips on the motherboard, one of which is shown in the picture above. It seems to be a good storage place, reliable, but sometimes the BIOS becomes uncomfortable there and escapes. More precisely, it gets damaged and stops performing its tasks.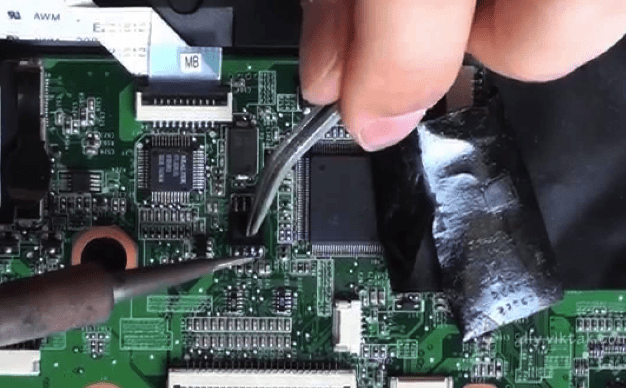
There are not too many reasons for damage to the BIOS, in some cases they are obvious, in others they are not. Here is a list of the most common ones:
- During a power outage of the computer.
- The flasher program (flasher) does not interact correctly with the firmware or flash memory microcircuit.
- The BIOS version is flashed, not suitable for this motherboard. Yes, .
- If the update is carried out from under a running operating system - a system failure or software interference, for example, antivirus blocking.
- Incorrect user actions, for example, restarting the computer before the update installation is complete.
- Failure of the flash memory chip.
- Hidden BIOS firmware errors. Sometimes this explains the spontaneous "gatherings" occurring for no apparent reason.
- Electrical problems on the motherboard.
How damage to BIOS is manifested
In most cases, the BIOS firmware is partially damaged, so the symptoms of a failure can vary:- When you press the PC power button, only the cooler turns on, which immediately starts rotating at maximum speed. Occasionally, the LED indicators on the case and keyboard light up.
- One or several seconds after switching on, a cyclic restart begins. Outwardly, this is manifested by a cycle of spinning up and stopping the cooler, which are repeated while the power is supplied.
- When turned on, the power indicator lights up, the cooler does not spin.
- The computer shows no signs of life. This happens when the boot block, the BIOS boot loader, is damaged. This is the most difficult case.
There is no image on the screen. Not even the manufacturer's splash screen appears.

There are other forms of BIOS damage, more precisely, its area, which stores the configuration of the ME controller (part of the chipset) on motherboards working with Intel processors - the so-called ME-region. If there is a problem in this area, a computer or laptop may:
- Incorrectly loaded or not included at all.
- Shut down or restart at regular intervals.
- It is incorrect to adjust the rotational speed of the cooler, for example, to turn it at high revs regardless of the load.
Elimination of such failures consists in reading the BIOS dump, replacing the ME-region with a clean one and re-flashing it using the programmer. Since this is usually done by repairmen, and not by computer owners, we will not dwell on this. Better to do something that can be done at home without special equipment and the risk of finally sending your "iron pet" to the kingdom of eternity.
BIOS recovery without a programmer is possible only if you save the bootloader. It is sometimes possible to determine whether it has survived or not by indirect signs: flashing of the screen backlight, sound signals from the system speaker, reaction of the motherboard to switching on without RAM (sound or flashing of indicators), etc. If the BIOS bootloader is intact, the first moments of work computers run normally, the failure appears a little later.
How to restore functionality to a motherboard with a failed BIOS
Asus
Many Asus brand desktop motherboards support USB Flashback, which is designed to quickly update and restore BIOS in case of failure. This does not require anything except a USB flash drive with a capacity of up to 4-16 GB and the BIOS file itself, which must be downloaded from the manufacturer's website from the section about your mother's model.After downloading, the firmware must be renamed. For example, the file "Sabertooth X79" (model name) is renamed to "SABERX79.ROM", the file "Sabertooth Z77" to "Z77ST.CAP". Information on how the firmware file for your model should be named is most likely on the Asus website, but if you don't find it, check it out on the forums or in support.
Next, save the renamed BIOS on a USB flash drive formatted in FAT32 and connect it to the USB port marked “ Flashback" or " ROG Connect". It is advisable to turn off the computer before this, this will increase the chance of a successful recovery.

After connecting the flash drive, turn on the PC and press the " BIOS". Hold it down for about 3 seconds until the indicator light on the board starts flashing. Blinking indicates that the file has been successfully read and is being stitched into memory. When the firmware process is completed, the indicator will turn off.
If your board is from the budget segment or not too new, that is, it does not support USB Flashback, most likely you can restore it in another way. If the computer is equipped with a floppy drive or optical drive, write the renamed BIOS file to the root directory of a blank floppy disk or CD, place it in the drive, turn off and then turn on the PC. The firmware will be completed when the drive indicator turns off. If there is no drive, use a USB flash drive.
Gigabyte
On Gigabyte motherboards with Dual (dual) bios, failures rarely occur, since in case of damage to the firmware in the main microcircuit ( M ain_ BIOS) the dump from the backup ( B ackup_ BIOS). As long as the main flash memory is functional and contains firmware, even damaged, the board remains operational.
Problems with starting the board with Dual_BIOS are possible in the following cases:
- The main microcircuit is missing or out of order.
- The microcode in the main microcircuit is completely erased.
- The contents of both microcircuits are damaged.
Some Gigabyte mothers are able to boot from the backup flash memory and use it as the main one. Another group of boards from this manufacturer uses a dedicated area on the hard disk as a backup media for BIOS. This is a less reliable option, but also better than nothing.
Restoring the Gigabyte BIOS from a backup is usually done automatically, but if this does not happen, try turning off the computer from the outlet, wait a little and turn it on again.
MSI and others
Most Micro-Star motherboards use a firmware recovery technology very similar to ASUS's - using a flash drive, floppy disk or CD. Copy the BIOS to a blank media, connect it to the PC, press the shutdown button for 4 seconds, hold down the combination on the keyboard leftCtrl +Home(or Alt +Ctrl +Home) and, without releasing the keys, turn on the computer. The beginning of the firmware process can be judged by the blinking of the flash drive or drive indicator.
BIOS on MSI board. On the right is the JSPI1 port for firmware on the programmer
On motherboards from MSI and some other brands that are more than 8-10 years old, the BIOS is flashed from a floppy disk. The instructions for AWARD and AMI BIOS are slightly different.
To recover the AMI BIOS, do the following:
- Rename the BIOS file downloaded from the motherboard manufacturer's website to AMIBOOT.ROM.
- Transfer it to the root of a blank floppy disk. Insert the floppy disk into the drive of the turned off PC.
- Press the left Ctrl + Home on the keyboard and turn on the computer.
To restore AWARD BIOS:
- Place the flasher and BIOS files on a floppy disk (usually downloaded in one archive).
- Create a text document on a floppy disk, which contains the name of the BIOS file with the bin extension. Rename the document to autoexec.bat.
- Further actions are similar to those given above.
By the way, some motherboard manufacturers post BIOSes on their websites only in exe format - in "one bottle" with a flasher for updating from under Windows. Sometimes it is possible to unpack such a file as an archive, but users often do not understand which of its contents is the firmware. There is no universal solution for such tasks. In order not to aggravate the problem, it is better to consult the specialized forums or the manufacturer's technical support.

On some boards, before restoring the BIOS, you also need to remove the real-time clock (RTC) battery from the socket or rearrange (remove) the clear CMOS jumper. It is important to clarify these points before starting the procedure.
Features of BIOS recovery on laptops
On laptops, like on Gigabyte boards, the BIOS is also often stored in two flash memory chips. But this is not Dual and it has no backups. Both chips contain different parts of the firmware, or one contains the main BIOS, and the other contains the multicontroller program. To prevent the device from turning on, it is enough to damage the microcode in at least one of them.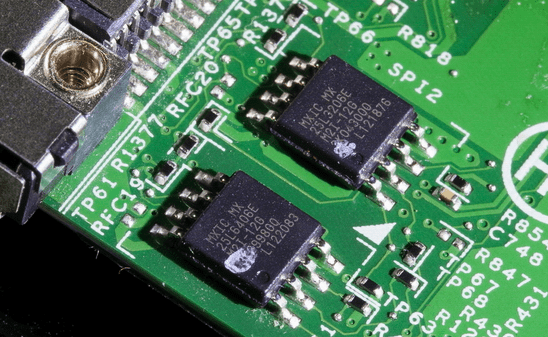
The recovery method for a failed BIOS on laptops is approximately the same as on desktops. The firmware file and the flasher program downloaded from the manufacturer's website (the latter is not always needed) are placed on a clean USB flash drive formatted in FAT32 / 16, connected to a de-energized device (just turning off the laptop is sometimes not enough, you need to disconnect the power supply and remove the battery), insert a charged replace the battery, turn on the device and hold down the key combination. Different laptops use different keyboard shortcuts for this, for example:
- Ctrl (left only or both) + Home
- Windows + B (this and other letters are in the Latin keyboard layout)
- Windows + F
- Windows + M
- Windows + Esc
- Fn + B
- Fn + F
- Fn + M
- Fn + Esc.
The main work is to unpack and rename the BIOS files. Again, there is no single rule. In most cases, you have to get the firmware from exe-files, but! Many manufacturers include BIOSes for different revisions of one platform or a whole series of platforms in their programs, and it can be very difficult to choose the only file you need. In order not to be mistaken, read the instructions for the firmware of your particular model and the platform revision on the specialized forums. And feel free to ask questions.
I deliberately do not include in the article instructions on how to restore BIOS's by flashing on a programmer with and without unsoldering, closing various contacts, hot swapping removable flash memory, etc., since all these methods are unsafe and require certain knowledge. However, among the readers, there are likely to be those who have done something similar on their PC and got good results. It will be great if you describe your actions in detail in the comments to the article. You are also encouraged to share negative experiences so that other readers can avoid mistakes thanks to you. In the comments, be sure to include the model name and revision of your motherboard, as well as the BIOS version you worked with.More on the site:
How to restore the BIOS of a computer and laptop if it crashed updated: February 5, 2018 by the author: Johnny mnemonic
Sometimes a computer owner is faced with the need to clean the system from various bugs that interfere with normal operation. This can be done by reinstalling the operating system or using special utilities. But there is a method that has several undeniable advantages over them.
Restoring the settings to factory defaults will help restore the device to working condition in most cases, even if you cannot start the OS. This method is especially relevant for those who do not want to waste time reinstalling the OS.
When restoring factory settings, the OS will be reinstalled automatically. You do not need to enter a second OS activation code. The version of Windows that came with the laptop at the time of purchase will be restored.
By rolling back the BIOS, you will fix the listed problems. In this article, we will look at how to return your laptop to factory settings and restore it to working condition. There are several ways that we will take a closer look.
 The option to reset the settings may be needed if:

What are factory parameters?
Factory parameters are set by the manufacturer for a specific model of a computer or laptop. They store BIOS settings and computer configuration parameters. Such information is located in the dynamic memory of the device, which is called CMOS.
All factory parameters take up very little space, and have a separate power supply - from a small battery located on the motherboard. You can reset the laptop parameters without access to the BIOS. To do this, just take out the battery, wait 30-40 seconds, and insert it again.

After the BIOS reset process is completed and the OS is reinstalled, you will receive the laptop in the state in which you bought it in the store.
It is worth noting that in order to successfully return the device to factory settings, in addition to CMOS, a Recover section is needed, which stores installation files and other necessary system information.
Video: Laptop Factory Settings
Where is Recovery and its activation
The hidden partition on the hard drive that stores all the files needed to restore the system is called Recovery. It is created by default on all laptops, and is deleted or damaged in most cases as a result of incorrect user actions.
You can see where the hidden section is located:

There you can also see the size that Recovery on HDD takes. Usually this is 20-25 GB of system information and installation files.
If you have a Toshiba laptop, then you probably already noticed that on the D drive there is a system folder called HDD Recovery. It also stores the information necessary to reset the system, so it cannot be deleted.

Activating Recovery launches the process of clearing custom BIOS changes, restoring factory defaults, and reinstalling the OS and system programs and drivers.
In order to activate Recovery, press a specific combination of hot keys. This will allow you to enter the system menu where you can select several options for system recovery. It should be remembered that each manufacturer has its own combination of hot keys, below we will consider the most popular.

Restoring settings with hotkeys
In order to restore your laptop to factory settings, you should memorize a few hotkey combinations. When booting the system, press hot keys to access the BIOS Setup menu, from where you can start the process of restoring the parameters.

Depending on the manufacturer of computer equipment, hot keys and their combinations differ:
- Toshiba - depending on the model, F8, or 0, or Fn + 0;
- Sony - F10;
- Acer - Alt and F10 at the same time;
- HP, LG and Lenovo - F11;
- Samsung - F4;
- Fujitsu - F8;
- ASUS - F9;
- Dell - Ctrl and F11 at the same time, but in some F8 models;
- Packard Bell - F10. If Windows 8 is installed, you can use the power button when you log in. Hold Shift and at the same time select the "Restart" menu item;
- MSI is F3 and on some models F11.
How to reset a laptop to factory settings via BIOS
Using hot keys, you can rollback custom system changes and reset the BIOS to factory defaults.
On the black screen that appears, select sequentially:
- option "Launching Recovery Center" for Sony, or "Troubleshooting computer problems" for Toshiba, or "System Recovery" for HP;
- menu item Load Defaults BIOS.

Depending on the manufacturer, the option name may vary: Load BIOS Setup Defaults, Load Safe-Fail Defaults", But the words "Load" and "Default" will be sure to attend.
Preparation
Prepare for a factory reset:

After you start the process of resetting the settings, the process of collecting information and preparing system files will begin. This may take a while, so don't worry.
Recovery process
After you start the recovery process, all actions will be performed automatically, without your participation. The computer can restart if required by the installed software. In the process of resetting the settings, the drivers for the devices will be restored and the standard system programs will be installed.
![]()
It is worth mentioning that it is not always possible to successfully reset the settings on a laptop. This is possible if:

What can you do if you removed the hidden Recovery partition from your hard drive? You will have to look for a bootable settings disk or a hidden partition image for your laptop. They can be found on the net, and sometimes manufacturers offer to buy such discs for system recovery on official sites.
If there are no ready-made images for your laptop, you can ask the owners of a similar model on computer forums to create such an image for you. And to avoid this situation, you can create your own bootable USB flash drive or DVD-drive for your laptop, which you can keep close at hand and use when needed. Details Last Updated on 02/27/2017 05:06 PM Published on 01/27/2017 01:15 PM Posted by nout-911
How to recover a laptop via BIOS: working solutions
Unfortunately, no OS is immune from a sudden crash, when this happened, users are interested in - how to restore a laptop via BIOS on one's own? Those who have already passed this path and know what the essence of all the difficulties is, feel themselves simply omnipotent. If the user thinks about this issue, it means that his affairs are very bad and about the usual recovery and we can not talk, since the OS does not boot at all.
Most often, when such a problem arises, not only a beginner, but also a specialist simply reinstall the OS. Of course, this is the easiest way out of such a situation, but why spend a lot of time reinstalling if there is a faster option.
How to restore a laptop via BIOS,
using DOS?
It is worth understanding that DOS is a relatively small OS, which is most often stored on a regular disk or flash drive. Once launched, this system gains full access to the management of all hard drives and access to the BIOS menu. Using a DOS system allows you to reanimate the operating system with minimal losses. Due to the possibility of low-level control, it is possible to make the necessary adjustments and correct operational punctures with pinpoint accuracy.
Common recovery methods:
1. Initially, you can use a disk image or a USB flash drive as an assistant. It is necessary to act in the following sequence:
- Take the disk with the OS that was installed on the laptop and insert it into the drive.
- You need to restart your laptop.
- With a frequency of 1 pressing per second, you need to press one of the buttons: "Delete", "F8" or "F2", which serve as an entrance to the BIOS menu.
- Once in the menu, you need to go to the "Boot" section (in different versions of microsystems, this menu may be called differently).
- As a bootloader, using the arrows, you need to install a floppy drive or USB flash drive.
- Save all changes.
When the laptop restarts, just select "System Restore" and proceed to recovery.
2. "Almighty" command line. Sometimes, this method is rightfully considered a real salvation. The command line allows you to fix basic errors in the hard drive, so that the system comes to life.
We reboot the laptop and press the BIOS login button several times, after which we perform the following actions:
- You need to select the line "Safe mode with command line";
- When you are transferred to the operating system environment, enter "rstrui.exe" into the command line and click "Next";
- All that remains is to choose the appropriate backup.
This procedure allows you to roll back to the working state of the system.
3. Recover laptop bios through safe mode... When rebooting the laptop, you need to press the "F8" key. From the list that opens, select the "Safe Mode" line. Based on the version of the operating system, this item may differ in name. It is designed to start the system with only the most essential functions.
When the system has booted, you need to:
- Go to the control panel through "Start";
- In the list you need to find the line "Recovery";
- In the window that opens, select "Start System Restore";
- From the list provided, you need to select a working backup and wait for the restoration to complete.
This recovery method is suitable for absolutely all OS versions, but with some peculiarities in Windows8. This version of the OS may simply not use "Safe Mode", as there is often program resistance. But, even in this case, there is a simple way out:
- Install a boot disk / flash drive;
- Select "System Restore" in the lower corner;
- Go to the "Diagnostics" area;
- We select "Additional parameters";
- And we get to the desired "Command line" by prescribing (bcdedit / set (globalsettings) advancedoptions true);
- Now, you need to exit the menu and select "Continue".
This method is considered very versatile for Win10 as well, and also a real find for those whose laptop is equipped with an SSD drive.
4. A rescue option for those whose laptop does not have a restore point, but there is an installation distribution of the operating system.
Procedure:
- At the first stage, you need to repeat the same steps as in paragraph 1;
- Choose "System Restore";
- At the next stage, we perform all the actions from the instructions, which helps to make the right choice during the entire installation;
Upon completion, everything will be restored, but with the exception of the previously installed programs. Unfortunately, they will have to be reinstalled.
The new Refresh Your PC feature for Windows8 deserves special attention. This function is simply a salvation and a real find for beginners, from whom a minimum of actions are required during the recovery process. In case of a critical error, the OS itself opens the recovery menu. By clicking on "Diagnostics" and "Restore" - the system will return to a fully operational state.
The system can also be restored from an archived image. Thanks to the built-in recimg utility, which very quickly creates an OS image and remembers its storage location. Next time, the system will be restored from this archive. Rating 5.00 Vote - support the service!
Hello dear readers.
Any computer is a complex system. Sometimes, during the operation of the device, some problems may appear related to the correct execution of its functions in an area such as the BIOS. There are several ways to solve this ailment - it all depends on the type of error. Later in the article, I will tell you how to restore BIOS on a laptop, depending on the type of problem.
Restore to factory settings
If suddenly the device has ceased to function normally, and you have a suspicion that the reason for this is incorrect settings in the area mentioned above, you can try to return them to the factory settings:
In most cases, this procedure helps. True, sometimes you can come across a simple error that does not allow the OS to start normally. It can be corrected simply:

If you have a password
Sometimes users may come across a situation where someone or they themselves have previously set a password for the area we need, and have safely forgotten it. As a result of several incorrect attempts, the device will simply stop functioning.

Then it is necessary to open the mobile computer itself. By the way, this method will help if it doesn't include:

Important! Before moving on, there are a few key points to clarify. So, in some laptops, for example, Acer Aspire, not two, but three contacts are provided. In this case, set the jumper to a different position and wait a few minutes.
In addition, sometimes you can find a special small button that performs the same function. You just need to press it with a pencil for a few seconds.
Another way out is to remove the battery, which supports all important data in memory. If you remove it, everything will be reset.
Recovery after firmware
If problems appear as a result of an unsuccessful installation of a new software version for the corresponding component, you need to perform a series of movements.


