Greetings, dear visitors of my blog! In this article I will tell you what a screenshot is, why it is needed and how to take a screenshot or pages in several ways, and you choose the method that suits you best. In principle, there is nothing complicated about this, but for a novice user this is certainly valuable information.
What is a screenshot
The word screenshot comes from the English skreenshot - a snapshot of a page or computer monitor screen, or video fragments.
With that what is a screenshot, it seems we’ve figured it out, but what is it needed for? Well, everything is simple here too.
For example, on this blog, screenshots are constantly used to make it easier to explain certain nuances in the article and it is much easier for the reader to absorb information where everything is clearly shown in the picture.
They are also actively used on forums and when contacting any support service to clearly show the essence of the problem.
Gamers also use screenshots to show interesting or problematic moments in computer games.
Screenshots from videos are mainly used to assess the quality of the video itself, but this is a separate topic.
How to take a screenshot in Windows or the Print Screen button
Let's look at the simplest (standard) method, how to take a screenshot of a page using Windows, using the “Print Screen” button on your computer’s keyboard (it may also be called “PrtScn” or “PrintSc”)
This is what it looks like on the on-screen keyboard:

On a regular keyboard it is usually located at the top, closer to the right corner. When you click it, a snapshot of the page will be copied to the windows clipboard i.e. If you need to take a screenshot of the screen, just press this key, everything is simple. Another thing is how to get it out of there, this is also not difficult and is done using some program for working with images. The easiest and most accessible way to do this is with the help of the well-known Paint. Open the program and click the “Paste” button, then “Paste content from the clipboard” and your photo appears.

Here you can edit the image, change something (for example, size) and save it in a place convenient for you.
Screenshot using the Snipping Tool
In the latest versions of the OS (Windows operating systems), a convenient tool called “Scissors” has appeared; it is available in Windows 7 and Windows Vista. It's located in Start > All Programs > Accessories > Snipping Tool. When you click, a small window will appear where you can control the creation of a screenshot of the screen.

There are several modes, with their help you can take a screenshot of the screen or a separate window, you can select a rectangular area or an arbitrary shape. If you experiment, you can easily figure it out.
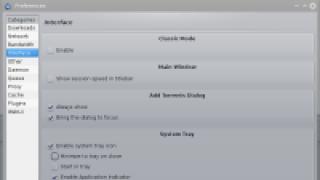
I use the SSmaker program - it is very convenient and multifunctional for creating screenshots. Thanks to this program, you can take a screenshot and post it on the forum or send it in an email in just a few seconds. It intercepts pressing the “Print Screen” button, after which you can immediately create a screenshot.
Its icon is located in the tray; if you right-click on it, you can see the program menu with its settings, documentation, and through it you can also view your previously taken screenshots, which are stored on the program server and are deleted only a month after the last opening of the picture.
On the “My Screenshots” page you can select any of them and below there are ready-made links for posting the picture on blogs and forums, for sending by mail or posting in text.

1. Your monitor windows.
2.Web page, a window appears for size settings, with the ability to select JPEG or PNG format.

3.A free screenshot, you can select any area of the screen where, after pressing the “Ctrl+Enter” key combination, an image editor window appears with its tools for editing your photo and saving it to a folder on your computer.
In the page image below, I have demonstrated some of the capabilities of the SSmaker tools.

In my opinion, SSmaker is suitable for any user, with any requirements, if for the purposes of your activity you need to create a lot of diverse, specific screenshots, I think SSmaker is a good choice. This concludes the article on how to take a screenshot of a screen or page. I wish everyone good luck!
) let's talk about how to take a screenshot of the screen on a computer and laptop. Let's consider the capabilities of operating systems, free web services and third-party applications. We’ll also talk about how to take a screenshot of a website page.
On PC and laptop under Windows
Windows includes tools that allow the user to take screenshots without additional tools. Almost everyone knows about one of them - the Print Screen key. And few use the rest.
Print Screen
Print Screen (Prt Scr) functions very simply: just press this key (on some laptops you need to press it together with Fn) - and the screenshot will be sent to the clipboard. After this, the image can be inserted, for example, into a Word document, loaded into the Paint editor or another program, edited and saved.
If you want the screenshot to be saved directly to your hard drive (bypassing the clipboard), press the Windows key together with Print Screen (the option is available in Windows 8 and Windows 10). The pictures will “fall” into the “Images” - “Screenshots” folder of your account. If you don’t know how to get to this folder, copy the path %Userprofile%\Pictures\Screenshots, paste it into the address bar of Explorer and click the go button.
To “screenshot” a separate window, press the Alt key together with Print Screen. To save a picture to a file, paste the image, for example, into Paint and press Ctrl + S.

“Tricks” with Print Screen are available in any version of Windows and on any devices - Asus, Lenovo, HP, etc., with the exception of Apple based on OS X. The latter have their own technique, which we will consider below.
Windows application "Scissors"
The Snipping Pool utility built into the system allows you to take not only snapshots of the entire screen or a separate window (like Preent Screen), but also of a randomly selected area.
“Scissors” has the simplest editing tools: a pen (allows you to add inscriptions and handwritten notes to the image), a marker (for underlining and highlighting areas) and an eraser for removing marks. In addition, the program has a delayed shooting function - a delay of 1-5 seconds, as well as tools for saving, copying and sending a file by email.
To take a screenshot using Snipping Pool, go to Start, open Programs (or All Programs if you have Windows 7 or Windows 8). “Scissors” are located in the “Standard” section.

The application looks like a small panel. Click the arrow icon next to the New button and select the area to photograph. The “Freeform” and “Rectangle” functions allow you to capture any part of the screen. In the first case, it will have uneven edges, in the second, it will be rectangular in shape with an arbitrary (at the user’s choice) aspect ratio.

Having selected, for example, a rectangle, click “Create” and, holding the left mouse button, select the desired area on the screen (the cursor will take the shape of a cross). After you release the button, the screenshot will open in the program window.

Xbox game console
The Xbos console is one of the innovations of Windows 10, designed for filming the process of a game, for example, World of tanks. As practice has shown, it can be used not only in games, but also in other windowed applications, but you won’t be able to capture the desktop view with it - you need to open at least one window.
To launch the game console, press Windows + G. After the panel appears, as in the picture below, check the “Yes, this is a game” checkbox.

The panel will change to look like this:

Click the camera icon. The program will automatically save the screenshot in your account folder - “Video” - “Clips”. To open this folder, paste the following path into the address bar of Explorer: %Userprofile%\Videos\Captures and click the go button.
On OS X
Taking a screenshot on a MacBook or iPad running OS X is no more difficult than on a PC running Windows. The keyboard is also used for this. More precisely, 3 key combinations, each of which performs one action.
- So, to “screen” the entire screen, press Command + Shift + number 3 at the same time.

- To capture a specific portion of the screen, press Command + Shift + number 4. Once the cursor changes to a cross, select the desired area and release the trackball or mouse button. The picture will be automatically saved to your desktop.

- To capture a window or context menu along with the previous combination, press the Spacebar. The cursor icon will change to a camera. Point it at the desired area and click the mouse.

To copy an image to the clipboard, in addition to any combination, press the Ctrl key.
Screenshot Apps
Joxy

The cross-platform Joxi application is, according to users, one of the best free alternatives to standard Windows and OS X tools.
In addition to installation on a computer, each user of the program registers on the Joxi.ru service and gets access to cloud storage, where screenshots taken by Joxi will be saved. From there they can be downloaded to your computer and mobile device, and also sent to social networks.
After installation, the program will create an icon in the system tray. Clicking it opens a menu containing buttons for selecting the capture area - the entire screen or a fragment. The resulting image is automatically loaded into the built-in mini-editor, which contains everything necessary for processing the image:
- trimming function;
- pencil - for drawing over the image;
- lines and arrows;
- adding text;
- framework;
- blur tool (if you need to hide something);
- numbering with a marker.
When you save a photo on Joxi.ru, the program generates a link from which you can download it and copies it to the clipboard.
By the way, in addition to installation versions for Windows, OS X and Linux, there are Joxi browser extensions. They are designed to create screenshots of web pages as a separate fragment or as a whole.

is also a simple and convenient tool for creating screenshots on Windows and Mac. After installation on the computer, it intercepts presses of the Print Screen key and the Shift + Print Screen combination. The first option is designed to take a snapshot of a fragment, the second - the entire screen.

After selecting a fragment using LightShot, two small panels with tools for processing and saving the screen open next to it.
Among them:
- pencil;
- line;
- frame;
- text;
- Color palette;
- download button to the program’s cloud service;
- social media sharing button;
- search by image in Google;
- copying;
- seal;
- saving on computer.
By the way, if you want to use the Print Screen function for other tasks, you can reassign LightShot hotkeys in the program settings.
In addition to installation versions, LightShot is also available as browser extensions for Google Chrome, Firefox, IE and Opera versions 11 and 12. With their help, you can take screenshots of web pages and screens outside the browser.
Free web services
The web service allows you to take screenshots without installing any programs on your computer. This can be a great help when you are not at your own PC, but, for example, in an Internet cafe or at work. It does not even require registration (despite the presence of such an option), but, nevertheless, stores the files of its users for some time.

Using the SNAGGY service is as easy as shelling pears:
- Select the desired window and press Print Screen + Alt.
- Open the main page of the site and press Ctrl + V.
Once the image is uploaded to SNAGGY, you will receive a link to it and you can edit it a little right in your browser.
The service works in a similar way. To create screenshots, it also uses standard OS tools (Print Screen + Alt), and to upload them to the site - the combination Ctrl + V.

Like SNAGGY, there is a small built-in editor that allows you to crop the edges of the picture, add captions, arrows, frames, etc. to it.
After downloading and editing, the file will be saved and you will receive a link to it. The screenshot will remain on the PasteNow server for six months from the moment it was last opened.
How to take a screenshot of a website page
Screenshots of website pages can also be made without programs - there are specially designed online services for this. And - one of the most popular.
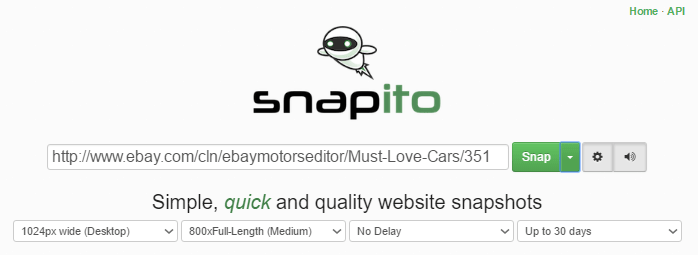
On the main page of the Snapito service there is a field for the address of the page that you are going to “screenshot”. After inserting the address, the Snap, Settings, and Sound buttons will appear next to this field (you will hear the camera shutter click when you turn on the sound while taking a photo).
The settings set the screen resolution, quality and size of the image (the entire page or only the visible part), the time delay before taking it, and the length of time the screenshot is stored on the Snapito website.
The “Snap” button menu also has additional functions - quick transition to photo hosting Pinterest, URL to PDF conversion and short link generation.
After creating a screenshot, a link and buttons will appear next to it: “Copy”, “Download original Screenshot” and “Edit Screenshot”. Clicking the latter opens the built-in graphic editor with a fairly solid set of tools. Of course, this is not Photoshop, but it is much more functional than in all the applications reviewed.

The Snapito service is often overloaded (apparently due to the large number of users), so it does not always work correctly and sometimes slows down quite noticeably. If you do not need all its capabilities, use a simpler online resource -.

S-shot does not have editing tools - it simply “photographs” web pages and stores their images on its resources for some time. The file storage period is up to 1 month from the date of last viewing, but may be shorter.
To take a screenshot of a website page, paste its address into the specified field, set the size - full (entire page) or the desired width and height, select the appropriate resolution, zoom percentage, file format and scale.
The “Refresh” option replaces a previously taken snapshot of the same page with a new one.
The resulting screenshot will be displayed under the table shown in the picture. Next to it there will be links to the location where the file is stored on the S-shot website and the address of the “photographed” web resource.
There is no download button here. If you want to download a picture to your computer, open it in a new tab, right-click on it and select “Save Image As” from the menu.
To have access to all your screenshots taken at different times, you need to register with the service.
Sometimes, while working at a computer, we need to “photograph” some event occurring on our monitor screen. For example, some program generated an error, or some kind of notification, which is impossible to deal with on your own, but you need to solve this problem. This is where the ability to “photograph” what you see on the monitor comes in handy—to take a so-called “screenshot” of the visible area of the monitor, or “screen” for short. To do this, you need to press the “Print Screen” key (sometimes the name on it is written in abbreviated form, for example, “PrtScrn”), usually it is located either to the right of the F12 key, or just below. You can see its location in the pictures below.

The image will be placed on the clipboard, and to notify the program developers (or technical support) about the error, you can paste it into an email or other document (for example, MS Word, Excel or PowerPoint) and send it to them so that they figured out why this or that error occurred and gave recommendations for eliminating it. If you want to save a screenshot to your computer, then you need to open any graphic editor (the simplest one is built into Windows Paint), paste it there (either through the “Edit” - “Paste” menu, or with a simple key combination “Ctrl” + “ V" in the English keyboard layout) and save it in any convenient place on your computer or on removable storage media.
If you need to take a screenshot of not everything that is happening on the monitor, but only a separate window of a folder or program, then you need to make this window active, and then press the “Alt” + “Print Screen” key combination on your keyboard.

In general, screenshots are needed in cases where it is easier to show or send a screenshot of what is happening on the screen to your interlocutor than to explain it for a long time or manually retype it into the text of the letter.
But what to do if you need a screenshot of a page that vertically does not fit into the size of the monitor? For example, you need to save as an image a long page that is five to six vertical lengths of your monitor, according to your vertical scroll bar.
There are several ways to do this.
1. The simplest method, which does not require installing any programs, and at the same time the most time-consuming and not very high-quality method, is to take several screenshots one after another, each time scrolling the page one screen down, and simultaneously insert the resulting images one after another, for example, in Word or Excel. The disadvantage of this method is that it takes a long time, the resulting image is not whole, and the need to adjust the edges of the previous and next images to each other. You can use this method only in cases where you are in a hurry and you do not care about the quality of the final result. In this case, you will not get a whole, unified image.
2. Using online services for creating screenshots of any website pages. For example, let's try to get a screenshot of one of the pages of my website “Computer Smarter”, on which I talk about increasing the text size (opens in a new window):
On my work monitor, this page takes up four vertical screen sizes. There is a wonderful online service that easily copes with the task, resulting in full screenshots of long pages. I suggest you familiarize yourself with it and use it in the future if you like it.
By following the link above, you are taken to a simple page on which you need to indicate the address of the site page from which we want to receive a full-size screenshot. We copy it from the address bar of the browser (or directly from this article) and point to our test page on this site: https://site/sovetyi/kak-uvelichit-razmer-teksta.

Click the “Capture Screenshot” button and wait for the site to generate the image (progress will reach 100%). This usually takes from a few seconds to a couple of minutes, depending on the vertical length of the page.


Click on the “Download Image” button, and the automatic downloading of the screenshot of the resulting page begins.
We open the resulting image and make sure that the service worked perfectly, a screenshot of a long page was received and saved as a picture for further work.
Of course, there are a fairly large number of online services that allow you to do the same thing as Web Screenshots, but some of them are quite difficult to learn, some require registration in order to get the necessary image, so I recommend you what I use myself.
3. If you use the Google Chrome browser, then the task is simplified. In this case, you need to find and install an extension for Google Chrome called Awesome Screenshot. To do this, just enter the following line “Awesome Screenshot for Google Chrome” into the search query of Google or Yandex search engines (you can copy it directly from here), and follow the first links of the search results to go to the site for installing extensions for this browser.
Yandex:

Google:
After going to the extension installation site, click the “+ Free” button and install it in your browser:

Confirm the installation of the extension by clicking on the “Add” button:

As a result, an icon of the installed extension will appear at the top of your Google Chrome browser:

Let's look at the main features of this extension. Click on this icon and open its menu:

Briefly about the main points of this menu:
- Capture visible part of page— take a screenshot of a part of the page visible on the screen
- Capture selected area— take a screenshot of the selected area (a very convenient option). After clicking on this option, you can select any area on the monitor screen with the mouse and get an image of this area.
However, for our initial purposes (taking a screenshot of a long page), we need to go to the desired page on the Internet and select the menu item “ Capture entire page"("take a screenshot of an entire page").
The extension itself will scroll the page all the way down and redirect you to a new page where you can edit the screenshot you took, or you can simply click the “Done” button at the top

Our screenshot is ready, all that remains is to select further actions with it on the right:
- Save— save the picture in a graphic file format;
- Copy— copy it to the clipboard;
- Print— send the picture to the printer for printing.
We will save it as a picture, so select “Save”

We indicate the location on your computer where to save the received file, and finish working with the extension.
I hope you found this article helpful. If you have any questions about the operation of the methods specified in the article, ask in the comments.
Post navigationEvery owner of a computer - be it a PC or a laptop - periodically faces the need to take a screenshot on a website. You may have such a need either during routine surfing of pages on the Internet, or while reading an article, or if you want to send someone an interesting correspondence. If you have never taken a screenshot before and don’t know how, then in this article I will tell you how to take a screenshot of a page on the Internet.
A screenshot (from the English screenshot - screenshot) or briefly a screen is a picture (photograph) that accurately reflects what the user sees on the monitor. For example, if you do it now, you will get a snapshot of this article.
What are the ways to solve your problem? Depending on your needs, you can choose one or another option:
- The easiest way is to use the functionality of your operating system. If you rarely need to take a screenshot, this method is suitable for you - it is the simplest and does not require additional time to download applications or browser add-ons.
- It’s also easy to use the services of sites that can create a scan of a page on the Internet for you and all you have to do is download the image to your computer. The undoubted disadvantage of this method is that the picture can only be taken from a page on the Internet, and, for example, a desktop cannot be taken using this method.
- download the program to your computer, or download a browser add-on that will allow you to take many pictures in a form convenient for you. If you often need to take screen photos, it would be best to use this opportunity and install software that is convenient for you
![]()
The easiest way
Of course, the easiest thing is to use the keyboard. If you don’t know about printscreen, then you will probably like this method, because it is very simple and does not require installing additional software. That is, below we will look at methods that include downloading additional add-ons for the browser and even entire programs for scanning the working window, but if you need a quick way, the easiest way is to use PrintScreen.
PrintScreen (also PrtScr or Print Scrn) is a button on the keyboard that allows you to take a screenshot of your monitor screen and save it to the clipboard.
How to make a printscreen? Different operating systems have different sequences of actions.
For Windows computer owners
- find the key on your keyboard Print Screen(this may be called PrtScr or PrintScrn depending on the model and is often located in the upper right corner)
- press it - the print screen of the page will be saved to the clipboard (part of the computer's RAM)
- Now, in order to use the image - save it or transfer it to someone - you need to use any image editor. The editor is installed by default in Windows OS Paint, so I will describe the sequence of actions for it. After pressing the key PrintScreen, open Paint (Start button - All Programs - Accessories - Paint)
- in the working window of the program, use the sequence of buttons “Edit” - “Paste” (or simply press the key combination “Ctrl + V” on your keyboard)
- the resulting image can be formatted using the functionality of the program, or simply saved using the sequence of buttons “File” - “Save As”, and select the location where to save the file (you can also use the key combination “Ctrl + S” to save).

For Mac users
- use the keyboard shortcut “Cmd+Shift+3”
- If your system settings are set to default, the snapshot will be saved in PNG format on your computer desktop
For Android phones
- On phones, of course, there is no PrintScreen button, but removing the screen will not be difficult. Starting from Android 4.0, you need to simultaneously press and hold the Power button and Volume button. The image will be saved to the appropriate folder.

Using additional software
How to take a screen photo using auxiliary software
If you are not happy with the prospect of making a screenshot via the keyboard, you can use additional software or add-ons for your browser. Fortunately, nowadays there are many programs with similar functionality, and you can choose the best ones.
- Snagit from Techsmith is one of the best programs for capturing monitor images. Convenient and simple, there is a version for Windows and Mac. Its disadvantage is that it is not free (there is a trial version for 15 days, so use it for pleasure. You can purchase it after the end of the trial period if the functionality suits you).
- FastStone Capture is another good program, one of the products from FastStone, which has a lot of image editing software. Windows only. By the way, FastStone Image Viewer (graphics editor) has wide functionality, which includes screen capture.
- Paparazzi! is a simple free application for MacOS. A good alternative to Snagit if you don't want to spend money.
We use the functionality of other sites
It is also a simple method that does not require installing additional software on your computer. If you need to get an image of a site, you can take a screenshot of the site online using the functionality of another site; fortunately, there are a lot of such sites now. On any of them you need to indicate the URL of the site whose screen you want. Let's look at the best online services:
- snapito.com- good simple service. You can specify the desired width and height of the image.
- web-capture.net— you can select the extension for the output file.
- IMGonline.com.ua— you can select many items such as width/height, zoom, disable images/javascript.
- ScreenPage.ru- will send it to you by email.

Summary
These are the ways we looked at how to create a screenshot of a page. You can choose the one that is right for you, and it depends on your specific needs: how often do you need to take screenshots, are you ready to download additional software to your computer, are you ready to pay for this software. Of course, I haven’t considered all the methods, so if you have something to say, write in the comments.
Conclusion
I hope our tips helped you. Try the universal algorithm described above. See you on the pages of the site!
Video instruction
Snipping Tool in Windows 7
The Snipping Tool allows you to take a screenshot of any element on your desktop or the entire screen. The program is launched from the menu Start → All Programs → Accessories.
More details
MacOS
To take a screenshot in Mac OS, press the keyboard shortcut ⌘ Cmd + Shift + 3. A file with a snapshot of the entire screen will appear on your desktop.
If you want to take a screenshot of a specific part of the screen, press the keyboard shortcut ⌘ Cmd + Shift + 4 and highlight the desired area of the screen with the cursor.
To take a screenshot of just the active window, press the keyboard shortcut ⌘ Cmd + Shift + 4 and then press Spacebar.
iOS
The iOS platform allows you to take a screenshot using standard tools starting from version 2.x. To take a screenshot, press and hold the button for a couple of seconds Sleep/Wake Mode and Home. The resulting images are saved in the standard Photo application.
Android
You can take a screenshot on a mobile device running Android in different ways, depending on the device manufacturer and platform version. The resulting images are saved in the standard Gallery application.
- Android 4.x, 5.x, 6.x
- Android 3.2 and higher
- Android 1.x and 2.x
- Samsung
Press and hold the button for a couple of seconds Decrease volume and Nutrition.
Press and hold the button for a while Recent Programs.
The Android platform version 2.x and below does not support taking screenshots using standard means. You must use third-party applications installed from Google Play.
Press and hold the Home and Power or Back and Home buttons for a couple of seconds (depending on the device).
Press and hold the Power and Home buttons for a couple of seconds.
Windows Phone
- Windows Phone 8.1 and 10
- Windows Phone 8