Modern smartphones are equipped with a GPS chip, which greatly simplifies our searches or searches for a specific address. However, it is not uncommon for GPS to not work well. And not always the poor assembly of the smartphone is to blame. You can often improve the functioning of the navigation module by digging into the settings.
Many motorists have a full-fledged GPS-navigator. Some of these devices have an antenna connector on the back wall or side end. This allows you to enhance signal reception several times - you just need to get the appropriate antenna.
As for modern smartphones, we hasten to disappoint you. In their composition, you will never find a special connector for the antenna. It is possible to improve GPS reception on Android only by software methods. If they did not work, then you will have to put up with the current state of affairs. As you might guess, budget devices work worst with GPS satellites. This is explained by the fact that they are equipped with the cheapest and oldest navigation chips, which have a low speed and a weak signal receiver.
Visiting the settings section
In many smartphones and tablets, the GPS chip is disabled by default. In this case, the device determines the location by cell towers and Wi-Fi networks. To enable the navigation chip, you need to configure the device. To do this, do the following:
Step 1. Go to the section " Settings».
Step 2 Here you should be interested in the item " Location».

Step 3 On different devices, this item may have a different name. For example, you need to select the tab " Connections” and click on the item “ Geodata", at the same time activating the corresponding switch.

Step 4 In this section, you need to enable high location accuracy. The device must use all sources for this - GPS satellites, Wi-Fi networks and data from cell towers.

It should be noted that in this mode of operation, power consumption increases. And if this is practically not noticeable on new smartphones, then the owners of budget and old devices will definitely feel the reduced battery life.
Depending on the features of the device, the GPS settings may be in different subsections. Therefore, on more modern Android smartphones, these steps can be performed a little differently.
Call the notification panel and make a long press on the icon GPS(may have a different name). In the page that opens, give applications access to the location and in the "Location determination" section, set "High accuracy".

Compass calibration
If it is impossible to enhance signal reception on smartphones, then no one will interfere with improving the operation of a digital compass. The fact is that on some devices it is not calibrated, as a result of which the navigation program cannot understand in time which direction of the world your smartphone is directed. At this moment, it seems to you that the device does not catch GPS.
You need an app to calibrate the compass GPS Essentials. Download and install it, then follow these steps:
Step 1. Run the program.

Step 2 Enter the mode Compass.

Step 3 If the compass works stably, then the problem is not in it. If the compass refuses to show the cardinal directions correctly, then calibrate it.
Step 4 First, rotate the smartphone around its axis with the screen up. Then turn it upside down. Well, then flip it from left to right. This should help. In some versions of the application, you must first select the item Calibrate in section settings.
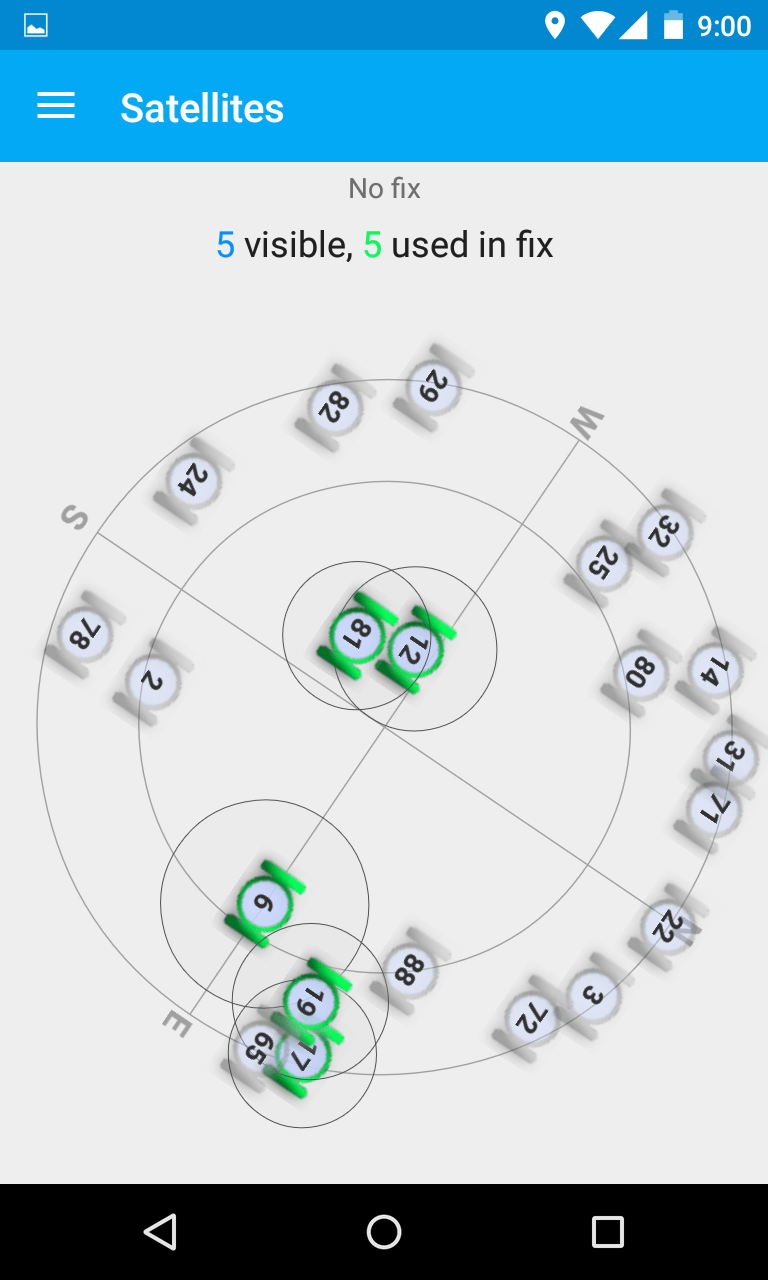
Viewing the number of visible GPS satellites
In the same GPS Essentials you can look at how many satellites your smartphone connects to. If it is large enough, then you should not blame the navigation chip - the problem is in one of the programs. To view satellites, you need to select the item in the application menu Satellites.
Reset GPS Data
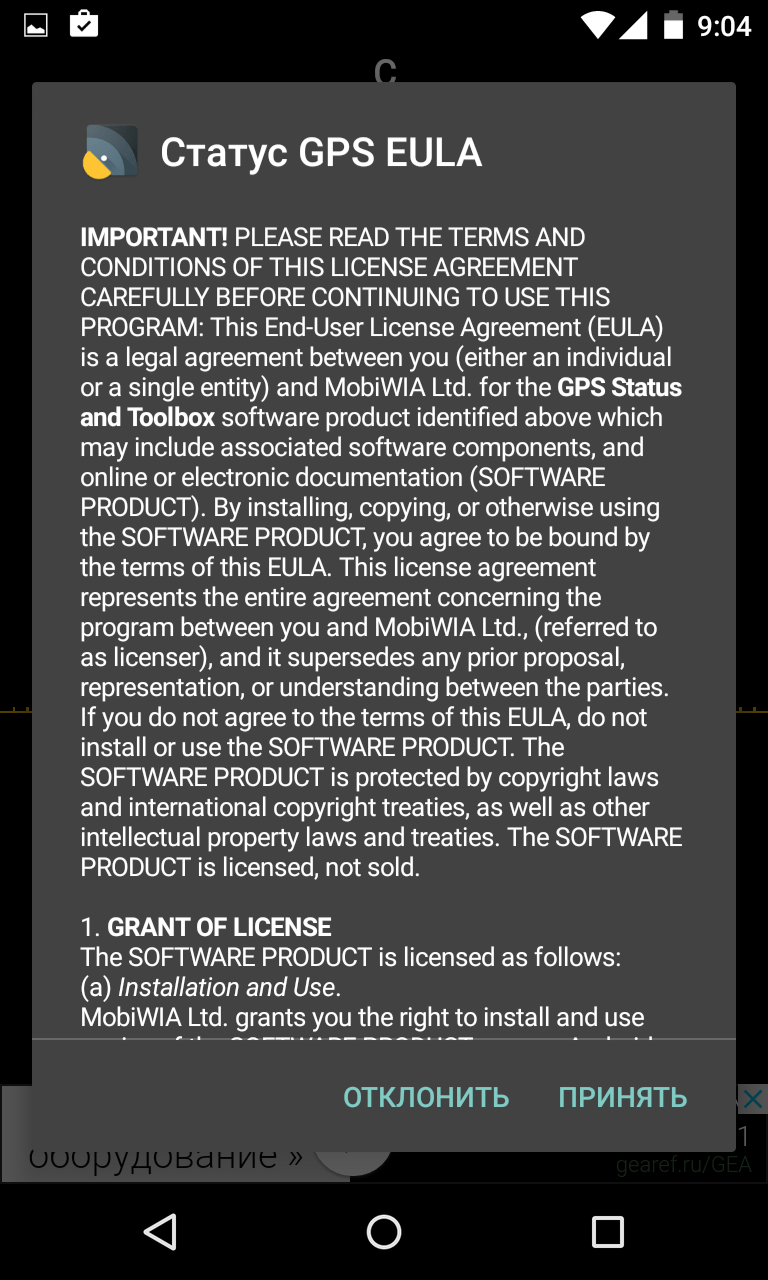
A common problem with some devices is the long-term binding to specific GPS satellites, even when they have managed to leave the field of view. The application can help in this case. GPS Status & Toolbox. It will reset the GPS data, after which the connection to the satellites will be made from scratch.
Step 1. Download and install the utility.

Step 2 Run the installed application by agreeing to the terms of the license agreement.
Step 3 On the main screen of the program, you will see the readings of various sensors, as well as information about the number of GPS satellites overhead.

Step 4 Click anywhere on the display, after which you can pull out the curtain with the main menu on the left. Here you can calibrate the compass if it was not possible to do this using the application discussed earlier. But now you need to click on the item " A-GPS state management».

Step 5 In the pop-up menu, click the " Reset».

Step 6 After the reset is complete, return to this pop-up menu by clicking the " Download».
What to look for when buying a new smartphone?
Now you know the answer to the question "How to set up GPS on Android?". But all this will not help you much if you want to use your smartphone as a GPS navigator on an ongoing basis. It is better to get a solid modern smartphone for these purposes. When choosing it, be sure to read the full technical specifications. They need to find a mention of the support for A-GPS technology - it greatly reduces power consumption. The ideal smartphone for you will be one that also works with satellites. Fortunately, almost all devices that have been imported into our country over the past year have support for the Russian navigation system. But, again, you still need to look at the specifications of the device before purchasing it.
22.02.2012 46498
Simple georeferencing of photos - GeoCam service
To be honest, I have long been interested in the ability to automatically link photos to the geographic location where this photo was taken. And this is necessary for several reasons. Firstly, I often need it myself - well, you know, you take a picture of a nice restaurant, a shop, just an interesting place, and then you try hard to remember where it all is from the photo. Of course, you can find a restaurant by name and city (if you can remember the city, which is not always possible after some restaurants), but in the case of shops and places without a name, it is somehow quite difficult. Secondly, it would be very useful to put GPS coordinates on some photos for a blog post. And then it starts: you publish a photo (yes, the same restaurants that I like to study in terms of spiritual growth while traveling), and it starts - what address, what town, what country, what planet, what kind of galaxy ... Well, in -thirdly, when you send relatives-friends the data of my stay somewhere in the same Spain so that they can come, it is very convenient to throw a bunch of photos with coordinates and viewing angle: this way they will perfectly imagine the environment, study the area well, well, and get the required address. How to solve all these problems? Modern digital photos are almost always supplied with various metadata according to the EXIF standard: this includes, for example, the name and model of the camera, date and time of shooting, shutter speed, aperture and other data, among which, by the way, there is also GPS data. That is, geographic coordinates can be written directly into the image. However, modern cameras are rarely equipped with a GPS module that allows you to write coordinates to the EXIF data of the photos they take. (For some models, you can purchase separate GPS devices that capture coordinates and transmit them to the camera wirelessly, but I have not held such devices in my hands yet, and some friends who have tested something similar say that all this is implemented quite well. crookedly.) With communicators, of course, it's easier - almost all of them are equipped with a GPS module, and some of them (although, oddly enough, not all) are able to perform geotagging - that is, write GPS coordinates into photographic data. Well, in any case that cameras with GPS, that communicators with GPS that record coordinates in EXIF, do not determine and do not record the position of the camera in space - so that you can accurately determine from which point the picture was taken from the photograph. I studied this issue, and it turned out that for Android and iOS devices there is a service that effectively solves the problem of recording geographic data and lens viewing angle in the images produced. This service is called GeoCam. It has free and paid versions for Android (free download, paid download), as well as free and paid versions for iPhone (free download, paid download).
GeoCam Application Page
I downloaded the version for Android, installed it (on Samsung Galaxy Note). I went to test it. It all works as follows. Launch the application, the camera mode appears in the following form. On the whole screen - the image from the camera (it was not included in the screenshot) with the viewing angle of the lens. On the top left is a piece of a map of the area from Google Map. On the top information panel - latitude, longitude and accuracy of determination. On the lower information panel - viewing angle parameters: azimuth, inclination, roll.

Shooting mode
Click on the "shutter" of the camera - the image is saved along with all the coordinates. If you click on the icon under the "shutter" icon, you will see the frame taken with all the data. Below is a photo, above is a piece of a map with a viewing angle. The map can be switched between satellite-pattern modes.

Photo and map in satellite mode

Photo and map in outline mode
There you can turn on the editing mode (also a map and a satellite), in which you can specify the position and viewing angle, if this is necessary for some reason.

Editing in Schematic View

Editing in satellite mode
In all these modes, maps are scaled in the usual way for modern communicators - using icons or multi-touch. Next, it is important to understand the following thing. All information collected with GeoCam about geographic coordinates, azimuth, tilt and roll of the camera is recorded directly in the EXIF of the image! GPS data is written to a standardized EXIF field, and any program that understands EXIF can get these parameters from there, and additional fields that GeoCam enters into EXIF (many programs make their own extensions of standard EXIF - this is quite acceptable) can be read as special GeoCam applications , as well as any other programs whose creators can work with this data using the EXIF extension available for download, accepted in GeoCam. Thus, if the photograph taken - just as it is - send somewhere (by mail, to a device, to a social network), then there, at least, you can find out the GPS coordinates of the picture taken, and in addition, if you use special extensions, you can find out both the azimuth and other information that you can enter there - photographer's notes, user comments and so on.

Information about the file with comments
You can send (transfer) a photo directly from the communicator. If you press the android "menu" button, the following options will appear: send, create a report, delete. The following options are offered at the send item.

Shipping options
There are many options here, and they, of course, depend on the installed applications: mail, wireless networks, SMS, social networks, online services, other applications, and so on. Only the image itself with the corresponding data wired in EXIF will be transmitted. Report The second menu icon is a report. As a report, a PDF document is created, which includes a photo, two options for the scale of the map scheme (you can also include a satellite), and all the information collected. The document can also be transferred-sent anywhere or opened directly on the communicator. It looks like this (clickable).

Single photo report

Projects

Filters
Photos can be split into projects both manually, specifying the project when shooting, and you can also attach a set of filters to the project (continent, country, city, street, and so on), and then the captured photos will automatically fall into the desired project. Projects, among other things , are interesting because there you can select the desired group of geophotos and display all the shooting points on one map. First, the necessary photos of one project are selected.

Photo of one project and menu

Selection of photos of one project
After that, the "View" button is pressed, after which, on the top image, GeoCam displays on the map (scheme or satellite) all the shooting points of the selected photos, between which you can switch. The map can be scaled accordingly.

All shooting points on the diagram

All survey points on the satellite

My geophoto in Geo-Photo.net

GeoView

Photo with a diagram for iOS

Satellite photo for iOS
By the way, which is strange, I just had a paid (Pro) version that first worked under iOS with noticeable glitches. But then I deleted it and reinstalled it - it worked fine. Subtleties of working with the service Some users, studying how to work with the service, ask a question from the series: "Well, how is it, and if we don't have the Internet there, so what - you can't take a photo without it?" Do it, of course! The essence of the service is that your communicator, using GeoCam, puts the necessary coordinates on the photo, plus azimuth and other data (at your discretion) during the shooting. After that, the photo can be sent to friends, uploaded to your computer, published on any social networks or on a special service www.geo-photo.net! Since the shooting information is stored directly in the file itself, nothing else needs to be done and no Internet is required when shooting. The main thing here is to install the application on your Android phone or iPhone, after which the coordinates and shooting angle will be saved automatically, and where and in what you will then view the captured images is up to you. Your friends, relatives and acquaintances will also be able to view the sent photos in any services that support obtaining information from EXIF, and there are hundreds of such services. conclusions The service is very interesting and helpful. I tested it for about a week - I was very pleased. Both on an android phone and on an iPhone, everything worked as it should, and I already started compiling a separate collection of geophotos for myself, which later, separately from the main collection, can be used as images with reference to the location. However, there is something to criticize . Photos with embedded GPS data are great, but many users of the same social networks (and just my readers) have no idea how to get such information from the images I publish. And it's not their fault: my task is to provide a convenient opportunity to receive such data. What is needed for this? That's all: so that with the help of GeoCam I can prepare a photo for sending by mail or to social networks with geographic coordinates superimposed directly on the image - this is the easiest option. I talked to the developers, they said that this is all quite feasible and that in the following versions such an opportunity will definitely appear. Yes, the service practically does not solve the problem of imposing geocoordinates on photos taken not by a communicator, but by cameras. (Of course, for cameras that support Eye-Fi cards, you can use Wi-Fi transmission of frames to a communicator with GeoCam, followed by localization, but this is too hemorrhoids.) However, binding, as a rule, is required not for artistic photographs taken a DSLR or other high-quality camera, but for a purely reportage shooting (from the series - here we live, here is a cool restaurant, here is a gorgeous view of the sea, a blonde in a bikini almost without a bikini sits here every day), for which modern communicators (smartphones) - just above the roof! So now, dear readers, when I publish a photo of something interesting on my blog, do not be too lazy to look into EXIF (I traditionally almost never erase this data) - most likely, there will be GPS coordinates of interest to you, if the frame was taken on the communicator. And now you don’t have to ask me unnecessary questions about what kind of address it is, on what street, in what country, on what continent, what planet or galaxy. Provided, of course, that it was filmed in the same universe with you. Yes, here - try it yourself!
This F.A.Q. The article is intended to tell the reader how to enable the display of the photo shooting location on Android or help set up the output of geotagging information on any captured photo from an Android smartphone / tablet.
Enabling this option will help you add the geographic coordinates of the location where the photo was taken, which you want to upload to Vkontakte, Facebook, Instagram or another social network ...
This is exactly what a photo uploaded to the network looks like, which is “tied” with geotagging and “uploaded” to VK.
In order to enable the display of the place where the shooting was carried out, we will perform a few simple steps to set up the system.
At the very beginning, you need to go to the "Camera" application on your mobile device and make sure that the function of adding shooting coordinates to photos is enabled there:

Attention! If you start uploading the photographs taken after that to the Internet, then these shooting coordinates will become publicly available.
We are done with the camera settings. You can check the display of geotagging on photos. You need to view the information about the image in the section "Position":

If the desired result is not achieved, then we do the following ...
You need to check if location access is enabled on your Android mobile device. To do this, go to the general "Settings", then select your own. Then look for the "Privacy" section and go there.
It is there that we will find the “Location Access” item, we must activate it. By doing this, we will allow all applications to receive data about our location or current geographic coordinates.

We also need to choose one of three location modes:
- High accuracy. In this case, the operating system will use all available data from the GPS module, mobile and WLAN networks to obtain the most accurate coordinates. In this case, the battery charge will be consumed relatively quickly.
- Save battery power. Here, the smartphone or tablet will obtain location information based on WLAN and mobile network (if available).
- Device sensors. The latter option provides for the analysis of positioning data only from the GPS module.
The second way is probably the best. Although, it may not work on tablets that are not adapted to work in mobile networks.
Geographic information systems are gradually entering everyday life.
Most mobile devices are equipped with GPS/GLONASS receivers. This allows developers to get records of their users' path (tracks). Tracks can be used for a wide range of tasks, from navigating the map and telling friends where they are, to plotting traffic jams and predicting the traffic situation.
Unfortunately, without additional processing, the user track is not very informative, so the stage of connecting external data and the internal application map is required. For this, there are special data binding algorithms (map matching algorithms).
This article is devoted to the algorithm for linking a track to a road graph and the results of its application in the [email protected] project.
The algorithm, which will be discussed, processes the incoming track, obtaining at the output a sequence of edges of the road graph, which, with their geometry, repeat the input data as closely as possible.
A road graph is one of the foundations of a geospatial application. It contains within itself all the information about the roads: from the type of coverage and the number of lanes to their geometry. There are several ways to represent a road graph in computer memory.
Let's consider the simplest option: a directed graph, in which the nodes are intersections, and the edges are roads. This simplification makes it difficult to check the rules of the road, but facilitates further calculations. Roads with traffic in both directions in such a graph will be represented by a pair of edges. An edge is an indivisible unit of a path. However, an edge is a mathematical representation of a road. The real location of the road on the map (a set of points-coordinates of the road) will be determined by a separate property of this graph edge, which we will call the geometry of the road.
A track is an ordered sequence of points containing some error. Due to this error, the point will almost never lie on the edge of the graph to which it is necessary to attach. According to the law of meanness for GPS data, the positioning error is less in an open field than in the city center. In other words, the incoming point can hit an adjacent edge.
This is how one Moscow denouement looks like through the eyes of cards: 
And this is how our users go along it, according to navigators: 
Track linking process
To bind a track point to a graph, in the simplest case, you need to find edges with a minimum distance from the edge to the point. Unfortunately, in practice (especially in the city center), a route tied in this way may turn out to be a set of edges that are not connected to each other. In order to improve the quality of binding, we will assume that the track is an ordered, purposeful movement of the user along the geometries of the graph edges. That is, the entire route passes along edges connected to each other. In this case, each edge of the route can have both several track points, and none.Thus, since we refuse to take the edge closest to the point, we need to choose some other quantitative measure that would allow us to determine whether the measured edge is suitable for anchoring.
There are many factors that can be used for this:
- The distance from the point to the edge geometry of the graph. Estimates both the shortest distance and the probability that the receiver could make such an error.
- Coincidence of directions of movement. Estimates the angle between the vehicle's motion vector and the direction of the piece of edge geometry to which the point is anchored. (This measure is robust to the systematic error of the GPS receiver, but susceptible to random).
- Changing the direction of the vehicle. The probability that the car will turn off the main road is generally less than the probability that it will continue moving along it (this minimizes the number of maneuvers).
- Physical possibility of transition from one edge to another (edge reachability). The adequacy of the speed with which the car had to move in order to make this transition.
For track binding in this article, we use the evaluation formula for the incremental data binding algorithm (based on the work of S. Barcatsoulas ).
This formula includes two main components: and.
The component takes into account the weighted distance from the track point to the edge and is calculated by the formula:
Where
are the scaling factors and is the distance from the point p i to the edge geometry c j .
The component takes into account the angle between the edge geometry direction and the track direction:
Where
and are the scaling factors, and cos(α i,j) is the angle between the geometry of the i-th edge of the graph and the direction of movement along the edge of the track
and are the parameters that affect the significance of the components. For the algorithm, the values of these parameters relative to each other are important - this determines which of the factors will have more weight in the comparison.
Parameters and affect the sensitivity to changes in the described factor.
After calculating the components, the final metric is calculated as:
The higher the number obtained in the end, the better the match between the track section and the edge.
Having in the arsenal the formula for the likelihood of the route being laid, we can describe the binding algorithm:
- Select all graph edges with geometry intersecting the delta neighborhood of the first track point;
- Evaluate all selected edges using a formula;
- Select the edge with the highest score. Make it current and add it to the finished route;
- If the point closest to the track point on the edge geometry is not at the end of the edge, then select the next track point. (If there are no more points, then the binding is finished);
- Select all graph outgoing from the current edge and the current edge;
- Go to 2;
Strategy for taking into account subsequent points
The undoubted advantage of the chosen formula is the ability to evaluate the likelihood of binding to the graph not only for one point, but also for the route as a whole. This can be used to implement a strategy for taking into account subsequent points. If at the moment the last point of the route is not bound, then it is possible to calculate the estimates of the anchoring of the next points, provided that the route lies along the selected edge. After that, the sum of the likelihood estimates can be compared. This will avoid errors at complex junctions and intersections, as the algorithm will select edges based on subsequent movement.
A little about performance
The task of linking a single track is not incredibly costly, but in practice it is rare that anyone ever links a couple of tracks. As a rule, it is necessary to have time to bind thousands of points per second. Therefore, we have to find a compromise between the processing speed and the accuracy of the track binding. In the selected algorithm, the performance is affected by the number of estimated edges for each track point and the depth of evaluation of points "from the future". As practice has shown, in most cases, to make the right decision about the behavior at intersections, it is enough to take into account 2-3 subsequent points of the track.In fact, it is difficult to change the number of edges to be evaluated, since for a quality binding, after selecting the first edge, it is necessary to evaluate all outgoing edges. But you can not consider options with too low a likelihood estimate.
Results
The implementation of the binding algorithm allowed the [email protected] project not only to start working with mobile user data, but also to quickly coordinate its own data with arbitrary systems. The use of the new binding subsystem makes it possible to recalculate tracks containing up to 55 thousand points in total on one server within a minute on one server. Thanks to this, the display of data to users occurs as quickly as possible. The algorithm shows high-quality binding even with one track point per three edges of the internal graph. However, the greatest efficiency of the described algorithm is achieved when linking long tracks with one or two points to each edge of the graph.Literature on the topic
- Map Matching. An Introduction” Prof. David Bernstein, James Madison University.
- “On Map-Matching Vehicle tracking Data” Sotiris Bracatsoulas, Dieter Pfoser Randall Salas Carola Wank VLDB’05
- “Approximate Map Matching with respect to the Frechet Distance” Daniel Chen, Anne Driemel, Leonidas J. Guibas, Andy Nguyen, Carola Wenk. Stanford. 2011
Lev Dragunov, programmer [email protected]
. Where and what can it be used for? There are several options here:- Firstly, it is quite often interesting to see on the map exactly where this or that photograph was taken. Sometimes the coordinates can be determined quite accurately by looking at a satellite image in Google Maps, provided that some well-recognized objects are taken in the photo. But what if the photos were taken in the forest or in the field, where there is absolutely nothing to attach to? And what if we returned from a multi-day hike and brought with us another pack of N gigabytes of photos? In this case, linking each photo, even with not very high accuracy, becomes an almost unsolvable task.
- Secondly, most modern photographic services (for example,panoramio,Flickr), photosites and social networks are able to findGPS coordinates in EXIFphoto data and automatically generate a link to a map of the area where it was taken. Very comfortably.
We write tracks
So, what is needed for geotagging? Entry requiredtrack our movement during the shooting. In fact, this is a simple text file in which each line isGPScoordinates of the current point, height above sea level, date and time received from the satellite. The more often information is written to the track, the more accurately it will be possible to attach a photo later. The most important thing to remember here is that the clock in the camera should be as accurately as possible synchronized with the clock in the navigator, it is also important to take into account the possible difference in time zones and the translation of time by an hour back / forward.
At the moment, there are many different devices for recordingGPStrack, let's try to understand their advantages and disadvantages.
Recording a track using a smartphone
The choice here is huge. Now almost any smartphone is equipped with a GPS module, with which you can record tracks. For Android OS, I used a simple but convenient programMy tracks. Its functionality is more than enough for the task of georeferencing photos. There are certain benefits as well. If you are in the coverage area of a mobile network, you can immediately load a satellite or vector map of the area through it, at any time the recorded track can be sent by e-mail, sent todropbox or Google Disk.
But there are also disadvantages, and the main one is the rapid discharge of the battery. My phone is onGPSmodule in continuous track recording mode is able to work for a maximum of 10 hours. It is clear that we can’t talk about any multi-day trip here, unless you take a stack of spare batteries with you, but, in my opinion, this is not a good idea. But for recording a short walk during the day, the smartphone is perfect.
Below are screenshots of my trip out of town for evening photography. Recorded with smartphoneSamsung Galaxy S3 . As you can see, there is enough variety of information, andMy Tracksfar from the only program in storesGoogle Play and Apple Store .
Unfortunately, the GPS module in smartphones does not always work correctly. I have come across cases where sometimes satellites are searched for a very long time or the phone cannot find them at all. Perhaps it depends on the hardware manufacturer.


Track data recorded using a smartphoneSamsung Galaxy S3.
Recording a track using a tourist GPS navigator
The choice here is huge. It's like the most popular travel navigatorsGarmin , and a large number of Chinese noname devices. The simplest will doGPS Logger, because in this case, apart from the track, we do not need any other information. I repeat, the most important thing is not to forget to periodically synchronize the clocks in the navigator and the camera.
In my opinion, the most significant advantage of using travel navigators compared to a smartphone is their noticeably lower power consumption. So mineGPS navigator Garmin eTrex 30 on two batteries or accumulatorsAAworks without problems from 23 to 25 hours, which makes it possible to record tracks for 7-8 hours for several days in a row without recharging. Well, take a couple of kits with youAAbatteries are usually not a problem. It is also convenient that to start recording a track, you just need to turn on the navigator, no additional actions are required.
Other useful functions of the tourist navigator (actual navigation, waypoints, astronomical calendar, search for hiding places, etc.) within the framework of this article, I think, it makes no sense to consider. Some models of tourist navigators haveGSMmodule and insertingSIMmap, we can use some additional services, such as: downloading maps and photos of the area, sending a track, etc. However, such functionality, in my opinion, is not very useful. Where there is a mobile connection, you can use a smartphone for the same purposes, and in a mountain hike, in addition to the additional energy consumption for searching for a network, as a rule, the benefits ofGSM no module.
Below are screenshots of the track recorded using the tourist navigatorGarmin eTrex 30at the same time as recorded on a Samsung smartphoneGalaxy S3. The data between them differ slightly, but for our purposes, extra precision is not required and this is quite enough.
Track data recorded using a travel guideGPS navigator Garmin eTrex 30
If you superimpose these two simultaneously recorded tracks on the map, you will notice that one of them quite often flies off the road. To my surprise, it turned out that this is a track recorded witheTrex 30, the track recorded by the phone matches the road on the map much more accurately. Having understood the settings, I found out that by default inEtrex 30not the highest recording frequency of the track is set (Interval: Normal). If setInterval: Most often, then the recording accuracy increases.

Geotagging with the camera's built-in GPS receiver
Probably the easiest way to link photos toGPScoordinates using data received from the receiver built into the camera. Unfortunately, not all SLRs and not only cameras have such a function. But if there is a receiver, then it is enough to turn it on and all photos will be linked automatically. Convenient, but it also has its drawbacks. I got to know them while usingGPS in Canon EOS 6D . Firstly, these are the same problems of increased power consumption, and on a long trip, when every battery counts, such waste becomes simply unacceptable. Secondly, my6Dfor some unknown reason, it often loses contact with satellites, as a result of which some of the photos remain unreferenced and without a track, nothing can be done about it. And I have come across this situation many times.
By the way, in Canon EOS 6Dit is also possible to include the recording of the track in a plain text file and link the photos later on the computer using specialized software.
Programs for georeferencing coordinates
Georeferencing with GeoSetter
GeoSetter powerful software forEXIFinformation in photographs. It has a fairly flexible and functional interface, has a lot of interesting functions for working withGPScoordinates and tracks. The main functionality of the program is based on third-party development ExifTool by Phil Harvey — library for working withEXIF. The library is updated quite often, so when you start GeoSetter, an information window appears with a suggestion for updating:

Unfortunately, according to the official siteGeoSetter ,the program has not been updated for a long time, however, it is availablebeta version , which has more than sufficient functionality for solving geotagging problems.

The program interface is quite simple. The left panel is divided into two parts: a display of the contents of the selected folder and a small photo preview. Right: satellite map with the ability to select the type of maps (usually I use OpenStreetMap) and a panel for selecting GPS tracks. The size and location of the panels can be customized to your taste. You can switch to the Russian interface language usingFile -> Language -> Russian . Enable panel for working with GPS tracks: View -> Tracks (Ctrl + T). To load tracks in the tracks panel, press the buttonOpen track files(s)You can upload multiple files at once. By default, the tracks on the map are displayed in red, if desired, you can set the color of each track separately.
 «
«
Our task is to bind all files from the selected folder to the coordinates according to the tracks loaded in the GeoSetter. To do this, select all tracks, click on any photo in the left panel, select all CTR + A, synchronize with GPS data files CTRL + G.

In the dialog box that appears, you can choose which tracks to synchronize photos with, the maximum time difference between the time the photo was taken and the point in the GPS track, the time zone shift if one time zone was set in the camera and another in the navigator. You can leave all the default settings and click Yes. The next dialog box tells you how many files were linked to the coordinates and asks for confirmation, click "Yes" again.
 Coordinates added successfully
 Happened! Coordinates appeared under the photos, and on the map on the right, markers of the places where they were taken! By clicking on any marker, you can see which photo it is attached to. But that's not all, the program allows for group editing of data in exif photos! Again, select all the photos CTR + A, and edit the meta information CTRL + E.
 Group Editing
 As we can see, we have filled in the GPS coordinates of the shooting location and the height above sea level, but there is also a location that is currently empty. Press the button " Get all data from internet” and after a while for each photo the fields Country, City, etc. are filled.
In addition to the tab Location» In the upper right corner there are several more tabs that allow you to add categories and keywords, photo descriptions, modification date, information and contact details of the author, etc. Very comfortably!
Having finished editing the information of interest to us, click "Yes". Now, under the previews in the left panel, in addition to the coordinates, geographical names of the area have also appeared. Note! Up to this point, no changes are made to the original photos! After making sure that all the photos are selected CTR + A, press CTR + S. And one more thing. By default, Geosetter creates a new file for each photo, but adds the “jpg_original” extension to the original version. This behavior can be changed in the program settings.
You can see the list and program of my photo tours on the page. Join, it will be interesting!
Format

