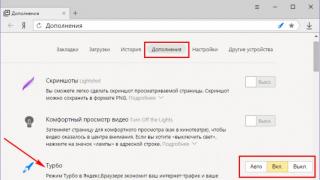
The Android operating system in various modifications is an ultra-modern and popular shell, widely used in portable mobile devices of leading brands. It doesn’t matter what version of the platform your smartphone, tablet or e-reader is running on: sooner or later you will begin to wonder how to free up memory on Android without deleting super-needed and important files, accumulated photos and videos. This harsh reality - functionality expanded for user comfort (animated wallpaper, super-fashionable interface, working with videos with posting on YouTube, etc.) automatically creates an acute shortage of free space. Is it possible to clear memory on Android without purchasing flash cards? My answer is yes.
The pop-up warning about full memory every time you save is terribly annoying. Which path do owners of portable mobile equipment generally follow when wondering how to free up memory on Android? They begin to frantically clear cookies, drop applications onto the card, and permanently delete videos and photos. If a smartbook or tablet is used for work, then you think about budget ways to increase memory on Android by purchasing a flash card. But this is a temporary solution. After a “mechanical” increase, the free space also quickly fills up and the issue of clearing memory on Android again arises.
But there is a real way to increase memory on Android without deleting anything by 1GB at once! It was tested on several Samsungs and no changes other than freeing up memory occurred.
Two-click algorithm for quickly cleaning and increasing memory in Samsung running Android:
1. Open settings, memory tab. Find the "other files" folder

2. Open it and boldly remove all the debris in it. Including files of the same name with popular applications (for example, like mine - vkontakte, its removal did not cause any damage to VK).

I suspect that something else disappeared after this procedure, maybe some accidentally downloaded music or videos. But nothing was missing from what was saved in the corresponding folders of galleries, videos, etc. not detected. That is, if a pop-up message prevents you from quickly saving something important and relevant, my method of how to free up memory on Android in just two clicks by selecting all files in the “other folders” folder will definitely be useful to you!
Many budget smartphones have very little internal memory. Such devices may have 8, 4 or even 2 GB of internal memory. Moreover, part of this memory is occupied by system files of the Android operating system.
Naturally, in such a situation, problems with free space cannot but arise. The device's memory quickly fills up and the user can no longer install new applications. If you are faced with such a problem, then this article should help you. Now you will learn how to free up memory on Android.
Tip #1: Remove unnecessary programs and games.
The easiest and fastest way to free up memory on Android is to play games. Open the list of applications and look for programs that you no longer need or use. Removing these applications will quickly free up memory on Android.
Tip #2: Transfer applications to a memory card.
Memory is a great way to free up a lot of memory on your Android device. In order to transfer applications to the memory card, you need to open Android settings and go to the “Applications” section. Here you need to open the properties of any application and click on the “Move to memory card” button. After clicking this button, the operating system will transfer all files of this application to the memory card. In this case, the performance of this application will not be affected in any way.

It should be noted that transferring to a memory card is not always possible. If the application is not transferred, then in its properties you will not find the “Move to memory card” button.
Tip #3: Inspect the folders where downloaded files are stored.
Use a file manager to examine the contents of the folders in which applications and the operating system store downloaded files. First of all, you need to check the download and bluetooth folders. Usually, these folders accumulate a large number of files that are no longer relevant. Deleting these files will quickly free up some of the occupied memory on your Android device.
Tip #4: Transfer user files to a memory card.
As a rule, users do not think about where they store their files. Very often, captured photos and videos, as well as other user files, are stored in the internal memory of the device. Open the internal memory of the device and check folders such as DCIM, media, Music, Movies, Video and Sounds. You also need to check folders created by other applications for the presence of media files in them. All found files must be transferred to a memory card. This will free up some more memory on Android.
Important Note: You should not touch files whose purpose you do not understand. Transfer only those files that were created/downloaded by you personally. If you transfer everything indiscriminately, this will lead to incorrect operation of installed applications and the Android operating system.
One more note: To avoid freeing memory too often, you need to configure the applications you use. To do this, you need to go to the application settings and change the storage location of files from the internal memory to the memory card. For example, you can change the storage location for photos in the camera settings.
Tip No. 5. Clear the memory of your Android device from garbage.
Just like in the Windows operating system, Android accumulates a variety of junk files that are not needed for work. It is best to remove such debris using special applications. For example, you can use the application. This application removes unused cache, residual files and outdated APKs.
No matter how much memory there is in your mobile device, sooner or later it will run out and you will have to get rid of old, unnecessary and simply junk files. Today we will tell you how to clean up junk from your Android phone and free up as much memory as possible.
Content:
Types of memory on Android devices
Modern smartphones and tablets have several types of memory, each of which performs its own functions:
- RAM memory or random access memory. RAM is a type of memory that ensures the operation of running or already running processes. This is a buffer memory that is used by any applications, both installed and system ones. Data is quickly written and deleted. RAM memory is active when constantly connected to a power source. System information about RAM is available in the Task Managers manager - here you can see the amount of allocated and free memory.
- ROM or ROM memory- a type of memory that performs its functions constantly. ROM does not assume the presence of a constant source of energy - the memory is not erased, even if the source is turned off. ROM is mostly required to store the Android operating platform. The data stored in this memory is difficult to change in any way; under normal conditions, it is read-only.
- Internal memory - Internal phone storage. This type of memory is provided to the owner of the smartphone so that he can store his data. This list includes files, programs, applications, media content, text information and more. Information about the status, amount of used and free memory is available in the settings menu in the corresponding section.
- External Micro SD memory. You can write any information to flash memory, edit or delete individual files. A memory card makes it possible to transfer some applications from internal storage to it, freeing up space for system files. Manufacturers offer large amounts of external memory, up to 128 gigabytes.
The easiest and fastest way to clear your phone memory
- First easy way— Go to Gallery -> Albums -> Videos or Photos from the camera (if possible, sort the files by size/weight), and then delete the “heaviest” files.
- Second easy way— Go to Settings -> Storage -> Cleanup and delete all junk files that were found on your phone using this function.
As we already found out at the beginning of the article, the memory in a phone can be different (internal permanent, operational and external-connected).
![]() Devices with the Android operating system almost constantly use RAM and internal memory. You can quickly and easily clean it using standard means or use third-party software. The device will work much faster if it has enough RAM and as much of it as possible. If the internal memory is practically full, then the smartphone will often begin to generate system errors, randomly reboot, freeze and show low performance.
Devices with the Android operating system almost constantly use RAM and internal memory. You can quickly and easily clean it using standard means or use third-party software. The device will work much faster if it has enough RAM and as much of it as possible. If the internal memory is practically full, then the smartphone will often begin to generate system errors, randomly reboot, freeze and show low performance.
Users who do not yet know how to clean their phone should use the following tools:
- Own functionality of the device;
- Third-party software designed for a mobile device;
- Personal computer;
- Online services - cloud storage.
Any of the proposed methods can be considered quite fast, simple and effective in order to clear the memory of an Android phone.
How to clear internal memory on Android
To improve the performance of the device, you need to clear not only the internal memory, but also the RAM.
To check the status and clear the RAM, you must:
- Activate the system key located on the left or right.
- View a list of open applications in the window that opens.
- View the amount of filled RAM.
- Click on the cross on the display and clear the RAM occupied by applications.
The system memory used by the operating system cannot be cleared in this way.
If you don’t have the desire or ability to understand the intricacies of third-party programs, you can carry out the procedure manually, after which the device will work much faster. Manual cleaning methods include:
- clearing application and browser caches;
- deleting messages;
- deleting applications that have not been used for a long time;
- Cleaning your phone from files stored on it.
Manually clearing Android phone memory takes longer than automatic cleaning, but gives comparable results.
![]() Deleting messages is important if the device has been used for several years, and the amount of text content amounts to thousands of files. Clearing your phone of messages is done like this:
Deleting messages is important if the device has been used for several years, and the amount of text content amounts to thousands of files. Clearing your phone of messages is done like this:
- Go to the “message” application from the desktop.
- Press one of the messages with your finger.
- In the menu that opens, activate the “select all” item.
- Activate the “delete” action.
Uninstalling applications in android
Unnecessary applications that take up space can be deleted through the operating system menu or on the desktop if the device has proprietary firmware. To do this, the application icon is pinched and removed from the desktop.
Advice: If the Android shell has a full-fledged menu, deleting an icon from the desktop will not lead to the elimination of the application. To delete a program, you need to go to the menu and then press the icon and put it in the trash.
Deleting files in android
The internal storage can also be cleaned using the built-in file manager - a standard program that is found on any Android device. The removal algorithm may differ on devices from different manufacturers, but in general the steps must be performed the same.
On most devices, the algorithm of actions is as follows:
- Open your phone's desktop and see application icons.
- Find the “files” application and go into it.
- The file categories and information about the amount of used memory will appear in the window that opens.
- Select a category.
- In the list of files that opens, select those that need to be deleted or activate the “select all” command.
- Delete files.
Transfer applications to a memory card, PC or cloud
- To transfer files to the card, you need to use the File Explorer application. We simply launch the application, find files in the phone’s memory, mark them and indicate their future location.
- To transfer files to your PC, simply connect your phone via a USB cable to your computer and copy files as if from a flash drive.
- To transfer files to the cloud, install the Google Drive application, enter your Google account information (log in), then click on the “Upload” button and select the files that you want to upload to the cloud. Once the data has been uploaded to the cloud, you can delete it from your mobile phone.
We clear memory automatically using Android and third-party applications. Removing cache and garbage in the browser.
The cache in a mobile device is an intermediate buffer containing information that the user can access in the near future. The cache saves computational time, provides faster access, and improves performance. But, if the file cache accumulates, it begins to slow down the system, taking up a lot of memory space.
You can clear the cache in the following way:
- Open the device settings menu.
- Find the "all applications" section.
- Open application manager.
- Open each program in the list one by one and activate the “clear cache” button.
Cleaning your phone of debris accumulated in the browser is done in the following way:
- Go to the browser.
- Open the menu located on the side.
- Activate the “clear history” command.
- Set the necessary settings: what to delete and for what period of time.
- Activate the “delete data” command.
![]() External memory also needs to be cleaned periodically. Cleaning can be soft (manual selective deletion of files) or radical (full formatting (deleting all files) from the memory card). Let's look at each method in more detail.
External memory also needs to be cleaned periodically. Cleaning can be soft (manual selective deletion of files) or radical (full formatting (deleting all files) from the memory card). Let's look at each method in more detail.
Manually deleting files
The most effective method of manual cleaning is to remove the heaviest files, usually video, audio files or high-resolution photographs. To delete them, you need to go to the gallery and sort all the files by size, and then delete the heaviest ones.
Tip: If you can’t sort files by size in your mobile device’s gallery, use a file manager. For example Total Commander.
Formatting the external memory of the device
Files from an external drive can be deleted by performing a full format.
The formatting process consists of the following steps:
- Go to Android settings.
- Search and go to the “Memory” section.
- Selecting the “Disable SD card” command.
- Exit settings.
- Go to settings again.
- Find and activate the “Clean memory card” command.
We download applications and files directly to the memory card from the Internet
You can learn how to download applications directly to a memory card as follows:
- Go to “settings”.
- Open the memory section.
- Find a subsection with approximate names: “Main memory” or “Default memory”.
- Check the “Memory card” option.
If all steps are completed correctly, all applications will be downloaded to the memory card automatically.
![]()
Countless annoying advertising banners, slow operation of the device - all these are signs of the presence of virus programs on the device. Viruses must be removed immediately, since malware, in addition to minor ones, causes serious problems - they steal personal information and read user correspondence. To prevent this from happening, you need to install an antivirus program on your smartphone. Any of the well-known antiviruses presented on the Play Market will do.
All you need to do is:
- Install any antivirus you like from the Play Market.
- Launch the application.
- Run a system check.
- Wait for the system scan.
- Delete malicious files if they were found by the antivirus program.
You can also remove viruses from your smartphone manually. Typically, users resort to this method when antivirus scanning does not produce the desired results.
To be sure to get rid of viruses, you need to do the following:
- Go to the settings section.
- Find the "Application Manager" tab.
- Open the list of applications.
- Remove applications that were installed shortly before problems with the device began to operate.
- Go to the application menu and activate the “delete” command.
How to completely wipe an Android phone without the ability to restore personal files
The easiest way to completely clear memory without the ability to restore files is to reset to factory settings. The internal memory will be cleared 100 percent, and the user will receive a clean Android.
To reset to factory settings you need:
- Go to the “settings” section on your smartphone.
- Open the “recovery and reset” section.
- Activate the “restore factory settings” command.
Applications to clear phone memory
From the numerous list of applications for cleaning RAM and ROM, users speak well of:
- . The application removes unnecessary files from memory, debris remaining from programs, and scans the device for malicious files. The program also helps speed up the phone by optimizing already running processes. Some applications are optimized to cool down an overheating processor.
- Mobile Boost. This application is a godsend for owners of smartphones that have been working for quite a long time, since it supports the old version of the operating system. To start the cleaning process, you only need to turn on the application and activate the “Clear” button.
- SD Maid. When launched, the program will immediately prompt you to scan, after which it will issue a full report on the state of the memory separately for each section. The user can clear everything completely or do selective deletion by sections. The program also has a built-in file manager.
In order not to get confused in the device interface, it is recommended to clear the device memory with simple and understandable software, for example the ES mobile file manager.
The operating algorithm is as follows:
- Go to Play Market.
- Find the application in the search bar.
- Download and install ES Explorer on your smartphone.
- Launch Explorer. The program will analyze the amount of free space and provide a list of files that can be deleted.
- Go to the side menu of the program.
- Go to the “local storage” section.
- Activate the “device” key.
- Open a window with folders located in the built-in storage. You can check the contents of each folder and delete unnecessary files.
Libraries with media content are cleaned in the same way. To go to the “libraries” subsection, you need to select it in the side menu of the program.
Often Android users cannot see files that take up space in the internal memory. In this case, you need to activate the “show hidden files” function in the program.
3 more useful articles:
Very often, the only correct solution to the issue of destroying information that is no longer needed is formatting. Format phone...
Power Clean is a popular tool for optimizing the performance of Android devices. The main characteristic feature of this cleaning wizard…
The Battery Calibration utility is designed to manage the energy consumption of a mobile device. To ensure that the charge is used correctly...
Android includes a large number of directories, but the question arises - which folders can be deleted and which ones cannot be touched?
Before deleting folders, please read the article.
This article is suitable for all brands that produce phones on Android 9/8/7/6: Samsung, HTC, Lenovo, LG, Sony, ZTE, Huawei, Meizu, Fly, Alcatel, Xiaomi, Nokia and others. We are not responsible for your actions.
We are not responsible for your actions
Android folders
The list of folders may vary depending on the Android version. Some applications can create their own directories in memory - for example, instant messengers. However, in general, the list of folders will be the same on all versions of Android, so you just need to know what is stored in them.
- Cache - folder with temporary update files. If you are not going to update the system, you can delete it.
- data/app - installation files of all third-party applications. If you don't use them, you can delete them.
- data/data - settings, saves and other service information necessary for the operation of applications. If you do not use installed programs, delete the directory.
- data/clipboard - data clipboard with the latest screenshots. It is not recommended to delete.
- data/dalvik-cache - cache memory area for the Java virtual machine, which allows the phone to run APK files. Files must be cleaned regularly, but cannot be deleted. (read)
The Documents folder stores a variety of documents. If they are not interested in the content, feel free to delete the directory. The same applies to the Bluetooth directory, which contains files received via this wireless technology.
Increase
The DCIM folder stores photos taken with the camera. If you don’t have the photos you need, you can safely delete the catalog. Deleting the Images, Pictures, Musi, Audio, etc. folders will not affect Android operation.
Folders that cannot be deleted
There are folders in Android that absolutely cannot be deleted, since without them the system will not work correctly. Remember these names:
- efs - information about IMEI, Mac, Bluetooth and Wi-Fi.
- etc - configuration files used when loading the system and processes of various built-in programs.
- lib - libraries necessary for the operation of programs and modules.
- mnt - images of mounted systems.
- proc - key information about the installed system.
- sbin - executable files of all programs involved in system management.
- sys - current system configuration.
Under no circumstances should you delete the system folder with all its subdirectories. System is the backbone of the system, so if you delete any data from here, you will have to flash the phone again.
Removal methods
To delete system folders, you need superuser rights - root. If you don't have them, then you definitely won't be able to break Android. If available, you need to be extremely careful - deleting important system files will result in you having to flash the device again.
If you figure out which folders can be safely deleted, then proceed to clearing memory using standard functions:
- Open the Android main menu and launch the file browser (file manager).
- , which can be deleted. Press it and hold your finger.
- When the menu appears, select Delete.
 Increase
 A manager option with multiple selection support is presented. The delete button is located in this case at the top right in the form of a trash can icon.
The standard file manager does not display all Android files and folders. To clean your device's memory well, use ES Explorer or another third-party file manager.
- Launch ES Explorer.
- Choose what you will clean - internal storage (Internal Storage) or memory card.
- Hold your finger on the folder you want to delete. Once it's checked, start highlighting other files and folders.
- After selecting all the items to delete, click on the “Delete” button in the bottom menu.
 Increase
 You can not use file managers on Android, but simply connect your phone to your computer by selecting the media device mode, in which you can view and change the contents of the memory.
There are two symptoms when the internal memory on the phone is sorely lacking:
- Applications and Android are slow,
- The phone displays a message that you need to take action and free up the occupied space.
The internal memory of the phone has a fixed volume, and it (seemingly) cannot be increased. However, in the guide we will tell you how to clear your phone’s internal memory of unnecessary files and applications.
By increasing the free space in Android memory, you will save time and stop noticing lag on your phone and tablet. The entire “cleaning” will take about 20 minutes.
Error: Insufficient memory on mobile device
Android usually displays this message if a process or application does not have enough free space in the phone's internal memory.
Lack of memory can make itself felt by constant freezes. If this is not noticeable when you buy a phone, then over time, after installing dozens of mobile applications and becoming overgrown with “garbage,” you begin to notice it.
The question involuntarily arises: do the phone’s characteristics “lie”? If not, then why does the same smartphone/tablet work stably for others?
Checking the amount of free memory on Android
When a notification appears about insufficient internal memory, the question arises: how much memory is available, what part of it is occupied?
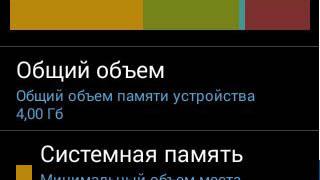
You can check your free space through your mobile phone settings. To do this, go to Settings – Options – Memory (Settings – Device Maintenance – Storage – Storage settings – Device memory). We carefully study the data, paying attention to the following figures:
- Total space – the amount of internal memory of Android
- System memory - the minimum amount of space reserved for system operation
- Available space – how much space is left in the internal memory.
Accordingly, if the built-in memory is not enough, you need to increase the memory on the phone to the size of System memory so that the system does not display the corresponding error.
In the following chapters, I will tell you how to clear the internal memory on Android.
Clearing your phone's internal memory
You can remove unnecessary things through the built-in tools of the operating system and through third-party applications. They analyze occupied space and help identify files that can be safely deleted.
Removing applications from Android system memory
There are probably applications installed on your phone that are hanging around like dead weight and are not being used for their intended purpose. Their size can reach hundreds of megabytes (including cache).
You can remove useless programs through the standard Application Manager: Options - Settings - Application Manager (Settings – Apps).
In Android 8, it is convenient to use the free utility FIles Go to calculate unnecessary applications. For other OS versions it is available for download via Google Play.
How to remove unwanted apps in FIles Go:
- Go to the Unused apps section,
- We sort applications by modification date or size,
- To remove, mark unnecessary programs with checkboxes and click Uninstall.
Video instructions for deleting applications:
Transferring files to a memory card
The internal memory of the phone, as already mentioned, has a fixed volume, so you need to constantly check whether there is enough free space for applications and the OS to work correctly.
In general, Android memory is divided into internal and external. External memory is easy to “expand”, fortunately, SD cards are inexpensive today (for $25 you can buy a 256 GB memory card).
Actually, you can transfer files through any file manager - via phone or PC.
Moving unnecessary applications from internal to external memory card
As an alternative to CCleaner, it is convenient to use the aforementioned Files Go application.
How to increase memory on Android manually
To manually clear your phone's memory, any file manager will do. We recommend ES Explorer or Total Commander.
Be careful and only delete unnecessary user files in Android internal memory that you created/copied yourself.
So, open the file manager, go to the root of the internal memory, start searching and deleting what is unnecessary.
Which files should you delete (transfer to a memory card) first:
- Photos, videos, voice recorders and other documents saved not on SD, but in internal memory;
- Documents received by mail or via social networks (most often they are saved in the Download folder);
- E-books and other files saved by third-party applications to the device’s memory;
- Contents of the DCIM, bluetooth, sounds folders.
We use Storage Analyzers (for clarity)
For clarity, we recommend using the Files Go application or any other storage analyzer for Android, which will show which files take up the most disk space and where they are located in the form of a diagram. Among these applications we note:
Transfer photos and videos to Google Photos service
It is photos and videos that “eat up” the most space on your phone, so you can quickly free up space on your memory card or built-in storage. If your phone doesn't support a memory card, move files you don't access often to the cloud. The best app for this is Photos, or Google Photos. It automatically uploads photos to the service, where they are available in their original quality through a browser or application.
In addition to Google Photos, you can pay attention to alternatives such as Dropbox, Flickr or Microsoft OneDrive.
Even when the photos are only available on the server, you can easily access them if you have a working internet connection. And most importantly, this is a really convenient and fast way to free up a couple of gigabytes of internal memory!
Memory clearing: questions and answers
1. The phone did not have enough internal memory, I sent half of the photos to the SD card, after that I open it, and they are all kind of cloudy. I tried to transfer it back to the internal memory of Android, but the photos are the same. How can I get my old photos back? so that it is as before, cleaned up without any distortions.
2. I didn’t have enough internal memory on my phone, so I wanted to clear it. I transferred the data (photos, music) to the memory card. Now the files cannot be read, although the phone sees the card. How can I get at least a photo back?
3. Samsung A5 phone. I didn’t know how to increase the internal memory, so I used my laptop to move folders with music and files from the internal memory to an SD card. After that, when opening the folders, they all turned out to be empty. Neither the phone nor the computer can see the files and music. The internal memory of the phone did not seem to decrease after this. How to find these files?
Answer. You probably copied sketches, not originals, to the memory card. The original photos may have remained in the phone's internal memory. If this does not happen, the DiskDigger program will help you.
If there is not enough space in the device memory, you should copy the files to your computer (make a backup copy) and only then move them to the memory card. It will be useful for you to read the instructions on how to clear internal memory on Android (see text above).
I have a Sony Xperia phone, when I go to the Play Market, I want to download some program, the system says that there is not enough memory on Android, although the flash drive is 16 GB! What to do?
Answer. Most likely, the “insufficient memory” error on Android is due to the fact that there is not enough internal memory - this is where the installation files are downloaded from Google Play.
- Transfer the largest files from the internal memory of Android to your SD card.
- Uninstall unnecessary applications using a file manager or Files Go.
- Use the CCleaner utility to clean up unnecessary files in your phone's memory.
I cleaned my phone's memory and deleted many folders. And now I can’t view the gallery through Android, it says: “The storage is not available.” How can I get it back?
Answer. During cleaning, you probably deleted the folder with photos on the memory card (SDCARD/DCIM/CAMERA). You can recover files from there using CardRecovery or PhotoRec programs.