To be honest, I have been thinking for a long time how to start considering the new version of 1C ZUP 3.0, and I am very grateful for this question. The final release, ready for accounting, of the 1C Salary and Personnel Management program, version 3.0, was released in September 2013. This edition is intended to change the program of edition 2.5, which is still supported by 1C. However, the developers warn that in 2015-2016 support for version 2.5 may be discontinued... In this regard, I will gradually begin to consider the new edition and start with the topic suggested by the blog reader ().
This article will cover two topics:
- Configuring and implementing data exchange between ZUP and ACU version 3.0;
- New document format in 1C ZUP 3.0.
Read also:
- Series of articles
What is the essence of the changes in the exchange between salary and accounting in version 3.0
✅
✅
✅
In version 2.5, the exchange of data, as a rule, consisted of uploading a document "Reflection of salaries in regulated accounting", in which transactions were formed on a monthly basis based on the results of accrued salaries, calculated personal income tax and contributions. And this document was uploaded to 1C Accounting 2.0. It was also possible to unload and payment documents. The upload was performed via an XML file. You can read more about the exchange of documents between the programs 1C ZUP 2.5 and 1C BUX 2.0 in the article.
The essence of the exchange between these programs of version 3.0 has changed. Now there is no need to take action every time to unload and load documents when required. It is enough to set up data synchronization between these programs once and set the exchange schedule (for example, once a day or once a week) or start synchronization when required. The main document for exchange is still "Reflection of salaries in regulated accounting", but the document itself has undergone significant changes.
How has the document "Reflection of salaries in regulated accounting" changed in 1C ZUP 3.0?
Since the main document for the exchange between accounting and salary is the document "Reflection of salaries in regulated accounting", it would be wrong not to mention the changes that he underwent in 1C ZUP 3.0 compared to version 2.5. And these changes are quite significant and in some way even controversial, but this is what the 1C developers decided and we cannot do anything about it.
Previously, in version 2.5, this document formed transactions based on the results of the salary calculated in the specified month, as well as on the basis of the calculated personal income tax and insurance premiums. To tell the truth, there weren't really any postings, i.e. the document did not form movements in specialized accounting registers as is done in 1C Accounting, but a complete semblance of this process was created. And most importantly, the user of the program could directly influence how these transactions are formed and customize this process. You can read more about how this is done in 1C Salary and Enterprise Management version 2.5 in the article. Then the document was uploaded to 1C Accounting and the very transactions that we saw in the "salary" were created.
It seems to me that an interesting situation was created in this scheme. The payroll calculator, who, according to the meaning of his work, would not have to get involved in the formation of entries, was exactly this, since only in the zup it was possible to set up the automatic generation of salary entries. And the accountant working in 1C Accounting could only wait for the finished document, check it and point out the salary to his mistakes, although in fact this is the work of an accountant. These are just my guesses and assumptions why the developers of 1C decided to abandon such a scheme for the operation of programs, and perhaps the reasons are completely different.
This is very convenient for me. You can see the calculation of insurance premiums on the "Contributions" tab of the "Payroll" document.
Next, it is necessary to form transactions based on the results of accruals. In 1C ZUP 3.0, for this, as well as in 2.5, a document is used "Reflection of salaries in regulated accounting." You can find it on the "Salary" tab of the main program menu. Let's create a new document, set January 2014 and generate transactions. It should be noted right away that we will not see the usual postings as in version 2.5. This is the first important difference.

Note that the fields "Reflection method" were not filled. This is true since I did not make any adjustments.
First, you can establish a reflection method for the entire organization. To do this, open the information about the organization (this can be done through the main menu item "Enterprise") and on the tab "Accounting policy and other settings" select item "Accounting and payment of wages". In the window that opens, fill in the field "The way of reflection". This field is filled in from the reference book of reflection methods.

And now it is worth paying attention to the element of the reference book "Ways of reflecting wages" itself. It has only one "name" field. And this is the second important difference in the new edition of the program.
 |
What is the meaning of this guide, if its elements can only have a name it is still quite difficult to understand, but soon everything will become clear.
So, I have established a way to reflect salaries and taxes for the entire organization as a whole. You can also set it separately for a department, a type of calculation, and so on, as it was in version 2.5 (read more). Now let's go back to the document "Reflection of salaries in regulated accounting" and re-fill it.

The field "reflection method" of the tabular section will be filled in.
Setting up synchronization / exchange between ZUP 3.0 and BUX 3.0
✅ Seminar "Life hacks on 1C ZUP 3.1"
Analysis of 15 life hacks for accounting in 1s ZUP 3.1:
✅ CHECK-LIST for checking payroll in 1C ZUP 3.1
VIDEO - monthly self-check of accounting:
✅ Payroll in 1C ZUP 3.1
Step-by-step instructions for beginners:
Now we need to set up synchronization / exchange between the ZUP and ACU so that the document we have created appears in the accounting department.
Setting up 1C ZUP 3.0
To configure 1C ZUP 3.0, go to the "Administration" section of the main menu and find the item "Data Synchronization Settings". It is necessary to check the box in it "Data Synchronization" and fill in the field "Prefix of this infobase"(I wrote "ZU" for the salary).

In the first window, select "Step 1. Configure a new data synchronization". By the way, in this window it is written which documents will be synchronized:
- Salary statements;
- Deposited salary;
- Receiving and paying off loans by employees;
- Reflection of salaries in regulated accounting.

Click Next. In the next window, you must select the option to connect to another program (1C Accounting). Since both databases are on the same computer, then we choose "Direct connection to the program on this computer or local network" and just below we select the switch "On this computer or on a computer in the local network"... You should also specify the directory of the infobase with which synchronization is carried out (1C Accounting). If you do not know exactly where the infobase files are physically located, then launch the 1C shortcut and in the list of your databases, hover over the line with the required database and the path to the database will be displayed at the bottom of the window.

This path must be specified in the field "Information base catalog".
If you need to enter a username and / or password to enter the database with which synchronization is configured, then we indicate the data in the appropriate fields. Finally, this step will look like this:

Note that this window has a button "Check connection" to make sure the settings are correct.
Click "Next". The program will start connecting to another database and setting up synchronization. As a result, a window will open in which you can change a number of unloading rules by clicking on the button "Change the rules for uploading data." In these settings, you can specify for which organization this particular synchronization will work.


Setting in 1C BUX 3.0
✅ Seminar "Life hacks on 1C ZUP 3.1"
Analysis of 15 life hacks for accounting in 1s ZUP 3.1:
✅ CHECK-LIST for checking payroll in 1C ZUP 3.1
VIDEO - monthly self-check of accounting:
✅ Payroll in 1C ZUP 3.1
Step-by-step instructions for beginners:
To fix this error, you need to run the 1C Enterprise Accounting base, version 3.0. 1C ZUP does not need to be closed !! Our task is to enable the data synchronization service. To do this To do this, open the program section "Administration" and in the group of links "Program settings" click on "Data synchronization settings". As a result, a window will open in which you need to put a checkmark in front of the line "Data synchronization". If you could not find this setting then until the last release or read below.

In previous versions of Accounting 3.0, this setting was in a slightly different form and was in a different place. Open the program section "Administration" and in the group of links "Settings" click on the item "Program settings".

In the window that opens, go to the bookmark "Data Synchronization" and check the box "Use data sync", and also specify the infobase prefix of two characters. For 1C Accounting, I have set the prefix "BU".

Now it is necessary
Let's take a look at a simple real-life example. Let's say we have a company that is engaged in wholesale and retail trade, as well as in this company, as in any other, accounting is conducted. The enterprise has two standard bases, these are UT (trade management) and BP (enterprise accounting), respectively, each of the bases maintains its own accounting, in the management UT to reflect all transactions related to trade, in the accounting BP. In order not to do double work, i.e. do not create the same documents in two bases (after all, the movements should be for management and accounting) we will just set up the synchronization between these bases.
We will set up data exchange one-way, from UT ---> BP. It is also possible to set up a two-way exchange, but in practice this is not so often required, so we will not consider it in our example.
Preparatory steps for setting up the exchange in the BP
Let's start setting up synchronization, first go to the 1C "Enterprise Accounting 3.0" database (receiver), we need to check if synchronization is enabled for this database, in order to do this we need to first go to the database. As soon as the base opens, go to the tab "Administration" ---> "Data synchronization settings"

A new tab opens in front of us, it must be filled in the same way as in the screenshot below, with the exception of the infobase prefix. The prefix should consist of two letters, you can set any one, but according to the 1C standard it is better to set the prefix by the name of the configuration, that is, for "Enterprise Accounting" the prefix will be "BP". If you set up complex exchanges and there are several accounting databases, then the prefixes should clearly differ from each other, here you can use the first two letters of the organization's name as an abbreviation.
We continue to configure data synchronization in UT

After we have done all the necessary actions in the receiver base (BP 3.0), in order to continue setting up the data exchange, we need to open the source base (UT 11.1). We go to the "Administration" tab, on the left in the menu, select the item "Data synchronization settings"... If synchronization is not enabled, then enable it using the checkbox, and do not forget to specify the prefix of the source base. Once we have completed all points 1-4 as shown in the image below, you must click on the "Data Synchronization" hyperlink (point 5).

In the new window that appears, you need to click on the green plus sign (Configure data synchronization), in the drop-down menu, select the item "Enterprise Accounting 3.0".
Configuring important points in the exchange of data between UT and PSU

Now we see a window with setting up data synchronization in 1C, select the item "Specify settings manually" and click "Next".

We continue to configure the exchange of data in 1C, on the next tab we need to select the option for connecting to the receiver infobase (direct connection to the program), connection parameters (on this computer or in the local network), the directory where the receiver base is located, as well as the necessary authentication data ( username and password in the database).

On the next page, we must fill in the rules for sending and receiving data from the BP 3.0 configuration (receiver). Click "change the rules for uploading data."

Before us opened the "Rules for sending data" window, in it we set the following parameters:
- Which reference data will be sent (in our example, we are only interested in documents and the reference data used in them, so we went to the appropriate item, if you select the first item "Send all", then all directories will be loaded along with the documents, often if the information is not used in the documents, then it is useless for the receiver, because it does not affect the accounting in any way)
- From what date to send all information (we will not consider manual synchronization in this article)
- For which or which organizations to send data to (in our example, we chose one organization IE "Entrepreneur")
- Rules for the formation of contracts
- Generalized warehouse
- Whether to fold documents in the warehouse
After we have made the settings, click "Save and Close".

Since in our example we are setting up and using a one-way exchange, from UT to BP, then the settings of the rules for obtaining data from "Enterprise Accounting 3.0" are not of interest to us, so click "Next".

In a new window, we are invited to configure the rules for the receiver base (BP). In point 1, we call our base some name, give it a prefix. The PREFIX should be the same as we set it in the BP database itself at the beginning of this article, if the prefixes differ, data synchronization in the 1C program will not work. After that we press point 2, and then point 3.

In paragraph 3, we need to allow documents to be posted when they are loaded into the database. Click "Save and Close".

Now the window should look something like the one shown below, click "Next".

This window contains reference information about the created synchronization in 1C. Just click the "Next" button. If the program displays an error when setting up data synchronization, then you need to contact us so that our 1C specialist will help you right now!

In the next step the program will offer to perform synchronization immediately after creating the data exchange settings... Let's agree with this and click "Finish".
A window will appear in front of you in which you will see information about how the synchronization is proceeding. If the receiver base is not empty, i.e. since accounting has already been kept in it, the user in the 1C program will be prompted to make a comparison of objects manually. Comparison of objects in 1C during data synchronization is a comparison of the same objects of the receiver with the same objects in the source.
Let's consider an example, let's say in UT there is a counterparty with the name "PharmGroup LLC" and TIN 1234567, and BP also has a counterparty with TIN 1234567, but the name "PharmGroup", if we do not compare these two objects when comparing data at the synchronization stage, then after synchronization in the receiver (Enterprise Accounting 3.0), we will have two counterparties with TIN 1234567 and two names "PharmGroup LLC" and "PharmGroup", respectively. In order to avoid such situations, a mechanism for matching objects was invented.

In our example, the receiver base is empty, and therefore the object mapping windows did not open for us. But after performing some operations, the system will certainly prompt the user to add some additional data and display the following window. We do not need to transfer any additional data, we have already configured everything that is needed before, so at this step we select "Do not add documents to sending". Click "Next".
The final stage of data exchange between 1C

At the final stage, the program will display the following window, in which the user will be informed that the synchronization was successful, click "Finish". This completes the synchronization between the bases in the one-way exchange from "Trade Management 11.1" (UT) to "Enterprise Accounting 3.0" (BP).
The order of synchronization of ZUP 3.0 and BP 3.0 provides for the possibility of scheduled exchange, with specified time intervals, but it can also be started manually, at any time.
In the process, objects included in the exchange plan will be transferred. Initially, objects in the databases are synchronized by GUID, but if some object was not found, then the search is carried out according to the search details assigned for each directory separately. You can see them in the exchange rules.
When changing the details of the directory elements in one of the systems, the updated directory will "arrive" with the exchange in the other system, but the elements will not be duplicated, since they have already been synchronized by the GUID.
Master data is transferred from the payroll system to the accounting system. For example, when unloading "Reflection of salary in accounting" and "Accrual of estimated liabilities for vacations", the accountant on the BP side must set the sign "Reflected in accounting" (Fig. 1 and Fig. 2).
When this attribute is indicated on the BP side, document transactions will be generated. When exchanged with the ZUP, this document is blocked for changes until the accountant removes the above sign in his program (Fig. 2).
Rice. one

Rice. 2
The first step is to activate the corresponding functionality in the Administration – Data Synchronization menu (Fig. 3 and Fig. 4).

Rice. 3

Rice. 4
The configuration itself does not have to be done in both programs. It is enough to set the settings in one of them and upload the file with the settings for loading into another system.
Settings from the ZUP side
- Setting method

Rice. 5
If the synchronization has already been performed in the receiving base, then you can load the settings from an external * .xml file.
- Connection option

Rice. 6
A direct connection will require you to specify the parameters for finding the destination base and a user with rights that allow you to perform the exchange.
- Directory for exchange files

Rice. 7
If you specify the "Compress data sent to archive" flag, the exchange file will be archived in * .zip format. When you click "Check the ability to write to the directory", the system will check the write access to the specified directory.
- In the settings of the synchronization parameters, you must specify the IB prefix (Fig. 8) and configure the exchange rules
The IB prefix is used in the name of the exchange file (Fig. 8), thanks to which it is possible to determine where the data is uploaded from and where it should be loaded. The file name is "Message_XXYY" .zip. Where XX is the prefix of the sender base and YY is the prefix of the recipient base.

Rice. eight
At this stage, it is necessary to select a list of organizations participating in the exchange and a method for uploading data. The data can be downloaded with a breakdown by employee or as a summary.
- Unloading the file of the exchange settings ZUP 3 - BP 3

The procedure for setting from the side of the power supply unit
When setting up the exchange in the receiver base, you need to load the settings file that you downloaded earlier (Fig. 10). After loading the file into the BP, the system will offer to generate data for sending (Fig. 11).

Rice. 10

Rice. eleven
Synchronization can be configured on a schedule, after which the systems will exchange data automatically. To do this, set up a synchronization script (Fig. 12). Let's consider the order of its filling:
- Enter the name of the script;
- Set up a schedule by enabling the "Automatically by schedule" flag;
- We indicate the information security involved in the exchange;
- We indicate the connection method;
- We mark the performed actions - receiving and sending.

We will also consider what errors may appear when setting up and performing synchronization.
- Making a backup
Before setting up sync and making the first sync, necessarily you need to create backup copies of our infobases 1C 8.3 BP 3.0 and ZUP 3.0:
The location of our database can be viewed in the 1C launch window:

- Check the relevance of releases in ZUP 3.0 and BUX 3.0. Update if necessary.
This topic is well covered in the article.
Uploading data from 1C ZUP 3.0 to Accounting 3.0 - step by step instructions
After completing the preparatory part, you can start setting up synchronization.
Step 1
Let's start the BP 3.0 base in user mode and go to the section Salary and personnel – References and settings – Salary settings:

And in this window, in the field "Accounting for payroll accounting and personnel records are kept:" set the switch to position "In an external program":

Step 2
Let's go to the section Administration –

And in the window check the box Data sync "Download prohibited dates" "Tune" specify the date until which data will not be transferred during synchronization.
The ban date can be set for the entire infobase

and separately, for each organization:

Attention! The date the data download was prohibited must be later than the date when the exchange began to be used. For example, the download ban date is 06/01/2015, and the exchange start date is 01/01/2015. Otherwise, it makes no sense to set the ban date later than the exchange start date.
In our example, we will not set the ban date. Let's close the form "Dates of data loading prohibition":

If you have encountered a problem, there is no way to check the "Data Synchronization" checkbox. this field is not active:

This means that the user does not have the "System Administrator" rights, despite the fact that he has full rights.
You need to start the infobase in the configurator, and go to the menu Administration – Users:

Open the card of this user, go to the tab "Others" and check the box "System Administrator":

Step 3
Let's start the ZUP 3.0 base in user mode and go to the section Administration – Data sync settings:

In this window, check the box "Data Synchronization"... If necessary, here you can set the date of prohibition of data download by checking the box "Download prohibited dates" and when following a hyperlink "Tune" specify the date until which data will not be transmitted during synchronization:

Step 4

The Synchronization Setup Wizard window will open. Here we click on the button "Configure data sync"... A selection list will open:
- "Enterprise Accounting, revision 3.0"- creation of synchronization with BP 3.0
- "Enterprise Accounting, revision 3.0 (in service)"- creation of synchronization in the service model (in the "cloud" service)
- "Exchange in a distributed information base"- intended for the creation of a Distributed Information Base (RIB) ZUP 3.0
Let's choose "Enterprise Accounting, revision 3.0":

Loading data into 1C Accounting 8.3 - step by step instructions
Step 1
Here we will be prompted to create a backup of the data. Since we have already created backups earlier, we skip this step. In field "Choosing a way to configure data synchronization"- let's leave the switch "Specify settings manually" and click on the button "Further":

Attention! The switch "Load a file with settings created in another program" - should be selected when you continue to configure synchronization, i.e. the setting was performed on the side of the Enterprise Accounting, 3.0 program. When you select the switch to this position, the selection button becomes available on the form, where the external settings file, previously unloaded from BP 3.0, is indicated.
Step 2
In field "Choosing the option of connecting to another program" set the switch "Direct connection to the program on this computer or local network".
Let's specify the parameter for connecting to another program - "On this computer or on a computer in the local network".

Click on the button "Check connection":

After a positive result, click on the "Next" button.
Step 3
The program will check the connection again and a window with further settings for the ZUP 3.0 infobase will open.
In field "Data for the formation of accounting entries are uploaded" set the switch "With details by employees".
If we need to carry out an exchange for all organizations, then in the field "Exchange in progress" set the switch to the position - "For all organizations".
If we need to perform an exchange for certain organizations, then in the "Exchange in progress" field, set the switch to "Only for selected organizations" and we will be given the opportunity to check the boxes opposite the organizations for which we want to set up the exchange:

After setting up the data exchange rules, click on the button "Record and Close".
Make sure that the Prefix is set and click on the button "Further".
Step 4
In the next step, we will make settings for the information base of the accounting program. The settings are made in the same way as in the previously described step # 3 for the salary program:

Step 5
At the next step, a window will open with information about the previously configured parameters. Here you can familiarize yourself with this information, and, if necessary, go back and make changes to the settings:

Step 6
The program will create a new data synchronization setting:

Attention! If this message appears in step 6:

it means that you forgot to check the box in setting up data synchronization for the accounting program "Data Synchronization".
To fix this error, without closing the synchronization wizard window in the salary program, go to the accounting program and in the section Administration – Data sync settings check the box "Data Synchronization"(look p. 2 chapters Synchronization setup). Then you need to return to the salary program and press the button again "Further".
After creating the setting, a window will open, which will tell you about the successful completion of the data synchronization setting:

When checked "Perform data synchronization with Enterprise Accounting, revision 3.0" and pressing the button "Ready"- the interactive data synchronization wizard will start and in the data mapping window you can specify which objects are the same.
By default, this check box is enabled and it is not recommended to clear it. But I, in my example, will uncheck this checkbox, and then we will consider the further possibilities of the synchronization settings and launch the interactive data synchronization wizard with the ability to match object data. And also let's see what will happen if we do not manually compare the data, but immediately synchronize the data.
Click the "Finish" button.
A window will open with the synchronization we created:

Fields "Data received" and "Data sent" with the meaning "Never"- says we haven't done sync yet.
Button 1 "Synchronize"(Synchronize data automatically) - start synchronization by the user at will.
Button 2 "Synchronize data by specifying additional parameters"- set additional parameters and perform synchronization.
Button 3 "Contents of the data to be sent"- here you can see a list of objects for which changes are registered and which will be sent during synchronization:

How to set a schedule for automatic synchronization in 1C 8.3
Let's go to the tab "Schedule":

and click on the button "Tune" and follow the hyperlink:

Here you can set a schedule for when and how often data synchronization will occur.
In the tab "Are common"- you can specify the date from which date you want to configure the automatic synchronization schedule:

Tab "Daytime"- specify the time and interval of synchronization:

Tab "Weekly"- specify the days of the week when synchronization will take place:

Tab "Monthly"- specify the month when the synchronization will take place:

By default, synchronization is configured for every 15 minutes (900 sec).
In our example, we ourselves will decide when to synchronize.
Uncheck the box "Automatically on schedule" and click on the button "Record and Close":

How to set up the rules for data exchange between 1C 8.3 databases
Let's go to the tab "Data Synchronization Settings" and click on the button "Tune":

Here we will see our configured data exchange rules. You can correct it if necessary.
By pressing the button "Download a set of rules":

Here you can use rules from the configuration itself, or load from an external file by checking the box "From a file on a computer"... For example, if these rules were modified by a programmer.
You can also upload rulesets to an external file by clicking on the button "More" – "Save rules to file"... A zip archive will be unloaded containing 3 files:
- CorrespondentExchangeRules.xml - file with conversion rules for uploading to the current database;
- ExchangeRules.xml - file with conversion rules for unloading from the current database;
- RegistrationRules.xml - file with registration rules for the current program:

Consider the following group of buttons - "Data Synchronization Options"... Here you can download the rules for converting and registering objects; view and change (if necessary) connection parameters:

when the button is pressed "Get sync settings for another program"- you can open or save data synchronization settings to an external xml file;
the composition of the data being sent (we have already considered this button);
or remove the sync setting:

Next group of buttons "Data Synchronization" previously considered:

Let's close the settings window.
You do not need to configure anything to synchronize the accounting department. we made all the settings from the ZUP 3.0 program.
Comparison of objects when exchanging data in 1C 8.3
So we're ready to sync.
At the first synchronization absolutely necessary perform data mapping. Otherwise, duplication of elements of directories or documents is possible. Comparison of data occurs on key fields, which we will consider further in this article.
Click on the button:

A wizard window will open, where it is also possible, if necessary, to configure the connection parameters. Click on the button "Further":

The program will analyze the data:

And the "Data Mapping" window will open, where in the tabular section there will be a list of compared objects. The composition and number of elements in the list will depend on the completed elements of the reference book and documents in the accounting program.
You need to make sure that the data is mapped correctly, and if necessary, match the desired items. For example, matching a catalog item "Organizations" happened automatically, because the key fields (Name) of this element in ZUP 3.0 and BUCH 3.0 completely coincide.
Attention! Even extra spaces are taken into account, i.e. if in the accounting program, in the requisite "Name in the program" there will be an extra space, then the organizations will not be matched automatically:

And in the reference book we have not matched 1 item. To match, double-click the right mouse button on this line or select this line and click on the button "Compare":

The Map Data Reference window will open “Methods of reflection in the bukh. accounting " and establish a correspondence between two objects:

After that, click on the button "Record and Close":

Synchronization 1C 8.3 BP 3.0 and ZUP 3.0
Now, the data is fully matched. The rest of the sent objects (elements of directories and documents) will be automatically created in the accounting program.

In the next window, you can make a number of specific settings, but in this example we will not add documents and data. In field "Data to send" let's leave the default switch - "Do not add".
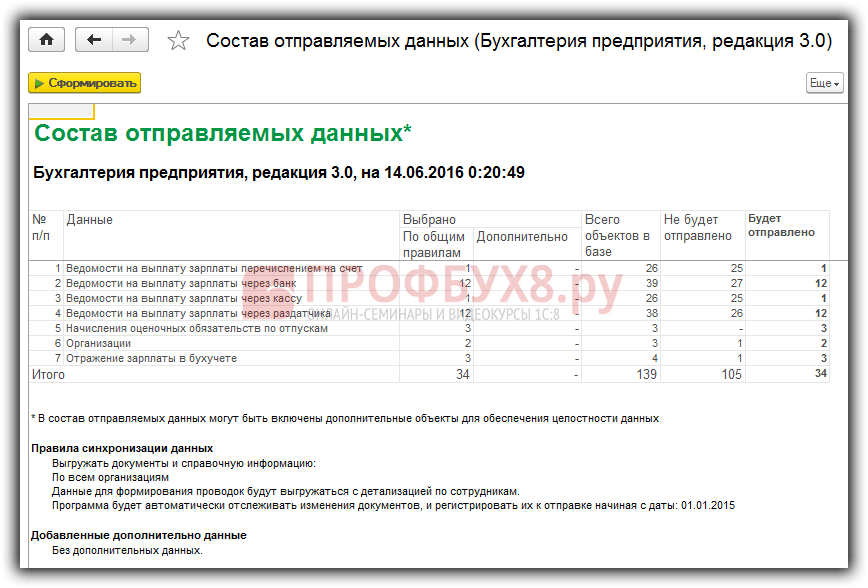
Let's open the report "Report on the composition of the sent data" by clicking on the corresponding hyperlink:

In this report, you can see the data that will be sent to Enterprise Accounting, 3.0 during synchronization. If necessary, you can open the elements of reference books or documents of interest from the report:

The process of transferring data to the accounting program will begin:

Upon completion of the process, a message will appear stating that the data has been successfully sent and received. Here, it is also possible to configure the data synchronization schedule.
Click on the button "Ready":

The entire synchronization process is recorded in the data send event log. You can go to the link Data received (data received from the BP 3.0 program) and Data sent (data sent to BP 3.0).

Errors when synchronizing data between databases 1C 8.3 BP 3.0 and ZUP 3.0 - how to find and fix
If data synchronization is used in the 1C 8.3 program, it is necessary to view and fix the problems that have arisen in ZUP 3.0 and BP 3.0. Which can be seen in the data sync warning information register:
- chapter Administration – Data sync settings – Data sync warnings:

- chapter Administration – Data sync settings – Data sync warnings – Data sync – Warnings:

- Main menu – All functions – Information registers – Synchronization warnings:

"Failed documents" when synchronizing data between 1C 8.3 databases
Tab « Failed documents " - here is a list of documents that came from the salary program during synchronization, and for one reason or another could not be automatically posted.
Let's go to the accounting program 1C 8.3:

In our example, these are documents "Cash withdrawal" and the reason why it was not possible to post is that the accounting account is not filled. Bug fixes:
- Go into each document and indicate an accounting account, and then post and close.
- Select these documents and click on the button "Change selected documents"... It is good to use this method when there is a large list of documents:

In the window "Change selected items" find the required attribute, set the value and click on the button "Change details":

After that, a message will appear about the successful change of the details. Click on the button "Ready":

As a result, our processing will automatically put the value - "50.01" in the props "Accounting account" to all selected documents:


Now select another document and click on the button "Ignore"... In this case, the document will remain unpost:

When conducting and ignoring, these documents are automatically cleared from the tabular section on the tab “ Unchecked documents ":

You can also view all ignored documents by clicking on the button "More" and by checking the box Show ignored:

We will now go to the document list form "Cash documents" and see our documents:

Button "Customize List" it is good to use if the tabular section contains a large list of various documents. For example, select one type of document and perform certain operations on them:

"Blank details" when synchronizing between bases BP 3.0 and ZUP 3.0
Tab "Unfilled requisites" - here is a list of documents and directory elements that came from the salary program during synchronization, and could not be recorded correctly, since one or several details were not filled in correctly:

The fix is the same as on the tab "Failed documents".
Let's go to the card of this counterparty, fill in the details "Country of registration", press the button "Record and Close"... After that, the data from the tabular section is automatically cleared :

"Conflicts" when synchronizing data between 1C 8.3 databases
Tab "Conflicts" - a list of documents and directory elements that were changed in the payroll and accounting programs in the interval between synchronizations are displayed here. As a result, two versions of one element of the directory or one document appeared. Such conflicts are resolved automatically - but you can view the list of such situations and confirm or revise the automatically made decisions to resolve conflicts.
Let's go to the salary program.
Here we see a conflict of a directory item "Organizations"... And this conflict was automatically resolved in favor of the accounting program, as evidenced by the entry in the requisite "Result of conflict resolution".
Let's press the button Show the differences and see if this choice satisfies us:

In this report, we see that a number of details are not filled in in the accounting program, these are: INN, OGRN, OKVED and contact information. We are not satisfied with this choice of program. Let's close the report:

Click on the button "Revise" and change the result of the permission to the opposite:

Let's give an affirmative answer to the question: "Replace the version obtained from another program with the version from this program?":

After that, the tabular section will be cleared:

Advice! If, for example, you need to correct the data in the statement (the wrong amount was entered), then it is better to do this on the side of ZUP 3.0. Then perform synchronization. In the BP, the list will change automatically. Thus, this list will not be included in the tabular section on the "Conflicts" tab.
"Not accepted by date of ban" when exchanging data between 1C BP 3.0 and ZUP 3.0 databases
Tab "Not accepted by date of ban" - documents are shown here, information about which has not been entered into the application database, because the dates of these documents are earlier than the date that the data was not loaded, set on the Data Synchronization tab.
Let's go to the accounting program. And if, when setting up synchronization, the download prohibition date was set, then we can see the following picture:

You can view the data of a specific document by first selecting it and clicking on the button "More" – Show unapproved version:

You can select the entire list and click on the button "Ignore"- clear the tabular section:

To display the ignored data, you can click on the button "More"- and check the box "Show ignored"... The entire list of ignored documents will appear in the tabular section. If necessary, you can select a document, click on the button "More" – "Don't ignore"- the document will return to its previous form:

After correcting all errors, you need to re-exchange data between the 1C 8.3 databases from ZUP 3.0 to Accounting 3.0.
Compliance of 1C 8.3 infobase objects for data exchange
When objects are matched and new objects are transferred during synchronization, the information is written to the PC in the salary program:

and in the accounting program 1C 8.3:

This information register records which element of ZUP 3.0 corresponds to the element from BP 3.0 and the unique identifier of this element, according to which, during the next synchronization, the program matches the elements.
Deleting a document in BP 3.0 with configured synchronization with ZUP 3.0
What will happen if we delete in BP 3.0, for example, the document "Statement for the payment of salaries"? Will this document be recreated on resynchronization? Let's experiment.
Let's go to the accounting program 1C 8.3 in the section Salary and personnel – Salary – Salary statements:

And we will delete document No. 0000-000012 "Statement for the payment of wages", with the view of the place of payment - "Through the distributor" from 28.12.2015, i.e. mark this document for deletion and completely delete it through the section Administration – Service-. And then we will perform synchronization.
Let's go to the document list form "Vedomosti for the payment of wages" and we will see that our document does not exist:

Also, an entry in the information register has been deleted.

Now, let's go to the salary program and open the document list form "Vedomosti for payment of wages through the distributor"... Our document is marked for deletion:

And in the information register "Correspondences of information base objects" the record is present:

To actually delete the payroll through the distributor, you need to start processing "Deleting marked objects" In chapter Administration – Service... As a result, the document itself and the entry in the information register will be deleted "Correspondences of information base objects".
If we mistakenly deleted a document in BP 3.0, in order to restore it, we need to:
- In the program ZUP 3.0, remove from the mark for deletion and post the document. As a result, this document will be automatically registered for exchange with the program “Enterprise Accounting, ed. 3.0 ":

- Synchronize. After that, this statement will be included in the accounting program 1C 8.3:

And there will be an entry in the PC "Correspondences of information base objects":

Attention! If in ZUP 3.0 for our document you remove the mark for deletion and re-install it (by mistake they removed the mark for deletion), then this document will be registered for exchange with the BP 3.0 program:

And when synchronized in the accounting program, the document will appear marked for deletion:

To prevent this from happening, you need to unregister this document in the salary program:


After that, this document will no longer be available for exchange with the accounting program:

What objects are transferred to 1C 8.3 Accounting 3.0 during synchronization
Synchronization of "Directories" when exchanging data between 1C 8.3 databases
The elements of the directories that appear in the synchronized document are synchronized:

Let's take a look at how the directories were synced "Subdivisions".
The ZUP 3.0 reference book "Subdivisions" for the organization "Kron-Ts":

Directory "Subdivisions" in BP 3.0 before synchronization.
For example, in a subdivision "Legal department" added an extra space in the name, and in the subdivision "Personnel development sector" did not specify "Parent", i.e. superior unit - "Department of Human Resources":

Directory "Subdivisions" in BP 3.0 after synchronization:

After synchronization, the unit "Personnel development sector" automatically matched and set the parent i.e. superior unit "Department of Human Resources"... A subdivision "Legal department" duplicated, tk. key fields "Name" are different (extra space).
Synchronization of "Documents" during data exchange BP 3.0 and ZUP 3.0

Regulated reporting is also synchronized.
Synchronization of "Registers of information" when exchanging data between BP 3.0 and ZUP 3.0

Attention! If, when setting up synchronization, it is specified that the data for the formation of transactions is loaded summarized by employees , then a number of documents and reference books are not uploaded into the accounting program: Deposits of unpaid wages, Salary statements, etc.
For example, those directory elements are unloaded "Individuals", which appear, for example, in the document , on the tab Withholding wages:

Directory "Individuals" in BP 3.0, if it is configured in the exchange rules "Summarized by employees":

Directory "Individuals" in BP 3.0, if in the data exchange rules it is configured with "Detailing by employees":

Regardless of how it is configured in the exchange rules: consolidated or with details by employees, in any case, documents will be synchronized "Reflection of salaries in accounting" and " Accruals of estimated liabilities for vacations "(if the organization maintains estimated liabilities).
Create Payroll, Premium, and Vacation Estimated Transactions After Synchronization
After synchronization and the appearance of documents in the accounting program "Reflection of salary in accounting" and "Accruals of estimated liabilities for vacations" no transactions will be automatically generated. To reflect transactions, you need to go to the document and check the box "Reflected in the accounting" and hold the document:

After that, transactions will be automatically generated:

And in the form of a document list "Reflection of salaries in accounting" this document is highlighted in gray:

Similarly working with a document "Accrual of estimated liabilities for vacations":

Postings of this document:

List form "Accruals of estimated liabilities":

After synchronization in ZUP 3.0, these documents become unavailable for editing.
Reflection of salary in accounting after synchronization:

Accrual of estimated vacation liabilities after synchronization:

To be able to edit these documents, you need to uncheck the box in the accounting program "Reflected in the accounting", write down the document and synchronize with the payroll program.
Disabling and deleting synchronization settings in 1C 8.3 Accounting 3.0 and ZUP 3.0
To disable synchronization, you need to go to the section in BP 3.0 Administration – Data sync settings and uncheck the box "Data Synchronization":

Similar actions must be performed on the side of the salary program.
Moreover, the synchronization settings themselves are not deleted, i.e. when re-checking the box "Data Synchronization" you don't need to reconfigure sync.
To actually remove the synchronization, you need to go to the section in BP 3.0 Administration – Data sync settings – Data synchronization, and press the button "Remove this sync setting":
ZUP 3.0 documents that get into BUH 3.0 during synchronization:
- "Reflection of salary in accounting" - gets into the document of the same name in the accounting program, then the postings are formed directly, based on the transferred data
- “Vedomosti…” - in ZUP 3.0 there are four types of this document “Sheets to the bank”, “Sheets to the cashier”, “Sheets of transfers to the account” and “Sheets of payments through the distributor”. All these documents come to the accounting program in the document - "Statement for the payment of salaries."
There are also a number of documents that are also transferred, but not in all cases.
For example, the document - "Accrual of estimated liabilities for vacations". When a company keeps records of estimated liabilities, it becomes necessary to form and calculate a document on a monthly basis after the formation of documents - "Calculation of salaries and contributions" and "Reflection of salaries in accounting" - "Calculation of estimated liabilities for vacations". The program will calculate the accumulated amount of liabilities for each employee, taking into account the remainder of vacations and average earnings.
After synchronization, a document of the same name will be created in ACC 3.0, which, when posted, will create transactions to reflect the calculated estimated liabilities.
An additional series of documents involved in synchronization:
- Deposit of wages (ZUP) -> Deposit of unpaid wages (ACH)
- Payment of the deposited salary (ZUP) -> Cash outflow order or Write-off from the current account (ACC) - a document is created in the accounting program depending on the value of the "Settlement form" field of the salary document
- Loan agreement to an employee + Issuance of a loan to an employee (ZUP) -> Expense cash order or Write-off from a current account (ACC)
- Loan repayment by an employee (ZUP) -> Receipt cash order or Receipt to current account (ACC)
Elements of directories are also transferred from the ZUP during synchronization. Pay attention to the directory - "Organizations". If the synchronization is done for the first time and organizations have already been entered in both databases, then it is worth making sure that all key information (such as TIN, KPP) is entered in the same way in both databases. For the program to correctly match the organizations.
The directories are also synchronized:
- Individuals
- Subdivisions
- Methods for reflecting salaries in accounting
- Contractors
Data elements of directories are involved in synchronization only if they are present in the synchronized document - "Reflection of salaries in regulated accounting" or in any other uploaded document, if we talk about individuals.
Priority of objects when synchronizing ZUP and Accounting 3.0
It is strongly recommended to change data in synchronized documents only on the ZUP side, and not in ACC. For example, if we noticed an erroneous amount in the statement in ACC 3.0, then we should find the error in the ZUP, and not correct the figure in ACC. After correcting the error in the memory, perform the synchronization again. The amount in ACC will change automatically.
If you follow this rule, then for the synchronization mechanism the documents from the ZUP will remain priority and there will be no confusion.
Priorities can be controlled. When, after synchronization, the program cannot determine exactly which directory or document from the ZUP or from the ACU is of higher priority, then in the synchronization window, warnings will automatically appear.
By opening warnings on the Conflicts tab, you can see which objects the program "doubts" about, the priority of which program it has selected, and if you need to change it. Typically, this kind of warning occurs during initial syncs. For example, the element of the directory "Organizations" was created in both programs, and the composition of the filled information is different. If the priority element is in the ZUP, and you need it to be from the ACU, then the priority can be changed by clicking on the button - Review.
Setting up Accounting 3.0 during synchronization
During synchronization, all the settings of the BUCH 3.0 program are concentrated in - Accounting parameters, in the Salary and Personnel tab. This is where the parameter is set - In an external program, if salary accounting will be carried out in the ZUP.
The summary accounting for employees is also set up. In this case, account 70 will not be recorded for employees, and no one will see the salaries of specific people in cash. Convenient function of the program.
In 1C: Accounting, only individuals are unloaded, not "employees". The "Employees" directory will be empty and there is no need to create employees there, since personnel records are kept in the ZUP. In all accounting documents, where the presence of employees is assumed, in fact, a choice will be made from the directory "Individuals".
First and subsequent synchronization of objects
Let's take an example, in the ZUP and in the BUH, one and the same individual was created independently of each other. If, after creating it, you make synchronization, then 1C will see that a new element of the directory has appeared in the ZUP - an Individual and will look for a match to it in the Accounting Department. The search will be conducted on key fields. For an "Individual" it is - Name and date of birth. If an element with the same key fields is found in the Accounting Database, an entry will be made in a special register - Compliance of infobase objects.
There it will be recorded - which element of the ZUP corresponds to this element from the ACU. The record will be formed by the unique internal identifier of the element (any element of all reference books or documents has it). At the next synchronization, the program will simply refer to this register and determine the correspondence from it, without additional compliance checks.
In the ZUP, a statement is often created, which, upon completion of synchronization, is uploaded to the Accounting Department. If this list is deleted from the Accounting Department, then during the next synchronization it will not be unloaded again. In the correspondence register, this record - SPM corresponds to the already deleted record-record and will not be re-created.
It will only help to re-create a new document in the ZUP (with the deletion of the old one). It will not yet be in the register of correspondences and as a result, during synchronization in the Accounting Department, a corresponding document will be created.


