Like any other operating system, Android may not always work the way you want it to. For example, when launching the simplest application, the smartphone begins to slow down or freeze. Often something similar happens even with a regular incoming call. Many owners of smartphones and tablets based on Android OS are upset, and some even suggest purchasing a new device. Do not hurry! Most problems can be resolved with a factory reset. This function is present in this operating system.
In English, the function is called Hard Reset, which can be translated as “hard reboot”. In fact, the system is rebooted, which restores the initial factory settings. In addition, all information that was added by the user is deleted, including applications, SMS messages, contacts, video and audio clips, etc. Therefore, before performing a hard reboot, it is recommended to save the data that you will need later.
Information is deleted only from the phone's memory. Those files that are on the memory card, if present, will not be deleted. However, you can remove them yourself from the menu using a soft reset.
So, if you decided to do a Hard Reset and saved all the important data that you needed (for example, using backup), then we can begin the procedure itself.
Method one
I will show an example on "naked". If you are using a smartphone or tablet with add-ons, the menu may be slightly modified, although the procedure itself will not change. Go.
We look for the “Settings” application on the desktop. If it is missing, find it in the "Application List". I have “Settings” on the main screen.

The menu opened. Now you need to find the “Backup and Reset” section.

We go and select the section “Return to factory settings” - “Reset settings”. Here you can configure backup of your data.

You will see a kind of reminder that says that all data will be deleted from the internal memory of the device, including settings, applications and even the added Google account (the account itself, of course, will not be deleted, just next time you will have to re-enter your login and password him). Click on the “Reset phone settings” button. If you also need to clear the memory card, check the box next to “Clear card memory”.

The system asks again whether to reset? When you're ready, click Erase Everything. The device will reboot. Most likely, the reboot will take a little longer than your gadget usually loads - this is quite normal, do not panic.

Method two
You can try using an even simpler method. All you need to do is dial *2767*3855# and send a call. Afterwards a Hard Reset will automatically occur.
However, I do not recommend using this method for the simple reason that, according to reviews, this set of numbers can perform different functions on different devices. So, on some devices it allegedly changes the IMEI. I find it difficult to say how true this is, and therefore I advise you to be as careful as possible.
Method three
This is the so-called hard reset. You should only use it if your device does not turn on. If it works, use the first method.
So, your device does not turn on, just in case, remove the memory card from it, if there is one. To enter Android system recovery (the menu we have to work with), you need to press the buttons on the device’s body in a certain order. The problem is that the combination of buttons may vary from manufacturer to manufacturer. I decided to show you an example on a device from Samsung, one of the leaders in the Russian mobile device market.

Since the device is already turned off and will not turn on, we immediately proceed to active actions.
- Press and hold the Volume Up key, the Power button, and the Home button.
- Keep them pressed until a green robot appears or the menu starts to load.
- Using the volume keys, select wipe data/factory reset and confirm it with the device on/off button.
- In the menu that opens, select Yes - delete all user data, after which settings and files will begin to be reset and deleted.
- Then click select Reboot now and the device will reboot. You will receive a device with a completely clean operating system.
Regarding restoring settings
After the user makes a Hard Reset, he will probably want to use a backup to get back all his settings, files and applications. Is it worth doing? The question is controversial.
The problem is this: if your device was not working properly, for example, freezing or lagging during operation, then it is quite possible that the cause was an application or certain settings. If you restore the backup, then there is a high probability that your device will work exactly the same as before the full reset. Therefore, it makes sense to restore a backup only if you are sure that the problem is definitely not in the previous settings or applications.
Contacts can be transferred manually, as well as the necessary documents, and applications can be downloaded from. In my opinion, this is the most optimal solution.
Custom firmware
As for custom firmware, they are restored in exactly the same way; there is no need to reinvent the wheel. The main thing is to remember that if you need to return the phone under warranty, you will first need to bring it to life if it does not turn on (use the third method), and then flash it to the factory firmware. And remove root rights if they were installed.
Surely everyone has encountered the problem of an iPhone or iPad not working correctly. Previously, it showed the highest performance, but now it glitches with minimal use. It turns out that fixing this problem is very simple. You need to clear application data, reset some settings to factory settings, reset iOS, or even format the device completely. But how to do it correctly so as not to harm your favorite gadget? Let's find out!
What is a factory reset and is it necessary?
Any device, be it a computer, tablet, phone or even an MP3 player, saves a lot of additional data in addition to the information that the user directly views. This includes the application cache, operating system settings, and launch data for certain files. All this information is needed for the convenience and efficiency of using the gadget. After all, no one wants to configure the program from scratch after each launch or wait several minutes for the device to turn on. The operating system saves information that will be used frequently.
Naturally, the internal memory of any gadget is not endless. Despite the fact that auxiliary data takes up little space, sooner or later a lot of it will accumulate. And when the memory is overloaded, problems will begin. That is why resetting application data and settings of your phone or tablet is a necessary measure. Even if your device is working fine now, it is still worth clearing it of unnecessary information. This will help you avoid serious mistakes in the future.
What to do before completely cleaning your iPhone
So, if you decide to reset the settings (it doesn’t matter whether you want to completely format the device or clear the data of some programs), you first need to make a backup copy. This copy will save all your data and settings, as well as files and programs. In general, it is recommended to do backups periodically. If you want to “start over”, just skip this step.
Officially, Apple devices can back up using two programs: iCloud and iTunes. In the first case, your data will be placed in the cloud on the company’s server. So you can only access them via the Internet. The second option allows you to save a backup copy on your computer. Choose the one that suits you best.
Create a backup in iCloud
In order to back up your device to iCloud, you will need a Wi-Fi connection. In Settings, find iCloud and select it.
At the bottom of the list that opens, find the “Backup” item and turn on the “iCloud Backup” option.
Click on “Create a backup” and wait for the process to complete. Do not turn off Wi-Fi until the copy is complete.
To check if you were able to create a backup, go back to the Settings section called iCloud, then go to Storage -> Manage. Select your device. In the window that appears, you will see the time the copy was created.
iCloud provides automatic backup creation. It will update periodically if the iCloud Backup option is turned on in Settings. However, by default, only 5 GB of free space on the server is available to the user. If you want to save more data, you'll have to purchase a subscription that costs about $1.
Creating a Backup in iTunes
To back up your Apple device to your computer, do the following:
- Launch iTunes and connect your device to your PC.
- Enter the device password on your computer (if you have one installed).
- Select your device in the program interface (it will appear in the main window).
- In the window for working with the device, check the box next to the words “Encrypt backup”; set a password.
- Click "Make a copy."
To check your backup, go to the iTunes app options and under the Devices tab you will see a list of copies with the corresponding dates.
Using iTunes does not require a network connection. In addition, the amount of available memory is unlimited. However, you will have to create backups yourself each time.
How to reset iPhone to factory settings
So, the backups have been created. Now you can proceed directly to resetting the settings. We will consider all popular methods and options. The specific one you choose depends on your situation. For example, if the browser is faulty, you need to reset the cache and cookies; if the music plays poorly, clear the player data; if the desktop freezes, clean it, etc. But first of all, let's talk about a complete reset as the most radical measure.
Reset all settings
To perform a full reset procedure, go to “Settings” and find the “Reset” item in the “General” subsection.
A window will open for you to select a reset option. In this case, we are interested in the first two: “Reset all settings” and “Erase settings and content.”
In the first case, the device settings will be reset to factory settings. In this case, all your data and files will NOT be deleted. This option is suitable for those who have problems finding a network, cellular settings, synchronizing applications, etc. If you want to completely format the device, select the second option: “Erase settings and content.” After this, you will need to enter the gadget lock password.
If your device is jailbroken, this formatting method is not suitable for you. You need to use iTunes.
A reset warning will appear in front of you. Tap the “Erase iPhone” (or any other device) button twice.
If your phone is synced with iCloud, you will need to enter the appropriate password for your AppleID.
After entering the password, the formatting process will begin. An Apple icon and a loading bar will appear on the screen. It will take no more than 20 minutes.
Please note that for the formatting process to be successful, the phone must be charged at least 25%.
Video: how to reset settings on iPhone?
Reset all settings via iTunes
The exact same reset procedure can be done through iTunes. Connect the device to your computer and find it in the program interface. On the Overview tab, click the Restore device button. Again, if you synced your gadget to iCloud, you will need to enter a password. After this, the formatting process will begin.
Reset all settings via iCloud
If your device is synced with iCloud, you can clear all its settings directly from your computer browser. However, your phone or tablet must be connected to the Internet. Otherwise, the formatting process will simply be configured and will begin the first time you connect.
Log in to the iCloud website and enter your personal information. Then go to the Find My Device app.
In the “All devices” list at the top, select the one you need and click on it.
A control panel will appear on the right. Select Erase iPhone.
A warning message appears. Click Erase.
Then you will need to enter your AppleID password again.
If you want, you can enter a message in the field that appears. It will appear on your device before formatting. Then click "Done".
The formatting process will begin instantly.
Please note that after formatting, you will not be able to track the gadget using the Find My Device function. It will need to be reconnected. Therefore, clear data through iCloud only if you know the exact location of your phone or tablet.
Reset advanced settings
Full formatting of the device is, of course, a radical measure. If you know exactly what the problem is, you don't have to erase everything. Apple devices provide the ability to reset specific settings. You can access it via the familiar path “Settings” -> “General” -> “Reset”.
Resetting network settings
This feature allows you to clear connections and passwords to Wi-Fi access points. Additionally, resetting your network settings will remove all connected VPN servers. Select the appropriate option and enter the device password to perform cleaning.
Resetting the keyboard dictionary
The keyboard on Apple devices can remember frequently used words. Subsequently, when typing, the program will offer you the desired word if you start typing it. Resetting the keyboard dictionary allows you to clear your word memory data.
Reset Home Setting
This function allows you to return the original appearance of the first page of your desktop. After the reset, shortcuts to standard programs installed by default will appear on it. The remaining icons will be moved to another page.
Reset location warning
Each program that uses data about the geographic location of the device, when first launched, requests permission to process the corresponding data. If you want to reset these permissions, reset the location alert.
Removing apps and support data
It may well be that an application is taking up too much memory. Or you want to delete a program that you haven't used for a long time. One way or another, this can be done in several ways.
Removing from desktop
To uninstall a program directly from your desktop, do the following:
- Go to your desktop.
- Press your finger on the touchscreen for 2 seconds.
- Click on the cross that appears next to the program shortcut and confirm deletion.
Please note that you cannot remove standard programs.
Removing from the "Storage"
In the “Settings” of your device, in the “General” -> “Statistics” subsection, there is a “Storage” application. It contains data about all installed programs, including the amount of memory they occupy. So here you can determine which application is taking up too much memory.
To remove a program, click on its name and select “Uninstall a program” in the window that opens.
Uninstall via iTunes
iTunes is used to control your Apple device through your computer. Accordingly, you can use it to remove programs. Connect your device to your PC and sign in to iTunes.
The connected device will appear in the upper right corner of the screen. Click on it.
Go to the Applications (or Programs) tab. A list of installed programs will appear on the screen. Next to each there is a “Delete” button.
Once clicked, it will change to “Will be deleted”. This way, you can select several programs to remove. Then click "Apply" and the specified steps will be completed.
Video: working with files in iTunes
Cleaning Safari Browser
If you notice that your default browser has become incorrect or glitchy, it makes sense to clear cache data and cookies. Go to the Settings section called Safari.
Select "Delete cookies and data" to clear temporary files from your browser.
A warning message appears. Click the appropriate button.
Video: Cleaning Safari
You can also scrape data from specific sites. Go to the “Add-ons” subsection and select “Site Data”.
You will see a list of all saved data, as well as the amount of memory occupied by them. Click "Edit" to start cleaning. A circle with a minus sign will appear next to each site.
After clicking on the corresponding circle, select “Delete”. The data will be erased.
Resetting your Apple device (both individually and all at once) is not difficult to do. Moreover, such cleaning has a positive effect on the operation of the gadget. Just don't forget to make a backup copy in case you suddenly delete something you need. Although you can find many “magic” applications online that will do everything for you, using them is not always a good idea. Better to do the cleaning yourself. This way, you will know exactly what is happening with your device.
Hi all.
Are you interested in how to reset your Android to factory settings? Then read this article where you will find several ways to complete your task. Still not sure whether you should really reset your gadget? Find out when to do this and how to avoid losing your data.
Reasons for resetting settings
What do you get when you return to factory settings? It's like a device you just bought. That is, your personal data, applications that you have downloaded are erased, RAM and clipboard are cleared. This may be needed if:
Saving data
If you are not going to sell the gadget, but only want to clean it, you should first save its contents. How?
- Go to “Settings”, and then to the “Backup and reset” tab (in some gadgets it is called “Privacy” or “Backup and reset”).
- Check the "Data backup" box.
- Below, indicate the Google account to which you need to perform this action.
- Place another tick in the “Auto recovery” checkbox.
Now you are not afraid of losing data, since it will return to its original place after cleaning the system.

Reset
In gadgets of different models and brands, the algorithm of actions and names of sections may differ, but in general they are similar. I'll tell you about several ways to perform a Hard Reset (that's what it's called) so that you can choose the one that suits you best.
Via "Settings"
Method one:
- Go to the same tab as when backing up, only this time click on the “Reset settings” section.

- You will receive a warning that all content will be deleted. Confirm your decision.
- Next you will see a list of parameters that will be erased. Give the go-ahead for that too.
Your participation will no longer be required: the gadget will do everything itself, restart and you will receive a reset system.
Using service codes
 As with any other system, there are special codes for Android, by entering which you will return the factory settings.
This option is suitable in cases where you can only get to the emergency dial menu.
But you can also enter combinations from the same menu as other phone numbers.
Please note that the codes may change and differ for different gadgets. Try one of these:
- *#*#7378423#*#*
- *#*#7780#*#
- *2767*3855#
Using hardware keys
Does your gadget freeze when loading? Can't navigate the menu? Forgot your password? Perform a full clean through Recovery mode. How to activate it? First you need to turn off the device, and then hold down a certain combination of buttons. It differs from one manufacturer to another:
Asus, Acer:
— volume down + power button.
Huawei.
— Offers a couple of options for different models:
— Press and hold the volume up and power keys for at least 10 seconds;
- The same thing, only the first one needs to be pressed in the middle. Wait for the logo to appear and release only Power. When you see an Android robot with gears, slide your finger on the volume up and press until the green loading bar appears.
Lenovo. There are also several combinations:
— Volume “+ and -” together with the power key;
— Hold down the last button until vibration, and then increase the volume;
— Volume up and start button at the same time.
— Power + volume down. When you see the logo, release the buttons for a second and press them again until the recovery mode turns on.
Prestigio:
— Volume “up” or “down” and “Power”.
Samsung:
— “Home” + volume up + power or the latter and volume down.
Sony.
- Such variations:
— Volume up + power;
— Connect the gadget to the network. When the charging indicator appears, press the Reset button using a paper clip. As soon as the display lights up, hold down the “Power” button for a couple of seconds.
Xiaomi, Meizu:
— Turn on + increase volume. When you see the picture, release only the first one.
What to do when you enter the Recovery menu?
- Navigate to the Wipe data/factory reset section.

- Agree that the information will be erased.
- When the reset is complete, click on Reboot System to restart the device.
If the sensor refuses to work, navigate through the menu using the volume keys and select an action using the power button.
By the way. An important note.
If the selection is not made using the volume buttons and the device reboots, then try removing the flash card.
Correcting errors in the engineering menu
Did you go to the engineering menu and did something wrong? You can return the previous parameters in this way:

You can completely erase the last folder. Don't be afraid to do this, because the standard parameters are built into the kernel and the system will automatically restore them.
Via PC
Resetting settings on a mobile gadget via a computer is more suitable for advanced users, but if a beginner strictly follows the instructions, the task will be crowned with success for him too :). So:
- Download the program from the official website Android System Development Kit.
- Unpack the archive, click the “Browse” button and specify the path “C:\Program Files”.
- Go to the folder with the extracted files and press F2 to give it a simple name that you like.
- Right-click on the “My Computer” icon or on the corresponding section in the “Start” menu to get to “Properties”.
- You will need the “Advanced system settings” section, where in the “Advanced” tab you should click on the “Environment Variables” button.

- In the “System Variables” window, select the “Path” field, and then “Edit”.
- Another window will open. Scroll down and set the path to the unpacked archive with a semicolon at the very beginning. For example, ;C:\Program Files\ADT\sdk\platform-tools\.
- Is everything right? Click "OK".
- Open the command line. To do this, either go to “Search” and enter “cmd”, or hold down the Win + R keys.
- Connect your mobile device to your computer via USB.
- Write “adb shell” in the line.
- Click the Enter key.
- When ADB connects to the device, add “-wipe_data”.

- Enter again.
- The gadget will reboot and return to its default settings.
Many users ask the question: how to reset the BIOS to factory settings? I’ll answer right away, there are no factory settings in the BIOS as such. It all depends on the firmware version. But there is still some truth in the question. Let's figure out what the point is.
Thanks to BIOS, we can configure the operation of our computer's devices, regardless of whether it is a desktop computer or a laptop and what operating system is installed. How it will start its work, from what the system will be loaded first. We can increase the power of our personal computer (though at our own peril and risk, as this can lead to equipment failure) and change the operating modes of our system.

But it happens that over time we forget where and in which sections we made changes, or making changes did not improve the work, but on the contrary. Therefore, there is a need to return the system to the optimal configuration, or make it default in accordance with the firmware
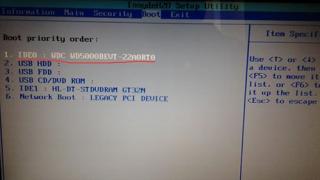
To do this, go to the Exit section, this is the very last tab where we save our settings after changes. Instead of saving, select Load Setup Default (load default settings), confirm by clicking OK and reboot the system. That's all.
Resetting the BIOS will return it to its factory state, removing all user and other settings. Often, this step allows you to solve many computer problems.
There are three ways to reset to factory settings: through the BIOS menu, through the computer's motherboard, and using the motherboard's battery. Each method will lead to the same result, but their implementation is fundamentally different.
Resetting BIOS through its menu
Login to BIOS. If you do not know which key on your computer is responsible for entering this settings menu, we cannot answer 100%, since different keys may be used for different motherboards and BIOS versions. However, as practice shows, most often F1, F2 or Del can act as a hotkey. Finding out which button is in your case can only be done experimentally.
To do this, reboot your computer or just turn it on. As soon as the computer starts to turn on, you will need to repeatedly and quickly press the key responsible for entering the BIOS (for a faster result, you can alternately and also quickly press all three keys we have listed). If you were unable to enter the BIOS using one or another button, you will need to try again, this time using a different key.
Having entered the BIOS, we will need to open the menu responsible for resetting the settings. Again, for different BIOS versions, the menu item we need may be called differently and located in a completely different place, for example, in older BIOS versions, there may be items on the main screen that contain the word “Defaults”, for example, “Load Optimized” Defaults", which allows you to reset the settings to optimized ones, or "Load Fail-Safe Defaults", which will reset the settings to eliminate failures. Having chosen this option, all you have to do is agree to the further procedure and wait for it to finish.
On more modern versions of BIOS, which are usually found on laptops, for our task you will need to open the “Exit” tab, where you will need to select an item like “Load Setup Defaults”.
And finally, the most modern versions of BIOS (UEFI), which already support working with a mouse and also have a more visually pleasing interface, can return the factory settings in the “Save and Exit” tab, where the “Load Defaults” item is located.
Resetting BIOS via motherboard
This method is suitable if in your case the BIOS does not start. It is not particularly complicated, however, here we will need to look under the body of the system unit.
Turn off the computer and be sure to turn off the power, limiting the power with a special button on the back of the system unit.
Open the system case. Having found the motherboard, you will need to find a jumper on it, which, as a rule, is located next to the battery. As a rule, such a jumper is labeled with the word “CMOS”.
In most cases, the jumper is equipped with two or three contacts. If there are two contacts, then you only need to move the jumper for a few seconds to the second position (15 will be enough), and if there are three contacts, the jumper should be moved to the second contact.
To complete the procedure, you will need to hold down the computer's power button for 15 seconds (the computer will not turn on because it is de-energized).
After completing all the steps, return the computer to its previous state, that is, assemble the system unit case, and then provide power to the computer.
Resetting the BIOS via the battery on the motherboard
The third method is to return the BIOS to factory settings, which will also require “implementation” under the system unit case.
Turn off the power to the computer by moving the button to position “0” on the back of the system unit.
Open the system case. You will find a small battery on the motherboard.
Try carefully removing the battery for 15-30 seconds, and then put it back in place. Such an action will cause the BIOS to reset its settings.
Please note that some motherboards are equipped with non-removable batteries, so if you do not know which battery is in your case, proceed with extreme caution (to remove it, you often just need to press a special latch).
Reassemble the system case, and then return power to the computer.
Each of the presented methods is guaranteed to cope with the task. Which method to use is up to you to decide, based on the type of problem, your skills and preferences.