Any Android user has his own idea of how the operating system should look, what functions it should perform and what set of software should be installed in it by default. However, not everyone knows that creating your own firmware is not so difficult. To do this, it is not at all necessary to understand the Linux kernel, be able to compile Android sources or understand how a smartphone works.
Introduction
There are three ways to create your own firmware for an Android communicator: 1. Finalizing and compiling the operating system from sources published by Google or the CyanogenMod team. 2. Modification of the stock firmware of the communicator. 3. Modification of third-party firmware created using the first or second method.
The first method is the most correct and flexible, but it often requires a deep enough knowledge of the features of Android and the ability to edit the source code of the system so that they then work on the device. This topic is beyond the scope of our article, so we will not consider the assembly of Android sources, but will focus on two other methods, more precisely on the third.
Third-party firmware (so-called mods) exist for almost any Android device that has been on the market at least a week. Usually, they already include all the necessary modifications necessary for the correct operation of the firmware on the communicator, and therefore represent an excellent platform for experimenting with the system. They can be modified almost beyond recognition, include any software in the OS, change its appearance, create many low-level settings using a simple text editor and file manager. These actions do not require deep knowledge of the operating system and can be performed by any reader of the magazine.
Choosing a Subject
So, let's suppose that our communicator is already loaded and the ClockworkMod recovery console is written to the boot area, which allows installing any firmware on the device without any restrictions (we wrote about how to do this in the article "Total Submission" published in the October issue] [ ). Now we want to install a different firmware on the device, but not anyhow, but with our own modifications, settings and a set of software. Therefore, we need a framework, namely someone else's firmware that works stably on our device. Where can I get it?
The main habitat of all romodels is, of course, the xda-developers.com forums. There you can find anything you want for communicators running iOS, Windows Mobile, Windows Phone and Android. Open the site in a browser, click on the Forums section and look for your communicator in the forum lists. Then we go to the corresponding section of Android Development and carefully review the list of topics containing the word "" in the title. Better to find some clean firmware with a name like "Pure Android 2.3 Rom" or a port of CyanogenMod, although, in essence, any other will do (although you may have to undo the copyright changes). Open the topic, skip the first post, find a download link somewhere at the end and load the ROM on your computer.
Now the firmware file needs to be opened. This is done using the most common unzip:
$ mkdir ~ / rom; cd ~ / rom $ unzip ../path/to/firmware.zip
General directory structure and important files
The set of files and directories resulting from the execution of the previous command is, in essence, the Android operating system, and exactly in the form in which it will be located in the device's NAND memory. Depending on the Android version and the author's imagination, it may contain different sets of directories and files, but it always contains three required objects: META-INF, the boot.img file, and the system directory.
The first directory contains metadata about the firmware, including the author's certificate files, a manifest with a list of files and their checksums, and an update script that can create new files in NAND memory, change access rights and display a progress bar that users see during installing the firmware.
The boot.img file contains a boot image that includes the Linux kernel and initrd image. It can be unpacked, but it is not very useful for us, since almost any system parameters can be changed using the configuration files and the / proc file system. If you need a kernel compiled with special parameters, for example, with an activated BFS scheduler or NFS support, then you can almost certainly find it on the same xda-developers and flash it using ClockworkMod.

Finally, the system directory is what it was all about. The contents of this directory represent the Android operating system without the Linux kernel. It contains everything that is needed for the OS to work, and therefore it is simply necessary to know its structure. It looks like this:
- app- pre-installed applications: phone, calculator, calendar, etc.
- bin-analog for the / bin and / usr / bin directories in Linux. Contains various system components used by higher-level system components. For example, this is where the dalvikvm virtual machine lies.
- etc- settings files. Full analogue of / etc in Linux, used, however, only by system components. Android apps store settings in the / data / data directory.
- fonts- fonts. Contains only Droid (or Roboto in Android 4.0) branded fonts by default.
- framework- sets of Java classes used by the system and Android software. There is also a framework-res.apk file containing a complete description of the operating system interface, including all graphic files.
- lib- Linux libraries used by low-level components of the system. The analogue of the / lib and / usr / lib directories in Linux, includes such standard libraries as libc (although Android uses its own Bionic instead of Glibc), libz (gzip encryption), libssl and others.
- media- media files: ringtones, notification sounds, interface sounds and OS boot animation files.
- tts- files required for the speech synthesizer to work.
- usr- an optional directory that usually contains the files needed for the software to work from the bin directory. Essentially analogous to / usr / share.
- vendor- files supplied by the manufacturer of the device. Usually contains binary firmware for various hardware components, such as a Wi-Fi module.
- xbin- an optional directory that contains everything that is not in bin. As a rule, it is used to store useful utilities, however, not necessary for the system to work (top, text editor). CyanogenMod uses it to store administration tools: bash, ssh, powertop, busybox, etc.
- build.prop- a file containing information about the assembly, as well as various low-level settings.
Setprop command
The build.prop settings given in the article can be applied to an already running system using the setprop command:
# setprop debug.sf.nobootanimation 1
Own set of software
The / system / app directory contains all the software preinstalled in the firmware. By removing and adding packages to this directory, we can change the set of applications available out of the box. For example, it's not a secret for anyone that the standard Android launcher (and ADWLauncher in CyanogenMod) slows down and has numerous drawbacks. OK, let's replace it with LauncherPro:
$ rm system / app / Launcher.apk $ wget goo.gl/U9c54 -o system / app / LauncherPro.apk
And it's all. You don’t need to install anything, you don’t need to poke around, just drop the required application into the directory - and you're done. Even the name doesn't matter, Android will find the application it needs and install it as a home screen. In the same way, you can put any other program in the firmware or remove it from there.
It is useful to put one of the applications for finding a lost smartphone into the firmware (for example, prey), then even if it is reset to factory settings, it will remain in the OS and will work. You can also replace some system software, for example add Dialer One instead of the standard Phone.apk or Go SMS instead of sms.apk.
How about Linux system applications like ssh server or mc? Here, too, everything is simple. You can build software for Android and an ARM processor using the NDK from Google, but most of the necessary applications have already been assembled before us. For example, we want to preinstall mc in our firmware. Go to xda-developers and search for Midnight Commander. On the first page, we find the apk-package with the installer and unpack it using the same unzip:
$ cd / tmp; unzip ~ / NativnuxInstaller_1.1.apk
We see assets / kits / mc-4.7.5.4-arm.tar.jet in the list of unpacked files. This is a tar.gz archive, which is unpacked to the root of the system after installing the apk package (or rather, after installing the apk, running the application and clicking the Install button). We can immediately unpack it into our firmware and get the preinstalled mc:
$ cd ~ / rom $ tar -xzf /tmp/assets/kits/mc-4.7.5.4-arm.tar.jet
Now, to launch the file manager on the device, just open a terminal and type mc. Other applications can be distributed in zip archives for firmware using ClockworkMod Recovery. It's even easier to put them in your mod, for this you just need to go to the root of the firmware (in this case ~ / rom) and unzip the archive using unzip.

External appearance
Custom firmware is most often created in order to change the appearance of Android to your liking. This operation in Android is, again, very simple. All Android GUI settings are stored in the framework / framework-res.apk file. It can be unpacked using the apktool utility:
$ cd ~; wget goo.gl/hxz5l $ tar -xjf apktool1.4.1.tar.bz2 $ cd ~ / rom / system / framework $ java -jar ~ / apktool.jar d framework-res.apk
As a result, the framework-res directory should appear in the current directory, containing all the package files. The most interesting subdirectories within it are res / drawable- * and res / layout- *. The first one contains all the graphic elements in the form of png files for different resolutions and screen positions. For example, drawable-land-mdpi is a directory with graphics resources for medium-resolution screens that are in a horizontal position (when the screen is rotated, the OS switches to using other files). Of course, any file can be edited or replaced with another.

The layout directories contain descriptions of graphical elements in XML format (they are actually stored in binary AXML format, but apktool converted them to normal XML). The format of the description is quite simple and straightforward, but it's hard to figure it out with a snap, especially if you don't know where everything is. Therefore, we will again turn to the services of the inhabitants of the xda-developers forum, who have already come up with a lot of different modifications for the Android graphical interface. They are easy to find with the search term "framework-res mod device_name".
Usually such mods are distributed in the form of a ready-made framework-res.apk file, which you can simply put into your firmware. If you want to find specific differences in the content, then the mod can be unpacked and compared with your framework-res using diff:
$ diff -R ~ / framework-res \ ~ / rom / system / framework / framework-res
Unfortunately, within the framework of one article, we cannot consider at least part of the internal structure of framework-res, so for more information, refer to the corresponding topic of the w3bsit3-dns.com forum.
After making the modifications, you can build framework-res.apk using the same apktool. However, this operation requires the aapt utility from the Android SDK, which apktool uses to finalize the apk file. It can be obtained separately:
$ cd ~ / bin; wget goo.gl/tC7k8
Now you can build the file:
$ cd ~ / rom / system / framework $ java -jar ~ / apktool.jar b framework-res $ cp framwork-res / dist / framework-res.apk. $ rm -rf framework-res
The next step is to change the loading animation. It is stored in the form of regular png-files packed in the system / media / bootanimation.zip archive. Let's unpack it:
$ cd / tmp $ mkdir bootanimation; cd bootanimation $ unzip ~ / rom / system / media / bootanimation.zip
Inside there is a desc.txt file describing the animation in the following format:
Width Height FPS p Order Pause Directory ...
The standard view of this file is:
480 800 30 p 1 0 part0 p 0 0 part1
This means that the image is 480 x 800 and the frame rate (FPS) is 30 / s. The following is a description of the first part of the animation, the files of which are located in the part0 directory. It is played once (number 1 after p). The next part (part1) is played an infinite number of times until the device boots up. Typically, the part0 directory contains the images corresponding to the first part of the animation, and part0 contains all the other images that are played in the loop. The images themselves must be the same size, and their names must contain numbers in ascending order, for example 0001.png, 0002.png, etc.
Since the loading animation has a very simple format, it is quite easy to make. It is enough to convert the video into png images using mencoder (in desc.txt, you must set the FPS value to 24):
$ mplayer -nosound -vo png: z = 9 video.avi
But this will be superfluous. Participants of the xda-developers forum have done so many animations that the need for manual work disappears altogether. Links to interesting animations are given at the end of the article.
Low-level settings
The last thing I would like to talk about in the article is editing low-level settings. In Android, there is a system / build.prop file for this, which stores information about the firmware assembly and settings for specific devices. By adding certain lines to this file, you can change the functioning of Android, speed up its work, or reduce battery consumption. Below are the most interesting settings.

- Prevent unloading the desktop from memory: ro.HOME_APP_ADJ = 1
The option allows you to make the work with the device more convenient due to instant access to the desktop at any time. Not recommended for low memory devices.
- Improving the quality of saved JPG files: ro.media.enc.jpeg.quality = 100
Allows you to sharpen camera shots, but significantly increases the load on the CPU.
- Disable boot animation to speed up the loading of the operating system: debug.sf.nobootanimation = 1
- Assigning part of the work on rendering the interface to the GPU: debug.sf.hw = 1
Allows you to make the interface faster and smoother.
- Blocking notification of active debugging mode (when connected to a computer using USB): persist.adb.notify = 0
- Eliminating the problem with a black screen after the call ends: ro.lge.proximity.delay = 25 mot.proximity.delay = 25
- Turning on the backlight of the control keys immediately after turning on the screen: ro.mot.buttonlight.timeout = 0
In addition to all this, many users also recommend using the following flag combinations:
- Reducing touch screen response time: debug.performance.tuning = 1 video.accelerate.hw = 1 windowsmgr.max_events_per_sec = 150
- Increase battery life: wifi.supplicant_scan_interval = 180 pm.sleep_mode = 1 ro.ril.disable.power.collapse = 0
- 3G module tweaks: ro.ril.hsxpa = 2 ro.ril.gprsclass = 10 ro.ril.hep = 1 ro.ril.enable.dtm = 1 ro.ril.hsdpa.category = 10 ro.ril.enable. a53 = 1 ro.ril.enable.3g.prefix = 1 ro.ril.htcmaskw1.bitmask = 4294967295 ro.ril.htcmaskw1 = 14449 ro.ril.hsupa.category = 5
- Improving network performance: net.tcp.buffersize.default = 4096,87380,256960,4096,16384,256960 net.tcp.buffersize.wifi = 4096,87380,256960,4096,16384,256960 net.tcp.buffersize.umts = 4096,87380,256960,4096,16384,256960 net.tcp.buffersize.gprs = 4096,87380,256960,4096,16384,256960 net.tcp.buffersize.edge = 4096,87380,256960,4096,16384,256960
All these lines just need to be placed in the system / build.prop file and saved.
Assembly
OK, we made the necessary changes, implemented our applications, tweaked the system and now we need to create an OS image ready for firmware. The testsign utility will help us with this. First, you should zip the firmware:
$ cd ~ / rom; zip -r my-rom.zip *
Now you need to sign the archive so that Recovery can install it:
$ wget goo.gl/OyBBk $ java -classpath testsign.jar testsign \ my-rom.zip my-rom-signed.zip
After that, upload the my-rom-signed.zip archive to the device's memory card and turn off the device. To get into Recovery, turn on the device while holding down the volume down key (for some devices, the procedure may be different).
Now go to the "Install zip from sdcard" item, and then to "Choose zip from sdcard", find my-rom-sign.zip on the SD card and select Yes. After the installation is complete, select "Reboot system now".
conclusions
Android is a flexible platform, and this article does not cover all the possibilities for its modification. Deeper modifications can include replacing the kernel, changing the lock screen and standard applications, activating features such as automatically installing applications to a memory card, implementing a boot script mechanism (/etc/init.d), and much more. We will talk about all this in the following articles.
Experienced users are often looking for how to make the firmware of a device on Android themselves. One of the key features of this operating system is that it comes open source. It includes the core, user interface, libraries, and core applications, all available for free.
What is custom firmware
Data-lazy-type = "image" data-src = "http://androidkak.ru/wp-content/uploads/2017/06/protech1-e1498230690613.jpg" alt = "(! LANG: android tablet with tools" width="267" height="200">
!}
 Any user with the necessary technical skills can build their operating systems using Android source code and install them on smartphones. Thanks to such opportunities, many non-commercial projects have already been created, the participants of which are developing alternative distributions. Usually they are called "custom firmware", however, a more accurate definition in this case can be considered as "homemade firmware".
Despite the fact that all the necessary materials are available to users, many believe that creating their own ROM is an overwhelming task. Success in this business will depend on perseverance and how much time a person is willing to devote to creation.
In order to install custom firmware on Android, you need to assess the scale of the task ahead. If you have absolutely no coding experience, command line skills (on Linux or Mac), and have no idea what a Makefile is, then it’s better to ditch the idea.
Android is a complete operating system. It is quite complex and contains many different subsystems. Building an OS is rewarding, but also very complex. Any changes you want to make to the stock operating system will require careful consideration. It will take dedication and many hours of hard work to create an alternative distribution that is radically different from its predecessor. If the user has already had to deal with writing program code and he has an idea of what a Makefile and compilers are, then creating his own version of the OS can be successful.
Read also: How to update the version of Android on a tablet
In theory, one could create custom firmware for any computing device capable of running a modern operating system. But it's best to limit yourself to creating a software environment for devices that fit perfectly with stock systems. The Nexus 5X smartphone will be used as an example.
What is needed to create the firmware
Data-lazy-type = "image" data-src = "http://androidkak.ru/wp-content/uploads/2017/06/linux-i-mac-e1498231546463.png" alt = "(! LANG: linux and mac" width="300" height="171">
!}
 To create the firmware, you will need access to a Linux or Mac computer. In both cases, the PC will be used frequently, so you need to be sure that the software environment you are using is working.
If you create your own assembly using a Linux virtual machine, then with a high degree of probability it will not be able to recognize the mobile device and will refuse to work with it. If you don't have a full-fledged Linux operating system at hand, then it's better to turn to a Mac computer.
In order to create your own firmware, you will need 130 GB of disk space and at least 8 GB of RAM. If you try to do this with 4GB of RAM, you can get a lot of problems. Similar difficulties can arise with 8GB of RAM, but some tricks can be overcome.
You need to be patient as building an Android build is a long process. It can take over 24 hours to sync the original repository with the local machine. It will take a few more hours to complete the build. Even after making minor changes, it can take 10–20 minutes for them to be accepted. Much will depend on the hardware, but do not expect a powerful system to complete all processes in a few minutes.
The version of the operating system, dubbed the Android Open Source Project, does not contain the usual Google services. As a result, apps like Google Play, YouTube, Gmail and Chrome will be missing. Fortunately, there is already a way that can make these programs work on custom firmware.
The process of creating an assembly is to download the Android Open Source Project and make changes to its source code. Google provides users with excellent documentation on how to create an AOSP. It is recommended that you read this manual carefully. A common mistake many users make is that they refuse to read the entire documentation, limiting themselves to just a few chapters that seem to be the most informative.
Process of creation
According to the instructions, you need to take the following steps one by one:
- Set up a software build environment, including installing the required development tools and Java Development Kit.
- Checkout the source using the Repo tool.
- Get your own binaries (some of the drivers are only released in binary form).
- Select a target with the Lunch tool.
- Run build using Make and Jack.
- Install the firmware on the device using ADB and Fastboot.
Android is an operating system developed by Google for use on smartphones, tablets, e-books, digital players, and many other popular devices.
Usually, when buying the above devices, the android is already installed, so you just need to get used to managing it.
However, many types of viruses have been created for this operating system, so even an antivirus program will not always reliably protect your device from them.
If you caught a virus and the android began to work incorrectly, hang, glitch, execute extraneous commands, then it's time to contact the specialists or to the service center - most likely, with a probability of eighty percent, you will have to change the device firmware (that is, in this way, reinstall the device's operability ).
But what if you urgently need to use the device, but it is faulty and there is no way to contact the specialists right now? In this case, you will have to make the firmware yourself.
From today's article, you will learn how you can make an Android firmware.
By the way, this information can be useful to you even if you still bought a device that does not yet have this firmware (for example, cheap Chinese phones are initially sold without it, which greatly reduces their cost).
Before you do a flashing for android, you need to do some steps.
Charge the device as much as possible so that it has enough charge until this process is complete. If the device turns off during flashing, then you will lose the system and data.
Accurately identify your operating system version and firmware version. You can get this information by selecting the "Settings" menu item, and in it already click on "About phone" and in the menu that opens you will see everything in detail.
Next, find a similar firmware version on the Internet and download it.
There are many versions of both official firmware and the so-called "custom", which the craftsmen make themselves. Some homemade custom firmwares can even fix some bugs in the manufacturer's operating system or add new features to it. However, do not forget that free cheese is usually only in a mousetrap, so do not download files from dubious sources, as they may already contain a virus.
Firmwares exist in different variations - ZIP, TAR archives, or as a set of files in a folder. This circumstance determines the method of installing the operating system, since they are installed in different ways.
Flash using ZIP archive
The very first step is to set root rights. We will briefly describe what it is and why it is necessary to carry out this action.
Since the android was made on the basis of the Unix platform, the root rights were inherited from there.
As you know, each person has certain rights in our life for different actions. For example, some are allowed to fly an airplane, while others are not, because they are not trained to do so.
So in android - root opens or closes the user's right to make certain changes in the operating system.
We hope that in a nutshell everything is clear to you. For more information on how to correctly set these rights, read our next publications.
So, step two - make a backup of the entire system. Roughly speaking, this is the point to which you can return after the changes are made. A separate article will also be devoted to this in more detail.
Now you need to install a program on the gadget that will give you the opportunity to restore the system (for example, ClockWorkMod). The same program can be used to flash your gadget.
Your next step is to download the official or custom ROM version, created and ported specifically for your gadget.
How to behave if you are surrounded by boors

What are the benefits and harms of bananas

Habits That Will Make You Happy
Prepare a microSDHC memory card so that you can write the firmware files to it.
The very process of backing up the system using the ClockWorkMod program is done as follows.
Run the ClockWorkMod program on your device.
In it, select the menu item "Backup & restore", and in it click on the inscription "backup".
Confirm the action ("YES").
Reboot the system by selecting the "Reboot system now" menu item.
As a result of these actions, after the device is rebooted, a new folder with the system backup will be written to its memory card. It can be found by following the clockworkmod / backup path. You can easily recognize this folder by its name - it includes the date and time the copy was made.
After you have done all these steps, you can actually reflash.
Write the previously downloaded ROM file to the memory card. It is in a ZIP archive by default.
Now you disconnect the device from the charger and the computer, turn it off and start it in recovery mode (how this is done depends on your gadget, each may be different).
Go to the menu and click on the inscription "Wipe" - this action will erase information about the current state of the system.
After completing this action, return to the beginning of the menu and select the inscription "Install zip from sdcard" or "Flash Zip from SD Card".
Find the ROM file with the firmware, which is located in the archive with the Zip extension.
Confirm the action following the instructions on the screen.
After the end of the process, select "Reboot system now" in the main menu. The gadget will reboot and you can use the updated device.
Flashing android from a folder with three files
First, download and install the Mobile Odin Pro program on your device.
Copy three files into one folder, the names of which contain the inscriptions CSC, CODE, Modem.
Run the program and select the "Open file" menu item.
In the window that opens, find and select the file containing the word "CODE", then click "OK".
Check that the information is present in all sections.
You are waiting for the end of the process.
Video lessons
It often happens that some of the Android users do not like the standard firmware of their smartphone or tablet. For example, due to excess software, due to which it is rapidly decreasing, or simply do not like the functionality of some programs and want to replace them with others. An intensive search for custom firmware begins, but they do not always give the desired result. What to do?
Any firmware can be modified for a specific user
Not everyone knows that the firmware can be finished to suit your personal needs. There are several ways to do this, each of them differing in the level of complexity and the required set of tools. And, if you don't know how to build Android firmware yourself, this article is for you.
Building from source
One of the most correct ways is to use the source code published by the Google development teams or Cyanogenmod. But at the same time, this method is the most difficult, because in order to build Android firmware from source, optimize it and make it work on a specific device, you need to have rather deep programming skills, to understand all the intricacies of the mobile operating system and device hardware. This knowledge is not acquired in a day, so in this article we will not describe this method in detail.

Modifying an already prepared file
If you are not too versed in all the intricacies of the OS, but want to change something in your firmware, the best solution would be to correct it already. You can change both native, built-in firmware, and already modified by someone else. There are a lot of customized firmwares on the Internet, and you are unlikely to experience a shortage of them. So, we present step-by-step instructions for assembling your own firmware based on an existing product.
Editing with a computer
Required software
We need a computer, a device, a firmware file, and a special program called Android Kitchen (also known as a kitchen). The firmware file can be found on specialized forums, the most famous are the English-speaking XDA Developers and the Russian-speaking w3bsit3-dns.com. In the section of your device model, you can find links to the most popular and tested firmware, both official stock and unofficial custom ones.
Next, you need to install the kitchen on your computer. It works best on Linux, but the required libraries can be installed on Windows as well. In this case, you can get out of the situation by installing Cygwin. and follow the step-by-step instructions included in the archive. Before that, you will also need to install the Java Platform (JDK) from the official website (https://www.oracle.com/technetwork/java/javase/downloads/index.html for Windows) or find and download OpenJDK Java 6 in the Ubuntu Application Center Runtime or similar (for Linux). The second use case is to install Linux on a virtual machine and control the process through it.

Firmware modification
Firmware is most often distributed as a file with the .img extension, less often as a ZIP archive. In both cases, you will need the firmware in the folder of the installed kitchen so that it can import it and start working with it. The kitchen must be installed in the path c: / cygwin / home / user / (when installing via Cygwin) or File system / home / user / (when using Linux).

- Start the kitchen through Cygwin or Linux terminal using the command cd kitchen, then. / Menu.
- Unpack the archive into the kitchen, as mentioned above.
- After the program menu appears, go to section 0. Advanced Options.
- After that, a list of commands for modifying the firmware will be presented. Choose exactly the one you need. You can add Busy Box, Root, Apps2SD, replace stock applications, various animations, free up device memory and much more.
- After finishing the manipulations, run in the main command 99. Build ROM from working folder (Build firmware from working folder) and take the ZIP archive with OUTPUT_ZIP.

Device firmware
You can flash the device both through a computer and without it. In the first case, you need to download the program for the firmware, usually the Flash Tool or Odin, drivers for your device model and prepare an already corrected archive.
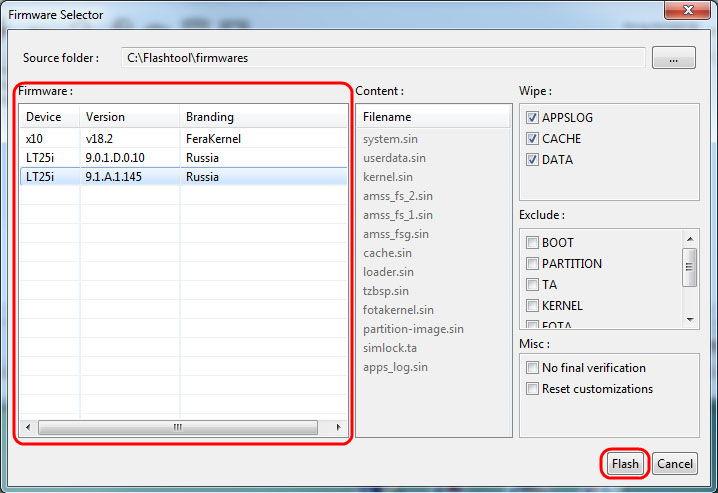
When flashing via Recovery, you need to copy the file to the root of the memory card, boot the device in Recovery mode, format the device and cache, and then install the firmware from the archive. After the reboot, you will have the firmware you personally changed.

Editing on a device
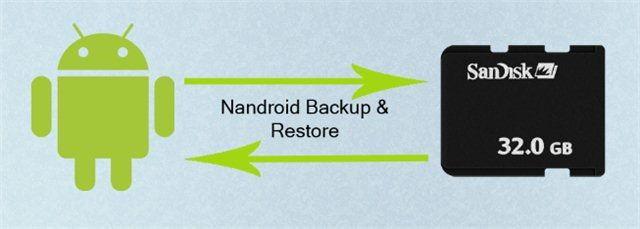
The easiest way possible. No additional devices and manipulations are needed. All you need is a rooted device, a backup application (Nandroid backup is best) and a file manager with the ability to change the system partition.

Changing your own firmware
- If the device is not yet rooted, get it. How to do this, you can read on specialized forums in the section dedicated to your particular device. The fact is that they are supported by a small number of devices and most of them have an individual procedure.
- Install Nandroid backup (https://play.google.com/store/apps/details?id=com.h3r3t1c.onnandbup&hl=ru) and use it to back up your device's system. Save it in a safe place, for example, in the cloud storage. Why create a copy? Suddenly something goes wrong or you accidentally delete something you need - there will be an opportunity to return everything as it was.
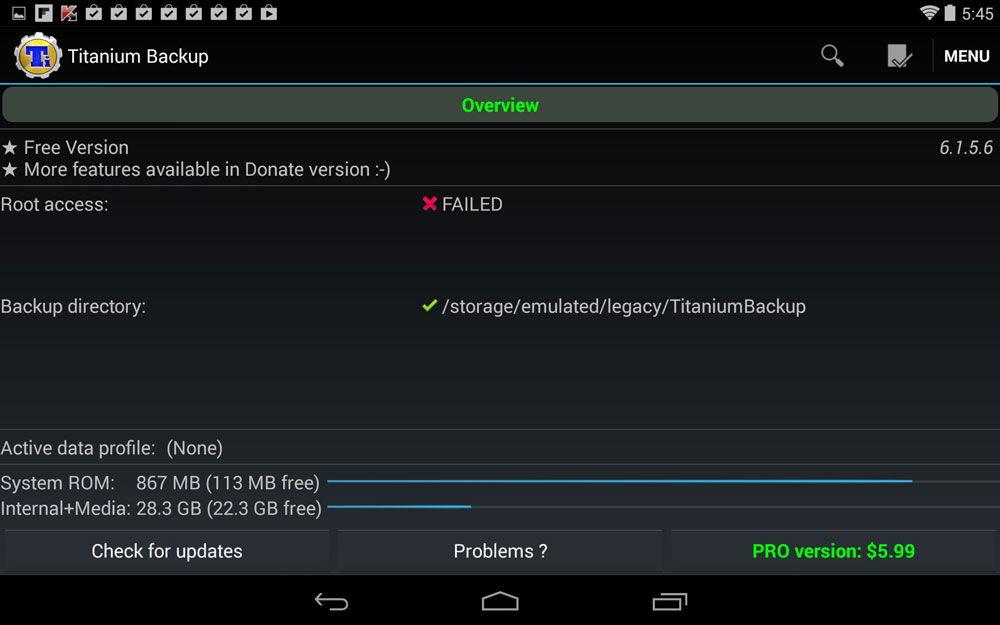
- Install a file manager that works with the system partition to remove unnecessary software and add your own applications. Titanium Backup is the gold standard.
- Select the apps you want to uninstall and uninstall them through the file manager.
- Install the applications with which you want to replace the deleted ones, and make them system ones through Titanium Backup.
- Reboot your device and enjoy your progress.
Changing third-party firmware in ZIP archive
- Download the firmware file you are interested in in .zip format.
- Install a file manager that can work with archives, for example, ES Explorer or Total Commander, and unpack the contents of the archive.
- Remove unnecessary or add missing applications, then pack the archive back and move it to the root of the flash card.
- Use Nandroid backup (https://play.google.com/store/apps/details?id=com.h3r3t1c.onnandbup&hl=ru) to create a system backup and copy it to a cloud drive.
- Flash the device from Recovery mode.

Conclusion
As you can see, assembling Android firmware with your own hands is not necessarily very time-consuming and requires deep knowledge. It is clear that it will be much more difficult to create a modification from scratch, but almost everyone can tweak or replace and remove unnecessary programs. We hope our instructions helped you with this.
Have you compiled the Android firmware yourself? What did you change in it and how did you do it? It will be interesting if you share your feedback.
If the user knows well how to flash the phone, and if he is tired of the official firmware, he can always create his own. It is very easy to do this, knowing the algorithm of the process, what is done and how.
How to make firmware on Android yourself
In order for the firmware to be of high quality and the phone does not turn into a brick, it is important to take a number of measures to prepare for the creation of an updated Android. You will need a computer with installed on it operating systemLinux, better than UBUNTU. It is desirable to install a 64-bit system for new versions of Android.
This bit depth is needed in order to change the firmware of Android versions above 2.4.
The hard disk must have up to 20 gigabytes free space. This is done in order to keep the sources.
In addition to making it yourself from source, there is a way to change an already finished file.
Methods of creation
To make Android firmware from source, it is recommended to follow these steps.
- Install UBUNTU. Only on it you get a solid firmware. You can download UBUNTU on the official website.
- Then to prepare desktop and free up enough space as described above. After we move on to the assembly itself.
- Install Java program.
- You can download the sources from the w3bsit3-dns.com forum.
The advantage of making your own firmware is that you can optimize your Android yourself as much as you need. And also you can rid it of the preinstalled programs that simply clog it up and are not used. Another advantage is that you can make the firmware yourself and update your phone to any version.
Of course edit already finished assembly for yourself is much easier. For this you will need:
- Install OS UBUNTU.
- Download andimgtool and rkwintools programs. They will help you decrypt data boot.img, recovery.img, system.img. and also pack them.
- Find clean firmware. The main thing is that the title contains the words ROM. We choose the site for downloading at our discretion, for example desktoplinux.ru, or any other.
Of course, it is much easier and simpler to make a phone firmware from a ready-made file. This is the advantage of editing a ready-made firmware.
Instructions for making Android firmware yourself
Build Android firmware from source
Before you start creating custom firmware with your own hands, it is recommended to install a virtual machine with Linux on it.
Now you need to find the firmware that you will modify. xda-developers.com - on this site you will find the firmware you need. The main thing is that they have the word ROM in their name and be clean. Then download it and unzip it using Winrar.
When you open the folder with the unzipped files, you will find the items listed below:


Launch android kitchen. Run it through Linux or through the Cygwin program. If running on Linux, enter the command cd kitchen, then. / Menu.
Now unpack the program... Then go to section 0 or advanced options. Having found the commands to improve the version of Android, click on the one you need. Here you add your own animations, applications, free up memory. After the performed actions, type the command 99. Now press build ROM fron working folder... It remains only to pick up the archive with output_ZIP. 
Editing the finished version
Having studied the manufacture of firmware from source files, now it will be considered how to modify the finished file. To edit it, the file must be downloaded, we are looking for the firmware with the name: Pure Android 3.0 ROM. This name indicates that she is pure.
After downloading the file, unzip it. The folders and files in it are the components of the firmware. They are usually located like this:
- Meta— inf... This is where all the data about the future system is. Certificates, checksums and scripts are also located here.
- Boot. img... This is an image for you to download the firmware and install.
- Folder system... This is an Android without a core. All system settings and some of the installed utilities are located here.
Then set software... You must go to the folder / system/ app/ and change the set of utilities. That is, you can destroy the folder with the utility that you do not need, or, conversely, install the necessary software. You can install the utilities that the future Android system will need. To do this, they must already be unpacked. You just need to drag everything you need into this directory and these applications will be automatically preinstalled.
For graphics modifications it is recommended to refer to the folder framework / framework-res.apk... The user should unzip the element and insert two folders there: res / drawable- *, where he can drop his pictures and background with .png resolution. And res / layout- * - files with .xml resolution will be attached here. After the performed manipulations, you must collect everything again into one file.
Modify animation or you can install a new one by unzipping the archive with the corresponding files. The user then modifies the files and packs them back.
If the user wants to improve the performance of his own smartphone, then he must enter the following commands: ro.mot.buttonlight.timeout = 0 - to highlight the buttons after turning on the phone. debug.sf.nobootanimation = 1 - disable animation when the phone boots. Many of them are located in the system / build.prop folder.
When all modifications are completed, you will need to archive them with the command $ cd ~ / rom; zip -r my-rom.zip *.
Editing without using a computer
To edit the Android firmware without using a computer, the owner of the phone must download it from the archive. Run Total Commander, this program can work with archived packages. Unzip the package.
- Download the Nandroid backup program from the website and make a backup.

There is one more option - if the sewing is in zip format.
In this case, the procedure is identical. But before and after the process, you must first unpack and then compress the firmware file without compression. With the help of Nandroid backup, we make a backup, and we sew the device through any convenient application.


