Good day, Habr. I am starting a series of articles that will help you get acquainted with the Arduino. But this does not mean that if you are not a beginner in this business, you will not find anything interesting for yourself.
Introduction
It would be nice to start by getting to know Arduino. Arduino - hardware and software tools for building automation and robotics systems. The main advantage is that the platform is aimed at non-professional users. That is, anyone can create their own robot, regardless of programming knowledge and their own skills.
Start
The creation of an Arduino project consists of 3 main stages: coding, prototyping (prototyping) and firmware. In order to write the code and then flash the board, we need a development environment. In fact, there are quite a few of them, but we will program in the original environment - the Arduino IDE. The code itself will be written in C ++, adapted for Arduino. You can download it on the official website. A sketch is a program written in Arduino. Let's take a look at the structure of the code:
main () (void setup () () void loop () ())
It is important to note that the main () function required in C ++ is created by the Arduino processor itself. And the result of what the programmer sees is:
void setup () () void loop () ()
Let's take a look at two required functions. The setup () function is called only once at the start of the microcontroller. It is she who sets all the basic settings. The loop () function is circular. It is called in an infinite loop throughout the entire operating time of the microcontroller.
First program
In order to better understand how the platform works, let's write the first program. We will execute this simple program (Blink) in two versions. The difference between them is only in the assembly.
int Led = 13; // declare the Led variable on pin 13 (output) void setup () (pinMode (Led, OUTPUT); // define the variable) void loop () (digitalWrite (Led, HIGH); // apply voltage to pin 13 delay (1000 ); // wait 1 second digitalWrite (Led, LOW); // do not apply voltage to 13 pins delay (1000); // wait 1 second)
The principle of operation of this program is quite simple: the LED lights up for 1 second and goes out for 1 second. For the first option, we do not need to assemble the layout. Since in the Arduino platform, a built-in LED is connected to pin 13.
Arduino firmware
In order to upload a sketch to the Arduino, we just need to save it first. Further, in order to avoid problems during download, you need to check the settings of the programmer. To do this, on the top panel, select the "Tools" tab. In the "Fee" section, select your fee. It could be Arduino Uno, Arduino Nano, Arduino Mega, Arduino Leonardo or others. Also, in the "Port" section, you must select your connection port (the port to which you connected your platform). After these steps, you can upload the sketch. To do this, click on the arrow or in the "Sketch" tab select "Download" (you can also use the keyboard shortcut "Ctrl + U"). The firmware of the board has been completed successfully.
Prototyping / prototyping
To assemble the breadboard, we need the following elements: LED, resistor, wires (jumpers), breadboard (Breadboard). In order not to burn anything, and in order for everything to work successfully, you need to deal with the LED. It has two legs. Short - minus, long - plus. For the short one, we will connect the “ground” (GND) and the resistor (in order to reduce the current that goes to the LED, so as not to burn it), and for the long one, we will supply power (connect to pin 13). After connecting, upload a sketch to the board, if you have not done so before. The code remains the same.
This is the end of the first part. Thank you for your attention.
Presents the Arduino for Beginners tutorial. The series is presented with 10 lessons, as well as additional material. Lessons include text instructions, photographs, and instructional videos. In each lesson you will find a list of required components, a program listing and a wiring diagram. After completing these 10 basic lessons, you can get started with more interesting models and assemblies of Arduino-based robots. The course is aimed at beginners, to start it, you do not need any additional information from electrical engineering or robotics.
Arduino at a glance
What is Arduino?
Arduino (Arduino) - hardware computing platform, the main components of which are the I / O board and development environment. The Arduino can be used both to create stand-alone interactive objects and connect to software running on a computer. Arduino is like a single board computer.
How are Arduino and robots related?
The answer is very simple - Arduino is often used as the brain of the robot.
The advantage of Arduino boards over similar platforms is a relatively low price and almost massive distribution among amateurs and professionals in robotics and electrical engineering. By getting involved with Arduino, you will find support in any language and like-minded people who will answer questions and with whom you can discuss your developments.
Lesson 1. Blinking LED on Arduino
 In the first lesson, you will learn how to connect an LED to an Arduino and control it to blink. This is the simplest and most basic model.
Light-emitting diode- a semiconductor device that creates optical radiation when an electric current is passed through it in the forward direction.
Lesson 2. Connecting a Button to Arduino

 In this tutorial, you will learn how to connect a button and LED to an Arduino.
When the button is pressed, the LED will be on, when it is released, it will not be on. This is also the basic model.
Lesson 3. Connecting Potentiometer to Arduino
 In this tutorial, you will learn how to connect a potentiometer to your Arduino.
Potentiometer- it resistor with adjustable resistance.Potentiometers are used as regulators of various parameters - sound volume, power, voltage, etc.This is also one of the basic schemes. In our model by turning the potentiometer knobthe brightness of the LED will depend.
Lesson 4. Controlling a Servo on Arduino
 In this tutorial, you will learn how to connect a servo to an Arduino.
ServoIs a motor, the position of the shaft of which can be controlled by setting the angle of rotation.
Servos are used to simulate various mechanical movements of robots.
Lesson 5. Three-color LED on Arduino
 In this tutorial, you will learn how to connect a 3-color LED to an Arduino.
Tri-color LED(rgb led) - these are three LEDs of different colors in one housing. They come with a small printed circuit board with resistors or without built-in resistors. This lesson covers both options.
Lesson 6. Piezoelectric element on Arduino
 In this lesson, you will learn how to connect a piezoelectric element to an Arduino.
Piezoelectric element- an electromechanical converter that translates electrical voltage into the oscillation of the membrane. These vibrations create sound.
In our model, the sound frequency can be adjusted by setting the appropriate parameters in the program.
Lesson 7. Photoresistor on Arduino
 In this lesson of our course, you will learn how to connect a photoresistor to an Arduino.
Photoresistor- a resistor, the resistance of which depends on the brightness of the light falling on it.
In our model, the LED lights up only if the brightness of the light above the photoresistor is less than a certain one, this brightness can be adjusted in the program.
Lesson 8. Motion sensor (PIR) on Arduino. Automatic sending of E-mail
In this lesson of our course, you will learn how to connect a motion sensor (PIR) to the Arduino, as well as organize automatic sending of e-mail. 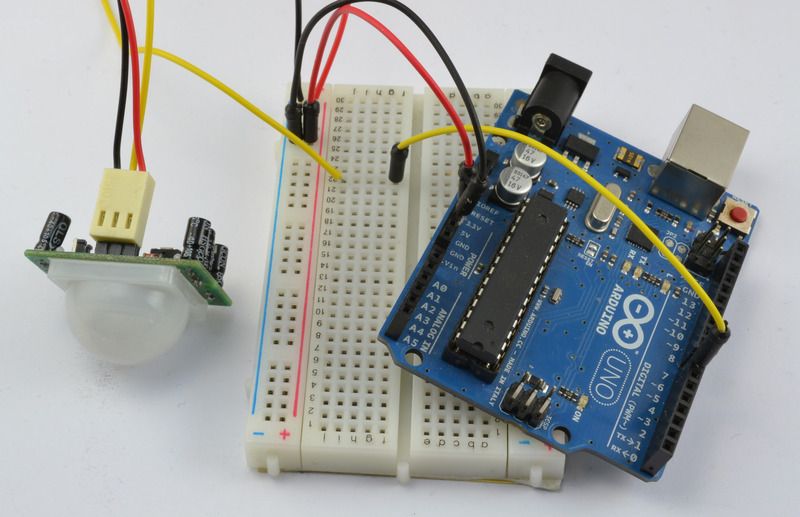
Motion sensor (PIR)- infrared sensor to detect movement or the presence of people or animals.
In our model, when a signal about a person's movement is received from a PIR sensor, the Arduino sends a command to the computer to send an E-mail and the letter is sent automatically.
Lesson 9. Connecting a DHT11 or DHT22 temperature and humidity sensor
In this lesson of ours, you will learn how to connect a DHT11 or DHT22 temperature and humidity sensor to an Arduino, as well as learn about the differences in their characteristics. 
Temperature and humidity sensor Is a composite digital sensor consisting of a capacitive humidity sensor and a thermistor for measuring temperature.
In our model, the Arduino reads the sensor readings and displays the readings on the computer screen.
Lesson 10. Connecting the Matrix Keyboard
 In this lesson of our course, you will learn how to connect a matrix keyboard to an Arduino board, as well as get acquainted with various interesting circuits.
Matrix keyboard designed to make it easier to connect a large number of buttons. Such devices are found everywhere - in computer keyboards, calculators, and so on.
Lesson 11. Connecting the DS3231 Real Time Clock Module
In the last lesson of our course, you will learn how to connect a real-time clock module from the family  DS to the Arduino board, and also get acquainted with various interesting circuits.
Real time clock module- this is an electronic circuit designed to record chronometric data (current time, date, day of the week, etc.), is a system from an autonomous power source and an accounting device.
Appendix. Arduino ready-made frameworks and robots
 You can start learning Arduino not only from the board itself, but also from buying a ready-made full-fledged robot based on this board - a spider robot, a robot car, a turtle robot, etc. Such way suitable for those who are not particularly attracted to electrical circuits.
By purchasing a working robot model, i.e. in fact, a finished high-tech toy, you can awaken interest in self-design and robotics. The openness of the Arduino platform allows making new toys from the same components.
Another option is to buy a frame or a robot body: a platform on wheels or a caterpillar, a humanoid, a spider, etc. In this case, you will have to do the filling of the robot yourself.
Appendix. Mobile Directory
 - an assistant for developers of algorithms for the Arduino platform, the purpose of which is to give the end user the opportunity to carry a mobile set of commands (reference).
The app consists of 3 main sections:
- Operators;
- Data;
- Functions.
Where to buy Arduino
 Arduino Kits
Additional lessons will be added to the course. Subscribe to us
Today we will talk about traffic light on on DigiSpark and WS2812 addressable LEDs ... This is the second version traffic light... I talked about the first one here. The first version turned out to be quite convenient and consisted of fewer parts. Why did I decide to make the second version? The fact is that the box for the batteries that I used in the first version traffic light on arduino, has risen in price very much. Some sellers sell it for $ 5 at. More expensive than all other electronics. Therefore, I decided to change the box to a cheaper one. And once I had to redo the body. I decided to change the size of the traffic light itself and make it larger than the first version. Also in the leg traffic light added a metal bar to increase rigidity.
Arduino alarm clock. The body is made of a LEGO construction set. LEGO Arduino
A 5 year old child came to me from a kindergarten and said that he was asked to make a project for smart devices in the house. The body can be made from any constructor at hand. Can be made from Lego constructor. With a little thought, my son and I decided to do alarm clock at Digispark and 7 segment display on TM1637 With real time clock DS3231.
New Arduino projects and Projects made on a CNC machine
So the summer is over. And time to develop Arduino projects get bigger. And today I plan to talk about my new projects which i do on Arduino and his homemade CNC machine. Projects still under development and do not have a final finished look. But still, I decided to talk about them in order to hear a third-party opinion.
Traffic light on Digispark and addressable LEDs WS2812 - Arduino traffic light
In the previous article: “ » I already talked about development traffic light and that I failed to make it fully functional and efficient. After a couple of weeks, I finalized it and now I'm ready to submit homemade traffic light on Arduino and WS2812 addressable LEDs.
I cut all the blanks for the body on my own homemade CNC machine.
Unsuccessful Arduino light and traffic light projects
Any development leads to unsuccessful and intermediate models. That don't meet all needs and expectations.
Arduino / Genuino UNO is a flagship board for developing your own projects, building simple automation and robotics systems based on the ATmega328 microcontroller with free software and an open architecture. Arduino UNO R3 is today the most popular platform for novice inventors, DIY enthusiasts, students and schoolchildren.
Arduino UNO: board pinout
We have already told you what Arduino UNO CH340 is, so let's go straight to the characteristics and description of the Arduino UNO board. The pinout and schematic diagram of the platform are shown in the photo below. As we said, the entire line of boards has a completely open system architecture, allowing any third party manufacturer to copy and upgrade Arduino Genuino UNO boards.
Arduino UNO board pinout in Russian, ICSP
UNO is the best option for getting started with microcontrollers. The board has a convenient size and everything you need to get started: 14 digital inputs / outputs (6 ports can work in PWM mode), 6 analog inputs for sensors, a USB connector for programming and an Arduino UNO power connector from a power supply or crown. But the main thing is a huge variety of lessons and instructions on the Internet.
Arduino UNO board specifications
- Microcontroller: ATmega328
- Clock frequency: 16 MHz
- Logic voltage: 5 V
- Input supply voltage: 7-12 V
- General Purpose I / O Ports: 20
- Maximum current from I / O port: 40 mA
- 3.3V port maximum output current: 50mA
- 5V port maximum output current: 800mA
- PWM Ports: 6
- Ports connected to the ADC: 6
- ADC capacity: 10 bits
- Flash memory: 32KB
- EEPROM memory: 1 KB
- RAM: 2 KB
- Dimensions: 69 × 53 mm
Arduino UNO: electrical circuit

Arduino UNO: I / O ports, power
Operating voltage - 5 V when connected via USB from any device (computer, laptop, charging from a smartphone, etc.). When an external adapter (battery, crown, power supply) is connected at the same time, the power is automatically switched, but the board can still be programmed through the computer. Recommended power supply for Arduino Uno from batteries or accumulator from 7 to 12 V.

Arduino UNO: powered from an external source
5V - supplies 5V to the Arduino pin, it can be used to power devices
3.3V - the pin is supplied with 3.3V voltage from the internal stabilizer
GND - ground pin
VIN - pin for external voltage supply
IREF - a pin for informing about the operating voltage of the board
You can supply power to the microcontroller through the VIN port using wires. Positive from an external source is fed to the VIN port and Minus to GND (ground). Applying an external voltage of 5 volts to the 5V pin is not permissible, since the power supply of the Genuino Arduino Uno bypasses the stabilizer, which can lead to damage. All digital ports on the board provide a stabilized voltage of 5 volts.
Arduino UNO: firmware, memory

The board is programmed in the free Arduino IDE in Russian, which can be downloaded from the official website. To connect devices and modules, connectors ("dad-dad" and "dad-mom") are used, which are connected to the ports of the Arduino. To get started with the platform, go to the Arduino uno r3 Tutorials for Beginners section for detailed instructions with examples.
The board supports three types of memory:
Flash - memory volume of 32 kB, used to store the program. When the controller is flashed with a sketch via USB, it is written to the Flash memory. To clear the memory of the Arduino UNO, upload a blank sketch.
SRAM memory- This is Arduino's 2 kB RAM. This is where the variables and objects created in the sketch are stored. SRAM memory is energy-dependent, when the power supply is disconnected from the board, all data will be deleted.
EEPROM Is a 1kB nonvolatile memory. Data can be recorded here that will not disappear when the power is turned off. The disadvantage of EEPROM in limiting rewriting cycles is 100,000 times according to the manufacturer.
Description of Arduino UNO in Russian
We recommend that you familiarize yourself with other boards from the Arduino-Genuino line, for example, an analogue of the most popular UNO board - RobotDyn UNO R3 from a Chinese manufacturer. The board in its characteristics is in no way inferior to the official manufacturer, but at the same time it has a more democratic price and a number of advantages. Such as a more convenient USB connector and more analog inputs.
My fascination with the Arduino platform led me to devices operating on the I2C bus (short for Inter-Integrated Circuit) also referred to as "Two-Wire" devices. A large number of microcircuits are produced that support the I2C bus in hardware. These are all kinds of sensors, real time clock, memory, port expanders and much more. The article below presents the modernization of the Arduino-based I2C device scanner project, which is described on the page http://playground.arduino.cc/Main/I2cScanner, and an example of practical work with a device prototype independent of a computer.
The control program, remote control methods (bluetooth or APC220), everything remains the same.

Schemes and program codes have been added to the article for transferring the project to common motor control chambers (s)

Automatic watering of plants
A couple of years ago I got carried away with the cultivation of various exotic plants. Fortunately, the window sills (almost half a meter and a half) allow you to put quite a lot of pots. But last year, as Muscovites may remember, the heat was not weak. Since I work in an office, I managed to water only in the morning and in the evening. And this was clearly not enough.
Plus, weekend trips to the country house ... And only one half-meter bush of eucalyptus can evaporate 2-3 liters of water in two days and a night and have time to wither.
The wick system did not like the fact that it is unregulated and eats up space on the window. Which is so little. Plant genie-type watering cans did not fit because even after learning the Tao of sticking them into a pot (not so stuck - or not dripping or leaking out in a couple of hours), they need or so many that there is not enough pot space or a small pot and just flips over. Well, for the stated two weeks, these 0.22 liters are also not very enough.


