Good day, dear readers and users of the best Threshbox portal! It's no secret that you can make good money on things you create with your own hands. If the idea is really interesting, then on its basis you can create your own business. Using the Arduino in this area is a very convenient solution, because the Arduino is not prohibited for commercial use. Today we'll talk about five interesting business ideas.
How to implement this?
It is most convenient to buy components for the implementation of an idea on AliExpress. Various buildings can also be found there. In our case, the case is necessary for our creation to take on a presentation.It is very profitable to do business on Arduino, as you only need to write a sketch once. In the following copies, you simply "fill" the already finished one. See below for ideas.
Automatic home temperature control


In order: Arduino Nano, Arduino Uno and NRF24L01
I didn't want to refer to this item as a "smart" home, because this idea is only about temperature control. I would implement this idea with several Arduino Nanos and one Arduino Mega / Uno. The communication between them will be carried out using the radio communication module NRF24L01. This module allows up to six Arduinos to communicate with each other.
The Arduino Nano will be housed in a small package with a DHT22 temperature and humidity sensor, an NRF24L01 radio module and a power supply - a battery, for example. Several of these small boxes will be placed throughout the house.


DHT2 and LCD text display
The data from the Arduino Nano will be received by the "base", which is an Arduino Uno or Mega, enclosed in a large case along with an NRF24L01 (as a receiver), a text LCD display and a power supply (battery). All this will be located near the heating system. The "base" will be able to receive and process temperature data and, depending on the value of this data, a command will be sent to the heating system to increase or decrease the temperature.
Smart greenhouse

An example of a ready-made solution.
It's no secret that managing your own greenhouse requires a lot of attention: opening and closing doors on time, monitoring soil moisture, and monitoring the growth of crops planted there. All of this can be automated using Arduino.


In order: Arduino Mega, DHT22 and LCD text display.
One Arduino is capable of controlling the temperature of the greenhouse (using the same DHT22 sensor), displaying the necessary information on the LCD display, giving a command to open a tap to supply water, and also controlling motors to open and close doors.
CNC machine


In order: Arduino Mega, L298N and stepper motor.
This also includes 3D printers. There are many ways on the Internet to make an Arduino-based CNC machine. Not all of them work, but there are definitely good options. As for the hardware, you will need an Arduino, preferably a Mega, as well as an L298N motor driver and, of course, the motors themselves. The rest is the frame and the programming code. I must admit that this is one of the most difficult ideas to implement.
Robots

An example of a ready-made solution.
Undoubtedly, children are very fond of robots, especially those that they themselves can control. With the help of Arduino, robots can even be made from scrap materials. I once considered the idea of making a robot with a vacuum cleaner body that looked a lot like the astromech droid from Star Wars.


In order: HC-SR04, L293D, HC-06 and NRF24L01
Ultrasonic rangefinder HC-SR04 can determine the distance to obstacles in order to go around them later. The L293D motor driver, which is used as an expansion board, is capable of driving four motors and three servos at once. In terms of communication, we are not very limited. You can use the HC-06 bluetooth module, which will allow you to control your child from a smartphone, but it cannot boast a good communication range, which cannot be said about the already well-known NRF24L01 radio communication module. However, then you will no longer be able to control from your smartphone.

18650 batteries
As a power source, 18650 batteries can be used, connected in parallel to increase the total capacity.
Outcome
Unfortunately, these are all the ideas that I managed to find. I am sure if you are interested in an idea, you can find a lot of information on this topic on the Internet.I want to say right away that I did not include quadrocopters and other aircraft in this list, because there are already ready-made control boards for them. Most likely, the Arduino would simply not have withstood such a load.
Anyway, I hope you found it interesting. Write in the comments, have you come across similar ideas?
"Presents the Arduino for Beginners tutorial. The series is presented with 10 lessons, as well as additional material. Lessons include text instructions, photographs, and instructional videos. In each lesson you will find a list of required components, a program listing and a wiring diagram. After completing these 10 basic lessons, you can get started with more interesting models and assemblies of Arduino-based robots. The course is aimed at beginners, to start it, you do not need any additional information from electrical engineering or robotics.
Arduino at a glance
What is Arduino?
Arduino (Arduino) - hardware computing platform, the main components of which are the I / O board and development environment. The Arduino can be used both to create stand-alone interactive objects and connect to software running on a computer. Arduino is like a single board computer.
How are Arduino and robots related?
The answer is very simple - Arduino is often used as the brain of the robot.
The advantage of Arduino boards over similar platforms is a relatively low price and almost massive distribution among amateurs and professionals in robotics and electrical engineering. By getting involved with Arduino, you will find support in any language and like-minded people who will answer questions and with whom you can discuss your developments.
Lesson 1. Blinking LED on Arduino
 In the first lesson, you will learn how to connect an LED to an Arduino and control it to blink. This is the simplest and most basic model.
Light-emitting diode- a semiconductor device that creates optical radiation when an electric current is passed through it in the forward direction.
Lesson 2. Connecting a Button to Arduino

 In this tutorial, you will learn how to connect a button and LED to an Arduino.
When the button is pressed, the LED will be on, when it is released, it will not be on. This is also the basic model.
Lesson 3. Connecting Potentiometer to Arduino
 In this tutorial, you will learn how to connect a potentiometer to your Arduino.
Potentiometer- it resistor with adjustable resistance.Potentiometers are used as regulators of various parameters - sound volume, power, voltage, etc.This is also one of the basic schemes. In our model by turning the potentiometer knobthe brightness of the LED will depend.
Lesson 4. Controlling a Servo on Arduino
 In this tutorial, you will learn how to connect a servo to an Arduino.
ServoIs a motor, the position of the shaft of which can be controlled by setting the angle of rotation.
Servos are used to simulate various mechanical movements of robots.
Lesson 5. Three-color LED on Arduino
 In this tutorial, you will learn how to connect a 3-color LED to an Arduino.
Tri-color LED(rgb led) - these are three LEDs of different colors in one housing. They come with a small printed circuit board with resistors or without built-in resistors. This lesson covers both options.
Lesson 6. Piezoelectric element on Arduino
 In this lesson, you will learn how to connect a piezoelectric element to an Arduino.
Piezoelectric element- an electromechanical converter that translates electrical voltage into the oscillation of the membrane. These vibrations create sound.
In our model, the sound frequency can be adjusted by setting the appropriate parameters in the program.
Lesson 7. Photoresistor on Arduino
 In this lesson of our course, you will learn how to connect a photoresistor to an Arduino.
Photoresistor- a resistor, the resistance of which depends on the brightness of the light falling on it.
In our model, the LED lights up only if the brightness of the light above the photoresistor is less than a certain one, this brightness can be adjusted in the program.
Lesson 8. Motion sensor (PIR) on Arduino. Automatic sending of E-mail
In this lesson of our course, you will learn how to connect a motion sensor (PIR) to the Arduino, as well as organize automatic sending of e-mail. 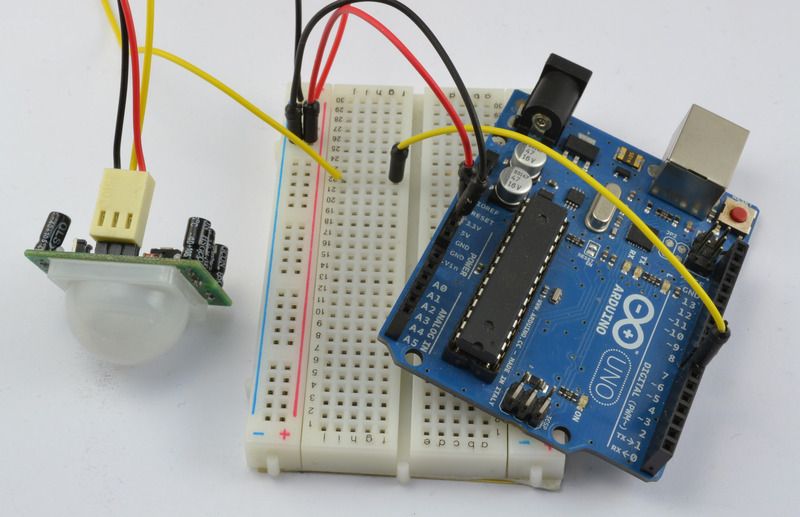
Motion sensor (PIR)- infrared sensor to detect movement or the presence of people or animals.
In our model, when a signal about a person's movement is received from a PIR sensor, the Arduino sends a command to the computer to send an E-mail and the letter is sent automatically.
Lesson 9. Connecting a DHT11 or DHT22 temperature and humidity sensor
In this lesson of ours, you will learn how to connect a DHT11 or DHT22 temperature and humidity sensor to an Arduino, as well as learn about the differences in their characteristics. 
Temperature and humidity sensor Is a composite digital sensor consisting of a capacitive humidity sensor and a thermistor for measuring temperature.
In our model, the Arduino reads the sensor readings and displays the readings on the computer screen.
Lesson 10. Connecting the Matrix Keyboard
 In this lesson of our course, you will learn how to connect a matrix keyboard to an Arduino board, as well as get acquainted with various interesting circuits.
Matrix keyboard designed to make it easier to connect a large number of buttons. Such devices are found everywhere - in computer keyboards, calculators, and so on.
Lesson 11. Connecting the DS3231 Real Time Clock Module
In the last lesson of our course, you will learn how to connect a real-time clock module from the family  DS to the Arduino board, and also get acquainted with various interesting circuits.
Real time clock module- this is an electronic circuit designed to record chronometric data (current time, date, day of the week, etc.), is a system from an autonomous power source and an accounting device.
Appendix. Arduino ready-made frameworks and robots
 You can start learning Arduino not only from the board itself, but also from buying a ready-made full-fledged robot based on this board - a spider robot, a robot car, a turtle robot, etc. Such way suitable for those who are not particularly attracted to electrical circuits.
By purchasing a working robot model, i.e. in fact, a finished high-tech toy, you can awaken interest in self-design and robotics. The openness of the Arduino platform allows making new toys from the same components.
Another option is to buy a frame or a robot body: a platform on wheels or a caterpillar, a humanoid, a spider, etc. In this case, you will have to do the filling of the robot yourself.
Appendix. Mobile Directory
 - an assistant for developers of algorithms for the Arduino platform, the purpose of which is to give the end user the opportunity to carry a mobile set of commands (reference).
The app consists of 3 main sections:
- Operators;
- Data;
- Functions.
Where to buy Arduino
 Arduino Kits
Additional lessons will be added to the course. Subscribe to us
Arduino is a universal platform for DIY microcontrollers. There are many shields (expansion cards) and sensors for it. This diversity allows you to make a number of interesting projects aimed at improving your life and increasing its comfort. The fields of application of the board are endless: automation, security systems, systems for collecting and analyzing data, etc.
In this article, you will find out what you can do interesting on Arduino. Which projects will be spectacular and which will be useful.
What can be done with Arduino
Robot vacuum cleaner
Cleaning an apartment is a routine and unattractive task, especially since it takes time. It can be saved if part of the housework is assigned to a robot. This robot was assembled by an electronics engineer from Sochi - Dmitry Ivanov. Structurally, it turned out to be of sufficient quality and is not inferior in efficiency.

To build it you will need:
1. Arduino Pro-mini, or any other similar and suitable size ...
2. USB-TTL adapter if you are using Pro mini. If you have chosen the Arduino Nano, then it is not needed. It is already installed on the board.
3. The L298N driver is needed for controlling and reversing DC motors.
4. Small motor with gear and wheels.
5.6 IR sensors.
6. Turbine engine (larger).
7. The turbine itself, or rather the impeller from the vacuum cleaner.
8. Motor for brushes (small).
9. 2 collision sensors.
10.4 18650 batteries.
11. 2 converters of constant voltage (step-up and step-down).
13. Controller for battery operation (charge and discharge).
The control system is as follows:

And here is the power system:

Such cleaners are evolving, factory-made models have complex intelligent algorithms, but you can try to make your own design that will not be inferior in quality to expensive counterparts.
They are capable of emitting a luminous flux of any color, they usually use LEDs in the case of which three crystals are located, glowing in different colors. To control them, special RGB controllers are sold, their essence is to regulate the current supplied to each of the colors of the LED strip, therefore, the intensity of the luminescence of each of the three colors is regulated (separately).
You can make an RGB controller on Arduino with your own hands, and even more, this project implements control via Bluetooth.

The photo shows an example of using one RGB LED. To control the tape, an additional 12V power supply is required, then the gates of the field-effect transistors included in the circuit will be controlled. The gate charge current is limited by 10 kΩ resistors, they are installed between the Arduino pin and the gate, in series with it.

Control panel based on Arduino and smartphone
Using a microcontroller, you can make a universal remote control controlled from a mobile phone.
For this you will need:
Arduino of any model;
IR receiver TSOP1138;
IR LED;
Bluetooth module HC-06.
The project can read codes from factory remotes and save their values. Then you can control this homemade product via Bluetooth.
The webcam is mounted on a rotating mechanism. It is connected to a computer with installed software. It is based on the computer vision library - OpenCV (Open Source Computer Vision Library), after the program detects a face, the coordinates of its movement are transmitted via a USB cable.

Arduino gives a command to the rotary mechanism drive and positions the camera lens. A pair of servos are used to move the camera.
The video shows the operation of this device.
Watch your animals!
The idea is to find out where your animal is walking, which can generate interest for scientific research and just for fun. To do this, you need to use a GPS beacon. But to store location data on some storage device.

In this case, the dimensions of the device play a decisive role here, since the animal should not feel any discomfort from it. For data recording, it can be used to work with Micro-SD memory cards.
Below is a diagram of the original version of the device.

The original version of the project used the TinyDuino board and shields for it. If you cannot find one, it is quite possible to use small copies of Arduino: mini, micro, nano.
A small-capacity Li-ion cell was used for power supply. The small battery lasts about 6 hours. In the end, the author had everything in a cut-off tik-tok jar. It is worth noting that the GPS antenna must point upward to obtain reliable sensor readings.
Breaker of combination locks
To break combination locks with Arduino, you need a servo and a stepper motor. This project was developed by hacker Samy Kamkar. This is a rather complex project. The operation of this device is shown in the video, where the author tells all the details.
Of course, such a device is hardly suitable for practical use, but this is an excellent demo device.
Arduino in music
This is more likely not a project, but a small demonstration of how this platform has been used by musicians.
Drum machine on Arduino. It is noteworthy that this is not an ordinary search of the recorded samples, but, in principle, the generation of sound with the help of "iron" devices.

Parts ratings:
NPN transistor, for example 2n3904 - 1 pc.
Resistor 1 kOhm (R2, R4, R5) - 3 pcs.
330 Ohm (R6) - 1 pc.
10 kOhm (R1) - 1 pc.
100 kOhm (R3) - 1 pc.
Electrolytic capacitor 3.3 μF - 1 pc.
For the project to work, you will need to connect the library for fast Fourier expansion.
This is a fairly simple and interesting project from the category "you can brag to your friends."
3 robot projects
Robotics is one of the most interesting areas for geeks and just fans to do something unusual with their own hands, I decided to make a selection of several interesting projects.
BEAM robot on Arduino
To assemble a four-legged walking robot, you will need:
Servo motors are needed to move the legs, for example, Tower Hobbies TS-53;
A piece of copper wire of medium thickness (to withstand the weight of the structure and not bend, but not too thick, because it does not make sense);
Microcontroller - AVR ATMega 8 or Arduino board of any model;
For the chassis in the project, it is indicated that the Sintra Frame was used. It is a kind of plastic, it bends into any shape when heated.
As a result, you will receive:

It is noteworthy that this robot does not drive, but walks, can step over and go to elevations up to 1 cm.
For some reason, this project reminded me of a robot from the Wall-e cartoon. Its peculiarity is its use for charging batteries. It moves like a car, on 4 wheels.

Its constituent details:
Mom-Dad jumpers;
Solar panel with an output voltage of 6V;
As a donor of wheels, engines and other parts - a radio-controlled car;
Two continuous rotation servos;
Two conventional servos (180 degrees);
Holder for AA batteries and for "crown";
Collision sensor;
LEDs, photoresistors, fixed resistors 10 kOhm - only 4 pieces;
Diode 1n4001.
A plastic bottle of a suitable size;
Here's the basics - an Arduino board with a proto-shield.

This is how spare parts from - wheels look like.

The structure is almost complete, the sensors are installed.

The essence of the robot's work is that it travels to the light. He needs abundance for navigation.

It is more of a CNC machine than a robot, but the project is quite entertaining. It is a 2 axis drawing machine. Here is a list of the main components of which it consists:
(DVD) CD-drives - 2 pcs;
2 drivers for stepper motors A498;
servo MG90S;
Arduino Uno;
12V power supply;
Ballpoint pen, and other design elements.
From the optical disc drive, the stepper motor and guide bar units are used to position the optical head. The engine, shaft and carriage are removed from these blocks.

You will not be able to control a stepper motor without additional equipment, therefore, special driver boards are used, it is better if a radiator of the motor is installed on them at the time of starting or changing the direction of rotation.
The complete assembly and operation process is shown in this video.
Conclusion
This article covers just a small drop of all that you can do on this popular platform. In fact, it all depends on your imagination and the task that you set for yourself.
In this article, I decided to put together a complete step-by-step Arduino beginner's guide. We will analyze what an arduino is, what you need to start learning, where to download and how to install and configure the programming environment, how it works and how to use a programming language, and much more that is needed to create full-fledged complex devices based on the family of these microcontrollers.
Here I will try to give a concise minimum so that you understand the principles of working with the Arduino. For a more complete immersion in the world of programmable microcontrollers, pay attention to other sections and articles on this site. I will leave links to other materials on this site for a more detailed study of some aspects.
What is Arduino and what is it for?
Arduino is an electronic designer that allows anyone to create a variety of electro-mechanical devices. Arduino consists of software and hardware. The software part includes a development environment (a program for writing and debugging firmware), many ready-made and convenient libraries, a simplified programming language. The hardware part includes a large line of microcontrollers and ready-made modules for them. This makes working with the Arduino very easy!
With the help of arduino, you can learn programming, electrical engineering and mechanics. But this is not just a teaching constructor. Based on it, you can make really useful devices.
Starting with simple flashing lights, weather stations, automation systems and ending with a smart home system, CNC machines and unmanned aerial vehicles. The possibilities are not even limited by your imagination, because there are a huge number of instructions and ideas for implementation.
Arduino Starter Kit
In order to start learning Arduino, you need to acquire the microcontroller board itself and additional details. It is best to purchase an Arduino starter kit, but you can also choose everything you need yourself. I advise choosing a set because it is easier and often cheaper. Here are links to the best kits and individual parts that will definitely come in handy for you to explore:
| Basic arduino set for beginners: | Buy |
| A large set for training and first projects: | Buy |
| A set of additional sensors and modules: | Buy |
| Arduino Uno is the most basic and convenient model from the line: | Buy |
| Solderless breadboard for easy learning and prototyping: | Buy |
| A set of wires with convenient connectors: | Buy |
| LED set: | Buy |
| Resistor kit: | Buy |
| Buttons: | Buy |
| Potentiometers: | Buy |
Arduino IDE
To write, debug and upload firmware, you need to download and install the Arduino IDE. It is a very simple and handy program. On my site, I have already described the process of downloading, installing and setting up the development environment. Therefore, here I will just leave links to the latest version of the program and to
| Version | Windows | Mac OS X | Linux |
| 1.8.2 |
Arduino programming language
When you have a microcontroller board in your hands and a development environment is installed on your computer, you can start writing your first sketches (firmware). To do this, you need to familiarize yourself with the programming language.
A simplified version of the C ++ language with predefined functions is used for Arduino programming. As in other C-like programming languages, there are a number of rules for writing code. Here are the most basic ones:
- Each instruction must be followed by a semicolon (;)
- Before declaring a function, you must specify the data type returned by the function or void if the function does not return a value.
- It is also necessary to specify the data type before declaring the variable.
- Comments are denoted: // Inline and / * Block * /
You can find out more about data types, functions, variables, operators and language constructions on the page by You do not need to memorize and memorize all this information. You can always go to the reference book and see the syntax of this or that function.
All firmware for Arduino must contain at least 2 functions. These are setup () and loop ().
Setup function
In order for everything to work, we need to write a sketch. Let's make it so that the LED lights up after pressing the button, and after the next pressing it goes out. Here's our first sketch:
// variables with pins of connected devices int switchPin = 8; int ledPin = 11; // variables for storing the state of the button and the LED boolean lastButton = LOW; boolean currentButton = LOW; boolean ledOn = false; void setup () (pinMode (switchPin, INPUT); pinMode (ledPin, OUTPUT);) // function to suppress bounce boolean debounse (boolean last) (boolean current = digitalRead (switchPin); if (last! = current) (delay (5); current = digitalRead (switchPin);) return current;) void loop () (currentButton = debounse (lastButton); if (lastButton == LOW && currentButton == HIGH) (ledOn =! LedOn;) lastButton = currentButton ; digitalWrite (ledPin, ledOn);)
// variables with pins of connected devices int switchPin = 8; int ledPin = 11; // variables for storing the state of the button and LED boolean lastButton = LOW; boolean currentButton = LOW; boolean ledOn = false; void setup () ( pinMode (switchPin, INPUT); pinMode (ledPin, OUTPUT); // function to suppress bounce boolean debounse (boolean last) ( boolean current = digitalRead (switchPin); if (last! = current) ( delay (5); current = digitalRead (switchPin); return current; void loop () ( currentButton = debounse (lastButton); if (lastButton == LOW && currentButton == HIGH) ( ledOn =! ledOn; lastButton = currentButton; digitalWrite (ledPin, ledOn); |
In this sketch, I created an additional debounse function to suppress contact bounce. There is a bounce of contacts on my website. Be sure to read this material.
PWM Arduino
Pulse width modulation (PWM) is the process of controlling voltage using the duty cycle of a signal. That is, using PWM, we can smoothly control the load. For example, you can smoothly change the brightness of the LED, but this change in brightness is obtained not by decreasing the voltage, but by increasing the intervals of the low signal. The principle of operation of PWM is shown in this diagram:

When we apply PWM to an LED, then it starts to quickly light up and go out. The human eye is unable to see this because the frequency is too high. But when filming on video, you will most likely see moments when the LED is off. This will happen provided that the camera frame rate is not a multiple of the PWM frequency.
The Arduino has a built-in pulse width modulator. You can use PWM only on those pins that are supported by the microcontroller. For example Arduino Uno and Nano each have 6 PWM pins: these are pins D3, D5, D6, D9, D10 and D11. Other boards may have different pins. You can find a description of the board you are interested in in
To use PWM in Arduino there is a function It takes as arguments a pin number and a PWM value from 0 to 255.0 is 0% filling with a high signal, and 255 is 100%. Let's write a simple sketch as an example. Let's make it so that the LED lights up smoothly, waits for one second and fades out just as smoothly, and so on ad infinitum. Here's an example using this function:
// The LED is connected to pin 11 int ledPin = 11; void setup () (pinMode (ledPin, OUTPUT);) void loop () (for (int i = 0; i< 255; i++) { analogWrite(ledPin, i); delay(5); } delay(1000); for (int i = 255; i >0; i--) (analogWrite (ledPin, i); delay (5);))
// LED is connected to pin 11 int ledPin = 11; void setup () ( pinMode (ledPin, OUTPUT); void loop () ( for (int i = 0; i< 255 ; i ++ ) { analogWrite (ledPin, i); delay (5); delay (1000); for (int i = 255; i> 0; i -) ( |
Good day, Habr. I am starting a series of articles that will help you get acquainted with the Arduino. But this does not mean that if you are not a beginner in this business, you will not find anything interesting for yourself.
Introduction
It would be nice to start by getting to know Arduino. Arduino - hardware and software tools for building automation and robotics systems. The main advantage is that the platform is aimed at non-professional users. That is, anyone can create their own robot, regardless of programming knowledge and their own skills.
Start
The creation of an Arduino project consists of 3 main stages: coding, prototyping (prototyping) and firmware. In order to write the code and then flash the board, we need a development environment. In fact, there are quite a few of them, but we will program in the original environment - the Arduino IDE. The code itself will be written in C ++, adapted for Arduino. You can download it on the official website. A sketch is a program written in Arduino. Let's take a look at the structure of the code:
main () (void setup () () void loop () ())
It is important to note that the main () function required in C ++ is created by the Arduino processor itself. And the result of what the programmer sees is:
void setup () () void loop () ()
Let's take a look at two required functions. The setup () function is called only once at the start of the microcontroller. It is she who sets all the basic settings. The loop () function is circular. It is called in an infinite loop throughout the entire operating time of the microcontroller.
First program
In order to better understand how the platform works, let's write the first program. We will execute this simple program (Blink) in two versions. The difference between them is only in the assembly.
int Led = 13; // declare the Led variable on pin 13 (output) void setup () (pinMode (Led, OUTPUT); // define the variable) void loop () (digitalWrite (Led, HIGH); // apply voltage to pin 13 delay (1000 ); // wait 1 second digitalWrite (Led, LOW); // do not apply voltage to 13 pins delay (1000); // wait 1 second)
The principle of operation of this program is quite simple: the LED lights up for 1 second and goes out for 1 second. For the first option, we do not need to assemble the layout. Since in the Arduino platform, a built-in LED is connected to pin 13.
Arduino firmware
In order to upload a sketch to the Arduino, we just need to save it first. Further, in order to avoid problems during download, you need to check the settings of the programmer. To do this, on the top panel, select the "Tools" tab. In the "Fee" section, select your fee. It could be Arduino Uno, Arduino Nano, Arduino Mega, Arduino Leonardo or others. Also, in the "Port" section, you must select your connection port (the port to which you connected your platform). After these steps, you can upload the sketch. To do this, click on the arrow or in the "Sketch" tab select "Download" (you can also use the keyboard shortcut "Ctrl + U"). The firmware of the board has been completed successfully.
Prototyping / prototyping
To assemble the breadboard, we need the following elements: LED, resistor, wires (jumpers), breadboard (Breadboard). In order not to burn anything, and in order for everything to work successfully, you need to deal with the LED. It has two legs. Short - minus, long - plus. For the short one, we will connect the “ground” (GND) and the resistor (in order to reduce the current that goes to the LED, so as not to burn it), and for the long one, we will supply power (connect to pin 13). After connecting, upload a sketch to the board, if you have not done so before. The code remains the same.
This is the end of the first part. Thank you for your attention.


