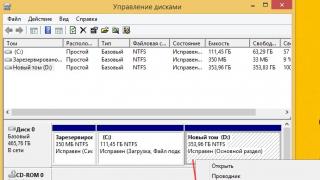
Hello admin, I want to increase disk space (C:) at the expense of disk (D:) without losing data, but I can’t do anything. Here you can see for yourself "Disk Management" of my computer. Drive (C:) is 111 GB and drive (D:) is 350 GB and I want to detach 50 GB from drive (D:) and attach them to drive (C:) to increase its space to 160 GB.
First I want to “pinch off” 50 GB from the disk (D:) and attach them to the disk (C:), I click on the disk (D:) and select “Shrink volume”

I set it to 50 GB and click “Compress”

An unallocated area of 50 GB is formed on the disk

I right-click on the drive (C:) and want to select “Extend Volume,” but as you can see, the button is blurred.

How can I attach unallocated space to the drive (C:) in my situation?
Friends, you can’t do this using the built-in Disk Management utility in Windows 8.1, so you need a special program from the class of hard disk partition managers.
Therefore, today I suggest you increase the disk (C:) at the expense of the disk (D:) without losing data with the free program AOMEI Partition Assistant Standard Edition 5.6, moreover, it is in Russian and has a very convenient management interface.
We have already written two articles about working in this program:
- AOMEI Partition Assistant Standard- an excellent program for high-quality management of partitions on your hard drive without data loss. Interestingly, the application is free for home and even commercial use! I tested this program for several months and wrote several detailed articles about it for you.
- Friends, I haven’t done anything with this program and I didn’t have any problems, but it still applies to disk partition managers and if you make a mistake somewhere, you can lose your data, so before working with the program, I recommend making a backup of everything partitions of your hard drive. In my opinion, all users should be able to create a Windows backup and deploy it if necessary. Articles to help.

The program is very easy to install without any pitfalls.


After successful installation, launch the program

And in the main window of AOMEI Partition Assistant Standard Edition 5.6, right-click on the drive (D:) and select “Resize partition”.
Left click to enlarge image

In the “Moving and resizing partitions” window, click on the delimiter with the left mouse and drag it to the right, thereby freeing up 50 GB of space in front of the volume (C:)


There is 50 GB of unallocated space between drive (C:) and drive (D:). Right-click on the drive (C:) and select "Resize partition"

We grab the delimiter with the left mouse and drag it to the right, thereby attaching the unallocated space of 50 GB to the volume (C:)

and click OK

The AOMEI Partition Assistant Standard Edition 5.6 program works in deferred operation mode and to implement our changes you need to click the "Apply" button

03.01.2018
How to redistribute memory between disks. How to partition a hard drive? Merging and expanding partitions
If you've never divided a hard disk into parts, then you're probably wondering why this is done at all. In fact, there are quite a few reasons - from banal convenience to safety. Why divide (split) a hard drive? Once upon a time, hard drives were small in size - 20-40 GB. Although even then many began to split them into 2 parts: the operating system and user files. Today, in the “terabyte” era, this is especially relevant. High-quality videos and music can take up hundreds of gigabytes - why not have their own section? Work files and studies are much more important and therefore also a separate storage area. Also, several people can use the computer - each with their own space. Or an example of parental control: limiting access to discs with games and films is just for study. Convenient! In addition, there are users (I am one of them) who have several operating systems on their computer, such as Windows and Linux. And here, dividing the hard drive into a certain number of partitions is a natural necessity. A little theory . What are the sections? It is advisable to know this information so as not to get confused. Firstly, a partition can be unallocated: this is when you seem to have allocated space for a new partition (“bite off” a piece from the “C” drive, for example), but the system does not see it. Don't be alarmed - your hard drive has not become smaller and you have not done anything irreversible. Most likely, this section is simply not marked yet. So what are the sections? · "Primary", "Primary", "Primary partition"- something like this. If you have only one partition and the operating system is installed on it, then it is the primary one. It must have a file system (NTFS, FAT). There can be up to 4 such partitions on a hard drive. It happens that you bought a laptop, but you can’t add a new partition. There may already be 4 of them, and some of them are hidden (Recovery – hidden partition with a backup copyWindows recovery tool). · "Additional", "Advanced", "Extended partition". The extended partition itself has neither a letter label nor a file system. If you seem to have created a partition, but it is NOT displayed in the system, then most likely it is extended. The extended section can only be in a single copy. It is included in the number of main sections - that is, if you have an extended one, then in addition to it you can have 3 more main sections. So why is it needed then? - you ask. I answer. That’s why the extended partition was invented – so that you could bypass the 4 partition limit. It is “inside” the extended section that you can create as many logical drives. But in the system you will only see these disks along with the main partitions - they will all have their own letter designation and file system. The extended partition will exist hidden. This can get confusing because different programs may use different names. Or, for example, “forget” about them altogether - which is the sin of the system utility in Windows 7. But now, I hope, you understand this structure at least in general terms. I'll try to depict it clearly: - Main section “C:” (Logical 1 NTFS or FAT) - Main section “D:” (Logical 2 NTFS or FAT) - Main section “Advanced”(No letter and no file system) - Logical 4 “F:"(NTFS or FAT) - Logical 5 “G:"(NTFS or FAT) - Logic 6"H:"(NTFS or FAT) - Main section “E:” (Logic 3: NTFS or FAT) The letter designations for partitions can be any - not necessarily alphabetical. File systems too. FAT and NTFS are simply commonly used on Windows. If you have less than 4 sections, then let them all be basic - there is no point in making an extended one. Methods for partitioning a disk There are as many ways as there are programs. It should be noted that there are a lot of funds, most of them are paid programs. But in general, methods for partitioning a disk can be divided into 3 main areas. Method number 1. System The system utility is quite simple and not very functional. You will be able to perform some operations with the main partitions, such as: resizing, creating a partition. The easiest way to do this is this way: the “Computer” icon on the desktop (it’s also in “Start”) - right-click. Then select “Manage” (you must have administrator rights). In the window that opens, in the left column, select the “disk management” utility. We wait a few seconds.
 And here are our disks. Disk 0– and there is our hard drive with its partitions. What is in the CD-rom does not bother us, but only puts us in the right mood. As you can see, the system utility is all 6
considers hard disk partitions to be simple and basic. Although in reality this is not the case. The program does not see that the last 3 partitions have other file systems (not FAT or NTFS) and that these are logical partitions inside an extended partition. This is a big minus. The program still can’t do a lot of things, but it can quickly and easily perform basic operations on partitions. For example, we can very simply create a new primary partition by “pinching off” a piece from drive “D” or “C”.
And here are our disks. Disk 0– and there is our hard drive with its partitions. What is in the CD-rom does not bother us, but only puts us in the right mood. As you can see, the system utility is all 6
considers hard disk partitions to be simple and basic. Although in reality this is not the case. The program does not see that the last 3 partitions have other file systems (not FAT or NTFS) and that these are logical partitions inside an extended partition. This is a big minus. The program still can’t do a lot of things, but it can quickly and easily perform basic operations on partitions. For example, we can very simply create a new primary partition by “pinching off” a piece from drive “D” or “C”.
 I forgot to say that the very first partition is, as a rule, on Windows 7, the so-called. “
Recovery”, which I mentioned at the very beginning. You shouldn't touch him. This is generally a hidden section. It will help you return your laptop or computer to its factory state by wiping the entire hard drive and returning Windows 7 to its original settings and software package.
I forgot to say that the very first partition is, as a rule, on Windows 7, the so-called. “
Recovery”, which I mentioned at the very beginning. You shouldn't touch him. This is generally a hidden section. It will help you return your laptop or computer to its factory state by wiping the entire hard drive and returning Windows 7 to its original settings and software package.
 To separate a part from an existing volume, right-click on it and select “Shrink Volume...”. A window like this appears where you just need to select the required size for the new partition. I chose 1000 MB - I’ll delete it later anyway. You must choose the size yourself.
 After this, we had an unallocated area of 1000 MB in size. Right-click on it and select “Create simple volume”.
 What are you waiting for? Click “Next”! Since we need the entire partition, we leave the maximum size at .
 Next, assign a letter (any one from the list) and go “Next”.
 We choose a file system - we can’t do without it. We have selected what we need – NTFS, so we finish with the “Next” button.
 We receive a table with a preliminary summary and click “Finish” to complete the procedure.
 All. A new volume has been created. Congratulations! And now I, as the owner of a well-functioning system, have a reasonable question: “Why did I do this???” That's right - to show you. But now this new 1 GB volume is like a fifth wheel to me. Therefore, we will immediately analyze the procedure for returning the “bitten off” disk space to its place. Maybe it will come in handy for you too. First, let’s delete the volume we just created (right button, “Delete volume”). Now instead of a volume there is an unallocated area. Let's move on. So, right-click on the disk from which we “stole” some space. And select “Extend volume”.
 By clicking “Next” we see a completely new window.
 We do not touch the size settings. Actually, we don’t touch anything, but move on - after all, our unallocated area called “Disk 0” has already been added to the “Selected” column. We again receive a preliminary summary and complete the process with the “Finish” button.
 That's all. Everything is back to its previous state! Method number 2. When installingWindows 7 Unfortunately, I can’t provide screenshots of this method, but everything is quite simple there, in Russian. I'll give you just a few tips. And remember that during installation you will not be able to read the instructions if you do not have another device with the Internet at hand. So it's better to print or write down all the steps. I will describe the sequence of actions. After you start installing Windows 7 and go through the language selection window, accept the license terms and select “Full installation”, a window will open asking you to select a partition for installing Windows. In this window you will see if you have any unoccupied space. There will also be a “Disk Settings” button, click it and tools for working with disk space will appear. Here you can format the disk or disks, as well as create new ones by clicking on the button of the same name, and set the desired disk size. All changes will take effect after clicking the “Apply” button. That's really all you need. If you did something wrong, calmly delete the partitions and create them again. Provided, of course, that there is no data there, otherwise formatting or deleting the partition will kill it. Method number 3. Specialized programs To talk about all the programs that help you break up a website, an entire website is not enough. I’ll just list which programs are the most popular today. Their functionality, as a rule, allows a lot. But we are only interested in disk partitioning, so if the program is in Russian, you can easily figure out how to create the partition structure you need if you read the article carefully. So, programs for working with disk space: · Acronis Disc Direktor; · Paragon Partition Manager; · Partition Magic; · Ranish etc. I hope you will be able to distribute disk space conveniently and correctly. Good luck!
Convenient distribution of disk space on a computer is one of the fundamental actions for comfortable operation and performance of the operating system. After purchasing a new PC or reinstalling the operating system, the question arises - how to properly partition a hard drive? The standard division into two volumes C and D will not be enough for a large hard drive. 100-150 GB are usually allocated for system files; the rest of the disk space will be correctly divided into several parts. This simple action will guarantee the performance of the OS by reducing the rate of fragmentation of the system volume. There are three simple ways to partition in the Windows operating system:
- Installation of separate software.
- Using internal Windows services.
- Separation when installing/reinstalling the operating system.
When using a separate program to partition a disk, you need to prepare, namely:
- make a backup copy of important personal files;
- free up additional space on your hard drive;
- check the hard drive for possible errors.
Protecting your personal files from loss during further work is the user’s primary task. Photos, contacts and other files should be copied to an external storage device (hard drive, flash drive) or use a file storage cloud on the Internet.
Once you have enough space for the new partition, you need to check the hard drive for errors. Go to “My Computer”, select the desired drive and go to “Properties”. Then select the “Service” tab and click “Run check”, check both boxes and wait for completion. At the end of the check, the OS will ask you to restart the PC - confirm. The disk properties interface in Windows 7 and XP is identical, so there will be no difficulties.
Working with programs to create partitions
The program interface is configured mainly to solve one problem - how to divide the hard drive into convenient parts. Most of the software works with different versions of Windows 7 and XP; there are both paid services and for free use. It would be more correct to use programs for free use with a Russian interface.
The following are very popular: “Partition Magic”, “Acronis Disk Director”, “Aomei Partition Assistant”. Each uses a standard menu for working with the disk. All that remains is to select the disk that needs to be divided into parts. Then set the volume for the new partition, its name and file system. Any of the programs will offer two file system options: FAT 32 and NTFS. The first is installed when working with Windows 95/98 or Millinium Edition. Starting from XP, NTFS should be selected. For stable operation of the OS, a prerequisite is that all hard drive partitions must be formatted under the same file system.
How to partition a hard drive without installing software
The ability to divide the hard drive into partitions using system services is provided in versions of Windows 7 and higher. To do this, find the “Management” item, located in the “My Computer” folder. In the “Computer Management” menu that opens, open the “Disk Management” tab. A list of disks that are on the PC will appear, as well as a hidden “System Reserved” section - a recovery system disk. We select drive C or the one that we will divide into two or three parts - additional containers. Open the list of disk functions: right button - “Volume compression”. In the window that appears, select the location where you want to compress the disk. Provided that the hard drive was not previously divided into separate parts, the system will offer to divide it into parts approximately equal in volume. You can set the desired value. If a miscalculation is made, you can return the partition to its previous sizes by selecting “Uncompress volume” in the disk functions. The system disk will be compressed and a new partition will be displayed called “Unallocated”. Open the list of functions and click “Create a simple volume...”. The “Create a Simple Volume Wizard” window will appear on the screen and prompt you to designate the new partition with a letter and give it a name. This is followed by the process of formatting into a file system. Having decided on the option, click “Continue”, and in a few minutes the work on creating a new section will be completed.
Partitioning the hard drive when installing or reinstalling the operating system
Partitions should be created at the moment when the OS installation reaches the point of selecting the partition in which it should be installed. Further actions:
- Create a partition for the OS, let it be drive C, and enter its size. If the hard drive initially has 1 TB of memory, you can allocate 100-120 GB for the operating system - that’s enough.
- Next, the computer will ask you to allocate a little more space for backup files, you need not to skimp, but click the “Agree” button.
- Create a second partition: look for the line “Free disk space”, click “Create”. Next we set the size for it. We call it drive “D” and the button “Apply”. So, there are already two sections.
- To create the third partition, proceed in the same way as described above: “Free disk space” - “Create”. We indicate the entire size remaining from the original one.
- Click on the “C” drive, which is allocated for the OS and click “Next”. The installation of your Windows 7/8 continues.
Conclusion
As you can see, there is nothing complicated about dividing a hard drive into several departments. Even a novice user can handle this simple process. The main thing is to carry out everything clearly according to the written points, and you will succeed. If done correctly, you will have several disks, in each of which you can store certain folders, files, etc. This will eliminate the problem of constantly searching for the necessary information on the computer.
The second important advantage of partitioning the hard drive is that when reinstalling the OS, for some reason, all information during the formatting process can be destroyed. And if the computer has the OS on one disk, and all the files on others, the process of destroying the contents will affect only one partition of the hard drive. And the speed of the system itself will be faster, the computer will not freeze, thanks to less “cluttered” departments. Ideal option: two to four sections, depending on the size of your hard drive.
The new operating system from Microsoft, which went through a high-profile release stage, caused conflicting reviews from users. This is not surprising - the company from Redmond has been a monopolist in the home computer software market for about two decades, and as its popularity grows, the amount of criticism naturally increases. Whether we like it or not, over time Windows 10 will become the new dominant operating system on the market, so it makes sense to adapt to it now.
One of the popular aspects of working with any operating system is disk management - both professionals and ordinary users should acquire knowledge here - the need to share a hard drive arises for everyone. Fortunately, Microsoft has restrained its ardor in its desire to stuff its new OS with a lot of innovations, abandoning its own successful solutions. In many ways, this was manifested in the management of such an element as a hard drive - the well-organized interface was borrowed from the previous version - 8.1. In Windows 7, which currently ranks first in popularity, memory management is similar to version 10, so this article will be useful to a much larger circle of users.
Only supporters of third-party software can object, but, as practice shows, its use (as well as the purchase of a license) is not justified for the average user, and for most of them the share of used capabilities remains extremely low - the need to share a hard drive rarely arises.
To start working with media (it doesn’t matter whether you want to split, redistribute or delete a volume), you need to open the built-in program, the name of which in the 10th edition of the OS has not changed since the days of “seven” - “Disk Management”. To do this, you need to do the following manipulations:
- In the search bar of the Start menu, look for Control Panel;
- Click on the “Administration” item;
- In the window that appears, select the “Computer Management” shortcut;
- Then select “Disk Management”.
Below are slides showing the above steps.

Control Panel - Administration

Computer management

Disk Management
Creating a new volume on free space

The screenshot shows the open program window and the list of sections available for modification. To create a new one, click on the disk icon and select “ Shrink Volume" In our case, it is only possible to compress the “drive D:” volume - there is more space on it, and it is not recommended to perform such manipulations with the system partition.
Why Shrink Volume? Disk space is limited; you won’t be able to take it out of thin air. Since our hard drive is completely divided between existing disks, the only option is to share the memory for the partition. Another method suggests using the free space in the unallocated area (it is also displayed in this list), or formatting one of the partitions, deleting it and using the resulting unallocated area to create two new ones of an acceptable size for you. It is worth noting that in the latter case, all data stored on this volume will be lost, so the method presented in the screenshot in this regard is the most convenient and fastest.
After activating the “Shrink Volume” option, a window will open in which the system will ask you to be patient and wait a few minutes. After this time, information about the maximum volume for the new volume will be displayed on the screen - in our case it is slightly less than 77 GB. The user will be asked to independently select the size of the new partition, which will be within the previously specified 77 GB. We choose 51200 MB - that's exactly 50 GB.

The space can be used for convenient cataloging of your data or for parallel installation of another operating system.
After setting the value, click the “Compress” button and wait. The waiting time can vary greatly - on SSD drives the process will take a few minutes, on older machines - a couple of times longer (since the hard drive is significantly inferior in operating speed). Once the process is complete, you will see noticeable improvements in the diagram below - among the blue bars indicating existing disks, a black one labeled “Unallocated” will appear.
Creating a section
After compressing the free memory on your hard drive, it's time to start creating a new partition. In Windows 10, control is carried out by right-clicking on the unallocated area and activating the “ Create a simple volume».
![]()
Will be called " Create Simple Volume Wizard", which will prompt the user to manage the volume size. By default, the disk set value will be equal to the size of the free space - it should be changed only if you plan to create more than one disk. You will also be asked to select a volume name and label, after which partition formatting options will open. It is recommended to use the default values set in Windows and click “Format”. Now you have a new volume at your disposal.
Since disk management in Windows 10 is similar to “seven,” we suggest you watch a video on how to partition disks in Windows 7.
In contact with
If you're logged in as an administrator, you can redistribute your hard drive partitions using the Shrink feature in Disk Management. You can shrink an existing partition or volume to create unallocated disk space on which to create a new partition or volume (note that the terms "partition" and "volume" are often used interchangeably).
- Open the "Computer Management" section. To do this, click the button Start, select components sequentially Control Panel, system and safety, Administration, and then double-click Computer management. If you are prompted to enter or confirm an administrator password, enter the password or provide confirmation.
- In the left panel in the section Storage devices click Disk Management.
- Right-click the volume you want to shrink, and then select Shrink Volume.
- Follow the instructions.
Notes:
Here, by the “Compress” function, Windows means changing the size of a partition (volume). Before you begin compression, review the list of conditions required for compression to occur. For more information, see the menu Reference select item Calling help, go to the tab Search, enter Base volume compression and press the button Sections.
If your disk has multiple partitions, you can delete one of them and create new partitions on the freed, unallocated space. When you delete a partition, all information stored on it will be destroyed.
You can also redistribute disk partitions using a third-party partition management program. Some third-party manufacturers offer programs that allow you to redistribute hard drive partitions without deleting information.
Below we will look at an example of deleting and creating partitions
As described above, we enter Disk Management.
Picture 1
On Disk 0 With a size of 465.76 GB we see 4 partitions. Please note that the fourth section F is a logical drive that is located in a secondary partition. An additional partition is a container that contains a logical disk F.
For clarity, let’s set the task - delete partitions D And F and in their place create one section D.

Figure 2
Move the mouse cursor over the section F and press the right mouse button. In the menu that opens, select “Delete Volume”.

Figure 3
A window opens with the warning “Deleting a volume will destroy all data on this volume.” Before deleting, back up any data you want to keep. Do you want to continue?" If you agree, click the button Yes.

Figure 4
Logical drive F deleted - there is still free space in the additional partition. Let's start deleting this additional section.

Figure 5
Move the mouse cursor over the free space of the additional partition F and press the right mouse button. In the menu that opens, select “Delete partition”.

Figure 6
A window opens with the warning “This is an additional partition. Once deleted, the partition will become inaccessible. Are you sure you want to delete the partition? If you agree, click the button Yes.

Figure 7
The additional partition was removed, leaving unallocated hard disk space in its place. Similarly, delete the main section D.

Figure 8
As a result, we get unallocated hard disk space, on which we proceed to create a new main partition.

Figure 9
Move the mouse cursor over the unallocated space of the hard drive and press the right mouse button. In the menu that opens, select “Create a simple volume.”

Figure 10
The “Create a Simple Volume Wizard” window opens - click the button Further.

Figure 11
Since it was decided to occupy all the remaining unallocated disk space for the partition being created, we leave the default “Simple volume size (MB)” without changing - click the button Further.

Figure 12
We assign a letter to the partition (if we don’t assign it, the partition will not be visible in the “My Computer” window) - press the button Further.

Figure 13
Set formatting parameters and press the button Further.

Figure 14
Press the button Ready.

Figure 15
And we admire the result.

Figure 16
An autorun window opens, open it and use it.
And in conclusion, I would like to note the features of expanding and compressing partitions.
Before performing these operations, make sure that the Disk Defragmenter service's startup type is set to Manual. If this service is disabled, then when you try to resize the partition you will receive the error: "The specified service cannot be started because it is disabled or all devices associated with it are disabled."
A partition can only be expanded by using an unallocated area on the hard drive adjacent to it.
Unallocated area can be obtained by deleting or compressing existing partitions.
Please note that the unallocated area can be used to expand only those partitions that are on the same physical hard drive.
For example, to expand partition C (when it is not adjacent to the unallocated area), you must:
Shrink section D as much as possible, create a new section in the unallocated area that appears, move information from section D there (if it fits there), delete section D, and then expand section C to the desired size, then assign a letter to the new created section D and expand it to the remaining unmarked area. This is such a complex process...
It often happens that the space on your hard drive is not very conveniently distributed, and it also happens that you only have one Disk C:. But you can always separate it yourself, without using additional programs - everything is done in the system itself.
You may ask: “Why is this even necessary?” One of the most important reasons is safety. For example, if you have to reinstall Windows, then all data from Drive C: will be lost. For this reason alone, you need to split your hard drive into several partitions: on C: to keep Windows itself, and for example on D: to load all other files: documents, videos, photos and other data.
Read other useful instructions:
How to partition a hard drive in Windows 7, 8, 8.1 and Windows 10
1. Open the command line by pressing the Win+R key combination and enter diskmgmt.msc in the Run window. The Win key is the key with the Windows icon.
2. After that, right-click on the partition that you want to divide and select “Shrink Volume” from the menu.

3. Set the size of the compressed space, that is, indicate how much memory you are taking from this partition. After that, click "Compress".

4. Now unallocated memory will appear at the bottom.

5. Click on it with the right mouse button and select the item in the menu "Create Simple Volume".

6. After this, set the size of the new partition. You may not use all the available memory if you want to add several new partitions.

7. Assign a drive letter.

8. In the next window, come up with a name for the new disk instead of “New Volume”. It is better to leave the remaining formatting parameters unchanged.

After this, you will have a new disk on your computer. Also when there is unallocated memory, you can add it to another disk. To do this, right-click on any partition and click “Extend volume”.
When purchasing a new hard drive or reinstalling the system, quite often there is a need to partition the hard drive or repartition it. This is quite simple to do, and there are a large number of methods for this procedure. So, let's look at how to partition, create a new partition, and also how to combine hard drive partitions.
What's the best way to partition a hard drive?
Why do you need to partition your hard drive?
If you are a beginner, then for convenient and safe work with data, the hard drive must be divided into partitions. For what? Firstly, it is very convenient when the operating system is installed on one partition of the hard drive, and all documents and media files are on another partition. Secondly, if files are infected with viruses on one partition of the hard drive, they will not be able to get to another partition, unless you copy the infected file to that other partition.
How to properly allocate hard drive space
Before partitioning your hard drive, you need to think very carefully about how to allocate the space on it.
As for the Windows operating system, it is best to allocate at least 25-30 GB for the system drive “C”. If the capacity of your hard drive does not allow you to save space on your hard drive, then we recommend that you allocate 100 GB for drive “C”. For what?
This way, you can install a large number of large programs without fear that there will not be enough space for them on the system disk. In addition, you will be able to install a large number of games, and at the same time, without fear that their saves will also not fit on the “C” drive. One more nuance: the freer the system partition, the better the operating speed of the OS.
We recommend downloading files downloaded from the Internet to the system drive so as not to infect all your media files on drive “D” if there is a virus in the downloaded file. And to download files you also need to allocate space. As you can see, there are a lot of arguments for allocating a large volume to the system partition. But at the same time, there is no need to allocate too much space for the partition with the system; this is of no use.
As mentioned above, you need to split the hard drive into at least 2 sections. If you have data that you want to separate into a separate partition, you can create a third partition with the required volume for these files.
All partitions must be created in the NTFS file system.

How to partition a hard drive and merge partitions in Windows 7 and Windows 8
How to partition a hard drive
To use the standard disk partitioning utility, you need to call “Manage” from the “Computer” context menu. In the left panel, select “Disk Management”. After selecting the line, all drives connected to the computer will be displayed in the right pane. After we activate it by selecting it with the mouse, it will be highlighted with a stroke on the bottom panel. Right-click on it and select “Shrink Volume” from the context menu.
While the system performs the appropriate actions on the disk, the user has no choice but to wait patiently. Finally, a message will appear on the screen warning you that the disk will be divided into two approximately equal parts. Confirm your choice by clicking on the “Compress” button. An unallocated area shaded in black now appears on the panel along with the disk. Click on the shaded area and select Create Simple Volume. When setting up a new disk in the Create Simple Volume Wizard, the user can assign a volume label, name the partition, and select a formatting type. As soon as the “Create Simple Volume Wizard” completes its work, formatting the disk will begin. After it, the user will have a newly created logical disk.
If you are not satisfied with splitting the disk into two equal parts, and this happens quite often, since with a 500 GB hard drive (and even more so 1 TB), allocating half for the system is an unaffordable luxury. For system and program files, 60-100 GB is enough. The rest of the space is best used to store personal files. This cannot be done using standard operating system tools. For this purpose, third-party programs are used that can work with disks, or they can partition the disk through the operating system installer.
How to Merge a Broken Hard Drive
In order to unite broken hard drive partitions in Windows, you need to resave the data on these partitions; they can be written to disks or temporarily sent to cloud storage. Then open the Disk Management menu as described above and delete the partitions you want to merge. To delete a partition, right-click on it and select the item: “Delete volume...”, do the same with the second partition. After that, right-click on the unallocated empty area and select “Create a simple volume.” That's it, two sections turned into one.

How can you partition a hard drive when installing a system?
In order to partition the hard drive when installing the system, you need to go to the selection of the partition for installation. Then click on “Disk Setup”. In the menu that appears, you will see all the necessary buttons for dividing and merging sections.
To partition a new hard drive, select the existing partition and click the “Delete” button. Then select the free area and click on the “Create” button, where you will need to enter the desired partition size and click on the “Apply” button. To create other sections, select again and click the “Create” button.
In order to distribute the remaining free space, if any, select one of the hard drive partitions and click on the “Expand” button, then you will need to specify the final size of the partition to be expanded.
To combine partitions, we delete one partition and, using an extension, add the freed up space to it.
The new operating system from Microsoft, which went through a high-profile release stage, caused conflicting reviews from users. This is not surprising - the company from Redmond has been a monopolist in the home computer software market for about two decades, and as its popularity grows, the amount of criticism naturally increases. Whether we like it or not, over time Windows 10 will become the new dominant operating system on the market, so it makes sense to adapt to it now.
One of the popular aspects of working with any operating system is disk management - both professionals and ordinary users should acquire knowledge here - the need to share a hard drive arises for everyone. Fortunately, Microsoft has restrained its ardor in its desire to stuff its new OS with a lot of innovations, abandoning its own successful solutions. In many ways, this was manifested in the management of such an element as a hard drive - the well-organized interface was borrowed from the previous version - 8.1. In Windows 7, which currently ranks first in popularity, memory management is similar to version 10, so this article will be useful to a much larger circle of users.
Only supporters of third-party software can object, but, as practice shows, its use (as well as the purchase of a license) is not justified for the average user, and for most of them the share of used capabilities remains extremely low - the need to share a hard drive rarely arises.
To start working with media (it doesn’t matter whether you want to split, redistribute or delete a volume), you need to open the built-in program, the name of which in the 10th edition of the OS has not changed since the days of “seven” - “Disk Management”. To do this, you need to do the following manipulations:
- In the search bar of the Start menu, look for Control Panel;
- Click on the “Administration” item;
- In the window that appears, select the “Computer Management” shortcut;
- Then select “Disk Management”.
Below are slides showing the above steps.

Control Panel - Administration

Computer management

Disk Management
Creating a new volume on free space

The screenshot shows the open program window and the list of sections available for modification. To create a new one, click on the disk icon and select “ Shrink Volume" In our case, it is only possible to compress the “drive D:” volume - there is more space on it, and it is not recommended to perform such manipulations with the system partition.
Why Shrink Volume? Disk space is limited; you won’t be able to take it out of thin air. Since our hard drive is completely divided between existing disks, the only option is to share the memory for the partition. Another method suggests using the free space in the unallocated area (it is also displayed in this list), or formatting one of the partitions, deleting it and using the resulting unallocated area to create two new ones of an acceptable size for you. It is worth noting that in the latter case, all data stored on this volume will be lost, so the method presented in the screenshot in this regard is the most convenient and fastest.
After activating the “Shrink Volume” option, a window will open in which the system will ask you to be patient and wait a few minutes. After this time, information about the maximum volume for the new volume will be displayed on the screen - in our case it is slightly less than 77 GB. The user will be asked to independently select the size of the new partition, which will be within the previously specified 77 GB. We choose 51200 MB - that's exactly 50 GB.

The space can be used for convenient cataloging of your data or for parallel installation of another operating system.
After setting the value, click the “Compress” button and wait. The waiting time can vary greatly - on SSD drives the process will take a few minutes, on older machines - a couple of times longer (since the hard drive is significantly inferior in operating speed). Once the process is complete, you will see noticeable improvements in the chart below - among the blue bars indicating existing disks, a black one labeled “Unallocated” will appear.
Creating a section
After compressing the free memory on your hard drive, it's time to start creating a new partition. In Windows 10, control is carried out by right-clicking on the unallocated area and activating the “ Create a simple volume».
![]()
Will be called " Create Simple Volume Wizard", which will prompt the user to manage the volume size. By default, the disk set value will be equal to the size of the free space - it should be changed only if you plan to create more than one disk. You will also be asked to select a volume name and label, after which partition formatting options will open. It is recommended to use the default values set in Windows and click “Format”. Now you have a new volume at your disposal.
Since disk management in Windows 10 is similar to “seven,” we suggest you watch a video on how to partition disks in Windows 7.
In contact with
If you're logged in as an administrator, you can redistribute your hard drive partitions using the Shrink feature in Disk Management. You can shrink an existing partition or volume in order to create unallocated disk space on which you can create a new partition or volume (note that the terms "partition" and "volume" are often used interchangeably).
- Open the "Computer Management" section. To do this, click the button Start, select components sequentially Control Panel, system and safety, Administration, and then double-click Computer management. If you are prompted to enter or confirm an administrator password, enter the password or provide confirmation.
- In the left panel in the section Storage devices click Disk Management.
- Right-click the volume you want to shrink, and then select Shrink Volume.
- Follow the instructions.
Notes:
Here, by the “Compress” function, Windows means changing the size of a partition (volume). Before you begin compression, review the list of conditions required for compression to occur. For more information, see the menu Reference select item Calling help, go to the tab Search, enter Base volume compression and press the button Sections.
If your disk has multiple partitions, you can delete one of them and create new partitions on the freed, unallocated space. When you delete a partition, all information stored on it will be destroyed.
You can also redistribute disk partitions using a third-party partition management program. Some third-party manufacturers offer programs that allow you to redistribute hard drive partitions without deleting information.
Below we will look at an example of deleting and creating partitions
As described above, we enter Disk Management.
Picture 1
On Disk 0 With a size of 465.76 GB we see 4 partitions. Please note that the fourth section F is a logical drive that is located in a secondary partition. An additional partition is a container that contains a logical disk F.
For clarity, let’s set the task - delete partitions D And F and in their place create one section D.

Figure 2
Move the mouse cursor over the section F and press the right mouse button. In the menu that opens, select “Delete Volume”.

Figure 3
A window opens with the warning “Deleting a volume will destroy all data on this volume.” Before deleting, back up any data you want to keep. Do you want to continue?" If you agree, click the button Yes.

Figure 4
Logical drive F deleted - there is still free space in the additional partition. Let's start deleting this additional section.

Figure 5
Move the mouse cursor over the free space of the additional partition F and press the right mouse button. In the menu that opens, select “Delete partition”.

Figure 6
A window opens with the warning “This is an additional partition. Once deleted, the partition will become inaccessible. Are you sure you want to delete the partition? If you agree, click the button Yes.

Figure 7
The additional partition was removed, leaving unallocated hard disk space in its place. Similarly, delete the main section D.

Figure 8
As a result, we get unallocated hard disk space, on which we proceed to create a new main partition.

Figure 9
Move the mouse cursor over the unallocated space of the hard drive and press the right mouse button. In the menu that opens, select “Create a simple volume.”

Figure 10
The “Create a Simple Volume Wizard” window opens - click the button Further.

Figure 11
Since it was decided to occupy all the remaining unallocated disk space for the partition being created, we leave the default “Simple volume size (MB)” without changing - click the button Further.

Figure 12
We assign a letter to the partition (if we don’t assign it, the partition will not be visible in the “My Computer” window) - press the button Further.

Figure 13
Set formatting parameters and press the button Further.

Figure 14
Press the button Ready.

Figure 15
And we admire the result.

Figure 16
An autorun window opens, open it and use it.
And in conclusion, I would like to note the features of expanding and compressing partitions.
Before performing these operations, make sure that the Disk Defragmenter service's startup type is set to Manual. If this service is disabled, then when you try to resize the partition you will receive the error: "The specified service cannot be started because it is disabled or all devices associated with it are disabled."
A partition can only be expanded by using an unallocated area on the hard drive adjacent to it.
Unallocated area can be obtained by deleting or compressing existing partitions.
Please note that the unallocated area can be used to expand only those partitions that are on the same physical hard drive.
For example, to expand partition C (when it is not adjacent to the unallocated area), you must:
Shrink section D as much as possible, create a new section in the unallocated area that appears, move information from section D there (if it fits there), delete section D, and then expand section C to the desired size, then assign a letter to the new created section D and expand it to the remaining unmarked area. This is such a complex process...
You may also be interested
Most users are accustomed to using two partitions on one hard drive, usually a drive called C and D. Many have become interested in the question of how to change the disk size in Windows 10 using the built-in system tools (during installation of Windows or after) and third-party free programs.
Use the Disk Management utility
- Open the utility by right-clicking on the Start menu and selecting Disk Management.
- In the search bar of the Start menu, type “Control Panel” and open it.

Select "System and Security".
In the window that opens, in the “Administration” item, click on the “Create and format a hard drive” sub-item.

Shrinking a volume, freeing up space to create a new partition in Windows 10
To create a new volume in the utility, you first need to get free space somewhere for this; it can be obtained by compressing space on an existing volume. In the Windows operating system, no more than 4 partitions can exist on one physical HDD, including system ones (for example, the Recovery Partition). Typically there are two local drives C and D.

To create a third volume, you need to right-click on the partition that has more free space, in our case it is drive D. An explorer window will appear, click on the “Shrink volume” item to free up free space, change it to unallocated.

Partition D to create a new volume.
After this, the message “The volume is being polled to determine the available space for compression” will appear. Wait…". The process can last from several seconds to several tens of minutes.
When the system finishes polling the volume, a window will appear in the “Size of volume to be compressed” column, you need to indicate how much space needs to be separated from the donor disk to create free space for now. It will not be possible to allocate more space for a new partition than specified. In the example in the screenshot, the limit is 78880 MB, a little more than 77 GB.

You can specify any other number less than the one specified above, for example, by setting the value to 51200 MB, allocate exactly 50 gigabytes for the new volume. After selecting the “Compress” option, no result will be noticeable for some time. To check whether the compression process is in progress, you need to hover the cursor over the utility window; a spinning blue circle should appear. When a black strip with unallocated space appears at the bottom of the window, this will indicate that compression has occurred.

This frees up space to create a new volume on the HDD in Windows 10. Now the unallocated space needs to be turned into a full-fledged hard drive partition.
— Creating a hard disk partition from unallocated space
You need to right-click on the area labeled “Unallocated” and select “Create a simple volume.”

The “Create a Simple Volume Wizard” will open, click “Next”, in the next window you will need to specify the size of the new volume. You can leave the value unchanged, or, if you want to create two or more sections, specify a smaller value. Click "Next".

After this, select the Latin letter that will denote the disk, for example, F. Select the letter and click “Next”.

You will then be able to format the new partition if necessary.

Continue by clicking “Done”.

After a few seconds or minutes, the partition is formatted and a new Windows 10 hard drive partition will be created. When choosing the amount of memory you want to allocate for creating a new one, you must take into account that a small amount of compressed space will be taken by Windows for system needs.
So, when choosing 50 GB of memory, we got a volume of 49.9 GB in size.

Creating partitions when installing Windows 10
When installing Windows 10 on a computer from a flash drive or disk, you can divide the disks into volumes. For those who reinstall the operating system, you need to take into account that this will lead to the deletion of data from the system partition.
During Windows installation, after entering (or skipping input) the activation key, select “Custom installation”, after which you will be able to select a partition for installation; tools for configuring partitions are available.

In our case, drive C is partition 4.
To make two partitions from one HDD, you need to use the “Delete” button to create a partition; as a result, it will be converted into “Unallocated space on the disk” (point 4).
Then select an unallocated space, click the “Create” button, set the size of the future “Disk C”. After its creation, there will be free unallocated space that will need to be converted into a second disk partition in the same way.

After creating the second partition, it is recommended to select it and click “Format” (otherwise it may not appear in Explorer after installing Windows 10 and will have to be formatted and assigned a letter through “Disk Management”). Then select the volume that was created first, click “Next” to continue installing the operating system on drive C.
Programs for partitioning disks
In addition to the built-in Windows tools, there are many programs for working with disk partitions. Some of the best free programs are Aomei Partition Assistant Free and Minitool Partition Wizard Free.
First, you will need to download the Aomei Partition Assistant program from the official website, install it on your PC and run it. The application has a Russian language; we select a non-system drive, in our case it is “E”.
Right-click on it and click “Resize partition”.


The selected amount of memory will appear, in our case – 15 GB.
Right-click on the system local drive C and select “Resize partition” from the context menu.

Again, drag the slider to the right to the desired size, or set the required space for expansion in the “Unallocated space after” field. A warning will appear to make a Windows 10 system recovery image or a backup copy using third-party tools, click “Ok”. To save changes, click “Apply” in the upper left corner.

A message will appear that there will be several reboots, during which drive C will be merged with unallocated space, select “Go”. A message will appear that the program will work in PreOs mode, click “Yes”.
Windows 10 will begin to reboot.
When you boot for the first time, AOMEI Partition Assistant PreOS Mode will launch.
The process of completing the task will begin.
redistribute space on local disks, their. That is, the functionality of this tool is practically a lightweight version of programs such as Acronis Disk Director, Partition magic and other disk management programs. And now I will show you how to manage it...
Disk management in windows 7 great tool to redistribute space on local disks, delete local disks, create their. That is, the functionality of this tool is practically a lightweight version of programs such as Acronis Disk Director, Partition magic and other disk management programs. And now I will show you how to manage it.
My plan of action is this:
1. Reduce local disk D by 50 GB.
2. Using the freed up space, create a new local disk of 25 GB in size.
3. Increase this newly created disk by the remaining 25 GB.
4. Return everything to its place.
The Disk Management tool can be found at the following address: Start - Control Panel - Administrative Tools - Computer Management - Disk Management. The top block of this window contains a list of local disks, the bottom block shows the distribution of space between them and all connected media.

To shrink local drive D, right-click on it and select “ Shrink Volume..." A window like this will appear

And then this.

In this window, we select how much we need to compress the local disk and we can immediately see how much space will remain on this disk. So, enter the size for which we will compress disk and click " Compress».
After some time at the bottom of the window " Disk Management"A scary black area will appear, but don't be alarmed, everything is going according to plan.

This is a black area; there is an unallocated area of the hard drive.
The first point of the plan is completed, let's move on to the second: Creating a new local disk 25 GB in size. To do this, right-click on this black area and select “ Create a simple volume..." The “Create Simple Volume Wizard” will open.


And here it is “Ulyalya”.

Everything worked out. New local disk size 25 GB. created. Moreover, as soon as it is created, you will be prompted to open it, as if you had inserted a disk or flash drive, this is good.
Let's move on to point 3: Let's increase the created local disk to the remaining free space. To do this, right-click on the new disk and select “ Extend Volume..." The Volume Expansion Wizard window opens.


So, the last stage, to return everything back, for this you need remove local disk“Ulyalya” and expand disk D. To delete a local disk, right-click on the desired disk and select “ Delete volume..." We will see a warning that all data on this disk will be destroyed.

We agree. And again the unmarked area appears. And we already know how to expand the disk using the unallocated area.

I would also like to say that it was impossible to expand drive C due to this unallocated area, because it is possible to expand a local disk only when the unallocated area is adjacent to it. That is, this black area should be located next to the local drive C. But there is a solution, albeit a little “crazy”.
To expand drive C (in my situation, when it is not adjacent to the unallocated area), you need to: shrink local drive D as much as possible, create a new volume, move information from drive D there, delete local drive D, and then expand local drive C, then assign the letter D to the new created partition and expand it to the remaining space. This is such a long process... Good luck!
Article taken from open sources: http://www.goodkomp.com/page/upravlenie-diskami-windows-7#1