Whenever something goes wrong with your computer or laptop, there are a number of troubleshooting tools you can follow to try and fix the problem. Windows 10/8/7 has several built-in commands that you can use to check and repair corrupted system files that cause problems over time when changed. One of the ways to troubleshoot Windows-related problems is System Check and System File Restore. It can help with all types of problems like slow system, blue screen of death, sudden power failures and system crashes.
Let's take a look at how to run the System File Checker on Windows using command line CMD and PowerShell commands such as sfc / scannow and tool DISM. I want to note that for the Windows 10 Anniversary Update, it will be better to use methods with PowerShell.
Checking and restoring system files via CMD
System File Checker scans your computer for any damage or changes to system files that might otherwise interfere with your PC's normal operation. From there, it replaces the file with the correct version to keep it running smoothly. Using the command line, you can try to scan and repair system files of late operating systems like Windows 10/8/7 / Vista. Let's analyze two commands sfc / scannow and DISM using CMD.
1.
- Run Command Prompt (CMD) as administrator. Click "search" and write simply "cmd" or "command line", then right-click on it and run as an administrator.
- Set command sfc / scannow and wait for the process to finish.

Note: After scanning your system, you will get one of three results:
- There will be no system file errors.
- There will be system file errors and Windows will repair them automatically.
- Windows has encountered errors but is unable to repair some of them.
If option 3 shows you that an error was found and the system cannot recover, then repeat the procedure. I advise you to disable encryption and, if they are available at the time of verification. Nothing succeeded? We move below.

2. (DISM)
If the above doesn't work in safe mode, there is one final way to check for corruption in system files and fix them. We use the Deployment Image and Service Management (DISM) tool. The team works with Windows 8 / 8.1 / 10 systems. Open back and use the following command:
The process can take a long time with the percentage scale freezing. When finished, restart your computer and start back sfc / scannow, to make sure there are no errors or the error is gone.

Checking and restoring system files viaPowerShell
We'll be using Windows PowerShell to show you how to use the Servicing and Management Service. DISM to scan and fix corrupted system files in Windows 10. This method will be more effective for updating Anniversary windows 10 than the command line.
1. Using the System File Checker (SFC) Tool
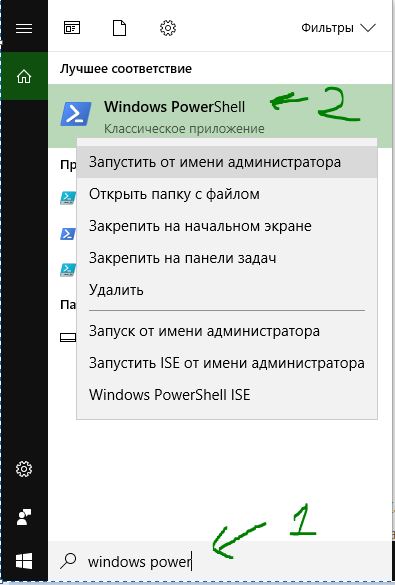
- Run PowerShell as administrator. Click "search" and type windows powershell, then right-click and select as admin.
- Enter the command in the PowerShell window sfc / scannow. If the scan finds any problems, Windows will try to fix them. If Windows cannot fix them, it will warn you that further research and action is needed. Move down if errors are found.

2. Using the Deployment Image and Service Management Tool (DISM)
DISM scan detects corrupted system files and Windows will try to fix them and give you a progress report at the end. If Windows cannot find the files it needs to repair corrupted system files, you will also be provided with information on what to do next, with a link to the Microsoft website and troubleshooting options. Issue below command to PowerShell window.
DISM / ONLINE / CLEANUP-IMAGE / RESTOREHEALTH
If DISM fixed everything or did not find errors, then restart the laptop, computer and run it back to check sfc / scannow.

The problem of unstable operation of Windows 7 is often associated with damage or deletion of system files, for example, after reinstalling or installing an infected program. This is not the most difficult problem - there are many ways to recover data using standard OS tools or manually. We will consider the simplest and most effective options further.
Rollback to the last stable state
By default, protection is active for all Windows system partitions. It is responsible for creating special checkpoints that contain configuration information and system files for the environment before modifying it — installing applications, drivers, and updates. Moreover, restore points are created without such a reason by the system at regular intervals or by the user himself.
If problems began to appear relatively recently, and you remember the approximate date of their appearance, then the best solution is to roll back the OS to the point when no failures were observed during the operation of the OS.
It is very easy to do this in a production environment:
All that remains is to reboot, after which the damaged system files will be replaced with the previous working versions.
If Windows won't boot
Even if the damage to system data is so serious that the OS cannot boot on its own, there is an opportunity to use restore points:

The corresponding utility for selecting a checkpoint will start, and you need to work with it in the manner described earlier.
If the boot options window does not open when you press F8, then you can get into the recovery environment only when using a boot / installation disk.
Using the standard SFC utility
This application checks and repairs basic OS system files. It can also be run from the command line from the boot disk, from the boot options window after pressing F8, and from a running system. The last option is the simplest:

Upon completion of the operation, the SFC will notify you of the results - the corrupted data must be detected and repaired.
Recovering data manually
Sometimes the methods described above cannot fix the problem. For example, when updating DirectX from distributions that come with various applications, DLLs are often lost. Therefore, always try to update DirectX from. Microsoft website, and if a problem has already happened, then if a new version is available, all DLLs will be updated automatically after installing a fresh package of components from the site http://www.microsoft.com/ru-ru/download/confirmation.aspx?id=35.
If there is no new version on the specified page, then any DLL from another source can be transferred to your system yourself. Libraries are stored in the following directories:
- for Windows 7 × 32 - in the C: \ Windows \ System32 folder;
- for Windows 7 × 64 - in the C: \ Windows \ SysWOW64 directory.
If, when starting an application, a window appears informing about the absence of any DLL, and the installer from the Microsoft website informs about the presence of the latest version of the libraries in your system and does not update the components, then you can simply use the search engine. Search the Internet for DLLs and move them to the specified folders.
Not only DLLs, but also any corrupted system files can be extracted from the Windows 7 installation distribution. To do this, you just need to know which files are damaged. Often, the OS itself informs the user about the absence of any DLL or about an application error, for example, Explorer.exe. You can get information yourself.
Find out which system information is faulty
To do this, you will need the command line again, we have already described how to open it. Write the following command here:
indstr / N: ""% windir% \ Logs \ CBS \ CBS.log> "% userprofile% \ Desktop \ sfcdetails.txt", where N is the drive letter.
Press Enter, after which sfcdetails.txt will be created on the desktop, which you need to open and carefully review. Its content will be something like the image below.
Here we see that the damaged library is Accessibility.dll. It will be necessary to find it on the Web or independently extract it from the existing Windows 7 distribution kit for recovery.
Extracting OS components from the distribution
In addition to the installation disc, you will need a small free 7-zip application. With its help we will work with the install.wim image located in the sources directory. The order is as follows:

All that remains is to copy them to the desired folder or to a USB flash drive. You can replace corrupted data with them using installation / bootable media or LiveCD.
Hello, friends! Restoring system files Windows 7 or Windows 8 / 8.1 is an interesting topic. Especially if the operating system starts to glitch, and we do not have a recovery image and we forgot to turn on system protection so that restore points are created. In this case, we will not be able to restore the system from the image, we will not be able to roll back Windows to the created restore point and we are too lazy to reinstall the system, since it will take a whole day. And just here we have another chance to get Windows back to normal - to try to restore system files. In this article I will try to fully disclose the topic so that we can reanimate our computer in any situation.
In the command line that opens, write:
sfc / scannow
We wait a bit ...
If your system is in order, you will see the following image.
If your Windows was broken, you will see the following.
System files have been restored successfully. We reboot and immediately turn on system protection to create restore points so that next time you just roll back the state of the computer a couple of days ago and that's it.
It happens that when scanning the system, the sfc.exe utility found damaged files, but could not fix them. In this case, I would do a system file recovery in Safe Mode. If the safe mode is the same, read the last of this article.
If it was not possible to enter the recovery environment by pressing the F8 key, then you will need to boot from the installation (bootable) flash drive or disk. How to boot from a USB flash drive -. In the same way, you can put boot from disk. Only in this case you need to put DVD-RW (optical drive) in the boot priority in the first place.
I like to boot from removable media using the boot menu. In ASUS motherboards, it is usually also called by pressing F8.
Having booted from a flash drive or from a disk, I saw the following picture. I choose Windows Setup- Windows installation.
We choose the one that does not turn on for us. And here CAREFULLY! Remember the letter assigned by the recovery environment to your system (in the Folder column). I have it D.
We enter the command:
sfc / scannow / offbootdir = D: \ / offwindir = D: \ windows
You can go to the disk and see what and where.
- We use the utility DISKPART
On the command line, enter:
diskpart- we call the utility for working with disks.
list disk- we look through the list of disks.
select disk- I choose the hard drive I need.
For Windows 8 / 8.1
If the sfc utility was unable to repair the damaged system files, then you should try to restore the storage of these system files. This is the place where copies of healthy system files should be located. As I understand it, it is located at C: \ Windows \ WinSxS. That is, we must first fix the file storage, and then restore the Windows system files with the "SFC / Scannow" command.
Recovering storage using Windows Update
- Launch Windows PowerShell with administrator rights. To do this, open the Start menu or start screen and click on the "Search" icon. In the search box, write "PowerShell". Right-click on Windows PowerShell and select Run as administrator or Run as administrator.
In the window that opens, write
Dism / Online / Cleanup-Image / RestoreHealth
and we are waiting. If the repository is intact or it was possible to restore it using Windows Update, you will see the following picture.
If Image Health State: Healthy - everything is fine. Restart your computer and try SFC / SCANNOW again.
Recovering a vault using an image
If we have problems with Windows Update, then this method will do.
- Download the original Windows 8 / 8.1 image with the same bit depth as your system. How to find out the bitness of the installed system -.
We connect or mount the downloaded image. Click on the image with the right mouse button and select "Connect" or "Mount".
On the command line with administrator rights, we look at what editions there are in the image with the command
I have 2 editions in my image. To understand which one I need by these decals is hard. We use the first one. If it doesn't work - the second one.
- We start Windows PowerShell with administrator rights and set the command
Repair-WindowsImage -Online -RestoreHealth -Source F: \ sources \ install.wim: 1
where, F is the letter of the drive to which we connected the image, 1 is the Windows revision number in the image.
Restore system files manually
If using the sfc utility it was not possible to recover the broken files, you need to try to do it manually. In this case, you need to additionally run the command
findstr / c:% windir% \ Logs \ CBS \ CBS.log>% userprofile% \ Desktop \ sfcdetails.txt
Findstr / c:% Windir% \ Logs \ CBS \ cbs.log> sfcdetails.txt
and examine the file carefully sfcdetails.txt on your desktop or in % windir% \ Logs \ CBS \.
There should be something similar to the picture below.
After the name of the damaged file is known (Accessibility.dll), we look for it on another computer with the same system as yours. If this is not an option, then I would download the original Windows image and install it on the virtual machine. I found the file I needed and copied it to a boot or installation flash drive. Then, from this installation flash drive, I booted into the recovery environment, I would launch the command line. I would open notepad from the command line. I opened the File> Open menu - and now I have almost a full-fledged explorer. We copy and replace the working file from the USB flash drive, reboot and everything should work.
If the option of installing a virtual machine does not suit you, then you can connect the install.wim file to the folder. Then go to this folder and copy the necessary files.
- We create a folder. For example, "Win8.1Pro" at the root of drive D.
Copy the install.wim file to the root of the D drive.
Mount the install.wim file in the created folder.
We go into the created folder and copy the necessary files.
Disable the image
Dism / Unmount-Wim /MountDir:D:\Win8.1Pro / Discard
Conclusion
This is how I will try to restore system files in Windows 7/8 / 8.1. Write your questions and wishes in the comments. Thank you for sharing the article on social media. All the best!
Best regards, Anton Dyachenko
The Windows operating system is in many ways similar to a living organism, from which it follows that sometimes even the smallest damage or deletion of one or more of its files can lead to certain problems. Damage can be caused by viruses, software malfunctions, sudden power outages, errors while editing system libraries, and so on.
As a result, the user may face various errors when launching programs or the inability to install them, problems with system settings, and even blue screens of death. Therefore, when diagnosing problems, the first thing to do is usually to check the integrity of the Windows 7/10 system files. At the moment, there are two main methods of checking and restoring system files - using standard utilities SFC and DISM launched through the command line or the PowerShell console.
The second tool is more powerful and is usually used when the SFC is unable to cope with the task or its launch fails. There are also third-party programs designed for this purpose, but they for the most part duplicate the functionality of SFC and DISM, providing more convenient access to them through the use of a graphical interface. In critical cases, when neither SFC nor DISM helps, restore the system or its individual components using a previously created backup copy is used.
Using SFC
SFC utility or else System Files Checker present in all versions of Windows, starting from 2000, and is intended for checking the status and restoring system files. The SFC can take multiple arguments, but in this case we are only interested in one. Checking and restoring system files Windows 7/10 with its help is as follows. Run Command Prompt or PowerShell Console as administrator and run the following command:
sfc / scannow
The verification procedure will take some time. If, upon completion, errors are found, the utility will offer to restore the damaged files during the restart of the computer. If the SFC says that it cannot recover files, make sure that you have disabled the EFS and Bitlocker encryption functions, boot into safe mode, and then repeat the scanning procedure.
To maximize access to the file system, repair damaged Windows system files can be performed in a bootable environment. There are several ways to get into the recovery environment, but we offer the most universal one. Boot your computer from the Windows installation disc, and when the installation wizard appears on the screen, click Shift + F10... Since the drive letters are different in the boot environment, you need to determine the letter of the system partition. We execute the following commands:
diskpart
list volume

On MBR disks, the system partition will most likely have the letter D, and the "System Reserved" partition will have the letter C. Knowing the letter labels of the volumes, use the exit command to close Diskpart and perform a check:
sfc / scannow / offbootdir = C: / / offwindir = D: /

After the scan completes, Windows will restart normally.
DISM utility
How to check the integrity of Windows 7/10 system files if the method described above does not help or when you run commands, you get different errors? In this case, you can try to resort to a more powerful tool - the utility DISM... We launch the command line with administrator rights and execute the following command:
dism.exe / online / cleanup-image / scanhealth
If the utility reports that the component store needs to be restored, restore it with the following command:
dism.exe / online / cleanup-image / restorehealth

If you receive errors while executing the commands, try repairing the Component Store using an elevated PowerShell running by running Repair-WindowsImage -Online -RestoreHealth while the computer is connected to the Internet.
After the performed procedures, you can check sfc / scannow and see if errors will be repeated. If so, check if the Windows Modules Installer service is enabled, but in general, it is advisable to do this in advance.

Recovering damaged files in manual mode
This method is used when it is impossible to recover damaged SFC files, but to use it, you in any case need the exact same operating system installed on another computer or virtual machine, or a backup copy. To determine which files to recover, run the command at the command line:
findstr / c: ""% windir% / logs / cbs / cbs.log> "D: /sfc.log"

Information about damaged files will be saved to a log file, in our case it is sfc.log to disk D. The contents of the file can be quite large, look for blocks with the key phrase "Cannot repair" with the corresponding date and time of scanning.

The attached screenshot shows that SFC was unable to repair the Asseccbility.dll file. The same log should contain the path to the unrecoverable file. Copy the original file from another computer and replace it manually with the damaged one. At this stage, you often have to face problems, since the file may be either used by system processes, or the user will not have rights to it.
To obtain rights and replace such files, you can use standard console utilities Takeown with parameter / f and icacls with parameter / grant administrators: f, but there is a simpler and more universal way - to use any "live disk" with a built-in file manager, for example, Dr.Web LiveDisk. If the computer boots, everything is even easier, just copy the original files to any convenient folder on its hard drive.
You can edit the bootable ISO image of the same Dr.Web LiveDisk in the UltraISO program by creating a folder in it and copying windows files into it.
Now let's look at how to restore Windows 7/10 system files using such a disk. After booting from the media, find your folder with files (in Dr.Web LiveDisk, the mount point is / cdrom), copy the original files to the clipboard, go to the target directory of the folder win and replace the damaged ones.


If the original files are on the Windows disk, look for them in the win location, in the partition where you placed them. This method is convenient in that it removes all restrictions on the Windows file system, allowing you to get exclusive access to it.
Using third-party applications
The development of special programs that would allow you to restore damaged and deleted system files does not make sense, since all the functionality necessary for this is available in the system itself. However, there are tools that simplify access to standard tools using a convenient graphical interface. Such, for example, is Microsoft DaRT- boot disk, which is a set of administrative tools, which also includes a module for scanning and restoring Windows system files. The procedure for such a check is shown in the screenshots below.


For a more convenient launch of SFCs, there are also programs Windows Repair and, only unlike Microsoft DaRT, they start from the production system.
In Windows Repair, to start the check, you need to go to the Pre-Repair Steps section, shout on the Step 4 (Optional) tab "and press the Check button.


In Glary Utilities, go to the "Modules" tab, select "Service" in the left menu and click "Restore System Files". In both cases, the standard SFC console utility will be launched.

Other ways
As for the question of how to recover completely deleted system files, everything should be clear anyway. If the size of the disk allows, regularly create backups of the system partition, or at least do not disable system protection so that in case of something you can roll back to the previous one.


And the last thing I would like to draw your attention to. If you've downloaded and installed a custom build, be prepared for the SFC to more than likely find corrupted files in it. The reason is very simple - collectors very often modify their images, replacing, for example, the original icons in libraries and so on. Therefore, before restoring the original files, think about whether you really need it if the system is not experiencing problems.
Windows? Checking the integrity of the Windows 10/8/7 / XP OS is needed if you suspect that some of the system partitions have changed or underwent defects due to the influence of a malicious program.
There are several tools available to check the integrity of Windows 10 files. The most common is SFC.exe, often used by DISM.exe. You can also use the Repair-WindowsImage function in PowerShell. We recommend using several methods, but one by one. This is necessary because each of the options will check the integrity of different files. If you needed to perform such a procedure, but do not know how to check the integrity of Windows 10 system files correctly, to correct them, resume work, carefully read the recommendations below, follow the sequential steps, then you can check, restore the integrity of Windows 10 system files and others. versions.
Check the status of system files using Windows tools
Scanning with SCF
Many users use the sfc / scannow command to scan the operating system before restoring lost, damaged files for the purpose of their correct functioning, resuming uninterrupted operation, troubleshooting by restoring damaged components; it examines and fixes Windows 10 system partitions offline.

- To activate this command, first open CMD, start with administrator rights. You can activate the utility using the mouse by right-clicking on the main menu "Start", then selecting "Command line" from the list. In the dialog box type sfc / scannow, press Enter.
- A check will start, defects will be revealed, then they will begin to be corrected without your intervention, assistance automatically, by the system itself. If no errors were found, you will be informed that no problems have been detected by OS Resource Protection.
- If you decide to check any one determined from the system files, then in the command line specify scf / scanfile = "path to file".
- It should be noted that SCF is unable to fix errors of those partitions that are running at the time of scanning, so it is best to use SFC exclusively when starting Windows 10 Environment Recovery.
Running SFC Using Recovery Environment
To properly activate SCF, follow the steps below the described algorithm sequentially.

After completing the above steps, a list of volumes will appear, you need to remember or write down the letters that correspond to the system partition and the "System Reserved" disk.
sfc / / scannow / offbootdir = bootloader partition letter: \ / offwindir = E: \ Windows (or your Windows 10 directory path).
As a result, a scan should start to check the integrity of the system files, recovery will be available for all of them. Please note that the check will take quite a significant amount of time; you do not need to turn off or restart your computer during the entire procedure. The last step will need to be performed only when the scan completes and you close the command line.
Scanning with DISM.exe
The specified utility is used to mount images, makes it possible to identify and fix problems that arise with OS partitions as a result of their damage, and perform recovery. It is perfect for those sections that the SFC couldn't handle. It can also be used if the SFC was unable to detect any scan problems. Therefore, do not limit yourself to only one type of scanning and treatment of damaged areas, be sure to carry out this operation when working with system components.
The command line is also used to launch DISM.exe. Activate it as administrator and then follow the steps:
- dism / Online / Cleanup-Image / CheckHealth - this function provides information about the presence of defects, damage to various components of Windows 10. A deep check, however, is not performed, only previously found data is used.
- dism / Online / Cleanup-Image / ScanHealth - Scan for possible damage to component store. This check often takes a lot of time, periodically hanging in the implementation process (usually by 20%).
- dism / Online / Cleanup-Image / RestoreHealth - a thorough examination and reconstruction of system files offline, recovery, which also takes a long time.

All logs of actions when executing the above commands are written to the path Windows \ Logs \ CBS \ CBS.log, Windows \ Logs \ DISM \ dism.log
Similar to the previous utility, DISM is also launched through Windows 10 recovery mode.
Checking the integrity of system files in Windows 7/8 is identical to the same operation in the 10th. It is carried out in the same way - via the command line via SFC and the corresponding command. All actions are performed in the same sequence as described earlier. A similar algorithm is used to check the integrity of system files in Windows XP. The command line interpreter starts like this:
- go to the "Start" menu;
- click on the "Run" option;
- in the dialog box, type the command "cmd", then on the keyboard Enter.
As a result, the usual command line will open, you can perform all the actions to check the OS files for defects.
All these operations will help to restore damaged, damaged partitions of any Windows-class operating system, which will solve the problem of interference of malicious programs in the computer, return performance to its work, and avoid extreme measures, such as a full system recovery in case of malfunctions. You do not need to completely reinstall the OS, it is enough to restore the damaged components. Identify them with the help of special commands and utilities, and your computer will continue its work.