Good afternoon The ZTE V807 smartphone today is morally and physically outdated. A 4-inch TFT screen with a small resolution of 480x800, a 3 MP camera and 512 MB of RAM - this will not surprise anyone. But if you are the owner of this gadget, then installing a new firmware can give it “freshness”. Firmware ZTE V807 will not take you much time, the only condition is to strictly follow the instructions below, otherwise there is every chance of turning your smartphone into a useless “brick”.
Drivers #1: |
https://yadi.sk/d/X7uhgb4hfP3mA |
|
Drivers #2: |
https://yadi.sk/d/OlqgWfIdfP3q4 |
|
Flash Tool: |
https://yadi.sk/d/b99uQIc-fP3qe |
|
Firmware: |
https://yadi.sk/d/6UK3h9qNfP4Qm |
Instructions for firmware ZTE V807
- Save all your data from your phone to your computer.
- Download and extract all archives from the links above.
- Check your phone's charge - it should be at least 50%.
- Connect the device to the USB port of your computer.
- Install drivers for your smartphone. To do this, run the file from the Drivers folder auto_install_driver.exe, or install manually by specifying the path to the files, according to the version of your operating system. Attention! On Windows 7/8/8.1, to successfully detect the device, be sure to disable signature verification of installed drivers.
- Disconnect your phone from your computer.
- Run the Flash Tool as Administrator.
- In the program, click the button and in the window that opens, specify the path to the file MT6577_Android_scatter_emmc.txt, which is located in the folder ZTE-V807_target_bin.
- Attention! Be sure to uncheck the items at the bottom of the program PRELOADER And DSP_BL, otherwise the situation can only be corrected at a service center.
- We check that the checkbox next to the item is not checked DA DL All With Check...(look at the top of the program window, immediately below the menu) and press the button Download.
- We connect the switched off smartphone to the computer. Uploading new firmware to ZTE V807 will begin automatically. A window with a green circle will indicate the successful completion of the process. After this, you can disconnect the gadget from the computer and turn it on. The first launch can last from 2 to 5 minutes. During this process, do not turn off the phone or remove the battery - just wait.
Lewa OS firmware (Android 4.1.2) for the ZTE Blade C V807 (V889S) smartphone.
Support for English and Chinese + translated firmware using jBART (not tested).
Instructions for installing Lewa OS firmware (Android JB 4.1.2)
1. Download the firmware without translation - or with translation -. We throw it into the root of the SD card.
2. Download the archive from SP_Flash_Tool and unpack the archive on your computer.
3. Download the archive and unpack it on your computer.
4. Remove the battery and connect the smartphone to the computer via USB. If the drivers are not installed and the computer asks to install them, then we install them (you can download them here -) After completing the installation of the firewood, disconnect the body from the computer. If the firewood has already been installed, then skip this step.
5. Installation stage of custom Chinese Lewa Recovery. Launch Flash_tool.exe. On the right, click on the Scatter button and select the file MT6577_Android_scatter_emmc.txt. Confirm by clicking “Ok”. Then click on the “Download” button and confirm “Y”. We insert the battery back into the phone and, without turning it on, connect it to the computer via USB. We wait for the green circle to appear, which means success, and disconnect the body from the computer.
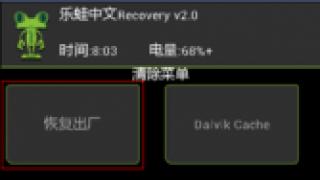
6. The phone is turned off, remove the battery and insert it back, press and hold the volume up key and the power button. We are waiting for Lewa Recovery to download.
6.1 Click on the upper right button.
6.2 Press the top left button.

6.3 Move the bottom slider to the right.

6.4 Then you need to go back and select “Cache”

6.5 Move the slider to the right again.

6.6 Press the top left button.

6.7 Select the archive with the firmware.

6.8 Move the slider to the right again.

6.9 We are waiting for flashing.
It’s hard to come to terms with the forced situation when your smartphone suddenly runs out of charge and there’s no way to charge the battery.
It is terribly difficult for a modern person to be cut off from the whole world and left without a means of communication, so it is not surprising that when going on trips or long trips, owners of modern gadgets stock up on additional chargers to ensure the correct operation of the devices.
However, not only dead battery capable of bringing unpleasant surprises. The operating system of the smartphone also competes with this, often accompanied by various glitches, as a result of which even a charged device refuses to perform certain actions.
Many users are not satisfied with the standard ZTE firmware and they decide to reflash their smartphone
Faced with such a problem, most users decide flash your smartphone ZTE to safely get rid of annoying problems.
There are several circumstances that force owners of modern devices to invade the “inner world” of their electronic friend.
Armed with information about what causes can provoke system failures, it is much easier for smartphone owners to prevent the gadget from sad consequences or to recognize them in time and take actions that eliminate all the problems that stand in the way.
Causes of Operational Failure
It may happen that your favorite ZTE smartphone has stopped working. The reason may be its mechanical damage, when it was handled carelessly, often dropped on the floor, or moisture got on it. It is also quite possible that the components of the device may fail.

Unfortunately, it is impossible to solve the problem of mechanical damage to a smartphone at home, so the correct thing to do is take it to a service center. Qualified craftsmen will carry out effective “resuscitation” measures and breathe new “life” into the gadget.
Another reason that at some stage the smartphone begins to reboot and turn off by itself is a failure of the operating system. This problem can be solved at home, but only with appropriate preparation.
It is very important to prepare, since the ZTE v815w firmware itself may turn out to be unsuccessful if it was installed accompanied by gross errors.
So, those who noticed are interested in how to flash ZTE v815w incorrect operation of the gadget, who decided to optimize the operation of the system by installing an updated version of the firmware, about which positive feedback has spread quite widely.
Firmware process
Many owners of modern gadgets will be able to flash a ZTE smartphone if they first receive a “portion” of useful information that will allow them to thoroughly understand how to flash the ZTE v815w.
In this case, you can take a risk and do everything yourself, saving money, as well as increasing your level of knowledge of modern devices.
Firmware algorithm
Programmers periodically give users a variety of useful products that allow many operations to be carried out not only quickly, but also easily.
One such software product is the CWM application, which is focused specifically on the process of installing the operating system for ZTE smartphones.
It is recommended to download and install this application in advance. Also get information about your smartphone, since it is advisable to use a Gen 2 device when flashing the firmware.
Unfortunately, not all smartphones come with this design; you can also find options that have Gen 1. In this case, you will have to take one additional step.
On specialized forums it is easy to find the CyanogenMod application, which can act as a successful assistant in converting the Gen 1 version to Gen 2.

First turn off the phone, then hold down two keys “-” and “on” at the same time, after which “FTM” should appear on the screen. Only after this you need to connect the smartphone to the PC.
All that remains is to find the download file download_nochecksGen2 with the exe extension, run it, wait for the process to complete and make sure that the smartphone now has the desired version of Gen 2.
Flashing a smartphone begins with formatting the flash card. In some cases, you have to run the formatting process more than once. Unfortunately, sometimes there is no other option but to replace the flash card, so you have to resort to such a replacement. This applies in most cases to cheap and too low-quality flash cards.
Now feel free to copy the previously downloaded firmware onto the prepared flash card. Don’t forget to let your computer help you successfully identify your smartphone in the CWM application.
It’s so simple, just find the “Mount USB storage” option in the main menu, click on it, then copy the firmware file, and then click on the other “Unmount” option.
The next stage involves the direct process during which the firmware is installed on the smartphone.
In Recovery, find the “Install zip from sdcard” option, click on it and follow all the recommendations that will be displayed on the screen. After the process is completed, you need to restart your smartphone. The “Reboot system now” option will help you with this.
Now, after launching the smartphone, you can enjoy the operation of your own smartphone, on which the new firmware is installed. This method of installing new firmware versions is only suitable for ZTE Blade smartphones.
So, get your smartphone working again, which you don’t want to say goodbye to and buy a new device, the owner himself can do it if he really values his device.
If the first attempt failed, the firmware was installed incorrectly, which reflects the low performance of the device, you can repeat the process.
Only this time you need to be extra vigilant and also download the firmware version from trusted resources. It is not recommended to trust all sources that characterize their offer with tempting phrases.
Along with them, you can download additional “gifts” in the form malware, which can cause serious damage to your smartphone.
For all owners of ZTE Blade C V807 and V889s smartphones who want to quickly get root rights, this is a simple step-by-step instruction.
What is Root?
For those who have just become a beginner or are not an expert in the vast world of Android and are not particularly familiar with the concept of how - Root Android, as well as why it is needed, what can be done after obtaining Root rights, or how to subsequently get rid of them if they are no longer needed, all this can be found in the detailed article -!
First of all!
There are no "left" links or unnecessary actions in this article! If you really need Root Rights, then read carefully and follow step by step, this is a guarantee that you will do everything right! This article on obtaining Root rights is divided into two parts: The first part is Required components and conditions, the second part is Instructions How to get root rights using the received files and programs. If, in the process of obtaining root rights, Android constantly reboots or is in the process of eternal loading (happens extremely rarely, but still), then it’s worth it. Now let's start getting Root rights!
Android manufacturers sometimes release new firmware on which you cannot get Root using one of the suggested methods. If the article contains alternative methods, try them. Doesn't work anyway? Indicate the Android version and firmware version in the comments (don't write angry shitty comments, it won't do you any good or anyone else). Android is frozen (will not load), read and re-read from the very FIRST PARAGRAPH, all the necessary links are present in the article!
Still have questions?
Do you have any questions or can’t get root rights to your Android? Leave comments about what worked or didn’t work for you, or what you did differently.What is needed to get Root ZTE Blade C V807 and V889s
For Method No. 1
1. Computer or laptop (preferably a laptop)
2. Download and install the program on your PC Kingo Root (it is recommended to disable the antivirus program)
For Method No. 2
4. Charged ZTE Blade C smartphone at least 50%
5. Original, undamaged Micro-USB cable
Instructions for obtaining Root ZTE Blade C V807 and V889s
Method No. 1
1. Connect your ZTE Blade C smartphone to your computer
2. Launch the Kingo Root program
3. Click the button in the program interface ROOT
4. Do not pull out the USB cable until the program notifies that Root rights have been obtained.
5. After a couple of minutes, Root rights to the ZTE Blade C smartphone were obtained
Method No. 2
1. Launch Vroot
2. Wait until the program detects your ZTE Blade C
3. Press the green “Root” button

4. After a couple of minutes, Root rights were obtained
5 To provide an application root in the pop-up window, press the right button

6. If you don't like Chinese characters, then you should consider replacing the application Kingroot on SuperSu
Replacing the Chinese administrator program Root rights with SuperSu
1. Install the SuperSU application from the Google Play app store