Unpleasant conflicts, expressed in the frequent failure of your operating system to work correctly with a certain group of drivers, as well as a completely justified desire to increase performance and expand the functionality of the motherboard used, can become a kind of reason for your genuine interest in resolving the issue of how to update Gigabyte BIOS. And only when you are completely sure of the expediency of carrying out such a crucial operation, which is the flashing of the microchip of the basic I / O system, and at the same time are determined to dot all the "and", well, let's upgrade your "iron friend" ...
The point is...
Now it's time to doubt modern competence once flawless model of your motherboard from Taiwanese IT industry leader GIGABYTE Technology Co. Ltd. A fully functional machine instantly lost its "authority" when you connected HDD enough large capacity or, perhaps, they purchased a new, more powerful one. As a result of the upgrade, the BIOS simply cannot control such "progressive" equipment, since software part The code is outdated and needs practical updating. Therefore, in such a situation, the question of how Gigabyte becomes not just important, but in dire need of a solution.

Choose the only and fail-safe update method
Of course, flash BSVV ( basic system input/output) of a computer in a variety of ways. But it is highly recommended not to produce deliberately incorrect update from the Windows environment. This is strictly the prerogative of DOS, so the operating system should not perform intermediary functions. The BIOS flash memory must be accessed directly. Only this way and nothing else. However, this method of firmware requires certain knowledge, so we read, remember and, accordingly, independent practical actions answer the question: "How to update BIOS Gigabyte?"
Number, series, motherboard revision: where and what exactly to look for?
First of all, you need to have information about the modification of your "motherboard". You can find this out in the documentation for your computer, but if there is none, use one of the options below:

We write out everything on a separate sheet and plunge into the immense abyss of the Internet - download programs.

Gigabyte BIOS firmware
Knowing the model of the "motherboard" and the version of our BSVV, we proceed to the next preparatory stage software upgrade. On the manufacturer's website, download the available update for your board. This is usually a file up to 3 MB in size, so you won't have to wait long. Next you need to do bootable flash drive, which will contain the new firmware of your BIOS. Only after the above, you will be able to carry out the process of "filling" a more advanced program code on the BSVV microchip, through which the hardware of your computer is controlled.
Preparing flash drive
By downloading from the Internet free utility entitled USB Disk Storage Format, you just have to carry out some actions with the program interface, that is, configure it properly:
- To do this, in the first line we define our flash drive.
- Specify file system: FAT32.
- IN Format line option check the box.
- We mark the item Create a DOS Bootable Disk.
- In the window below, we prescribe the directory in which our firmware file is located.
- Click Start and wait for the completion of the process of forming a bootable USB flash drive.
Now you can update the BIOS of the Gigabyte motherboard using the built-in BSVV software tools that need to be debugged.

An important final step is setting up
With a short press Delete keys go to main
firmware menu for managing the hardware of our electronic machine. In this case, the flash drive must be installed in the USB port of the computer.
- In order for the Gigabyte BIOS setting to return to its default values, go to the Load Optimaized Defaults tab and press Enter. We agree to save the changes by selecting "Y".
- Press F8 and go to the bootloader menu.
- Disable the first item Keep DMI Data by selecting the Disabl value.
- It is recommended to save the current firmware version, so select Save Bios to Drive and perform the backup process.
- Click Update Bios from Drive and get into the directory of our flash drive.
- Press the Enter key to launch the firmware file.
Attention: during the BIOS update, do not turn off the computer in any case, as this can lead to quite serious problems!
- Upon completion of the process of rewriting the microcode, a window with the message Copy BIOS completed-Pass should appear on the monitor screen. Press any key.
Congratulations, the firmware is complete!

Upgrade the video card
Probably, this will be a small discovery for you, but the graphics module can also be subjected to a qualitative software improvement or brought back to life when its inoperable state is seen due to a flashed firmware. Question: "How to update the BIOS of a Gigabyte video card?" — needs more detailed consideration. We read about it further and understand the nuances.
- In the Support & Downloads section, select Graphics card.
- In the By Chipset Series window, we look for our modification of the graphics card.
- Then we specify the Mode Name. Click on the Search button.
- Go to the section of the specified video card.
- Go to the Support&Downloads tab again. Where in the Download type box you need to select BIOS, after which the versions of available updates will be presented to you in a new window.
- We download the graphical BIOS from the server and run it in Windows environment.
Attention: the downloaded version should not be underestimated and should express the correspondence of the symbolic and numeric value with a tendency to increase by one unit. That is, the F2 firmware is replaced by F3, and F11 by F12 ... But in no case: F2 to F11 or F4 to F12! Gigabyte, you already know, now let's do it next step, which will help you upgrade your graphics card.
Small but distant
However, the VGA interface [email protected] has the option to save the current BIOS version. Despite its miniature size, the utility copes with the assigned task with a bang.
- Press the Backup VGA BIOS button to make
- Flash key we find our firmware file and mount it in the bootloader.
- Click "OK" and at the end of the BIOS rewrite, we enjoy new features and more effective work our video card.
Finally
To date, no Gigabyte BIOS update program can compare with functional correctness provided by the manufacturer embedded software. So important process how to overwrite flash memory BSVV in a standard way, requires only two things from the user: utmost attention and uninterruptible power supply. The system will handle the rest on its own. Happy upgrades!
20.03.2017
BIOS is a program that is responsible for the operation of the motherboard, therefore, almost all computer components. The component manufacturer Gigabyte equips its motherboards with only the most current BIOS versions. But over time, even the most new firmware is outdated and requires an update that can improve the performance of the entire computer.
Some useful tips:
- Download the update only from the official website of the manufacturer. In no case do not trust third-party "craftsmen" who offer to download their BIOS assembly, promising wider functionality and / or stable operation.
- The update version must be suitable for your motherboard. The manufacturer's website always indicates which equipment is compatible with one or another version of the update. Check the model and serial number of your motherboard, you can by reading the manual that came with the device upon purchase or by disassembling the computer / laptop case.
- Before downloading and installing, read the reviews of other users about the update. Sometimes, on the contrary, it worsens the performance of the system.
- During the installation of updates, make sure that it is not interrupted by a sudden power outage, reboot / system freeze.
- If you are updating through Windows, then turn off the Internet and antivirus, because. they can interrupt the installation or open background processes which will adversely affect the performance of such an important procedure.
Follow these steps to find out your motherboard model:


There are two ways to update:
- Directly through the OS. To do this, you will also need to download the free @BIOS utility on the developer's website. The whole process will take you a few clicks and a little time.
- Through BIOS. Only suitable for experienced users. This method is more secure, because it is possible to create backups and rollback if the update fails.
Method 1: update via OS
After you have downloaded the utility and current version BIOS from the official website, do the following:

Method 2: update via DOS
To do this, you will need to transfer the previously downloaded BIOS version to a USB flash drive. Connect the flash drive to your computer and follow the instructions:

Update the BIOS on your own mother card from Gigabyte may well be an ordinary PC user. The most important thing is to follow the recommendations and steps in the instructions.
UEFI Settings
The Gigabyte GA-X79-UD3 uses proprietary UEFI DualBIOS based on American Megatrends Inc microcode. (AMI). Early versions Gigabyte X79 series motherboards have a vulnerability in the overload protection system, so for any overclocking experiments, you need to update UEFI to version F7 or later. In our case, the motherboard had F4 firmware, which was immediately updated from a USB drive to version F8 from 01/06/2012.
The required operation has been completed, and now you can proceed to a detailed study of the capabilities of the UEFI setup program. The X79-UD3 has two interfaces for working with firmware - 3D BIOS and M.I.T. The first contains an interactive image of the board taken from two angles.

With a simple mouse click on a particular area in the picture, you can access the settings.

On the right side of the screen there are "widgets" with useful information about the state of the system components - frequencies, voltages, temperatures, memory delays, fan speeds.

The settings boxes can be moved around the screen.

By and large, in the shell 3D BIOS there are all key parameters of the system, so some users will be limited to this standard mode.

For quick setup, a "bios-like" interface is better suited. It is called by pressing the F1 key or by selecting one of the icons below. The first and main section is called M.I.T. - Motherboard Intelligent Tweaker.

Submenu M.I.T. Current Status informs the user about the frequencies of Bclk, processor and random access memory, current settings turbo boost, temperature indicators individual processor cores. At the bottom of the screen there is data on the volume of DDR3 modules and timings.

The second submenu in the list, Advanced Frequency Settings, provides access to the regulation of the reference frequency, the reference frequency multiplier (Gear Ratio), the CPU multiplier, allows you to activate the Intel XMP profiles and change the RAM multiplier.

The Advanced Memory Settings submenu partially duplicates the previous one, but there are already timing settings for each memory slot. The set of timings is sufficient for fine-tuning the system.


For experienced overclockers, we recommend the Advanced Voltage Settings submenu to change the protection settings for current, voltage and thermal conditions (3D Power Control), the voltage values of various CPU blocks (CPU Core Voltage Control), RAM (DRAM Voltage Control) and a set system logic X79 (Chipset Voltage Control).


The voltage adjustment ranges are shown in the following table:
| Menu section | Parameter | Value range |
| 3D power control | PWM Phase Control | Auto, eXm Perf, High Perf, Perf, Balanced, Mid PWR, Lite PWR |
| Vcore Voltage Response | Auto, Standard, Fast, Turbo, Extreme | |
| Vcore Loadline Calibration | Auto, Normal, Standard, Medium, High, Turbo, Extreme | |
| IMC Voltage Loadline Calibration, % | 0-180 | |
| Vcore Protection, mV | 150-500 | |
| DDR Voltage Protection, mV | 150-500 | |
| Vcore Current Protection, % | 40-128 | |
| CPU Vtt Current Protection, % | 50-160 | |
| IMC Current Protection, % | 50-160 | |
| DDR Current Protection, % | 50-160 | |
| CPU Core Voltage Control | CPU Core, V | 0.8-1.735V (0.005V step) |
| Dynamic Vcore (DVID), V | –0,64-+0,635 | |
| CPU Vtt, V | 0,715-1,61 | |
| CPU PLL, V | 1,195-1,985 | |
| IMC, V | 0,8-1,6 | |
| DRAM Voltage Control | DRAM Voltage, V | 1.1-1.99 (0.005V step) |
| Data Tx Reference, V | 0,69-0,815 | |
| DRAM Termination, V | 0,543-1,459 | |
| Data Reference, V | 0,583-1,422 | |
| Address Reference, V | 0,583-1,001 | |
| Chipset Voltage Control | PCH Core, V | 0,825-1,51 |
| PCH 1.5V, V | 0,925-1,8 |
Submenu M.I.T. PC Health Status contains information about the current values of the main voltages and temperatures, the readings of the fan sensors, and also allows you to set up an "alarm" in case of exceeding CPU temperature or stop one of the fans.


The speed of the fans connected to the 4-pin connectors on the printed circuit board.

The second tab System allows you to set the language, system date and time. The ATA Port Information submenu lists all installed drives.


In section BIOS Features you can change the order boot devices, disable the full-screen logo, specify the main video adapter, activate software and hardware virtualization technologies. In passing, we recall that Sandy processors Bridge-E of the C1 stepping do not support Intel VT-d hardware virtualization.

The Peripherals section contains settings for gigabit network controllers, sound, USB 2.0, USB 3.0 and SATA.


In the tab power management do not forget to turn off Wake on LAN - automatically turn on the PC on a signal from network adapter. You can also set an "alarm clock".

The UEFI setup program is partially Russified, however, the predominance of special terminology negates the efforts of translators. According to the subjective feeling, "vinaigrette" from Russian and English words doesn't help at all quick setup systems.


When working with UEFI DualBIOS, we encountered an inability to disable the 3D BIOS interface: we had to press F1 each time and switch to M.I.T. In addition, setting the frequencies and voltages manually, in our opinion, was too slow, because after pressing Enter keys you had to wait before entering a particular value. The “dual BIOS” technology itself was lame on both legs: when overclocked, the system constantly rebooted instead of immediately restoring safe settings. I had to do a reset by closing the CLR_CMOS contacts on the printed circuit board. We hope that these shortcomings will be corrected in new firmware versions.
Software
On the disk supplied with the Gigabyte GA-X79-UD3, along with all necessary drivers There are several branded Windows utilities:
- EasyTune 6 - overclocking and system component monitoring, fan speed control, tuning sound alert about emergency situations;
- DMI Viewer - a utility for viewing information about the motherboard;
- Face-Wizard - choice of design for the UEFI DualBIOS boot screen;
- @BIOS - update UEFI firmware via the Internet;
- Q-Share - a utility for sharing files over a local network;
- Update Manager - updating Gigabyte software via the Internet;
- G.O.M. (Gigabyte Online Manager) - view hardware information about a remote computer;
- Cloud OC - overclocking PC components via a wired or wireless internet connection.
In addition, the DVD contains third party programs, which, as conceived by the developer, should provide the owner of the GA-X79-UD3 high level antivirus protection (Norton internet security, Trand Micro PC-Cilin, Kaspersky Internet Security 2011), the ability to read the documentation that came with the motherboard ( Acrobat Reader), the ability to view video (CyberLink Media Suite) and edit it (CyberLink PowerDirector). The last three utilities - WinZip archiver, Firefox browser and a program to connect iPhone/iPod with personal computer AIWI Game. Third party software generally has a limited free trial period.
Do you think that's it? A separate list includes new utilities recommended for installation.

Let's start with the EasyTune 6 program, well known to fans of the Taiwanese brand. It will come in handy for those who want to save time without going into UEFI every time. It can also be used to overclock the system on the fly for maximum results in the HWBot Overclocker League scoring disciplines.

The first two tabs contain detailed information about the installed processor and RAM modules, thus duplicating the functionality of the popular CPU-Z utility. The third tab of ET 6 called Tuner allows you to select the values of frequencies, multipliers and voltages manually or automatically (Quick Boost). The latter was not useful to us at all, since the board did not increase the voltage on the Core i7-3930K test processor enough for stable overclocking. Better to do it manually.

In the fourth section, Graphics, it is proposed to overclock the video card, however, with the help of only three sliders (core, shader and memory frequencies). The ability to adjust the voltage and speed of the video card fan is not provided. The fifth Smart tab is designed for "smart" speed settings of one processor and two system fans connected to the 4-pin connectors on the PCB. The sixth tab HW Monitor displays key voltages in real time, and also allows you to set up an "alarm" in case one of the fans fails or the temperature threshold is exceeded.

One of the fresh proprietary utilities Gigabyte is called Touch BIOS. At first, even before the official release, it was mistaken for a UEFI shell by us, although it later turned out to be a regular Windows program. The Touch BIOS provides basic settings from UEFI Setup, the system information module (PC Status), the @BIOS module (online firmware update) and the Quick Boost option, which duplicates one of the EasyTune 6 tabs.

Touch BIOS settings can be changed with the mouse or with your finger (on touch screen). It is easy to see that the utility has a typical "tablet" interface and will probably be used in the future to manage the hardware resources of Gigabyte laptops and Internet tablets.
Studying the functionality touch programs BIOS, we noticed that memory delays are displayed incorrectly in it.

This is a good reason to move on to another bundled utility - 3D Power. Like the UEFI 3D Power Control submenu (see above), the 3D Power Windows application allows you to fine tuning protection systems for the main components of the PC. The frequency of the CPU and RAM power converters is also regulated here.

Strengthening or weakening of protection (for example, before extreme overclocking) is carried out by limiting the maximum voltages, current strength and temperatures of the system components.

The last of the utilities under consideration - Smart6 - makes it possible to automatically overclock the processor (again, duplicated by Quick Boost from EasyTune 6), create a disk image or restore the HDD partition from the image, set a password for UEFI DualBIOS and limit the computer's operating time in the evening hours, which is for sure will be in demand by young parents.


If you have reached this topic, there is most likely something wrong with your computer. Updating (also called "firmware") the BIOS can help resolve some issues, such as wrong work from peripheral devices or lack of support modern processors. But do not rush to "change", let's first study the theoretical part.
How to update Gigabyte BIOS
The first and most important thing to know is that the BIOS update operation must be treated with extreme caution. If you turn off the power of the computer during the update process, there is a high probability that the motherboard will fail. If your PC is working properly, then you should not chase latest updates so as not to sacrifice performance.
Have you decided? Then go ahead! If possible, connect your PC to an uninterruptible power supply, and fully charge the battery on your laptop.
There are two main ways to update the Gigabyte BIOS:
Method 1: Q-Flash
Q-Flash is a utility from the manufacturer Gigabyte built into the BIOS. “Firmware” with its help is a simple and understandable process, and an ordinary user who does not have deep knowledge in the field of computer technology can update. If you have old version BIOS that does not have Q-Flash, go to method #2.
We will analyze the update using the Gigabyte GA-H110M-S2H motherboard as an example:
- Go to gigabyte official website.
- Click on the magnifying glass (search button) in the right upper corner screen.

- Enter the model of the equipment (in our case GA-H110M-S2H) and select a model from the dropdown list.

- Click on the link "Advantages", then click on "Support".

- Click on the button "BIOS", choose the most latest version and click on the download icon.

- Unpack the downloaded archive, from it you need only one firmware file, in this case- this "H110MS2H.F21".

- Copy this file to a USB flash drive, preliminarily in FAT32.
It is desirable that only the firmware file be on the flash drive!
- Restart your computer, after starting press the key "END" until the Q-Flash utility loads.
- Select an item "Update BIOS from Drive" and press "ENTER".

- From the drop-down list, select the flash drive, most likely, its name will be "HDD 1-0" (depending on the number of media connected to your computer) and click "ENTER".
- Select the file with the firmware (if you listened to our advice in step 7, then it is one and you won’t have to look for it) and double-click "ENTER".
- Wait for the update process to finish and the completion message.
- Press any key and you will be taken to start menu. Next press "ESC" And "ENTER", then the computer will restart.
Method 2: @BIOS Utility
@BIOS Utility is a utility for Windows OS that can update the BIOS directly from the system. In order to use the @BIOS utility, you must first download and install .Net Framework version 4.5 or higher and APP Center (app from Gigabyte for maximum effective use motherboard capabilities).
- Follow the first four points from method number 1.
- Click on the button "Utilities", and then to the download icon in the line with the phrase APP Center.
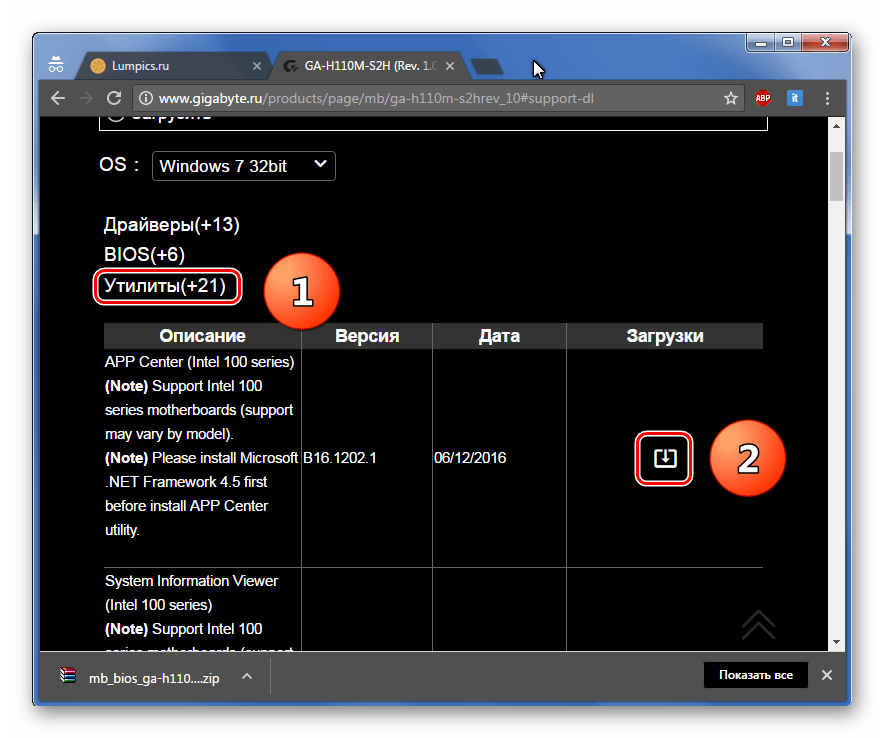
- Unpack and install APP Center.
- Find the phrase in the table "@BIOS" and click on the download icon.

- Unpack and install @BIOS Utility.
- Run the utility.
- Click on the button with text "Update BIOS from GIGABYTE Server". The firmware file will automatically download and the program will update the BIOS.

When downloading the firmware, a stable power supply to the computer and an Internet connection must be provided!
- You can also use the manually downloaded firmware file in method #1, to do this, click "Update BIOS from File" and select a file.
- Wait for the update to finish and restart your computer.
In this article, we looked at two ways to update the Gigabyte BIOS. It turns out that there is nothing complicated in the "flashing". The main thing to remember is that you should not allow a power outage and the Internet (if the second method is used).
When producing a computer motherboard, developers introduce into the built-in memory special program BIOS (Basic Input/Output System), which is valid at the time of manufacture. In the future, the manufacturer will improve the program by adding to it latest features and correcting various errors code. In most cases additional features favors performance optimization with more advanced processors and device support third party manufacturers. Considering an update motherboard BIOS GIGABYTE boards, you must first decide what it is for.
First of all, the GIGABYTE BIOS needs to be kept up to date as the developer is always trying to improve the performance of the motherboard with certain hardware and expand the capabilities of some functions. Of course, it is necessary to approach with all responsibility, since there is a possibility of disrupting the system and breaking something that worked fine before. If your computer has expired warranty service, flashing the bios leaves you without that right. You intentionally change the standard equipment of the equipment, which is a direct violation of the warranty rules.
The upgrade process is not as scary as it might seem. It is enough to follow the instructions and do not confuse anything. Below is how to update the BIOS of the board GIGABYTE family.
Preparing your computer for a BIOS update
Updating the motherboard BIOS is a simple process that is described on any manufacturer's official website. But this procedure has small nuances that must be taken into account. First of all, you need to remember that an unsuccessful BIOS update will disrupt the correct functioning of the computer, and it can only be “pumped out” in specialized services technical support. This will result in wasted money and time. Therefore, you need to take note of all the small snags and not lose sight of anything:
- Use only official version BIOS, which is downloaded from the manufacturer's website or is provided with the motherboard in the form of a CD.
- Try to avoid using unfinished (beta) firmware versions, as well as software that is designed for a different version of the GIGABYTE motherboard (differences of even 1 digit in the model number are not allowed). An exception can only be made if the manufacturer has released a single BIOS version that supports several different boards. Let's say your motherboard model is GIGABYTE GA-B75-D3H and the firmware is for GA-B75-xxx series models.
- Do not trust unofficial manufacturers and third party builds, even if you are tempted by additional features that have been hidden from ordinary users to cut the motherboard, that is, to create a budget option. No one will give you any guarantees that this particular version is suitable for your equipment. And if it does, then you still will not be immune from various glitches and malfunctions in the system.
- Make sure you have an uninterruptible power supply (UPS/UPS) for your desktop computer, or fully charge the battery if it's a laptop. A BIOS update does not tolerate a power outage at the most inopportune moment. If this happens, then a trip to the technical support service cannot be avoided.
- Before the change procedure BIOS firmware needs to be cleaned hard drive to free up space. Make sure it works and that there are no bad sectors (bad-sector).
It is worth paying attention: if you are updating the BIOS from under the Windows operating system, you must disconnect from the Internet and exit all unused programs including antivirus. Also, remove unnecessary processes in the task manager. Updating the BIOS should be the only and priority task performed at the time of changing the firmware in the motherboard.
Determining the BIOS version and downloading the required firmware
Before you update the BIOS of the motherboard, you first need to know it exact model and BIOS version. Don't trust the documentation that came with your board. Such manuals are most often generalized, and there may not be the board model that you are using at all.

You can determine the exact model of your board by running Everest program, and going to the "Motherboard" tab
To identify the exact name of the model, you need to use the special Everest utility. After installing the utility, run it and open the motherboard subsection. Its properties will contain the information you need (for example, GIGABYTE GA-B75-D3H). This model will be used to search for the required BIOS version on the official website of the manufacturer.
Before that, you still need to determine the current BIOS version. This is required in order to check the option on the official website and make sure that the latest current version is not already installed on the motherboard.
This is done by opening the motherboard subsection and selecting the BIOS item. The BIOS version line contains the required information - F13.
Write down the model number of the motherboard and, accordingly, the BIOS version on paper. Do it slowly, as any mistake is fraught with serious consequences.
Proceed to download the desired BIOS version. To do this, go to the official GIGABYTE website and open the motherboard section. Search for GA-B75-D3H and find your board model. By clicking on it, you can see breaking news and updates. Most often there are several different BIOS versions with the release date and brief description innovations.
Download the appropriate version and extract it from the archive. Now you need to download the extracted files to a USB flash drive or floppy disk. The second option is relevant for owners of outdated motherboards, since they do not support reading a flash drive outside the operating system environment. Front BIOS boot Format the flash drive's file system to FAT32.
GIGABYTE motherboard BIOS update
Refresh bios GIGABYTE can be done in 2 ways:
- Straight to operating system Windows using a program designed for this, which you will find on the official website of the developer. This is a good option that will suit most users, but it cannot be ruled out that the computer freezes due to any processes in the task manager that cannot be manually removed in the Windows environment. It's hard to say where this will lead, but you can be absolutely sure that the BIOS update will fail.
- Directly from under DOS, using the Q-Flash program, which is great for updating the BIOS of motherboards from the GIGABYTE family. This method is more trustworthy due to the fact that the update occurs smoothly, that is, absolutely no processes and services interfere with it. In addition, this method is universal and safe.
Updating using Q-Flash is described below: