Linux can be useful to you for many reasons. For example, your old computer can't be upgraded to new versions of Windows or macOS, or you need Linux-specific applications, or you're just curious to try something new. Or maybe you just bought a new computer without an operating system and want to save money by choosing free Linux.
Installing Linux is easy. Of course, there are distributions like Arch, which are quite difficult to install for a beginner. But most modern distributions are very easy to install. Perhaps even simpler and faster than Windows.
Before installing Linux on your main computer, make a copy of your important data. When working with partitions on your hard drive, you may accidentally erase something important. Of course, if you follow the instructions and carefully read what you are doing, then nothing unexpected will happen. But it’s not superfluous in any case.
You can install Linux on computers running Windows and macOS or on an empty hard drive. You can choose Linux as your main system or use it in parallel with your old system.
1. Download Linux distribution
First of all, you need to choose a Linux distribution. The DistroWatch.com rating will help you decide.
Then you need to download the selected distribution. This is easy to do: open the website of the desired distribution, find the downloads section and select the one that suits the bit capacity of your processor.
As a rule, Linux distributions on official websites are offered for download in two ways. The first method is a normal download. The second is via P2P using a torrent client. The second method is naturally faster. So choose it if you want to save time.

When the distribution kit in ISO format is downloaded, you need to burn it to a CD or a regular USB flash drive.
Burning to a CD can be done using standard system tools: “Burn a disk image” in Windows or “Disk Utility” in macOS. Just right-click on the downloaded image and select the appropriate item in the menu.

To burn ISO to a flash drive, you will need special utilities. For Windows it is better to choose Rufus, and for macOS - UNetbootin. These programs have a very simple interface, it is quite difficult to get confused in them.
3. Prepare the disk partition
This step should be followed if you want to keep the system installed on you and use Linux at the same time as it. If you decide to switch your computer completely to Linux or are installing the OS on an empty hard drive, skip this paragraph.
Windows

Open Windows Disk Management. Select the drive or partition from which you plan to carve out some space to install Linux. For most distributions, 10 GB is more than enough. But if you plan to install a lot of apps, get more. Right-click on the partition and select Shrink Volume. Enter the size and click OK.
The process can take quite a long time, so be patient.
When Disk Management finishes resizing the partitions, there will be empty unallocated space on the disk, marked in black. We will install Linux there.
Later, if you don’t need Linux, you can delete the partitions with it and give the free space back to Windows using the same “Disk Management Tools”.
macOS

You can allocate space for installing Linux through macOS Disk Utility. Select your drive and click on the “+” icon to create a partition for Linux. Creating a new partition may take some time.
4. Prepare the bootloader
Windows
This point only applies to new computers running Windows 10, 8.1 or 8 pre-installed. These computers use a UEFI boot loader, which will not allow you to boot into anything other than Windows.
To fix this, go into your computer's BIOS settings and disable the Secure Boot option. Then reboot. Done, you can now download and install other systems next to your Windows.
macOS
Unlike most computers, a Mac requires a couple of additional steps to install Linux on dual boot with macOS.
First of all, disable SIP. Restart your Mac and press Cmd + R. The Recovery menu will appear. Select “Terminal” in it and enter csrutil disable .
Restart your Mac again. SIP is disabled.
Manual
Suitable if you want to set the sizes for your partitions yourself or, for example, create a separate partition for your files. To do this, select “Other option” and click “Continue”.
Linux will display what partitions you have on your computer. You can delete them, format them, or, conversely, leave the sections with the information you want to save intact.
To install Linux instead of your system, select the partition with the installed system and delete it with the “–” button. Then create new partitions in the free space.

- Root partition for Linux system files. Select Ext4 file system and mount point /.
- A swap partition, or swap partition, is useful if you do not have enough RAM, but have a fast SSD drive. In the list of file systems, select "Swap Partition".
- Home partition where your files will be stored. Select the Ext4 file system and the /home mount point.
Click Continue and confirm the changes. The installer will erase the partitions you selected and create new ones in the free space.
How to install Linux next to your current system
There are two ways to install Linux next to your system.
Auto

Most Linux installers will immediately detect the systems you have installed. If you haven't created a separate disk space for Linux, you can try selecting the "Install next to Windows" option. The installer will automatically create the necessary partitions, and you will not have to do anything manually.
Manual

If you want to determine for yourself how much space to allocate to the system, and have followed the instructions in step 3, click “Other option” and click “Continue”. You will see your disk partitions and empty space that we have prepared for Linux. Create a root partition there (mount point /) as described above. A home partition is not necessary in this case: you will be able to copy and modify files on your main system.
Click Continue. The installer will leave your files in place. It will simply create new partitions on the free space. You will be able to choose which system you want to boot at startup.
8. Complete the Linux installation


You will then be asked to introduce yourself. Enter your name and create a password. Don't forget your password, as you will constantly need it to perform tasks on behalf of everyone. If you wish, you can encrypt your home folder.
Then just wait. When the installation is complete, you will be prompted to remove the installation disc and reboot. Don't forget to disable booting from external drives in the BIOS if you enabled it.
What to do after installation
When you reboot and your Linux desktop appears in front of you, you can do everything you can do in Windows and macOS: surf the Internet, edit documents and listen to music. Don’t forget to update and look at the “App Store” (or its equivalent, depending on the distribution) to additionally install the applications you need.
Try Linux and you will see that in everyday life it is no more difficult than Windows or macOS.
Wubi is a kind of installer for the Ubuntu Linux operating system, as well as Kubutnu and Xubuntu, designed to run on Windows. With it, you can install Ubuntu as a regular application. This does not require repartitioning the hard drive - during the installation process, a new folder is created on a regular Windows partition, into which all files are placed.
After installation, an additional entry will appear in the standard boot menu, allowing you to select which OS to boot - Windows or Ubuntu. With Wubi, almost any Windows user can have a full-fledged Linux-based operating system without the fear of losing their data or doing anything wrong at all. And besides, Wubi allows you to install and uninstall Ubuntu like a regular Windows program.
Warning
Wubi is essentially a web installer - it does NOT include an operating system. After launching it, Ubuntu will be automatically downloaded from the Internet (note - this is about 700 MB of Internet traffic) and installed. In addition, if you already have a disk with the Ubuntu operating system or its image, Wubi will be able to connect it and use it in its work - and, of course, you no longer have to download the OS from the network.
Have you thought about switching from Windows to Linux? Surely this thought comes to many people, because Microsoft is not pursuing the best policy right now, while Linux distributions, and free software in general, are gaining popularity. A rough transition can lead to a lot of problems, so the most popular advice for beginners is “Install the distribution as a second system next to Windows.” And due to the fact that one of the most popular Linux distributions is Ubuntu, today I will talk about how to install Ubuntu next to Windows 7.
Ubuntu next to Windows 7: dualboot
Dualboot translated from English means “dual boot”. This means that you will be able to boot into both Ubuntu and Windows. This approach is good because you don’t have to go through the hassle of searching for a particular software package. It will be enough to just boot from Windows, where everything will remain as before.
Before we begin the installation, we will need to prepare a Windows hard drive.
Preparing a hard drive in Windows
To prepare free space for installing Ubuntu next to Windows 7, we need to right-click on the “Computer” shortcut, and then go to “Management”.
In the window that opens, we need to find the “Disk Management” item and go to it:

Now, by right-clicking on the disk from the context menu, we go to the “Shrink Volume” item. Basically, according to the standard, you will have two partitions here: the system partition (C) and the file partition (D). It is best to “bite off” space from the partition with files, leaving the Windows system partition alone.

For Ubuntu to work comfortably, we need about 80GB of free space (for several disks, I’ll tell you about this later). If you have more space available, for example 100 or 120GB, then you can measure out that much. It won't be redundant.

As you can see, after this operation the “Free space” field appears in the window; this is the space we will use to install Ubuntu. Naturally, you should have somewhere around 80-100GB, but I (in the screenshot) have 2GB as an example.
Burning an image on Ubuntu to installation media (USB)
It is best to use Rufus or Etcher for these purposes. You can download them from official websites, and what’s good is that their interface is quite simple (especially the last one). However, I described this process in the article. You can also familiarize yourself with it.
After you burn the image, leave the flash drive in the slot and reboot the computer.

Now we must install the system itself. Select the desired language in the left list, and then proceed to install the system.

Don't forget to check these two boxes (updates and third-party software), because in most cases this can be useful.
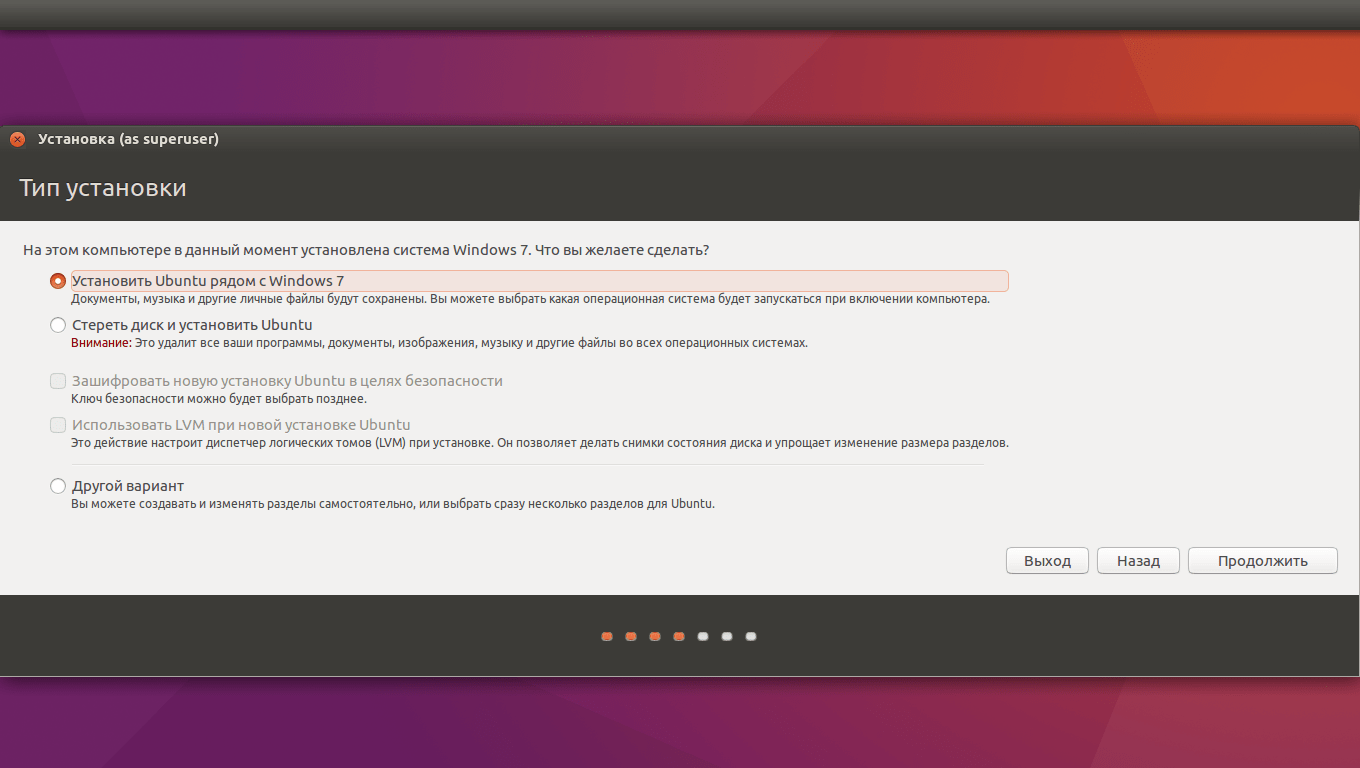
We need to choose the optimal installation type. You can choose the “Install Ubuntu next to Windows 7” option, which should allocate free space automatically. I’ll take a closer look at manual disk partitioning.
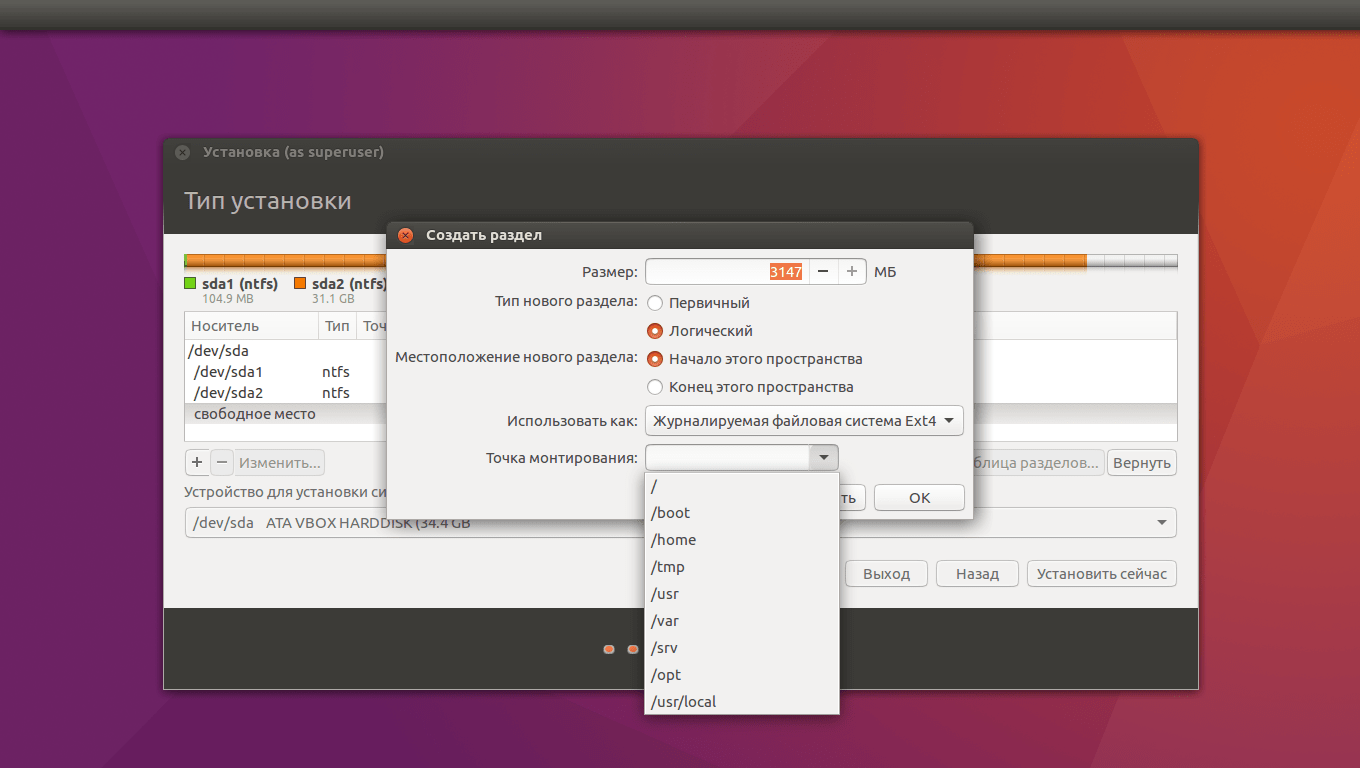
So, select free space and click the plus sign on the left side. A window like this will pop up, and with its help you need to create the following sections:
- System partition: size 20000MB, partition type: logical, partition location: start..., use as: Ext4 (leave as is), mount point - “/”.
- Swap partition: size 4000-5000MB, use as: swap partition. Section location: end of this space, leave the rest as it was.
- Home partition: give it the remaining free space, use it as: Ext4 (as in the first case), mount point - “/home”, partition location: the beginning of this space.
After marking, click “Install now”, confirm the changes, and proceed to selecting the location.
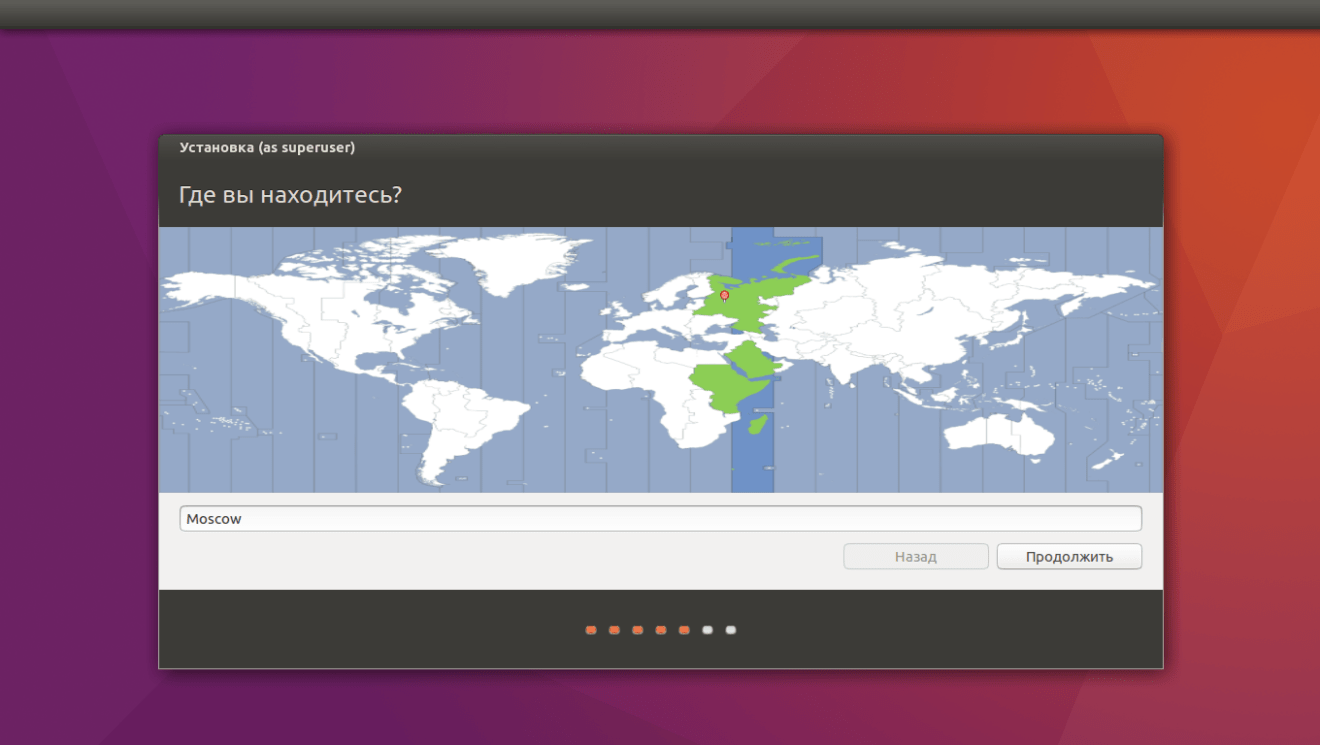
By clicking on the map or the field below, we find our city (or the one closest to us) and click “Continue”.

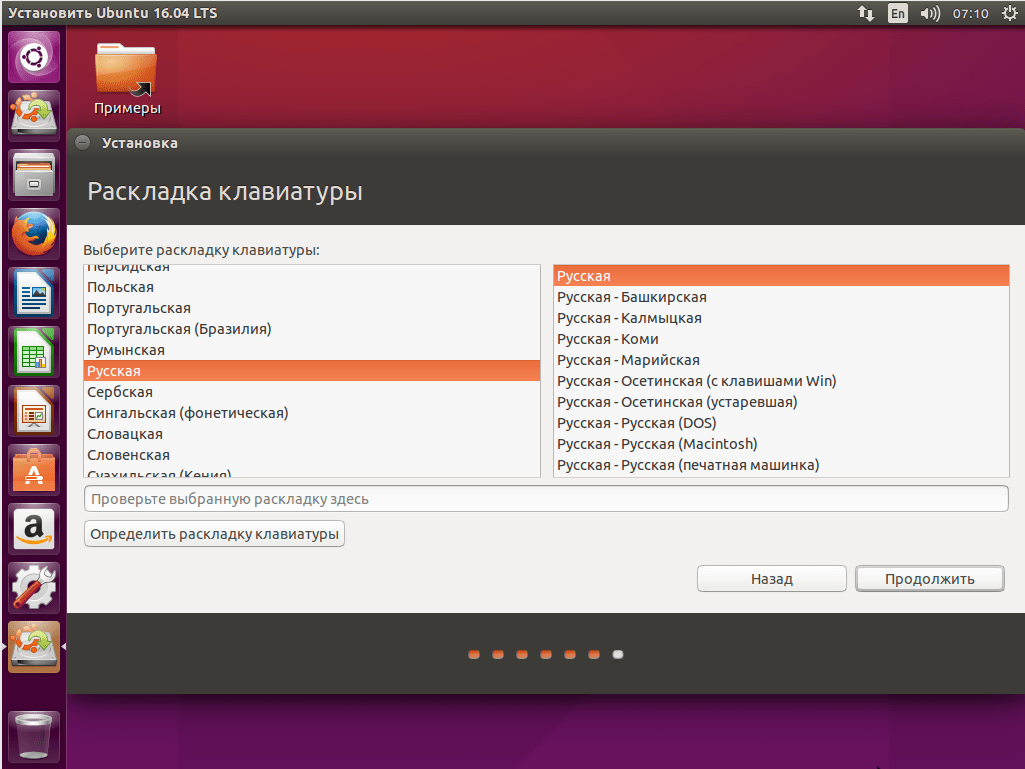
Also here we select the keyboard layout. We look for the one we need in the list, and then click “Continue”.

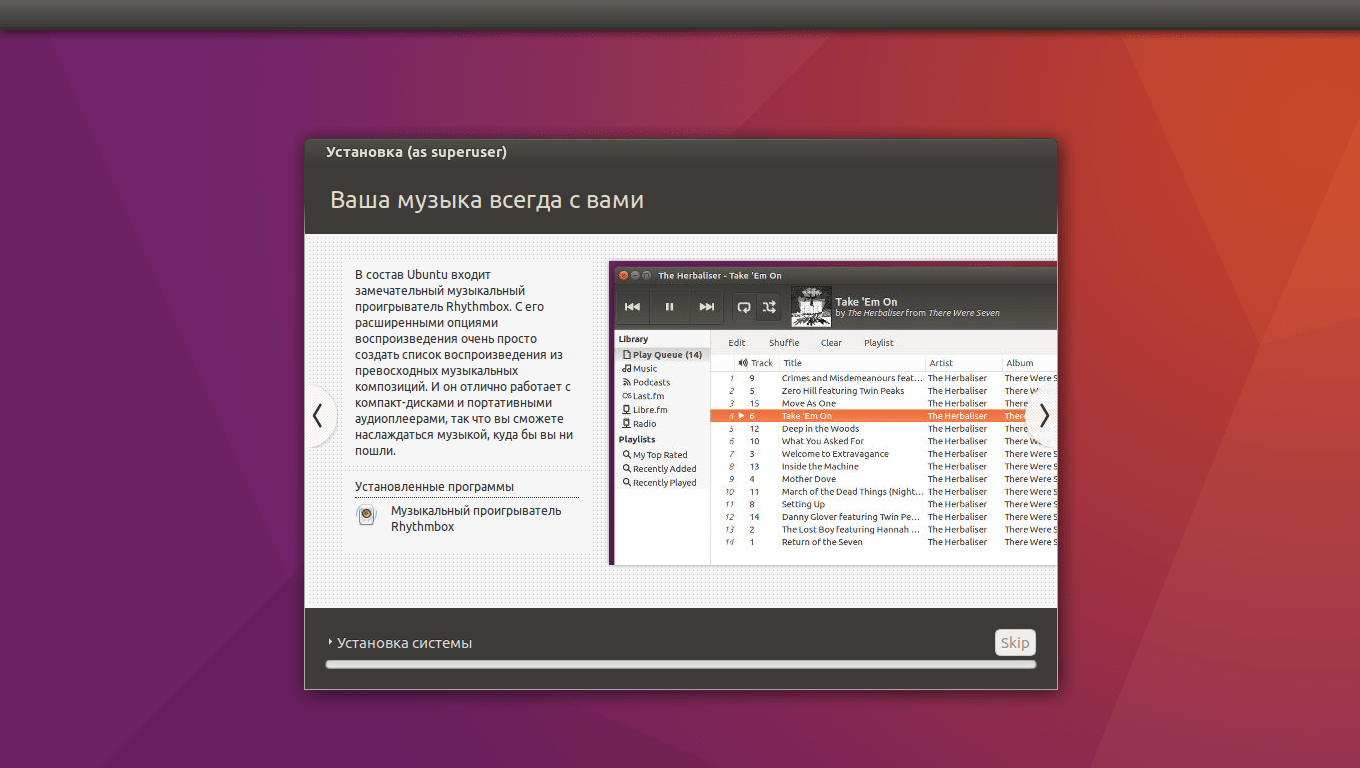
Voila - the installation of the system has begun, and will end in about 15-20 minutes (depending on the power of your PC). At this time, you can look through the wonderful slideshow that is built into the installer, which will allow you to fully familiarize yourself with the capabilities of the system you are installing.
Starting the system from Grub
After you have completed all the steps indicated above, your computer, when turned on, will ask you which of the two systems needs to be loaded. By default, if you have not selected a system, Ubuntu will automatically boot after 5 or 10 seconds. However, all this can be configured, or the automatic download function can be completely removed.

Conclusions
Ready! Now you can use two systems at the same time, deciding for yourself which is more convenient in a given situation. As it turns out, installing Ubuntu next to Windows 7 is not that difficult. Especially if you use automatic solutions (such as the “Install Ubuntu next to Windows 7” button). In any case, I hope this article will help you figure it out so you don't have any problems.
This guide walks you through the installation process of Ubuntu Linux step by step. Installing Ubuntu is very easy and quite fast. With the release of each new version of Ubuntu, developers try to simplify the system installation process as much as possible. In this guide, I will walk you through the complete Ubuntu installation process, with each step accompanied by a screenshot and description. As a rule, users have the greatest difficulties only with disk partitioning; everything else is no more difficult than installing some program. We will look at the process of installing Ubuntu on an empty hard drive, as well as installing Ubuntu next to Windows, that is, the case when you already have the Windows operating system installed and want to install Ubuntu next to it.
Before starting the installation, you must prepare the distribution kit - write it to a disk or USB drive (flash drive). You can install Ubuntu from a bootable USB flash drive (if the BIOS supports booting from a USB drive) or from a CD/DVD disk. All preparatory processes are described in the following articles:
- Burning an iso image to disk - for installation from a CD/DVD.
Writing an iso image to a USB drive (creating a bootable flash drive) - for installing Ubuntu from a flash drive. - — this item only needs to be completed if you already have Windows installed and want to install Ubuntu next to it.
This guide walks you through the installation process of Ubuntu 12.04. Other versions of Ubuntu are installed in exactly the same way.
Updated: Ubuntu 18.04 installs similarly. Feel free to use this guide.
First of all, you download the Ubuntu distribution kit, then burn it to the desired media (flash drive or disk). If you want to install Ubuntu next to Windows, then you pre-allocate free disk space. Then you restart your computer, configure the BIOS, and boot from the disk (or flash drive). You can boot either into a LiveCD system (a system that works without installation on the computer directly from the disk) or you can start the installation process without loading the LiveCD system. Let's look at the entire installation process step by step.
If you are installing Ubuntu for the first time and do not have sufficient experience, then it is highly advisable to backup your important data (copy it to another medium). Naturally, this is true if you are not installing Ubuntu on a clean computer.
Starting the Ubuntu installation
Let's assume you have already inserted a flash drive or disk and turned on the computer. The installer should start downloading. The following window will appear in front of you (let's call it the splash screen).
The not-so-informative keyboard icon at the bottom of the splash screen means that if you press any key on the keyboard, then you will be taken to a menu.
If you do not click anything, then the download will continue and the following window will appear. On the left in the list you can select a language (this language will be used in the LiveCD system) - select Russian. Next you can click the button Try Ubuntu to boot into the LiveCD system and start the installation from there, or immediately press the button Install Ubuntu. I advise you to boot into the LiveCD system, so click the button Try Ubuntu.
If you press an arbitrary key while the splash screen is displayed, then the language selection menu will be displayed. Use the arrows to select Russian and press Enter. 
A menu will appear in which we select the first item Run Ubuntu without installing it on your computer. Thus, we will boot into the LiveCD system, and from there we will launch the installation. If for some reason the LiveCD system does not start, then you can select the second option and begin the installation immediately. 
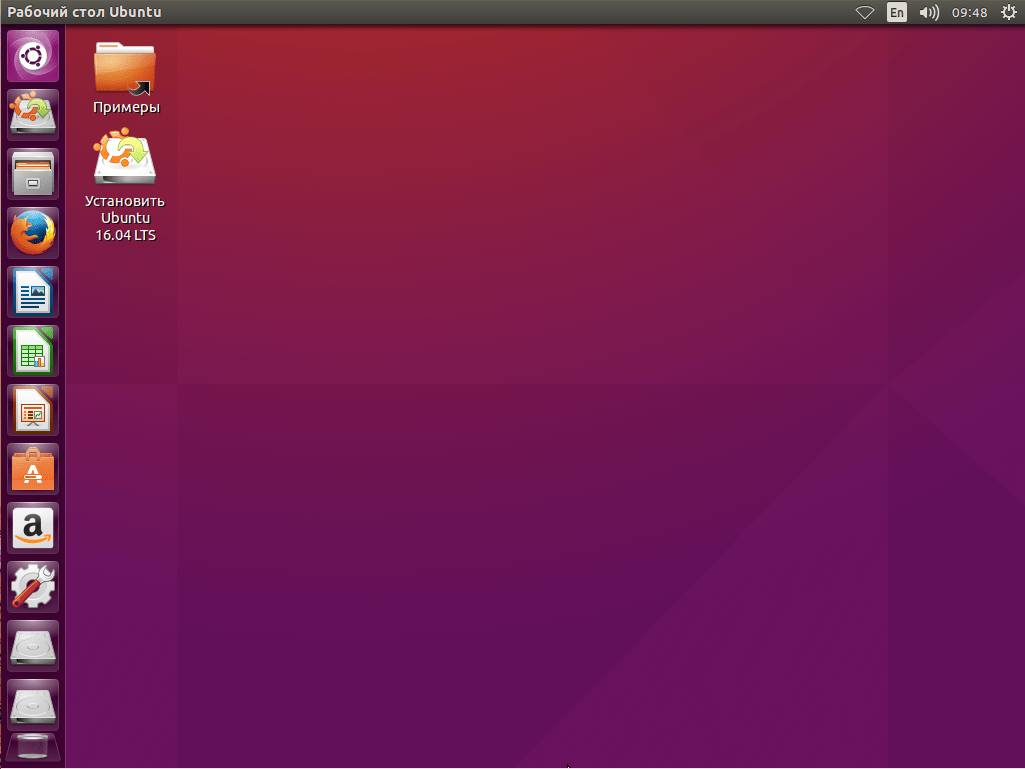
When you boot into the LiveCD, you need to double-click on the icon on the desktop Install Ubuntu (Install Ubuntu).
Language selection and initial settings
The first thing we will have to do is select the language of the future system (Ubuntu will be installed in the same language). Choose Russian and press the button Continue.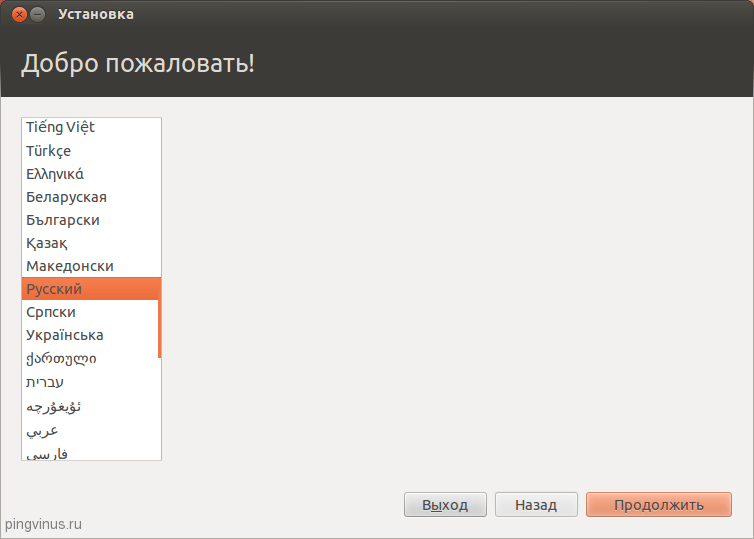
On the next window, “Preparing to install Ubuntu,” you are asked to check two boxes: “Download updates during installation” and “Install this third-party software.” If you select the “Download updates during installation” option, then during installation all the latest updates will be automatically downloaded from the Internet and installed (as well as localization files). I note that in this case the installation will take longer. If you do not currently have an Internet connection, you can update the system after installation. The second option (check mark) means that you agree that some closed source components will be installed (for example MP3 codecs and FLASH). I advise you to check two boxes, then press the button Continue.
Disk partitioning
We have come to the stage that causes the most difficulties for beginners - this is the partitioning of the hard drive (hard drive). I will try to briefly describe some basic principles of hard drive partitioning.
Each hard drive can be divided into several parts, these parts are called partitions (or partitions). For example, if you use Windows, then you may have only one partition - your C drive, or, for example, the hard drive can be divided into two parts - into two drives C and D (into two partitions).
Ubuntu Linux must be installed on a separate hard drive partition. The Linux file system has a specific directory structure. The root of the file system is designated as “/” (slash), all user data is stored in the /home directory (if we draw an analogy with Windows, this is something like the My Documents folder), the bootloader is located in the /boot directory, and so on. And you can put /home on a separate hard drive partition, /boot on another, and the rest of the “/” filesystem (aka system partition) on a third. In the simplest case, you need to create just one partition on your hard drive for the root “/”. There is also a special type of hard disk partition that Linux uses - a swap partition. A swap partition is an area on the hard drive that Linux can use in cases where it is low on RAM or needs to dump the operating system (the computer goes into sleep mode - hibernate).
As I already wrote, in the simplest case you only need to create one section. However, it is better to create at least three partitions. The first is the root partition (with a volume somewhere between 30-50GB), the second is the /home partition (the volume is usually taken to the maximum) and the third is the swap partition (the volume is usually taken equal to the amount of RAM). In this guide, I create exactly three sections.
For reference: 1GB = 1024MB, not 1000MB. For simplicity, during installation, I consider that 1000MB is 1GB, so I indicate the sizes in multiples of 1000. The installer himself adjusts them a little.
There are three types of partitions: primary, logical and extended. An extended partition is simply a combination of several logical partitions.
For MBR partition table There can be only 4 primary partitions for each hard drive (including extended). There can only be one extended section. There can be as many logical ones as you like. Windows is usually already installed on the primary partition, but Linux partitions can be combined into one extended partition. To do this, during installation you just need to specify that the type of each partition will be logical, then Ubuntu will automatically place them in one extended partition.
For GPT partition table(GUID Partition Table) there is no concept of logical and extended partitions. On disks with a GPT table, only primary partitions are created. You can create 128 partitions on one GPT disk.
Hard drives in Linux are referred to as sda, sdb, sdc, etc. Each partition on the disk is named sda1, sda2, etc.
If the disk uses an MBR partition table, then the first four digits are used to designate primary partitions, and the rest are used for logical partitions. For example, you can partition the disk like this:
sda1 - primary partition with Windows
sda2 - extended partition:
- sda5 - logical partition /
- sda6 - logical partition /home
- sda7 - logical swap partition
Each hard drive partition can be formatted with a specific file system. Under Windows, Fat32 or NTFS file systems are usually used. There are several file systems for Linux, but at the time of writing this guide, the best one is Ext4, so I will format all Linux partitions in Ext4.
Below are two ways to install Ubuntu. The first method is to install Ubuntu on a blank hard drive when you have a completely empty or new hard drive. The second method is to install Ubuntu on a hard drive that already has Windows installed. In the second case, when you start the computer, a menu will appear (GRUB menu), in which you can choose which operating system to launch.
Installation on a new (clean) hard drive
Installing Ubuntu on an empty hard drive is one of the easiest, since you don't risk damaging important data or accidentally formatting existing partitions on the drive. If you have a new and empty hard drive that does not contain other operating systems, then the following window will appear in front of you. You can select the first item, then the installer will do everything automatically, but we will select the second item and partition the disk ourselves the way we want. So, select the “Other option” item and press the button Continue.
A window will appear with a list of disks and partitions. Since there are no partitions on the new hard drive, the list will simply show your hard drive /dev/sda. First of all, we need to create a partition table. Please note that your partition table may already have been created and you can skip this step. Click the button New partition table.
A warning will appear, click the button Continue.
A new partition table will be created and the disk layout window will look like the screenshot below. Please note that you can now see the current disk volume (free space). Now we will create three partitions (root /, home and swap. To create a new partition, click on the inscription " free space" and press the button Add.
As I already wrote, we will create three sections. The first will be the root / partition with a size of 30GB, the second home partition will be 218GB and the swap partition will be 2GB in size. When creating partitions, we will specify that all partitions must be logical. The installer will automatically create an Extended (extended) partition and place our three logical partitions in it.
So, the window for adding a new section has opened in front of us. I specified the partition type as Logical, the size in megabytes is 30000MB. The location of the section was indicated by Home. Ext4 file system and mount point / (root partition). After setting all the settings, press the button OK.
Now the window with a list of disk partitions will contain our root partition. At the same time, the amount of free space will decrease accordingly. Now let's create a home section. Click on an item in the list free space and then the button Add.
In the window for creating a new partition, again select the partition type Logical. I allocate maximum space for the size of the home partition, therefore, since I decided to leave 2GB for swap, then we define the size of the home partition as the current free space minus 2GB. In my case it is 218GB. We indicate the location Start, Ext4 file system, and mount point /home.
The home section will be added to the list of partitions. All that remains is to create a swap partition. Select an item from the list free space and press the button Add.
In the partition creation window, specify the type again Logical, size 2000MB (all remaining free space), location Start. At point Use as choose: swap partition. There is no need to specify the mount point. 
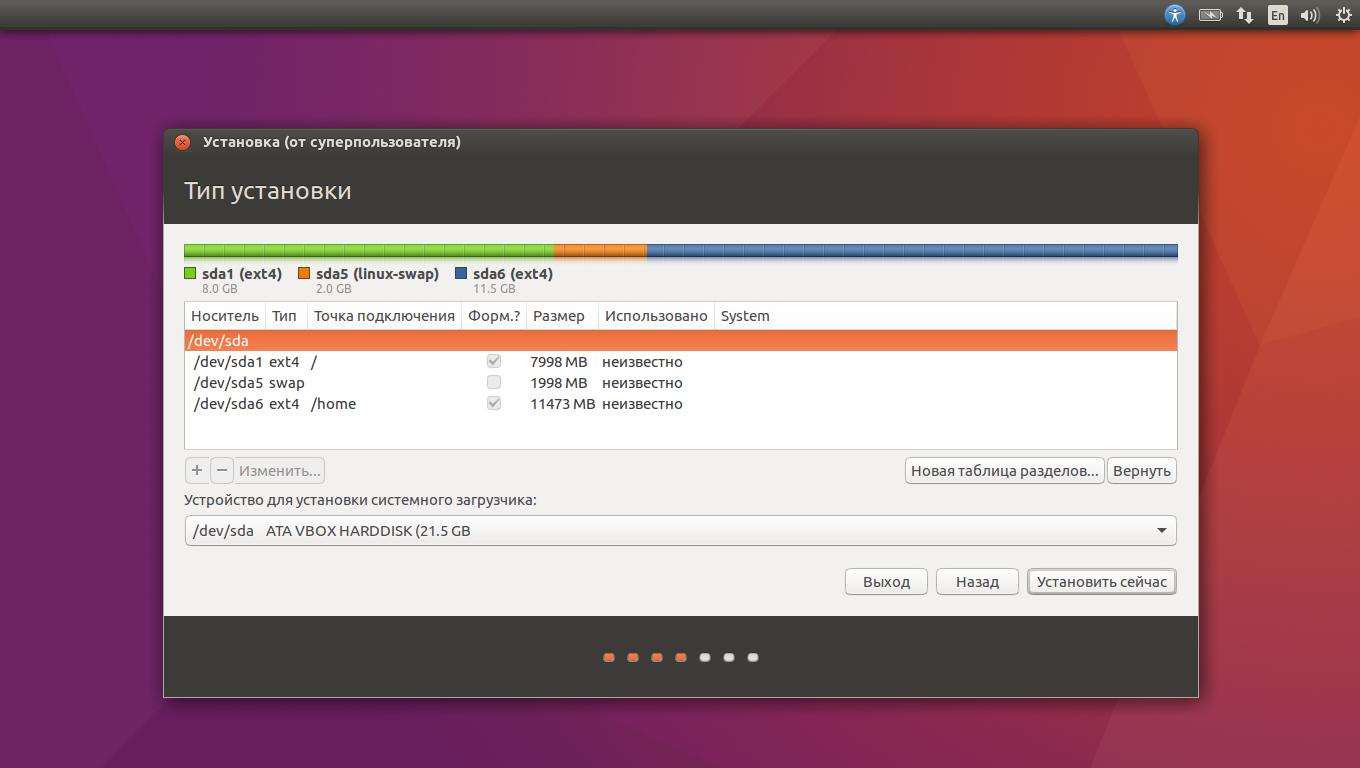
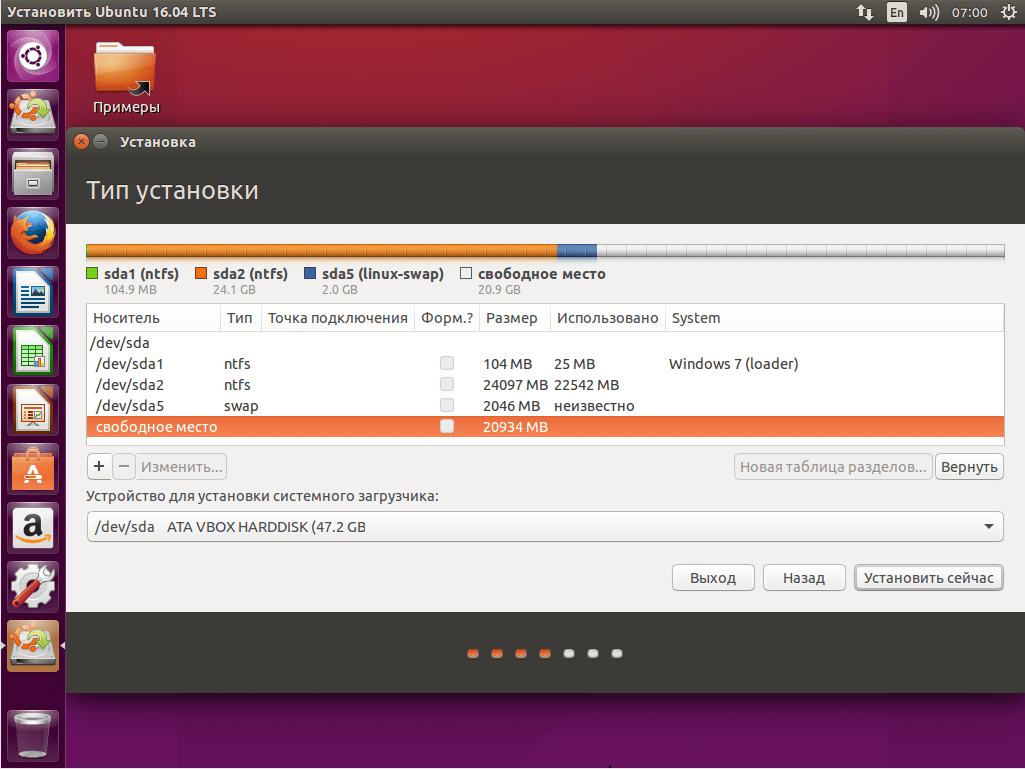
As a result, we ended up with three partitions on the hard drive. Now we just have to select the device on which the bootloader will be installed (in the “Device for installing the system bootloader” list at the bottom of the window), in our case we select /dev/sda (the bootloader will be installed on our hard drive). In fact, the partitions have not yet been created or formatted; we have only compiled a list of actions for the installer. Please note that the checkmarks in the column Formatting should be opposite the root and home partitions. For the last time, check to see if you have entered everything correctly and click the button Install now.
Installation next to Windows
Quite often, users install Ubuntu side by side (in parallel) with Windows. In this case, when you boot your computer, you will be able to choose which system to start. We will assume that you have already allocated enough space on your hard drive to install Ubuntu. If you have not already done this, then follow the instructions described in the article “Preparing a disk in Windows before installing Ubuntu”.
In my case, I have Windows installed on my laptop, which is located on a 42GB partition and I have allocated 105GB of free space for Ubuntu, plus there is a hidden 1.5GB partition where Windows recovery files are stored (since the laptop was purchased with the system pre-installed).
So, the installer will automatically detect that you already have Windows installed and offer you several options for installing Ubuntu. Namely: automatic installation next to Windows, complete replacement of Windows with Ubuntu and manual installation (manual partitioning of the disk to suit your needs). 
If you select the second option, then all data on the disk will be deleted and as a result one Ubuntu will be installed.
If you select the first item, then Ubuntu itself will automatically install itself in the free space that you allocated to it (for me it is a 105GB partition). In this case, the disk will be divided into only two partitions: root / and swap. This is what my disk looked like after this installation: 
I advise you to use manual disk partitioning, so select the third item labeled “ Another option"and press the button Continue.
A window will open showing the structure of your hard drive (or drives, if you have several). It clearly shows disk partitions, their sizes, file systems and occupied space. In the screenshot below you can just see the ~1.5GB partition (recovery partition for Windows), about 40GB is used for Windows and more than 100GB of free space that we left for installing Ubuntu. Click on the line " free space" and press the button Add.
The window for creating a new partition will open. First of all, we will create a root partition “/”. Selecting the partition type Logical, I installed the volume ~18GB, location " start", Ext4 file system and mount point "/". 
After adding the root partition, the disk structure will look like this. Click on the line again free space"and press the button Add.
Now we will create a home partition. I allocated all the available space for it minus 2 gigabytes, which will go to the swap partition. The settings are as follows: partition type “Logical”, size ~93GB, location “start”, file system Ext4 and mount point /home. 
After adding the /home partition, we get the following disk structure. We have just 2GB left for the swap partition. Click on the line " free space" and then the button Add.
All we have to do is create a swap partition. Select the partition type Logical, set the size equal to the remaining 2GB, location Start and in the “Use as” field set the item “ swap partition", you do not need to select a mount point (the field will be locked). 
As a result, we get the following hard disk structure. And the last thing we should check is the bottom option “Device for installing the system boot loader”. In the drop-down list you must indicate your hard drive (I have /dev/sda, on which we did all the partitioning), the GRUB system boot loader will be installed on it. 
Additional settings
The system installation process will begin. At the same time, you will be prompted to perform some custom settings. On the first screen you must select the city (country) you are in: 
Next, select the keyboard layout and press the button Continue. I have selected from two lists Russian.
Next, you must create a primary user.
In the field " your name» enter your full name.
In the field " Computer name» specify the name of the computer, for example - my-home-pc.
In the field " Enter your username»Indicate your username (in small Latin letters). It is advisable to choose a username that is not very long and simple, and this is what your home directory will be called later (in my case it is /home/yuriy).
Below you must enter your password and password confirmation. Please note that you will then enter this password when logging into the system, as well as during any administrative system settings (for example, when updating or installing programs).
Press the button Continue.
You may then be asked to select a picture for your user (avatar). Since my laptop has a built-in web camera, the installer suggested that I take a photo of myself (button “ Take a photo»). ![]()
Next, the installer offers to import accounts from other operating systems. For some reason, it didn’t offer to import data from Windows 7, but usually you can import some user data (for example, bookmarks from Windows), but I’ve never done this. So we just press the button Continue.
Copying files
Now the further installation process will begin and you will be able to view some presentation of the system (slideshow). The installation will take a few minutes. 
Restarting the computer
Finally, when the installation is complete, a message will appear asking you to restart your computer. Since I started the installation from a LiveCD system, I am also prompted Continue acquaintance with LiveCD system. Press the button Reboot. Most likely, you will also be asked to remove the flash drive (if the installation was from USB) or remove the disk (or the CD-ROM will open automatically), otherwise when you reboot, you will start auto-booting from the CD/flash drive again. 
First launch
After the computer restarts, the login window will appear in front of you. You must enter the password (which you provided when installing Ubuntu) and press Enter. 
The Ubuntu desktop will boot. At this point, the Ubuntu installation can be considered complete. After installation, as a rule, a window will immediately pop up asking you to additionally install the system localization files, as well as perform a system update (if this was not done during the installation phase). 
Among new Linux users, it is quite popular to use two operating systems on the computer - Windows, as a secondary system, just in case, and Linux, for learning, as the main system. One of the most popular systems for beginners is Ubuntu, and most users still use Windows 7 and consider it the best operating system. Despite all the problems, it remains popular.
In this article we will look at how to install Ubuntu next to Windows 7. If you think about it, this is the simplest option that could be.
Installing Ubuntu next to Windows 7
This is Windows 7, it uses a regular bootloader and does not yet know what UEFI is, so there will be no problems during installation. I assume that you already have Windows 7 installed on your computer and you are going to install Ubuntu as a second system.
Preparing a hard drive in Windows
I have already written in more detail about what partitions are needed and why in the article disk partitioning for Linux. But that's not the point. Now you have Windows and it takes up your entire hard drive. We need to separate some space from it, and at the same time do it so that nothing is broken and everything works. We could use the Gparted program directly from the Linux or Acronis boot image, but the safest way is to use the standard Windows tools. Click on the icon "My computer" right click and open "Control":
Then select in the left column "Disk Management":

Here you need to find a way to allocate some memory for Linux. Typically Windows has two disks, let's switch to Linux terminology and call them partitions. The first is C: this is the main partition on which the operating system is installed. The second is drive D:, this is where files, games and other data are located. It is advisable not to touch the system partition at all, but to separate space from drive D. But if you have already decided to reduce the system partition, for example, because you only have drive C, then under no circumstances touch the beginning of the partition, you can only cut off from the end. So, first we need to shrink the partition. Therefore, mark the desired volume, right-click on it, click "Shrink Volume":


In the window that opens, you need to enter the amount of free space to which you want to shrink this volume:
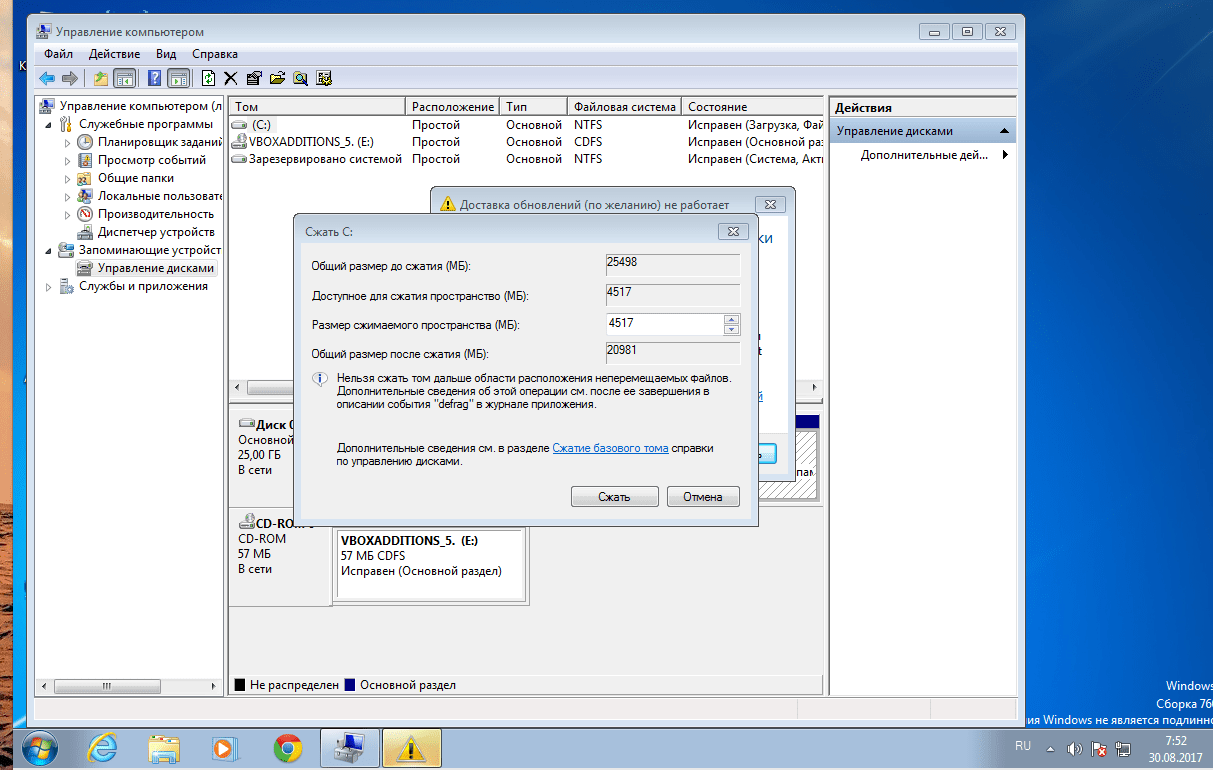
We will need about 100 GB for Linux, at least 30 GB for the root partition, 10 GB for other partitions and about 60 GB for the home partition. This will be enough for you so that you don’t have to think about what to do to have more memory. When you select the volume, click "Compress".
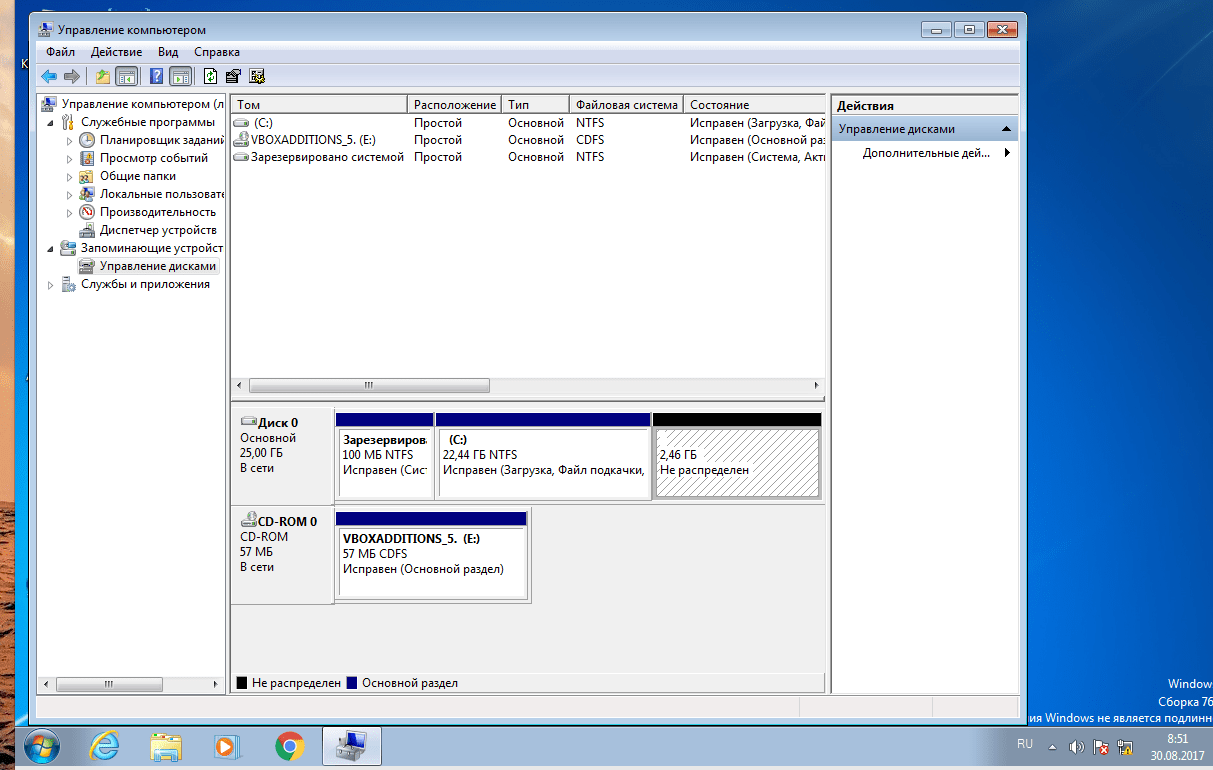
When the compression is complete, an empty space will appear in front of you. This completes your work with Windows. Further creation of partitions is best done from Linux. Almost everything is ready to install Windows 7 and Ubuntu.
Burning bootable media
Next, we need to burn Ubuntu to our storage medium, for example, a flash drive. Since we are working on Windows, we will use the Rufus utility. Download and run the program. In it, select the flash drive you are going to write to, then go down and find "Create boot image", select "ISO image":

Then select the disk image you are going to burn and click "Start":

When recording is complete, you can restart your computer.
Preparing a disk in Ubuntu
Next, you need to restart your computer and boot from the media you just burned. I won't tell you how this is done. If you are planning to install Linux, then you probably already know how to work with the BIOS. When the Ubuntu image starts, you will need to immediately press any key to select the language:

Select "Russian" and press "Run Ubuntu without installation". We need to run the system without installation because this way you will have more freedom if any problems arise.

When the system starts, immediately open the installer. Although I will be looking at the stable version of Ubuntu 16.04, this will definitely work for Ubuntu 17.04, 17.10 and newer versions. Nothing has changed there except the desktop wallpaper.
In the first step of the installer, select your language:

Then don’t forget to check the boxes to install updates and additional software:

On the next screen we can move on to working with the disk. The installer itself determined Windows 7 and beginners, those who are afraid to get into the disk settings themselves, can select this item and install Ubuntu next to Windows 7 in automatic mode. But we'll go the other way and look at manual disk partitioning, so choose "Another option":

Here we see the free space that we have allocated for Linux, I have 22 gigabytes, this will be more than enough to install a test system, but I recommend that you take about 100 GB and definitely at least 50. We have to create three partitions - the swap partition , root partition and home partition. First we create a swap partition. To do this, select free space and click the button "+" :

The partition size should be equal to the amount of RAM, and select the file system "Swap partition":

The next partition is the root partition, the partition size is from 30 Gigabytes, the minimum size is 8 GB, but it is better to take more so that you don’t have to think about where to get the memory later. For example, on my work system, which has been installed for a year, I now use 17 gigabytes on the root partition, despite the fact that I have not installed any games or heavy applications. We select the file system Ext4, and the mount point, the place where this partition will be mounted in the file system, is naturally “/”.

The last one is the home section. It takes up all the remaining space, the file system is also ext4, and the mount point is /home.

System installation
Now you are ready to continue with the installation. We leave the bootloader as is, let it be installed on this disk. It will transfer the Windows bootloader to the system partition and write itself to the MBR. Your installed Windows will be detected and you can access it from the menu during boot. When finished press the button "Install Now":

Next, you still have to create a new user, select a time zone, keyboard layout and wait. There is nothing specific here, so for information about this, see the article Installing Ubuntu 17.04.