Now the majority modern computers and laptops already go without optical drive CD / DVD. In this regard, the issue of creating bootable USB drives to install the operating room Windows systems 10. The Internet is full of various programs to create a bootable USB-drive and a beginner user can find it difficult to choose the one that suits him best.
I will tell you about the best and convenient applications, which will help you burn Windows to a USB flash drive without any problems for installation on a PC. Go!
1. Microsoft Media Creation Tool
In my opinion, branded application Media creation Microsoft's Tool is best program for creating bootable USB Windows flash drives 10 for beginners. Firstly, it is universal and allows you not to get overwhelmed by searching the Internet for a normal Windows image! Microsoft Media Creation Tool she will download it from official server and will write to bootable media.

Secondly, the utility can easily create not only USB installation media but also a DVD if needed. Thirdly, the program interface is very simple and built in the form of a dialogue. Even a schoolboy can figure it out!
2. UltraISO
This program not only allows you to make a USB flash drive with Windows 10 - it is a whole multifunctional harvester. Creation of bootable USB drives is just one of its functions, among which there is also creation of images. different formats, converting, editing and recording them.

To create a bootable USB flash drive in UltraISO, open the operating system image with it and select the following menu item "Boot" -> "Burn Hard Disk Image".
In the window that appears, you need to select the logical drive of your drive, format it and start recording to the removable drive.
3. UNetBootting
This is great free utility, which allows you to quickly and easily create a bootable USB stick not only with Windows 10. The user can choose from a bunch of distributions with Linux, MacOS and recovery LiveUSB. To access them, you just need to connect to the Internet. The program is small in size and cross-platform.

UNetbootin does not use allocation rules to create your Live USB, so most ISO files should boot properly using this option. But still it is worth considering the fact that not all distributions support booting from USB, and some others require additional parameters downloads or other modifications before they can boot from USB drives, so these ISO files won't work as they are.
4. Etcher
An excellent option for those who do not like to mess with the settings, but want to quickly make a bootable USB flash drive with Windows - a free cross-platform Etcher application.

In order to do installation USB-disk you just need to press 3 buttons in turn: image selection (formats are supported: ISO, IMG, DSK, GZ, BZZ, XZ), selection logical drive and recording. Everything! What I liked very much - Etcher works great not only with USB flash drives, but also with SD and MicroSD cards.
5. Rufus
Rufus is already pretty famous utility, which has already proven itself quite well. She perfectly knows how to format and create bootable USB drives with Windows 10, Linux, LiveUSB and other operating systems.
The main feature of the Rufus program is its speed. Rufus is really fast! On the test, the program managed to write a USB flash drive with a "Ten" almost 2 times faster than UNetbootin and Universal USB Installer.
6. WinToUSB (aka Windows To USB)
Many computer publications consider Windows program To USB or WinToUSB for short is the best free tool for creating installation USB disks. It will help you quickly install and run the Windows 10 operating system on your PC using a flash drive or external hard drive.

The utility works seamlessly with ISO, WIM, ESD, SWM, VHD, VHDX image formats. WinToUSB works fine with Windows ISO files 10 / 8.1 / 8/7 / Vista / Server 2008/2012/2016. Also, with its help you can create bootable USB disk c Windows PE.
The application interface is logical and does not cause any difficulties during operation.
7.RMPrepUSB
RMPrepUSB is not easy great program to create bootable USB, and a whole multifunctional harvester that supports a bunch of different formats, file systems and types virtual images... Generally, this console utility, but there are many different shells for it. The best, in my opinion, is the proprietary version from its developers.

RMPartUSB can create any size partition and is primarily intended for USB flash drives Flash Drive(UFD), although it can be used to create a bootable partition on other removable drives or SD and MicroSD cards. The utility can easily place a bootloader for XP / WinPEv1 (ntldr), Windows 10 / Windows 7 / WinPEv2 (bootmgr), MS-DOS (io.sys) or FreeDos (kernel.sys) onto a USB device. The result can be tested immediately thanks to the built-in virtual machine Qemu.
This is a great option for those who like to delve into the settings and parameters to get the result they want.
8. Universal USB Installer
The name of this program is translated into Russian as "Universal USB Installer". It is also known as UUI. The interface is built like a wizard. To with with Universal USB Installer to make an installation USB with Windows 10, you need to select the "Windows 10 Installer" option in the list at the first step.

At the second step, you need to specify the path to the file with the "Tens" image. The last step specify the letter of the flash drive and press the "Create" button.
The only thing I want to warn about is that you must format it first. Otherwise, further problems may arise.
9. WinSetupFromUSB
In the review, I cannot fail to mention another cool utility-combination for writing bootable USB flash drives - WinSetupFromUSB.

It is this program that is always present on my computer in case it is necessary to do multiboot USB stick to install Windows or Linux operating systems. She also has a built-in QEMU emulator, which allows you to test the result on the spot. WinSetupFromUSB program is simple, free and undemanding to computer resources.
10. Novicorp WinToFlash Lite
The main difference between the program is that it does not use an image file. If this utility is used, this image must be unpacked into some folder. Next comes standard procedure: the folder with the installation files is selected, the path to the flash drive is indicated.

11. ISO to USB
This simple program is designed to burn an ISO image to bootable USB media: USB flash drive or hard drive.

The work algorithm is no different from the same UUI: select the installation file Windows image 10, indicate the drive letter from which the flash drive is connected and press the "Burn" button.
12. ISO2Disc
If you look at the name, you might get the impression that the ISO2Disc utility only works with optical discs CD or DVD. But no! Thanks to the support Windows functions To Go, it allows you to make a bootable USB-drive or memory card for installing Windows 10. The interface is simple, similar previous application... The only limitation is that only ISO images are supported.

What I personally really liked was the ability in ISO2Disc to select the type for the installation flash drive - MBR for old hard drives or GPT for modern SSD... So definitely - Must Have!
13. Win32 Disk Imager
Perhaps the most minimalistic software of all presented. Small size and simple interface.

However, Win32 Disk Imager does a great job. Besides, it is fast enough. With its help, you can burn a CD without any problems or DVD image to USB or SD card. By the way, this is one of the few programs in the review that can not only record, but also capture an image from the desired media.
14. PeToUSB
PeToUSB is a small and resource-efficient application, and it is also very easy to use. But despite this, it has excellent functionality for formatting USB flash drives and removable external hdd disks as well as for further creation installation media with both the old faithful Windows XP and the new "Ten".
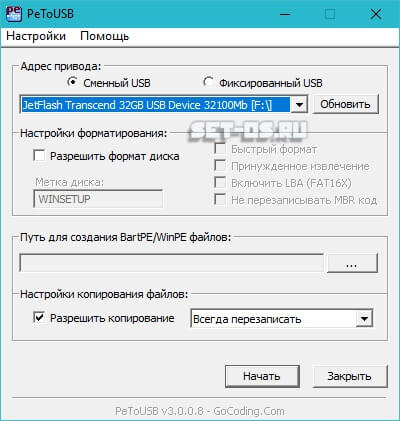
In addition, she knows how to perfectly create a backup. installed system with the subsequent transfer of it to the YUSB disk. Not bad, huh?
And PeToUSB can also be used to get detailed information about the external drive itself.
15. Passcape ISO Burner
As you might guess from the name of the utility, it is designed to work with ISO images - writing to various media and correctly unpacking. We are also interested in creating a bootable USB disk. To do this, in the main window there is an item "Create bootable USB disk":

16. WinToHDD Free
This program stands out among others in that it allows you to make a multiboot USB flash drive with different operating systems or several versions of Windows at once.

In fact, it is a kind of bootloader that allows you to run any of the ISO images that you put on removable media for installation.
If you often install OS on computers and laptops, then WinToHDD is your choice!
17. Windows Disc Image Burner
The last in the review of programs for creating bootable flash drives, I decided to include proprietary utility Windows Disc Image Burner for ISO recording from Microsoft, which she built into her Windows OS starting with the "Seven".

ISO and IMG files are supported.
This application is unremarkable, but in the absence of alternatives at hand for recording an image, it can quite help out in a pinch.
Creating and recording an image of Windows 10 to a disk or flash drive is a pledge quick recovery system operability in the event of a crash or incorrect settings that could not be canceled regular means Windows.
Why do you need a Windows 10 system image
The Windows 10 image is needed to burn the installation flash drive. With its help, it is possible to reinstall the system "from scratch" when the user is not satisfied with the update by standard means. The Windows image may also be required to fix problems with starting the OS, to reset it to initial settings that removes all programs and unnecessary devices installed after the system recovery image was created.
The system image is created using the following applications:
- with the help of the wizard Windows backup;
- third-party applications: Alcohol 120%, Daemon Tools, Nero, UltraISO, etc.
To write the installation flash drive, you need already ready image... That is, you first need to prepare the ISO file itself with a copy of Windows 10.
Windows 10 imaging work
All methods are fairly easy and reliable. Performing any of them is unlikely to take you more than half an hour, especially if the PC or tablet on which you are creating the OS image is powerful enough.
It doesn't matter which of the latest versions of Windows you burn - 7, 8, 8.1 or 10. They are all easily created in ISO format.
Create a Windows Image Using the Backup Wizard
If you create not just a system image, but an image of the C drive (Windows system with installed drivers PC hardware), the following preparatory work is required:
- reinstalling Windows "from scratch" from a ready-made installation flash drive or licensed DVD;
- installation of chipset drivers and built-in peripherals (network adapters, video card, tuner, printer, scanner, sound card and other devices you use);
- installation (optional) of useful programs, for example, Microsoft Office, WinRAR, etc.
No unnecessary applications should not be placed. Otherwise, you get an OS image that freezes due to tens or even hundreds installed applications, as a result of which the meaning of creating an image is lost. Such assemblies (for example, ZverDVD for the XP version) do exist, but they are rare.
Modern Windows versions in particular 8.1 and 10 already contain most of the drivers. So, network adapters and sound are integrated into the top ten, and set outdated drivers no need. Thus, you will only disrupt the operation of modules and devices that Microsoft has already taken care of.
Master Reserve copy not much different in Windows 7/8 / 8.1 / 10.
Find Windows Backup in the Start menu and launch it.
 Backup and Restore Wizard lets you create a Windows disk image
 Choose to create a system image.
 System Imaging can help you copy system and program files to ISO image
 Specify the disk or its partition where the image file will be saved.
 Drive C may not be suitable for saving Windows archive
 Select the drives, the contents of which will be backed up. At a minimum, this is a hidden (reserved) partition and system disk C.
 For archiving, drive C is set by default
 Click the start backup button.
Saving the contents of system and program folders drive C will take 20 to 40 minutes. After that you will have a ready ISO image, which can be recorded on external drive or a USB flash drive using applications such as Media Creation Tool, Rufus, WinSetupFromUSB, Universal USB Installer, etc.
Video: How to Create a Windows 10 Image Using the Backup Wizard
Capturing Windows 10 Image Using Third-Party Utilities
Third-party utilities, such as Nero, Daemon Tools and Alcohol, were actively used to create a Windows 10 image from a licensed DVD. However, you can write a Windows 10 image to a USB flash drive or to an external HDD / SSD drive. Suitable for this as a ready-made build windows 10 in ISO format downloaded from the torrent tracker and your personal ISO archive created using the archive wizard (see instructions above). The latter method eliminates the need to reinstall hardware drivers and applications that you need to work with the system.
Burning an image to DVD is morally obsolete: modern ultrabooks, netbooks and tablets are shipped without a CD-ROM drive. All actions - recovering data after a Windows crash and reinstalling the system, fixing startup problems - are performed from a flash drive, memory card or SSD drive. Therefore, do not focus on burning a Windows image to DVD.
DAEMON Tools
To write an image using the program DAEMON Tools do the following:
- Launch DAEMON Tools and go to Tools - Burn boot image to USB ".
 Pay due attention to the settings before capturing the image
 - Connect an external drive or flash drive and use the "Browse" button to select your media.
- Check the "Overwrite MBR" option. This will create a boot record, without which the media will not be detected by the computer or tablet as bootable.
- Save all your valuable files on other drives before formatting the media. Select file NTFS system and assign a name to the installation disk.
- Make sure your disk or flash drive is more than 4 GB in size. So, Windows 10 will not be written to a USB flash drive with less memory - its image takes at least 3 GB, depending on the build, not counting the rest copied from the C drive (if you used not a "clean" image, but an archive of drive C).
- Click the "Start" button.
That's it, the DAEMON Tools application will start burning the installation disc or flash drive. Creation boot record takes up to several seconds, its volume does not exceed several megabytes, but it will take at least 20 minutes to wait for the image to be recorded.
 Copying a Windows image can take 20 minutes or more
 At the end of the recording Windows copies DAEMON program Tools will report the success of the process.
 All steps for copying a Windows image are described in detail by the program
 Recording speed through USB interface 2.0, which has been used in all PCs and gadgets for 15 years, reaches 21 MB / s. Most modern PCs and laptops are equipped with USB 3.0, and the use of more modern media almost doubles USB speed 2.0. If a flash drive or external drive has been actively used for several years in a row and is worn out, the final write speed may drop several times. The newer the media, the faster all files will be written and the fewer problems when updating / rewriting. Windows installation from him - take it seriously. Another reason why you should not use CDs is that the read / write speed here is several times lower (in units of megabytes per second) than the speed of flash memory used on modern media.
Video: how to burn a system image to disk using DAEMON Tools
Alcohol 120% (57%)
Everything that has been said about expediency Windows entries 10 to a USB stick, does not work with by software Alcohol brands, which were created and updated mainly to work with "blanks" - CD / DVD / BD, and not with flash drives and memory cards. Therefore, alas, it is better to forget about flash drives here. For this reason, the Alcohol utility is being actively replaced by competitors - WinSetupFromUSB, Rufus and other applications that work with electronic rather than optical media.
To create a system image using Alcohol 120%, follow these steps:
Download, install and run the latest Alcohol version 120%.
 The Alcohol 120% application is paid, but you can also use the lite version
 Go to the submenu "Burn images to discs".
 Select the functionality of recording an image in Alcohol 120%
 Select the pre-downloaded Windows 10 image file using the browse button.
 Windows 10 image must be downloaded in advance to burn to disk
 Select your DVD-RW drive and disc write speed. It is recommended to choose a lower speed, make sure that the PC has backup power before starting recording, and do not save on disks - too cheap disks can fail prematurely.
 Recording at 1x speed is ideal - this will reduce write errors to zero
 Write speed affects Windows disk write errors. Do not forget that it is not a selection of music or photos that is recorded, but an image of the operating system. The requirements for the quality and error-free installation discs are very high: if you happen to install Windows system error and the OS will "freeze" in the same place, start recording again. The best way out would be using a 1x-12x disc from some long-term firm like Verbatim, Sony, TDK or SKC.
Video: how to burn a system image to disk using Alcohol 120%
Alcohol 52%
The capabilities of the "younger" program Alcohol 52% are even more curtailed: it does not write images to DVD, although it is free compared to Alcohol 120%.
Mounting images on virtual dvd will give nothing. The image is written to a separate object, information about which is stored on the built-in PC (local) disk, and not on external media. And flash drives and memory cards are identified by Windows as external, and not as local drives.
It is unlikely that you will be able to burn a Windows image to an external medium, be it a DVD or a USB flash drive, since Alcohol 52% simply does not know how to write images to external drives, as described in the application description. Launching Windows 10 from virtual media - except perhaps a LiveDVD / USB version taken from any disk - doesn't make sense. It's easier to set the BIOS / EFI to boot from this disk and start from it. It is better to use more modern analogs, in which there is recording of images to disk and a USB flash drive, for example, UltraISO.
Nero
As with Alcohol, Nero's ability to burn to media other than all sorts of CD formats has been curtailed.
Download, install and run the most recent Nero version(Burning ROM). Click the trial version button.
 Click the button to continue using the trial version
 Follow the path "New" - "DVD-ROM", select the option "No multisession" and click the "New" button.
 Select the type of data disc for recording the Windows image
 Click on the "Recorder" tab and select "Burn Image".
Video: How to Burn a System Image to Disc Using Nero
Other applications for capturing Windows images
You can write Windows to a USB flash drive using:
- WinSetupFromUSB;
- Universal USB Installer;
- Rufus (works with writing EFI-compatible installation flash drives);
- Sardu;
- Easy2Boot;
- Bootler;
- XBoot;
- Win2USB Free and a few others.
Some of them are suitable not only for recording Windows images, but also for other operating systems, as well as multiboot disks.
For recording to DVD, in addition to some of the above applications, it is suitable Windows utility USB / DVD Download Tool created by Microsoft.
Problems when capturing a Windows image
The following problems may occur when capturing Windows images:
- the burned disc or flash drive does not work, the bootloader of the disc or flash drive reports an error starting the installation. This is due to an error in the ISO file when it was created by previous user... Replace the ISO image and overwrite the disc or flash drive again;
- the disk or flash drive is badly worn out, cannot be read. They may not be read either before the start of recording the Windows image, or they may refuse during the recording process. Replace the disk or flash drive and start the process again;
- DVD drive or USB port is defective. Insert the USB flash drive into another port, or the disk into another drive, or try to start recording on another PC;
- floppy cables and / or USB controllers were not reconnected when servicing the computer or laptop. Turn off the PC and check if these cables are in place, then restart Windows and repeat all the steps in the application in which you are going to record installation disc or a USB flash drive;
- writing a Windows image to preferred media does not work in one of the applications. Perhaps there is an error in the application itself, for example, the Alcohol 120% program does not work. Update it to the latest version or use another application such as UltraISO;
- Internet problems on the PC. For example, the Media Creation Tool requires a continuous connection - this program downloads a Windows image from the Microsoft website and then writes it. Troubleshoot network access problems and start the application again;
- communication with DVD drive lost and the application reported an error. If the disc is rewritable (DVD-RW), you can try to clean it and start recording the Windows image again, the same applies to the loss USB connections with a flash drive, although "chopping off" the record leads to the appearance of problem sectors on it. But disposable DVD-R discs they simply fail, since such a disc cannot be recorded a second time. Do not use unreliable, "worn-out" drives and USB ports, which often "fall off" at the most inopportune moment - replace them.
The choice of media for creating and recording a Windows image - disk or flash drive - is yours. Both are good, but they depend directly on what kind of PC you have, and whether it has a floppy drive or USB ports.
You can install Windows 10 from any media that has installation program Windows. The medium can be a USB flash drive suitable for the parameters described below in the article. You can turn a regular USB flash drive into an installation one using third-party programs or official app from Microsoft.
Preparation and characteristics of the flash drive
The flash drive you are using must be absolutely empty and work in a certain format, we will achieve this by formatting it. Minimum volume for creating bootable USB- 4 GB. You can use the created installation media as many times as you like, that is, you can install Windows 10 on several computers from one flash drive. Of course, you will need a separate license key for each of them.
Preparing a flash drive
The flash drive you have chosen must be formatted before proceeding with the installation of the installation software on it:
Second way of formatting
There is another way to format a USB flash drive - through command line... Expand the command line using administrator rights, and then run the following commands:
- Enter in turn: diskpart and list disk to see all disks on the PC.
- To select a disk, write: select disk #, where # is the disk number shown in the list.
- clean.
- create partition primary.
- select partition 1.
- active.
- format fs = FAT32 QUICK.
- assign.
- exit.
Obtaining an ISO image of the operating system
There are several ways to create installation media, some of them will require a system ISO image. You can download the cracked assembly at your own risk from one of the sites that distribute Windows 10 for free, or get official version OS from Microsoft website:
- https://www.microsoft.com/ru-ru/software-download/windows10).
- Select OS language, version and bitness. Choose the version based on your needs. If you are an average user who does not work with Windows at a professional or corporate level, then install home version, it makes no sense to take more sophisticated options. The bit depth is set to the one supported by your processor. If it is dual-core, then choose 64x, if single-core, then 32x.
- When prompted to select a medium, check the "ISO file" option.
- Specify where to save the system image. Done, the flash drive is ready, the image is created, you can start creating the installation media.
Creating installation media from a USB stick
The easiest way can be used if your computer supports UEFI mode- newer BIOS version... Usually, if the BIOS opens in the form of a decorated menu, then it supports UEFI. Also, whether your motherboard supports this mode or not, you can find out on the website of the company that made it.
- Insert the USB flash drive into your computer and only then start restarting it.
- As soon as the computer turns off and the start-up process begins, you need to enter the BIOS. Most often, the Delete key is used for this, but other options are possible, depending on the model. motherboard installed on your PC. When the moment comes to enter the BIOS, a prompt with hot keys will appear at the bottom of the screen.
- Change the boot order: by default, the computer starts up from the hard drive if it finds an OS on it, but you must install your UEFI-signed USB flash drive in the first place. If the flash drive is displayed, but there is no UEFI signature, then this mode is not supported by your computer, this installation method is not suitable.
- Save your BIOS changes and start up your computer. If everything is done correctly, the OS installation process will begin.
If it turns out that your board is not suitable for installation via UEFI mode, then we use one of the following methods to create a universal installation media.
Media Creation Tool
With the help of the official Media utilities Creation Tool can also create Windows installation media.
- Go to the official Windows page 10 and download the Microsoft installer from it (https://www.microsoft.com/ru-ru/software-download/windows10).
- Run the downloaded program, read and agree to the standard license agreement.
- Select the option to create installation media.
- As described earlier, select the OS language, version, and bitness.
- When prompted to select a medium, indicate that you want to use the USB device.
- If several flash drives are connected to the computer, select the one that you prepared in advance.
- Wait while the program is in automatic mode will create installation media from your USB stick. After that, you will need to change the boot method in the BIOS (in the first place in the "Boot" section, put installation flash drive) and proceed to installing the OS.
With the help of unofficial programs
There are many third-party programs that create installation media. They all work according to the same scenario: they write the Windows image, which you created in advance, to a USB flash drive so that it turns into bootable media. Let's consider the most popular, free and convenient applications.
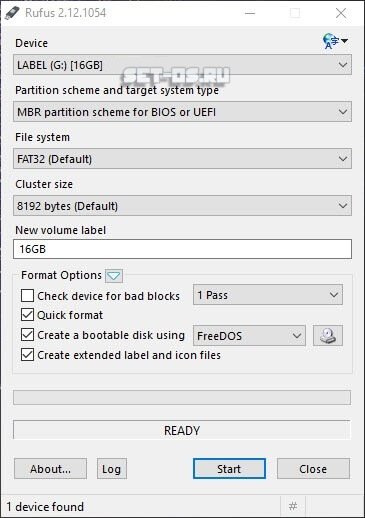
Rufus
Rufus - free program to create bootable USB drives. It runs on Windows operating systems starting with Windows XP SP2.
- Download and install the program from the developer's official website: http://rufus.akeo.ie/?locale.
- All functions of the program fit into one window. Specify the device to which the image will be recorded.
- In line " File system"(File system) specify the FAT32 format, since this is where we formatted the USB flash drive.
- In type system interface install the option for computers with BIOS and UEFI if you have verified that your computer does not support UEFI mode.
- Specify the location of the pre-created system image and select standard installation Windows.
- Click on the "Start" button to start the installation media creation process. Done, after completing the procedure, change the boot method in the BIOS (in the "Boot" section, you need to put the flash card in the first place) and proceed to installing the OS.
UltraISO
UltraISO - very multifunctional program, allowing you to create and work with images.
- Buy or download trial version, which is quite enough to complete our task, from the developer's official website: https://ezbsystems.com/ultraiso/.
- While in the main menu of the program, open the "File" menu.
- Select "Open" and specify the location of the pre-created image.
- Select "Burn Hard Disk Image".
- Indicate which flash drive you want to use.
- Leave the USB-HDD value in the recording method.
- Click on the "Burn" button and wait for the process to finish. After completing the procedure, change the boot method in the BIOS (in the first place in the "Boot" section, put the installation flash drive) and proceed to OS installation.
WinSetupFromUSB
WinSetupFromUSB is a utility for creating a bootable USB flash drive with the ability to install Windows, starting from the XP version.

Is it possible to use a MicroSD instead of a USB flash drive
The answer is yes, you can. The process of creating an installation microSD is no different from the same process with a USB flash drive. The only thing you need to do is make sure your computer has a suitable microSD port. To create this type of installation media, it is best to use third party programs described above in the article and not official utility from Microsoft, as it may not recognize MicroSD.
Errors during the creation of the installation flash drive
The installation media creation process may be interrupted for the following reasons:
- there is not enough memory on the drive - less than 4 GB. Find a USB flash drive with a lot of memory and try again,
- The flash drive is not formatted or formatted in the wrong format. Go through the formatting process again, carefully following the instructions above,
- the Windows image written to the USB flash drive is damaged. Download another image, it is best to take it from the official Microsoft website,
- if one of the methods described above does not work in your case, then use another option. If none of them fit, then the matter is in the flash drive, it should be replaced.
Video: creating an installation USB drive with Windows 10
Creating installation media is an easy process and is mostly automatic. If you are using working USB drive, a high-quality image of the system and use the instructions correctly, then everything will work out, and after restarting the computer you can start installing Windows 10. If, after the installation is complete, you want to save the installation flash drive, then do not move any files to it, then you can use it again.
The use of DVDs in the process of creating installation media is now a thing of the past. More and more often, users use flash drives for such purposes, which is quite justified, because the latter are more convenient to use, compact and fast. Based on this, the question of how the bootable media is created and what methods to do it is quite relevant.
Installation flash drive with operating room Windows system 10 can be created by several methods, among which there are both methods using OS tools from Microsoft, and methods in which additional software... Let's take a closer look at each of them.
It is worth noting that before starting the process of creating the media, you must have a downloaded image of the Windows 10 operating system. You also need to make sure that you have a clean USB drive with a volume of at least 4 GB and free space on the PC disk.
Method 1: UltraISO
To create an installation flash drive, you can use powerful program with a paid license. But Russian-language interface and the ability to use the trial version of the product allows the user to appreciate all the advantages of the application.
So, to solve the problem with with UltraISO there are only a few steps to follow.

Method 2: WinToFlash
Creating an installation flash drive using WinToFlash is as follows.

Method 3: Rufus
Follow the directions below to create bootable media.

In these ways, you can create a bootable USB flash drive in just a few minutes. Moreover, it is obvious that the use of third-party programs is more effective, since it allows you to reduce the time for answering the numerous questions that you need to go through using a utility from Microsoft.
Windows is unpredictable and poses a lot of problems for users. In case of a system restore or reinstallation, you may need a system installation media. To reinstall Windows 10, you will need a bootable USB flash drive with Windows 10. In this article, we will describe the basic methods of creating this drive using various programs.
A Frequently Asked Question Windows users 10: how to make a bootable Windows 10 USB stick (disk)? There are several options for quick and convenient creation installation drive:
- Using the Media utility Creation Tools
- Through third-party programs (UltraISO, Rufus, etc.)
Let's analyze these methods in more detail.
Using Media Creation Tools
First, we will tell you how to create an installation bootable USB flash drive (disk) Windows 10 using Media Creation Tools.
Media Creation Tools is a utility from Microsoft that has become widespread since Windows 8. The functionality of this program is quite simple - loading a Windows image and recording it. If earlier Windows 7 could be loaded with only a key from the boxed (not preinstalled OEM) version, MCT allows you to load almost any system image - the required bit depth, version and language.
Let's start in order:
- Visit the Microsoft website page to download the desired utility - download Media Creation Tools and click on "Download the tool now".

- With the release of a fresh version of the system, the utility is also updated. The version of the utility will be the same as the version of the system build that will be loaded. For example, MCT for Windows 10 version 1803 will have version 10.0.17134.1.

- After downloading and running the utility, we will see a verification screen, at this stage the system version and basic compatibility are checked and the terms of the license agreement are accepted.

- The next step is where the fun begins.
At the stage "What do you want to do?" need to choose Create Installation Media... Then, you need to select the bit and language of the system (in latest versions MCT, system release selection is not required as the image will contain them all).

At the stage of media selection, you can choose how USB stick, where the image will be recorded, and save the ISO image of the system, which can later be written to a disc or create an installation flash drive with another utility.
Select the correct storage device for recording, but be aware that the data from it will be formatted to capture the system image.

From time to time, users have problems with the Internet or the system, as a result of which the recording of the image to disk may be interrupted. In this case, you may need to download the ISO-image of the system for further use.
To do this, at the stage "Select media" select the ISO file item, specify where exactly the image will be saved and wait for the download. In case you want to burn an installation disc, you shouldn't choose it as a boot location. Specify the hard disk, and then you can write to the disk from the file.

With UltraISO
For the next recording option, we will try to use programs from third party manufacturers... For example, UltraISO - it will be used as a program for creating a bootable USB flash drive for Windows 10, which you can download for free at the office. the manufacturer's website - ultraiso-ezb.ru.

Installing the program takes a couple of moments and provides a 30-day free trial period.
To write an image to USB, in UltraISO you need to open the file necessary for recording. To do this, click "File" - Open and select desired file.

To further create a bootable flash drive, you need to go to the tab, where you click on "Write down image of tough disk "... After that, you will need to select the drive to record on, then select the USB-HDD + recording method and click on "Burn".

After waiting for the end, you can use this drive for future use.
Answers to common questions
It is worth paying attention to common questions and user errors associated with creating an installation drive.
Is it possible to write a system image to removable hard disk large volume?
It is possible, but when using the standard functionality of the programs, all information will be lost, and this is critical for many users. The solution will be to divide the disk into several partitions - one of them stores necessary information and the other is the boot sector and stores the installation data. The boot partition is marked active so that the BIOS perceives it as the main one and that it must be loaded from it. This will help both write the installation data to the disk and not lose the necessary information from the disk.

How to return a USB flash drive from a bootable to a regular one?
Analyzing the question of how to return a USB flash drive from a bootable to a regular one, it is worth noting that there is no special need for this, since the data from the image makes it bootable, namely the Boot folder, which "allows" UEFI and BIOS to see this drive as bootable. But also the partitioning of the drive is important if you use removable drive with 2 sections. To do this, you need to make the section inactive or simply delete the information.
How to remove a bootable USB flash drive?
Interested in a question related to how to remove a bootable USB flash drive, it is worth knowing that the name "bootable flash drive" is just a figurative description of a drive capable of loading program code before loading the system itself, and it can be formatted. To do this, in the My Computer (or This Computer, in Windows 10) window, right-click on the desired drive and select "Format"... The basic media settings will automatically determine the desired parameters for deleting information, all you need to do is click the "Start" button.

What is a Windows 10 multiboot flash drive?
Multiboot flash drive Windows 10 contains not only the Windows 10 system image, but also others useful utilities for example to check a hard drive, random access memory or other equipment, or antivirus. In general, it will be useful to check the system before it boots.
Is it possible to create a bootable USB flash drive for password reset?
It is quite possible to create such a thing as a bootable USB flash drive for password reset, and this is described in more detail in our article, where we indicated a password reset method with the Kon-boot utility.
Have a great day!