Need some good advice on how to Windows 7 bootloader recovery if the startup recovery using the installation disk of the seven did not help. I’ll briefly explain what’s the matter: Windows 7 was first installed on the computer, then Windows XP was needed as the second system, after installation it naturally started alone, I used the EasyBCD program to load two operating systems. In the future, XP became unnecessary and I formatted the partition on which it was located from Windows 7. Now, when loading, there is nothing but a black screen. What can be done in this case? More details if possible. Sergei.
Windows 7 bootloader recovery
Hello friends! Most importantly, do not worry, your problem is simple and, in principle, the simple tool "Windows 7 Startup Repair" described in our article should help, but! If this article does not help you, then two others should help:
these articles describe some more good ways to restore the boot of your operating system, besides them there is one more, so try it and don't just give up.
Let me remind you that you cannot install an older operating system after a younger one, Windows 7 will in no case boot after installation on a Windows XP computer, since the latter overwrites the master boot record (MBR) on itself during installation. Therefore, you installed an additional boot manager, which is used to configure the boot of several operating systems and has its own bootloader in turn.
- I also want to say that often file system errors are to blame for unsuccessful loading of Windows 7, you can fix them even when the operating system does not load, all the details are in our other article " "
- Friends, in this article we will work with the Windows 7 Recovery Environment, or more precisely with the command line of the Recovery Environment. I will give you the necessary commands, but if it is difficult for you to remember them, you can. This will greatly facilitate your work.
- The Master Boot Record (MBR) is the first sector on the hard disk, which contains the partition table and a small bootloader program that reads data in this table from which partition of the hard disk to boot the OS, then the information is transferred to the partition with the installed operating system, to download it. If the master boot record contains incorrect information about the location of the system, then we will receive various errors during boot, here is one of them "BOOTMGR is missing press CTR-Alt-Del for restart" or we will observe a black screen. The problem is being fixed Windows 7 bootloader recovery.
When you uninstalled old XP along with EasyBCD, you left your computer to fend for itself with a boot record that it did not understand, and it gives you a black screen as a token of gratitude. To remedy the situation, we will boot recovery Windows 7, namely, we will overwrite the master boot record using the utility Bootrec.exelocated on the recovery disk or on the Windows 7 installation disk (friends, if you have a netbook and want to use the recovery environment located on a USB flash drive, then read the comments first). Also, with this utility, we will write a new boot sector, understandable by Windows 7.
Windows 7 Boot Repair Automatically
We boot from the recovery disk or the installation disk with Windows 7, in the initial phase of booting the computer, when prompted to boot from the disk "Press any key to boot from CD ...", press any key on the keyboard for 5 seconds, otherwise you will not boot from the disk

There is a short search for installed Windows systems and an analysis of problems that prevent them from loading

Usually problems are found quickly and the recovery environment offers to fix them automatically. Click on the "Fix and restart" button, after which the computer will restart and the Windows 7 boot will be restored.

If the system boot problems continue or you are not prompted to fix the problems automatically, then in this window you need to select the operating system that you want to restore, you most likely have one and Next.

Choose a tool firstLaunch Recovery, it can also solve problems with loading Windows 7

Restoring the Windows 7 bootloader manually
If this remedy does not help, choose the remedy Command line

We enter the commands:
diskpart
lis vol (we display a list of hard disk partitions and see that "Volume 1" is a hidden partition System Reserved (Reserved by the system), the volume is 100 MB, it should contain Windows 7 boot files and it should be made active). We also see a partition with Windows 7 installed, it has the letter D:, the volume is 60 GB.
sel vol 1 (select Volume 1)
activ (make it active)
exit (exit diskpart)
bcdboot D:\Windows (where D: is the partition where Windows 7 is installed), this command restores the Windows 7 boot files (the bootmgr file and the boot storage (BCD) configuration files)!
"Download files created successfully"

Restoring the Windows 7 bootloader manually (method number 2)
In the command prompt window, enter the Bootrec command and Enter
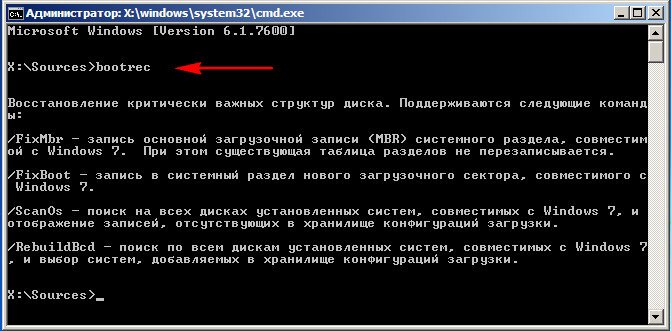
comes full information about the capabilities of the utility. Select the MBR entry Bootrec.exe /FixMbr .

Operation completed successfully. A new boot record has been written to the first sector of the boot partition.
The second command Bootrec.exe /FixBoot writes a new boot sector.

Operation completed successfully. exit. Next, we try to load our Windows 7.

Friends, if the Bootrec.exe /FixMbr and Bootrec.exe /Fixboot commands do not help you, do not despair, there is one more tool.
Method number 3
We enter the command Bootrec /ScanOs, it will scan all your hard drives and partitions for operating systems, and if any are found, a corresponding warning will appear. Then you need to enter the command Bootrec.exe /RebuildBcd, this utility will offer to add the found Windows to the boot menu, agree and enter Y and press Enter, all the Windows found are added to the boot menu.
In my case, two operating systems were found. Everything is visible on the screenshot.

In addition to the above method, there is another one, enter bootsect /NT60 SYS on the command line, the main boot code will also be updated.

exit
So, the error is that on both hard drives, the first hidden partitions System Reserved (Reserved by the system) should be marked with a red flag. On Windows 7, the volume of such a partition is 100 MB, and on Windows 8 350 MB, these partitions have the following attributes: System. Active and it is on these partitions that the boot storage configuration (BCD) files and the system boot manager file (the bootmgr file) reside. And we get these attributes are other sections. Because of this, Windows 7 and Windows 8 won't boot.

Select the first hard Disk 1, click on the first partition System Reserved (Reserved by the system) with the right mouse and select "Mark as active"

The "System Reserved" volume will be marked as active. We press OK.

We do the same with Disk 2. Acronis Disk Director runs in pending operation mode, so that the changes take effect, click the "Apply pending operations" button

Continue.

As you can see, after our changes, those sections that you need have become active.

Exit the program and reboot. The result of the work is positive - both operating systems are loaded in turn.
For those who do not understand what is at stake, I will show everything in pictures:
This is what the boot menu looks like when installing the latest Windows 8.
And this is how the menu looks when installing the latest Windows Vista, 7.

Prior to Windows Vista (Windows 2000, XP), all boot changes were made to the file boot.ini. Boot.ini is a system file that contains information about the Windows operating systems installed on the computer. This data is displayed while the computer/laptop is booting up. In order to change the boot options, just open the boot.ini files with any text editor and make changes.
Starting with the Windows Vista operating system (Windows 7, 8, 10), the boot.ini file has been replaced by the Boot Configuration Data (BCD) file. This file is more versatile than boot.ini and can be used on platforms that use other means than the BIOS to boot the system.
But how to make changes to boot options in Windows Vista 7, 8, 10? To do this, there are two ways provided by the Windows developers:
1 Via GUI;
2 Using the command line.
Change boot options using GUI in Windows Vista, 7, 8.
To use this method, press the key combination "Win" + "R", In the "Run" line, type msconfig, and press the Enter key.


I must say that quite a few settings are available in this way, but for most users this will be enough. This tool will allow you to:
1) Get information about the current and default boot systems.
2) Edit time (timeout). After this time, the default operating system will be loaded without user intervention. To do this, specify the time (in seconds) in the "Timeout" field.

3) Change the default boot system. To do this, select which system you want to boot by default (without external intervention) and click the "Use by default" button.

4) Remove unwanted entry from boot menu. Select the entry you want to delete and click the "Delete" button.

All changes will take effect after pressing the "OK" button and rebooting the system.
Change boot options using the command line (bcdedit) in Windows Vista, 7, 8.
The bcdedit utility provides more options for changing boot options. Bcdedit is a command line tool for managing boot configuration data. It can be used for a variety of tasks: creating new repositories, modifying existing repositories, adding boot menu options, and more.
In order to get to know this command better, launch a command prompt with administrator rights and run the command:
/bcedit/?
In this article, I would like to dwell in more detail on examples of using the bcdedit command. .
An example of using bcdedit.
Before you start making changes to the Windows bootloader, you first need to create a backup copy of it. To do this, create a BootBackup folder on any drive and enter the following command at the command prompt (command prompt must be run as Administrator):
bcdedit /export D:\BootBackup\bcd
If you feel that something has gone wrong, in order to return everything to its original state, issue the BCD restore command:
bcdedit /import D:\BootCopy\bcd
Where D:\ is the drive where the BootBackup folder is located.
The next step is to find out the basic information about your BCD. To do this, run the command bcdedit.

Where:
identifier– ID of this or that record;
device- shows the partition on which the boot files are located (this can be the operating system or the BOOT folder);
osdevice- shows the partition on which the system files of the operating system are located. Usually, the values of the device and osdevice parameters are equal;
path– if device defined a disk partition that contains operating system files, then this parameter specifies the rest of the path to the operating system loader;
default– shows the ID of the operating system loaded by default, if the operating system in which the command line was launched is loaded by default, the value (current) is assigned to the default parameter;
displayorder- shows the order in which the entries about bootable systems are located;
timeout– timeout (see above), the value is shown and set in seconds;
locale– indicates the language of the boot menu or advanced boot options menu;
description- shows the name of the operating system displayed in the boot menu.
How to change the default boot operating system.
Specify the /default value and the ID of the OS that should boot by default.
bcdedit /default (ID)
Now the operating system with the specified (ID) will boot by default.
How to change the download delay value
To change the value of the delay after which the operating system starts loading, run the following command:
bcdedit /timeoutXX
where XX is a number in seconds, the default is 30 seconds.
Removing an Entry from BCD and Boot Manager is done with the command:
bcdedit /delete (ID)
There is a feature of command execution: if a known entry is specified as an ID, for example (ntldr), then the command must be executed with the /f switch:
bcdedit /delete (ntldr) /f
If the ID is written in alphanumeric code, the /f switch is not needed.
In order to get more detailed information about the capabilities of the bcdedit utility, you need to use the help bcdedit /?
Hello dear readers.
Sometimes, as a result of various actions, it may happen that the computer refuses to enter the operating system. And in some cases, this is due to the disruption of an important tool. The solution is to repair the Windows 7 bootloader.
There are several main signs indicating the need to "return to life" the corresponding element of the operating system:
bootrec( )
To return your computer to working condition, you need to perform a number of actions. In addition, for the procedure, we need the Windows installation files. So without a disk with the corresponding data we can not cope. We do the following:

This command will show all the possible options it works with.
Description of Bootrec keys( )
Commands in the environment cmd.exe can be run in the standard version, or with special additions. So, for example, if you write " bootrec.exe /FixMbr”, the program writes a boot record to the main partition. The latter is compatible with Windows 7 and Vista. This will help restore the functionality of the device. In addition, this trick can be resorted to if there is a need to remove non-standard code in the corresponding segment. In this case, the existing partition table remains the same.

When using the key " /FixBoot”, the program enters a new boot sector. It is also compatible with the above operating systems from Microsoft. This option is used in several cases:
The boot file has been replaced with a non-standard one.
He's damaged.
A previous build has been posted since version 7 or Vista. So, for example, after installing XP, the Windows NT bootloader is used.
Interesting to know! The same effect can be achieved by using the program " bootsect.exe". It is also on disk. To do this, write " bootsect /NT60 SYS". A boot sector will appear that is compatible with "". For detailed information, you need to run the utility with the key " /help».
When writing " bootrec.exe /ScanOs”, the application scans all available drives for OS 7 and Vista. As a result, users receive a list of all found systems, even those not registered in the data storage regarding boot.
Using the key " /RebuildBcd"will start scanning all disks for the placement of installed operating systems. A list is compiled from which they can be added to the repository. In addition, this command will allow you to rebuild the database. True, before this, it is necessary to delete the past data.
The above utility has wide functionality. But at the same time, it will not help if the system startup file is missing. In this case, you need to resort to another tool.
It is worth noting that it works in automatic mode. That is, users only need to get to certain tools, write a command, and everything will be done on their own - there is no need to do anything during the process itself.
BCDboot( )
This tool is designed to create or restore a bootloader located in the main partition. The program also allows you to transfer files between hard drives. Even if the system is not visible on the latter.
To get started, just write " bcdboot.exe C:\windows". The operation restores corrupted data, including storage files.

The process has several options:
Source - the location of the directory where the Windows distribution is located. In our case, this is a plastic disk or USB flash drive. This parameter is required. The rest are specified as needed.
« /I» - sets the language of the environment. If not changed, English is used.
« /s' - indicates the drive letter where the necessary files will be placed. By default, this is the location that is set by the BIOS or the new system - UEFI.
« /v» – starts the detailed accounting mode.
« /m» - combining the parameters of an existing record and a newly created one. All this is written to the new boot area.
Return after using Linux( )
It is worth imagining a situation when you previously had an operating system from Microsoft. And after installing Linux, the first one suddenly stopped running. It happened as a result of some mistakes.
If your Windows does not work after installing Ubuntu, do not immediately panic. The problem can be easily solved.
dd if=/dev/sda2 of=/linux.boot bs=512 count=1
The code above allows you to copy the boot sector from the " sda2» in linux.boot.
It is worth noting that in this operating system, the root element " / ". If this is not the case in your personal situation, first you need to find out which of the existing areas is bootable.
The entry has been copied to the user folder. Therefore, we go to the appropriate directory and transfer the file to the partition where Windows is already installed.
The result will be " Command line", in which we write only two lines and after each press " Enter»:
Bootrec.exe /FixMbr
Bootrec.exe /FixBoot
After that, we restart the device and see how everything works in our OS.
The Windows 7 bootloader stops working for many reasons - if boot.ini is damaged or if you try to install XP along with the Seven, after which the latter does not want to boot. This is due to the fact that XP overwrites the Windows 7 MBR boot record. Usually, the Windows 7 bootloader is restored using standard system tools. You can also use another tool, such as Bootice.
The easiest way to restore the bootloader
If pressing F8 does not open additional startup methods and the troubleshooter, then you will need to use a Windows 7 recovery disc or flash drive. From this drive, you will need to boot the computer into the recovery environment by clicking on the system restore link at the bottom of the OS installation window.
- The computer will automatically try to find a solution to the problem, which will notify you in the window that opens.
- If the recovery utility is up to the task, all that remains is to reboot.
If it was not possible to restore the Windows 7 bootloader after XP, use the startup repair tool, which, along with others, is part of the installation disk or flash drive. Usually, these simple methods can deal with simple MBR startup problems.
Edit boot.ini
Boot.ini is responsible for starting the system by default. If one of the OSes is installed or removed incorrectly, its non-working record will be stored in the same boot.ini. It is located at the root of the system partition, so to edit it, the computer must be configured to show hidden files.
Sometimes boot.ini can be corrupted by a virus or some program could contribute to it, after which the OS does not start on its own.
The fix is simple - boot from the LiveCD and edit boot.ini with regular notepad. There are only two sections here - boot loader, which controls the boot and operating systems. You should remember the value of several parameters:
- timeout=10 - time in seconds during which the user can select an OS to run;
- multi(0) and disk(0) are parameters that must have zero values;
- rdisk(0) - disk number with the system partition (counted from zero).
In general, boot.ini from one OS should look like the one in the picture.
Using the command line to restore the MBR sector
You can get into command line mode from the same boot disk or flash drive by opening the system restore tool and selecting the very last item "Command line".
- Type the Bootrec command and then press Enter, a complete list of features will appear
- Write down the MBR sector, for which there is the Bootrec.exe /FixMbr command;
- On the successful completion of the operation after pressing Enter, the computer will notify the user in the next line;
- Next, carry out the procedure for writing a new boot sector, for which enter Bootrec.exe /FixBoot;
- It remains only to enter Exit and try to restart the computer.
- Enter the command line from the installation disk or flash drive;
- Enter Bootrec /ScanOs, after which the utility will scan the computer for an operating system;
- Write the Bootrec.exe /RebuildBcd command in the next line, the program will prompt you to add all found versions of Windows to the start menu, including XP, etc .;
- It remains to agree with this by pressing Y and Enter in sequence, after which, when the system boots, you will have a choice of which OS to boot - XP or the seven.
You can fix the problem with the MBR with one more command. To do this, at the command line, enter bootsect /NT60 SYS, then Enter. Enter Exit to exit. As a result, the master boot code will be updated and your systems will appear in the list during boot.
In case of serious problems, it may not be possible to restore the MBR using the described methods, so you should try overwriting the files in the boot storage.
BOOTMGR is missing
Such a message on a black screen is usually displayed by the computer when the MBR sector is damaged or deleted. The reason may not be related to the MBR, for example, if the BIOS has lost the Boot tab settings and the system is trying to boot from the wrong disk. But more often it is the bootloader that is to blame, so we will describe how to restore Windows 7 boot.
On a disk with Windows 7 there is always a small 100-megabyte reserved hidden partition for writing OS boot files, including a damaged BOOTMGR. You can simply copy BOOTMGR from the installation media and write to this partition. For this:
- Go to the command line from the recovery disk.
- Enter the diskpart and list volume commands in sequence, after which a list of your disks and the letters that the system assigned to each of them will appear on the screen. We are interested in a 100 MB reserved partition and an optical drive - drives C and F, respectively, as in the picture.
- To exit, type Exit and press Enter.
Type the letter of the installation drive followed by a colon and the command to copy bootmrg to the reserved partition. It will look like this:
- F: and then Enter;
- copy bootmgr C:\ and press Enter;
- Exit, the utility will exit.
If copying to the hidden partition fails, the download store can be completely overwritten. Restoring the Windows 7 bootloader is done with the bcdboot.exe N:\Windows command, where N is the drive letter with the OS. After you are informed that the files were created successfully, you can exit the tool with the Exit command and restart your computer.
- write the diskpart line on the command line, which calls the utility;
- to list all available physical disks write list disk;
- the required disk is selected with the sel disk 0 command, where 0 is the number of the only installed HDD;
- to display all partitions of the hard drive, enter list partition;
- to select a reserved partition, write the sel part 1 command, where 1 is the partition number;
- make it active by typing active;
- Exit the application by writing exit.
In extreme cases, you can completely manually delete and format the system partition by starting from some LiveCD, and then using the bcdboot.exe command to create the sector again.
Using Bootice
If Windows XP was installed after the Seven, due to the overwritten MBR sector, only XP starts up and you do not have the option to select a system after you turn on the computer. However, both systems are fully operational, and you can return the start menu very easily, for which the Bootice utility is used:

In the new Bootice window on the left you will see the OS boot list, in which you will need to add the missing "Seven" to Windows XP:
- click "Add";
- in the list that opens, select the line of the new Windows 7 entry;
- on the right side in the upper input field, select the hard drive;
- in the field below, indicate the section with the "Seven";
- click on save basic settings.
The program will notify you about the successful change of this element in Boot and you can exit Bootice. The next time you turn on your computer, you can already choose which OS to boot from your hard drive - Windows 7 or XP.
Complain about content
Copyright infringement Spam Invalid content Broken links
The section is updated daily. Always up-to-date versions of the best free programs for everyday use in the Essential programs section. There is almost everything that is required for daily work. Start to gradually abandon pirated versions in favor of more convenient and functional free counterparts. If you still do not use our chat, we strongly advise you to get acquainted with it. You will find many new friends there. It is also the fastest and most efficient way to contact project administrators. The Antivirus Updates section continues to work - always up-to-date free updates for Dr Web and NOD. Didn't have time to read something? The full content of the ticker can be found at this link.
Restoring the bootloader of Windows 7 without a distribution kit and creating a dual boot using the MultiBoot program
annotation
Restoring the Windows 7 bootloader after installing Windows XP and creating a boot menu are described in detail in the article Installing Windows XP on a Windows 7 computer and is easy if you have a Windows 7 installation disc or a Windows 7 recovery disc. However, there are situations when neither one nor the other is at hand. The program is designed to help in this case. multiboot, developed by participants of the OsZone conference.
You can download the MultiBoot program from OSZone soft portal from this page.
Program page on OsZone-Wiki: MultiBoot.
Development history
The program is based on the idea of Pavel Kravchenko on automation and presentation in the graphical interface (GUI) of the user's work on the command line - utility FixBootFull. However, the advent of the Windows 7 operating system prompted the improvement of the utility and the expansion of its functionality. Currently, the program covers almost all the necessary functions of the utility. bcdedit.exe, designed to work with operating system entries, with the exception of removing an entry from the boot storage (BCD) and adding an entry to the BCD for a second Windows 7 or Vista system.
Program features
With this program you will be able to:
- recover Windows Vista or Windows 7 boot files that were erased when the active partition was formatted; New
- restore the bootloader of Windows Vista or Windows 7, overwritten during the installation of Windows XP;
- create a dual-boot configuration both after and before installing Windows XP;
- specify the operating system loaded by default;
- edit the entries of any operating system in the boot manager and determine their position in the boot menu;
- set a timeout for the menu with a choice of loading operating systems;
- export and import boot configuration data;
- display detailed information about the boot storage, boot files, layout by disks and partitions, and save them to a text file;
- launch a command prompt to execute commands manually;
- specify file options boot.ini rdisk and partition for boot errors in Windows XP. New
To make it easier to work with the program, each control element is provided with a tooltip.
Program launch
Download the archive with the program and unpack it into a separate folder. If you booted into Windows XP, just run the program, and if you booted into Windows 7/Vista, run it as an administrator. After starting the program:
- collect information about the boot data (BCD) configuration, disks and partitions, and installed Windows operating systems;
- will analyze the version of the bootloader file bootmgr;
- will search for Windows XP boot files, including file contents boot.ini(if there are several).
The result of the analysis will be reflected in the field Configuration details tab Additionally.
The proposed version includes utilities bootsect.exe, so you do not need to additionally download or copy it from the Windows 7 installation disk, as well as the utility bcdboot.exe, located in the Windows\System32 folder of the Windows 7 operating system. You can read about the capabilities and use of the utility in the article BCDboot command line options.
Recovery Tab
Let's consider the program functions implemented using this tab.
Each control element is provided with a tooltip, which makes it easier to work with the program.
Figure 1 - Recovery tab: Recovering the Windows 7 bootloader and adding an entry about Windows XP to the boot menu.
Restoring the bootloader of Windows Vista or Windows 7, wiped during the installation of Windows XP
With the checkbox active Restore bootloaderWindows Vista /7 on all drives the command to restore the master boot record compatible with Windows 7/Vista will be executed:
Bootsect /nt60 All
If the computer has more than one hard drive, the command will be executed with the key /force.
If you are using the program as a BCD entry editor, uncheck this box.
Adding a Windows XP Boot Entry to the Boot Menu and Store.
You can add an entry to boot Windows XP before or after you install it. If there is no Windows XP boot entry in the BCD, then you will see a second checkbox: Add an entry to the boot menu for Windows XP, and in the field Executed commands and report– list of required commands.
Note: before the Windows XP boot entry was added to the boot store, in the combo box Select operating system there is no line about it, but the settings will be applied specifically to the created record. At this stage, you can:
- rename the created entry (by default - "Windows XP");
- set Windows XP as the default boot operating system (if you do not want this, uncheck the corresponding box);
- determine the location of the entry in the boot menu (by default, the entry will be located at the top of the list).
After clicking on the "Run" button, the scheduled commands will be executed.
You can prepare in advance for installing Windows XP and create a boot menu. To do this, run the program in Windows 7, configure the boot menu options in the same way as described above, but since there is no need to restore the bootloader at this stage, uncheck Restore bootloaderWindows Vista/7 on all drives and press the button Run. After installing Windows XP, you only need to restore the Windows 7 bootloader.
Editing the entry of any operating system in the boot manager.
The Multiboot program allows you to edit existing boot entries for operating systems. To do this, just uncheck both checkboxes on the tab. Recovery over the field Editing a post. To start editing, select the required entry in the combo box Select operating system. The remaining functions are similar to those that were applied to the Windows XP boot record that was created and are not difficult:
- renaming the selected entry;
- setting the selected system as bootable by default (if you do not want this, uncheck the corresponding box);
- change the location of the entry in the boot menu (top or bottom of the list).
Timeout setting
To do this, you need to change the value in the checkbox field Set OS selection timeout.
The control field will display the command
X:\Windows\System32\bcdedit /timeout nn
where X is the letter of the partition on which Windows 7 is located, nn is the number of seconds.
Executed commands and report field
A list of commands that you would need to run on the command line is displayed in the field Executed commands and report. After analyzing the existing BCD parameters, the program adds to the list only those commands that change the current ones. For example, if the timeout parameter is 15 seconds, it will not appear in the list of commands. Progress and result visible in the field Executed commands and report. Text can be copied to the clipboard and then pasted into a notepad file or into a forum post.
By pressing the button Run the creation of the boot menu or its modification will begin, as well as the restoration of the Windows 7 bootloader.
Restoring Windows 7 or Windows Vista Boot After Formatting an Active Partition
Sometimes during the installation of Windows XP, more often during reinstallation, unsuspecting users format the active partition on which the Windows 7 boot files were located. Naturally, after installing Windows XP, the ability to boot into Windows 7 disappears. If you have a Windows 7 installation disc, starting up recovery is a matter of a couple of minutes, but if there is none? multiboot is equipped with tools to solve this problem and without a distribution. At the beginning of the article, I mentioned that the utility is used for this. bcdboot.exe.

Figure 2 - Recovery tab: recovering Windows 7 or Windows Vista boot files after formatting the active partition.
The window for restoring the ability to boot Windows 7 will appear when the program does not detect a hidden BOOT folder on the active partition (or partitions, if there are 2 or more hard drives). You will only have to configure the utility keys and select an active partition for BCD recovery. This feature of the program is especially valuable for those who had Windows Vista installed, since the utilities bcdboot.exe not in Windows Vista.
WITH multiboot BCD recovery is a matter of a couple of mouse clicks.
Advanced Tab
This tab gives you the ability to see the boot configuration data and the breakdown by disks and partitions in the field "Configuration Details".
Figure 3 - "Advanced" tab
If you need a text file containing boot configuration data, click the "Copy" or "Save" links. In the first case, the information is stored in the clipboard, and you can use it as you wish. In the second case, you will be prompted to create a text file. There are two options for saving information:
The first one will contain information about the entries of the operating systems that form the boot menu, which is similar to executing the command:
Bcdedit /enum active
The second option will contain information about all the entries contained in the BCD, which is the same as running the command:
Bcdedit /enum all
Data about Windows boot files, layout of disks and partitions, installed Windows systems, text of boot.ini files will be added in any case.
"Tools" area
Creating a BCD backup is necessary so that in the event of an unsuccessful installation of the operating system or after experimenting with the boot menu, you can return the boot to a healthy state. To export BCD click on the link Save. You will be prompted to select a backup location in the program folder. You can change it if you wish.
If you have a download data backup previously created by the program, you can restore it using the link Restore. To do this, click on it, specify the location for storing the backup file, then click Open.
Console subsystem of the program
Help about the commands used in the MultiBoot console subsystem can be obtained by executing
multiboot /?

Figure 4 - Operation of the console subsystem of the program
To work with utilities bcdedit and bootsect you can use Multiboot, for example, to get information about BCD entries on partition C: with output to a text file:
MultiBoot -bcdedit /store c:\boot\bcd >c:\bcd_on_c.txt
or overwrite the bootloader on multiple hard drives:
MultiBoot -bootsect /nt60 all /force
Separately, I would like to focus on the team
MultiBoot –buildbootini
This command can be used to check if the file parameters are correct boot.ini, especially if you cannot boot Windows XP in a dual boot configuration. As a result of executing the command, the text of the file will appear in the command line window boot.ini Rebooting Windows 7 after installing XP and creating a dual boot on the forum.