Why can't the computer see the printer? Many users face this problem. And with both devices everything is in order. In addition, the printing equipment can work perfectly on another PC. And when you connect to the right one, it's buggy. It is not recognized by the system or gives errors. How do I fix the problem?
From the source of the problem to its solution
What if the computer does not recognize the printer?
1) Check the connection is working properly.
Most often, it is because of poor contact that the personal computer does not respond to the connected equipment. Therefore, remove the cable - plug it in again. Check that the connection is secure on both sides.
Make sure the cable is plugged into the computer into the correct, working USB connector. Most printing attachments require a USB 2.0 connection. For the duration of the test, you can free up other connectors (disconnect the mouse, keyboard). Connect the cable to each one in turn. Perhaps it will react to some kind of connector.
The banal reason for the invisibility of the printing equipment is that they did not press the on / off button. They just forgot. She is in an uncomfortable place (either behind or on the side). Make sure you click it. A light on the case should light up.
2) The driver has crashed.
Or you forgot to install it at all. Consider the forgetfulness situation first.
In order for the PC to recognize the connected device, you need to download a special program. It is on the installation disc that came with the printer. Insert the disc into the drive, follow the instructions of the installation wizard. Everything is clear there. Each next step is displayed on the screen.
If there is no disk, you will have to search the Internet for the driver. Look at the company of the manufacturer of your printer, model (all data is on the case of the device) and enter this information into the search engine line. Choose the official website of the manufacturer. There you will find a section with drivers. Download the necessary. What should you pay attention to? Compliance of drivers and utilities
- printing device models;
- the operating system of your computer (programs for 64-bit, 32-bit, etc. OS).
If asked to restart your PC, follow the request.
Now you need to check the result of the work done. How can I do that?
We go to the "Start" menu. Go to the Printers and Facts tab. The necessary equipment should be there.
But often everything is installed, but the problem is still there. It is inside the operating system. So, if the laptop does not see Wi-Fi, first check the settings of the laptop itself.
Consider a situation where the driver is installed, but it is buggy. Flew off. The device can be displayed, but it does not work. The step-by-step instructions for eliminating the problem can be indicated as follows:
1. Go to the "Control Panel" - "Add or Remove Programs" (the path may differ slightly on different systems).
2. Find the name of your printing device and delete it.
3. Again go to "Start" - "Printers and Faxes" - "File" (in the upper left corner) - "Server properties" - "Drivers" (in some systems, the path to them is through the "Device Manager").
4. Select the model of the printing gadget and delete (if the system does not show the desired name, delete everything).
5. Install the drivers again.
3) Other printing equipment is selected by default.
This is not a problem, but a problem. Very common and therefore easily solvable. Having installed the necessary equipment, right-click on its icon and put a checkmark in front of the "Use as default" inscription.
4) Disabled automatic printing service.
Start Menu - Control Panel - Administrative Tools - Print Spooler. Double click to open the tab. We are looking for the inscription "Startup type". We put "Auto" ("Automatic").
5) Operating system crash.
How can I check this? Connect the printing device to another computer or laptop. If it works, then the problem is in the system. We'll have to reinstall it.
Perhaps these are all the reasons for the invisibility of a working printer.
If the computer stopped seeing the printer, then in this case you will have to try to find the source of the problem. So why can't the computer see the printer? Almost every user of office equipment faces a problem of this kind, and first of all, you should check if the printer is properly connected to the computer.
Most often, it is because of poor contact between the PC and the printer that the computer does not respond to the connected equipment. In this situation (if the connection is via usb), you should remove the cable and reinsert it, and also check the reliability of the existing connection on both sides. Make sure that the USB port where the wire is inserted is working. During the test, connect the cable one by one to all the connectors available in the system unit, having previously disconnected the mouse and keyboard. Perhaps the PC will eventually react to some of the connectors. Otherwise, you will have to contact the service center, because if the printer is not detected, then the problem may be in it.
If the computer or laptop does not see the printer and the problem is not related to the USB cable, the problem may be with “broken” or “faulty” drivers. It is also possible that you simply forgot to install them. If the situation is related to your forgetfulness, then download a special program on your PC from the installation disk that you purchased with the printer. When installing, follow all the instructions that will appear in front of you on the screen. If there is no installation disk, then you can find the corresponding drivers on our website in the section. You can also download them from the official website of the manufacturer of your printing device. When doing this, take into account the model of the device and the OS installed on the PC.
But quite often the problem appears with existing drivers. In this case, its cause lies in the operating system installed on the computer. In a similar situation, it also happens that the laptop cannot detect even the Wi-Fi connection to the printer. Why is the printer not visible in this situation? The reasons for this problem may lie in a router that is not configured to receive a signal, unpaid Internet provider services, unfulfilled settings, and possible blocking of the home network by the antivirus. Another reason that the PC does not see the printer via Wi-Fi may be the following - the IP address was not entered automatically.
So, if the driver is "buggy", then to solve the problem, first of all, you need to go to "Add or Remove Programs", find the name of your printer there and remove it. Then again you need to go through the "Device Manager" to the "Drivers" tab, select the desired printer model and delete it. After that, it remains to install the printer driver again.
Viruses and system file recovery

If the computer does not see the printer and it does not normally connect to the device, then be sure to check the PC for viruses and other unwanted programs. In addition to antiviruses, it is advisable to use special utilities for this purpose, which have a narrow specialization.
It is possible that system files were damaged in your OS during operation or under the influence of malicious applications. Try to restore them in any available way. After the work done, install all updates that are important for the system and check if the described actions helped to solve the main problem. If nothing really has changed, then it would be a good idea to reinstall the operating system.
Other possible causes
Another problem may be that on your computer "by default" the selected equipment for printing is completely different. This reason belongs to the category of the most common, but at the same time it is very easy to solve. To do this, after installing the required printing device, click on its icon with the right mouse button, and then put a check mark next to the inscription implying the use of the equipment by default.
If the printer is still not detected, i.e. it is not visible to the computer, then the service responsible for automatic printing may be disabled on your PC. Go to the "Administrative Tools" menu through the "Control Panel" and then open the "Print Spooler". Next, find "Startup type" and set it to "Auto". In general, you don't need to do anything else in this case.

In addition, some users, due to their absent-mindedness, simply forget to press the power button of the printing device. It is usually located on the side or back, i.e. not in the most convenient place. Therefore, before proceeding to the consideration of the above reasons, you should make sure that the device is actually turned on and the indicator on its case is on.
Thus, if you are interested in the answer to the question of what to do if the computer does not see the printer, then you should not immediately fork out for the services of the masters. You can cope with this relatively easy problem with a competent approach on your own. You should contact the service center as a last resort, if none of the above helped you and the printer is still not visible on the network.
Most modern printers use a USB port to connect to a computer or laptop. More expensive models and office devices also have Ethernet connectivity. In this case, the connection to the computer is not made directly, but through a router or network switch (switch). Old equipment is connected through the LPT port. Since it is extremely rare on motherboards of modern PCs, it is possible to connect them via USB through a special adapter.
Connecting the Printer to a Computer via USB
USB is the most popular interface used to connect peripheral devices to a computer or laptop. Most often, a cable with USB type "A" connectors on the PC side and type "B" on the side of the peripheral device is used for connection. To connect your printer via USB, connect it to your computer with this cable. Then plug both appliances into a power outlet and start them up. Wait for the hardware to initialize and load the operating system on the PC.
In the next step, you can manually install the printer software or use the OS tools to automatically search for the driver on the Internet. For manual installation, download the file from the manufacturer's official website. As a rule, the installation file can also be found on the disc that comes with the documents and the warranty card. It is recommended to select the option with downloading the program from the Internet, since the latest driver can be found on the manufacturer's website.
If you choose to install using the built-in OS utility, go to the Windows Control Panel. Open the "Devices and Printers" item, then select the "Add Printer" item from the menu sections at the top of the window. The system will search for devices connected to your PC. At the end of the search, select the found device by marking it in the central section of the window and clicking "Next". If it is not found, make sure it is properly connected to your computer.

You can also add hardware manually. To do this, click on the link "The printer is not in the list" and specify the required parameters. You can also update the drivers of the connected device in the device manager. It also opens through the Windows Control Panel. Unidentified hardware will be displayed in the "Other devices" section. To update the software that is required to communicate with your PC, select the "Update Drivers" menu item.
Important advice! After connecting the device to your computer, print a test page. To do this, select "Print a test page" in the printer properties, section "General". The test page will help you check the device's performance and print quality.
Connecting to a network printer via Ethernet
If there are several PCs in the home network and an Ethernet connector on the printing device, it is advisable to use a connection to a router. In this case, you can print documents from any computer connected to the local network. This connection makes the equipment networked. The software of some manufacturers allows you to work with such equipment via the Internet, even from those PCs that are not part of the local network.
Most often, this scheme is used in offices, but if necessary, it is possible to use it for a home network. The advantages of such a connection can also be attributed to the ability to use a printing device via WiFi without the presence of a wireless adapter on the machine itself. This means that if you have a laptop at home, it does not need to be connected via a cable. Files can be sent to print over a wireless network.

Note! If your router has a USB connector, in most cases it can be used to connect a printer. This does not require a connection via an Ethernet network cable. In some cases, this arrangement provides more flexibility and allows you to take advantage of the advanced features of the equipment.
To search for a network device, the same section of the control panel is used through which USB printers are added. Before installing it, it is advisable to unpack the driver downloaded from the manufacturer's official website. During manual installation, you may need to specify additional parameters, for example, the IP address. To clarify it, use the desired section in the control panel of the router. The web interface can be accessed through a browser using the data from the sticker on the underside of the router.

Connecting using the LPT port
The LPT connector has 25 pins arranged in two rows. It was used to connect scanners, printers and other external equipment. Currently, this port is almost never used, but some older printing devices do not have a modern alternative for connecting to a PC. If your PC motherboard has a corresponding connector, connect the printer using the cable that is included in the package. The general procedure for connecting via LTP:
- Connecting the printer to the computer;
- Installing drivers;
- Testing and subsequent use of equipment.
If there is no LPT port on the computer, it is recommended to use a USB adapter if it is not possible to connect another printer. Such adapters do not require external power supply. To use them, it is enough to connect the required connectors. Connecting older printers to modern operating systems often presents additional challenges. They are connected with the fact that the manufacturer's support has already been discontinued, and there are no drivers for the new OS version. Use Windows compatibility mode to work with old software.

It's important to know! The use of adapters with a long cable degrades the quality of communication between devices. The longer the cord, the higher the signal attenuation in it, therefore it is better to give preference to adapters with a short cable.
There are several reasons why the computer does not see the printer. These include hardware problems with the product, or problems with the cartridges or the ink supply system. There are situations when the computer (PC) does not see or has stopped seeing the printer despite the fact that both devices are working normally.
There can be many sources of problems with any printer HP, Canon, Samsung, Epson and others, so you should first determine the malfunction, and then look for a solution.
The most common reason why the computer cannot see the printer via USB is wrong connection... You must first make sure that the printing device is connected to your PC or laptop at all. If this is not the reason, then you need pull outUSBcable from both devices and insert it into the connectors again until it stops.
Some modern printers use USB 3.0 for connectivity, while most computers use 2.0 connectors. It is worth considering this, read the instructions for connecting.
Damaged USB cable or connector
The next reason why a computer or laptop does not see the printer is a damaged USB cable or connector. In this case, you should disable all computer peripherals and insert the cable one by one into all USB ports on the computer. Each time you connect, you need to wait a little while the system responds: a sound signal or an alert on the monitor. 
Incorrect drivers
The next step in the case when the computer or printer Windows 7, 8, 10 does not see the printer will be checking for drivers and the correctness of their installation. As a rule, all the necessary software is included with the printer. In this case, it will not be difficult to install the drivers following the instructions. If there are no drivers, then you can download the required software from the official website of the manufacturer. But first you need to check the compatibility of the firmware and hardware of the personal computer.
But sometimes the drivers crash and start behaving incorrectly. There is a solution here too.
First you need to find a printer: " Start» — «» — « Device Manager". Right-click on the icon of the printing device found in the list, a context menu appears. Click " Properties». 
If in the section " Are common»It is written that the device is working normally, it means that there is a malfunction in something else. And if there is an error, then the driver needs uninstall and install again. 
In order to remove the firmware, you need to go to the tab " Driver"And click" Delete». 
After that, install the driver again from the disk or download the software from the Internet and install, after this the error when the computer does not see the driver should be eliminated.
Selected different device for printing
If you are not connecting the printer to your computer via USB, you should check if other printers and devices are connected to your PC. Then you need to go to " Start» — «» — « Devices and Printers». 
Right-click on the desired printing device and " Use as default». 
Disabled print service
Sometimes the computer does not see the printer when the print service is disabled, so the printer refuses to print. You can fix the problem by going to " Start» — «» — « Administration". Find in the list « Services"And double-click. 
Then select "", just click on it two times. 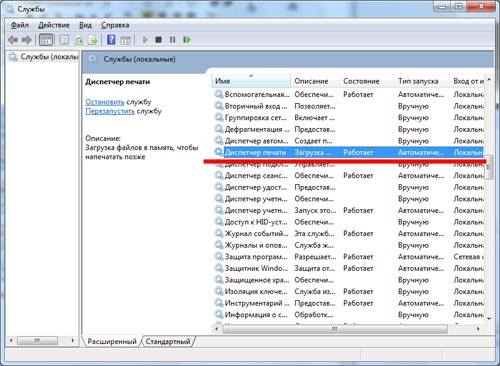
In the service table, you need to make sure that the value " Working"In the column" State". If not, then click on the button " Run"And in the" "field select" Automatically". Then at the bottom click on the button " Apply", Then on" OK ". 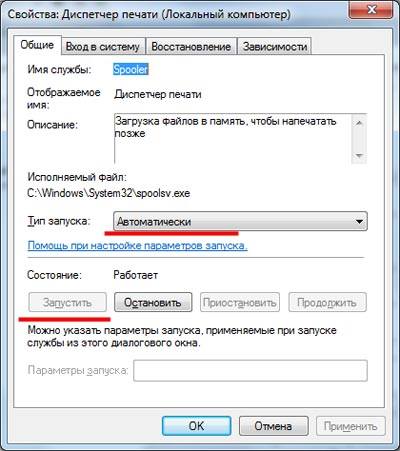
Automatic printing enabled
In some cases, automatic printing is enabled on Windows 10 PCs. This setting can be found in the " system and safety" v " Control panels". Then choose “ Administration» — « Services"-" ", click on it with the right mouse button to bring up a menu, where to select" Properties". Here, the startup type must be selected with the value “ automatically"And the state -" working».
Operating system crash
If all of the above methods did not help, then a failure in the operating system remains. In this case, you will have to diagnose Windows. The reasons for the failure can be:
- Availability viruses in system;
- blocking antivirus;
- wrong settings BIOS.
To find out if there are viruses on your computer, you should scan it for viruses using antivirus software. Moreover, it is better to check with several tools, launching them in turn. This provides a more reliable check.
Sometimes antiviruses themselves block the work of certain processes, mistakenly "thinking" that a virus is running, therefore may conflict and with printer drivers. To avoid such a conflict, simply turn off antivirus at the time of driver installation.
With the help of BIOS, you can configure the components of the system unit and other important parameters. Sometimes the BIOS itself may be incorrectly configured, which is fraught with incorrect operation of the USB ports. Having launched the BIOS, you need to check the state of the ports. You need to focus on the names of these options like USB Function, Legacy USB Port and USB Controller Mode. Then you need to turn on the controller and select “Exit and Save Changes”.
A printer is one of those devices that "accompanies" every computer device, and many users want to know how to connect the printer correctly to the computer, considering that it is quite difficult to do this. Some time ago, this procedure was really not the easiest, but today everything is different. And you yourself can easily cope with this task.
Connecting the printer to a PC: methods, features
Consider three ways in which you can produce connecting the printer to a PC, namely:
1) connection with a USB cable to install a local printer;
2) network connection of the printer by IP address;
3) connection to a printer installed on another PC.
Connecting a Printer Using a USB Cable
When you unpack and set up the printer next to your computer device, immediately connect the USB cable to it - the end where the plug looks like a simple USB input plugged into the computer. Connect the other end of the cable to your PC. Then proceed as follows.
1) Go to the "Control Panel" and select the "Devices and Printers" section there. You will see a list of all devices that are connected to your PC.
2) On the panel at the top, click on the line "Add printer". A window will open in which you need to select the type of printer you are connecting. Since this is a USB device in our case, select Local Printer.
3) Mark the point "Use the next port" with a dot and click on the field with the names of ports free for connection. From the list that opens, select the name "USB001".
4) The next step is to select a driver for the connected device. In the list with the name "Publisher" find the name of the manufacturer (for example, Canon), and in the list "Printers" find the model itself (for example, Canon LBP5960).
If you cannot find the name of your device, you will need to download the driver and install it manually. Download the driver on the official website, then click on the line "Install from disk ...", specify the path of the downloaded driver and confirm the action by clicking on the "OK" button. Then check the box "Replace the existing (current) driver" and click on the "Next" button. Now do this:
1) Specify the name of your printer, after which its installation and configuration starts.
2) Pay attention to the item "Sharing settings for home PC": if you are at home, cancel sharing, if you work in the office - you can open it to be able to connect to printer and print to it from multiple PCs.
3) Check the box "Use default printer" and click on the button "Finish".
If you did everything correctly, then, looking in the "Device Panel", you will find your "freshly connected" printer there.
Connecting a network printer
In order to install network printer connected to the Internet, click on the "Add Printer" button and select "Local Printer". Only in this case, you need to check the "Create a new port" item, and then select its type - "Standard TCP / IP Port".
You will see two fields: in the first, specify the IP address of the printer, in the second - the name of the port so that it can be identified later.
Your further actions will be the same as in the first case, when the connection was made via a USB cable:
1) select the driver (or install it manually),
2) allow (or deny) general access,
3) mark the printer as primary,
4) close the window by clicking on the "Finish" button.
Connecting to the printer from another PC
It often happens that there are several computers and the user of each of them needs to print. Here is just one printer. How to proceed in this case? It's very simple - connect the printer from another PC over the network and send a print job to it from any network device. More precisely, the task will first go to the PC to which the printer is connected, and from there it will be sent to the device.
To print over a network, it is imperative that the printer be shared. To do this, go to the "Properties" of the printer, go to the item "Access" and there check the box for opening access, specifying the network name (for example, it can be Xerox WC 5010). Click on "Apply" to save the settings.
Next, on all PCs that you want to connect, go to "Devices and Printers" and click on the line "Install a printer". Again, select "Local Printer" and create a new port - "Local Port".
A window will open in front of you where you will need to register the full path to the printer, that is, specify the name of the computer and the network name of the printer. It may look like this: \\ AndreyPB \ Xerox WC 5010. Here AndreyPB is the name of the PC to which you want to connect, and Xerox WC 5010 is the name of the printer (you specified it when you opened the general access). Then do the following:
1) click on "OK";
2) substitute your printer driver, for which: 1) click on the line "Install from disk"; 2) specify the path to the folder where the downloaded driver is located;
3) select the default printer;
4) close the installation window.
As you can see connect the printer to the computer not difficult at all and you can easily handle it.


