Touch ID is a unique fingerprint reader technology. It is equipped with such versions of mobile gadgets from Apple as iPhone 5s, iPhone 6 and iPhone 6 Plus. According to the manufacturer, this technology is more advanced in models of the sixth line. However, many users often complain on forums that Touch ID is a rather poorly functioning element in both the first and second versions.
The idea behind Touch ID is certainly a good one. And not only in terms of marketing, but also for practical use. Using Touch ID, the owner of an iPhone can unlock his device, log into the “accounts” of some programs on the network, and make payments using Apple Pay. But this is only if the technology functions smoothly, which is not always the case. As in any electronic mechanism, Touch ID sometimes also has problems. How to deal with them? Let's figure it out.
Firstly, if problems were discovered after a recent firmware upgrade to OS version 9 (or more recent versions of iOS), a downgrade may be required. This term refers to the rollback of the system to a previous version. But if the problems are not that serious, the best solution would be to wait for the next update.
All other problems are often caused by misunderstandings that do not imply anything serious. Therefore, the user can solve most of them independently, without going to a repair shop. Moreover, there are not many such problems, and the methods for solving them have long been known. In this article, we will look at each problem and how to solve it in detail.
It often happens that the fingerprint does not work on the iPhone 6 or iPhone 5S. If a system malfunctions, experts recommend making a simple reconfiguration. In other words, you need to retrain the gadget to recognize a fingerprint. When the first scanners appeared, Apple was concerned with annual software updates for them. This is done so that the devices remember the fingers of their owners as best as possible.
Significant optimization in this area was carried out in the eighth version of the operating system. But as the practical experience of many users has shown, if the fingerprint is not regularly refreshed, after about a month Touch ID will begin to malfunction. The reasons for this are usually the most banal, but they are basically cosmetic in nature (the fingerprint has worn out, dry skin on the finger, and similar misunderstandings).
Considering the above, if Touch ID glitches on the iPhone 5S you need to update the fingerprint in the gadget’s memory. But before the procedure, you need to thoroughly wipe the surface of the display and wash your hands. Then you should go to the iPhone settings, and after that - to the Touch ID password section. In this case, the earlier fingerprint must be removed by swiping, moving across the display from the right side to the left. After this action, you need to click on the add a fingerprint button and again carry out the usual operation of entering a fingerprint, in accordance with the instructions.
Touch ID doesn't work in the App Store
This, like the previous problem described, occurs quite often. And this usually happens due to the fact that the scanner does not interact with the App Store. As before, the reason most often lies in cosmetic factors. But sometimes the problem occurs due to software problems in the iPhone 5S. Many users note that gadgets based on OS version 8, or rather, the Touch ID technology in them, do not work in this store.
To solve this problem, you need to follow these steps:
- Click on the settings section, and then on the Touch ID and password item.
- Go to the technology usage section and disable the App Store.
- Reboot the device system.
- Return to original settings, enable App Store.
After all the steps have been completed, the Touch ID bug in the store should be automatically removed. Let us also remind you that if the user has not made purchases in a store during the day, when entering the store again, the system will prompt you to enter a password.
The fingerprint scanner doesn't work at all
It happens that the scanner itself fails, that is, it simply breaks. Although this happens extremely rarely.
A breakdown can be signaled by complete inoperability of the technology after the update. In this case, you can try “Hard Reset” by performing a backup procedure first.
But if the issue is a malfunction of the iPhone 5S software, a hard reboot usually solves the problem 100%. Otherwise, the user will have to seek repairs, since it is impossible to do without competent diagnostics of the device.

Touch ID stops working in cold temperatures
According to statistics, glitches in the operation of technology in winter or in cold conditions occur much more often. As always, the explanation for this phenomenon is simple. It's all about changes in the papillary pattern of the fingers, which changes when weather conditions change. Of course, it is not possible to detect such changes by eye. But smart Touch ID immediately detects them and reports failures.
As you might have guessed, this whole issue is also treated through updating the fingerprint. But here everything can be made even easier. All you have to do is complete and save your “winter” fingerprint in the device’s memory. To do this, you need to do the procedure as soon as you come from the street, and your fingers are still cold. Although, this is not a guarantee of a successful solution to the problem. According to reviews from iPhone owners, the above methods do not always cope with the situation.
If the scanner does not work in dirty or damp conditions
There is no need to go into long explanations here. Obviously, moisture and dirt prevent the system from scanning a fingerprint. We are talking about the presence of dirt or moisture not only on the finger itself, but also on the surface of the scanner. Therefore, before the operation, you need to wash and dry your hands well and carefully wipe the scanner with a dry cloth.
But you should remember one important point: you don’t need to keep your hands in water for a long time when washing, as this will cause the skin to swell and the papillary pattern will change significantly.
However, Apple guarantees fans of its products that in the new sixth line of gadgets labeled S, Touch ID works more effectively with wet surfaces. But at the same time, the developers still do not recommend using the scanner when your hands are wet.

Breakdowns after repair: causes
In simple words, during the process of repairing the device, the cable between Touch ID and the telephone board may be damaged. This leads to the fact that the system is no longer able to determine the authenticity of the fingerprint. And after that, the gadget deactivates the biometric sensor. In such a situation, replacing individual elements in order to improve the operation of the technology is impossible. The IDs between the Secure Enclave and a third party sensor simply will not match.
If the cable is completely damaged, then restoring it is an impossible task. The fact is that it includes ten tracks consisting of several layers. And the thickness of each track is a tenth of a millimeter.
The situation is different with the elements of the Home button that regulate the process of registering a click. Replacement is a simple matter. However, from now on, unlocking the device will be available exclusively through a password. It's easy to identify a broken Touch ID through settings. To do this, you need to carefully consider the menu for adding new fingerprints. It should be gray if there are any faults.
The only method of obtaining a properly functioning sensor with fingerprint technology at its core is to use elements of another device. This means you will need to install a new board and home button. However, this repair will be very expensive for the user. In such a situation, it is advisable to purchase a new iPhone. Of course, if Touch ID technology is very important for the user.
The Touch ID function was specially designed for Apple smartphones to unlock the gadget, make purchases, and easily log into social networking and mail accounts by scanning a fingerprint. One button responsible for many functions is certainly convenient, but what to do if Touch ID does not work on the iPhone 6? This happens during periods of severe frost and the fingerprint is difficult to recognize. But this is a minor defect that can be easily corrected. In this article we will look at more serious reasons for the failure of the touch ID.
Symptoms of a malfunction:
- The device does not recognize your fingerprint
- Resetting previously configured fingerprints
- The gadget freezes during the scanning stage
- The scanner does not respond to touch
- Can't access other apps
Why doesn't Touch ID work on iPhone 6?
The main reasons are as follows:
- mechanical impacts in the form of shocks, falls from a height, as a result of which the scanner cable is damaged,
- you tried to unlock your phone with a wet finger,
- there are cuts, abrasions and other marks on your finger,
- iOS software glitch
What to do if Touch ID iPhone 6 doesn't work well?
If the cause is software, there is a chance to fix the problem yourself. To do this you need to follow a few simple steps:
- open the touch password settings,
- enter the password to unlock your Apple gadget,
- reset all prints,
- scan your finger again
- Confirm the settings and try unlocking with the sensor again.
If the problem persists, restart your smartphone by holding down the Home and Power buttons. Also, update your software to the latest version. As a last resort, return the device to factory settings. When these methods do not help, all that remains is to come to the specialists at the Re:store service center for help.
Restoring functionality of iPhone 6s if Touch ID does not work
The difficulty of repair is that you cannot simply replace the button or sensor cable. In this case, a complete replacement of the motherboard is needed. Because a specific sensor chip is tied to a specific processor. If the cable is torn, it can still be repaired. In other cases, recovery will not be successful. Don't despair. Our masters, with many years of experience behind them, will bring your pet back to life. Using modern tools and equipment, engineers will carefully dismantle the device, remove the damaged element and delicately install a new one. Our service center has a large warehouse of spare parts, so you can choose between the original spare part and its high-quality copy. Upon completion of the repair, the smartphone must be checked for functionality. The cost, timing and quality of components are strictly agreed with the owner. If Touch ID on your iPhone 6 has stopped working, don’t delay your visit, call us right now!
Deadlines: from 20 minutes
Biometric sensor Touch ID first appeared in Apple devices in . A year later he moved to,. From a pleasant addition for owners of a flagship smartphone, the fingerprint scanner has turned into a real tool for protecting access not only to the mobile device itself, but also to individual applications, and has also become an integral element of the payment system. Unfortunately, Touch ID still does not always work as intended and as users would like. Let's try this to correct.
All the best deals on iPhones (there are even 20 thousand cheaper than the market). They change something and even give it away for free.
In May last year, Roman Yuryev already discussed this topic in detail and described in detail how to set up Touch ID so that you could then forget for a long time about malfunctions of the sensor and manually entering a password. Unfortunately, over time, the algorithm of the fingerprint scanner still begins to work with some “quirks”, which subsequently only become more frequent. For example, after switching to the iPhone 6, I was completely delighted with the updated Touch ID - it worked perfectly and smoothly for more than a month, and then suddenly began to fail, and this happened more and more every day.

The main thing is not to give up your hands, or in this case your fingers. The problem can be solved, using improvised means and will not require much of your time. This method was first described about a year ago, but for some reason it was ignored by most thematic resources, although the method really works, as I was convinced of from my own experience.
So, the best way to start is to delete all the prints and set them up again, as described in last year. After this, restart your smartphone, ending all applications first. Maybe these steps are unnecessary, but let them be for the purity of the experiment. Now let's go to Settings -> Touch ID & Password-> Enter the password, if necessary, and get into the very menu where your fingerprints are stored.

Now - attention - no more manipulations or transitions are needed, just touch the scanner the same way you do to unlock your device. Please note that when you hold your finger on the sensor known to the system, one of the prints in the list on the screen illuminated. This is the fingerprint of this finger, and you have just performed an additional scan of it, the results of which iOS saved somewhere in the system on the chip.

It happens in such a simple way Touch ID training, the biometric sensor receives additional pictures of your finger and can use them to unlock. Take five to seven minutes to properly scan each of your saved fingers, applying them to the button while in this menu. Each time one of the prints is highlighted, it means that the procedure was successful. Additional scans of your finger will appear in the device’s memory, and Touch ID will work much better, the actuation process will be noticeably faster.
Once again, each finger is different, many times - the result will be noticeable immediately and will continue with everyday use of Touch ID.
![]()
ATTENTION! All procedures listed below must be performed by professional engineers. Don't try to repeat them! You can damage some components and completely “kill” the entire smartphone without the possibility of recovery!
Tools and preparation
To disassemble and reassemble the iPhone 6, the following tools are required:
- plastic tweezers;
- plastic opening tool (spatula);
- a set of necessary screwdrivers;
- special thin knife.
Under no circumstances should you use improvised means, kitchen utensils or household tools: a regular knife is too thick for the tasks being performed. Getting into a smartphone for half a hundred thousand rubles is only necessary with the right tool.
Also used is a small plastic container with several compartments in which we put microscopic bolts. If you drop them on the floor, there is a high risk of losing them forever and not being found even with a magnifying glass and a flashlight.
The bolts and components themselves are grouped by the area from which they come. This significantly speeds up the subsequent assembly process.
IMPORTANT! Do not mix up bolts. Almost every bolt has its own length and thickness. When screwed in, it can damage the caps on the main board. And as they scroll, they cause breaks in the contact tracks.
We disassemble the iPhone 6
We put all the tools nearby, it is advisable to use an office lamp.

1. Turn off the smartphone, wait 10 seconds. Unscrew the two bottom screws. The bottom of the display should rise slightly.

2. Take a spatula and carefully pry off the bottom of the display. Pull it up and the display clicks out of the grooves along the edges. If this does not happen, then you need to pry the frame with the thin part of the blade and lift it away from the body. It is important not to rush and be sure to start from the bottom, and, on the contrary, not pull the top part.

3. Having freed all the grooves of the display, open the iPhone like a book. Smoothly.


4. Holding the display, we begin to unscrew the screws from the upper protective shield. There are only five bolts. You need to be very careful - they are very easy to lose. Then we pry up the shield with tweezers and place it next to the unscrewed bolts. It is better to use plastic tweezers to remove all metal parts.

5. The next task is to turn off the power to the smartphone. At the bottom of the case we find a shield smaller than the previous one and remove two screws from it.

6. Under the shield closer to the battery there is a folded cable. We take a spatula and very carefully pry it from below, bending it towards the battery.

7. Return to the display module. It is connected to the main part of the smartphone with a composite cable with two connectors. Again, use a spatula to pry up both cables, pull them up, and disconnect them from the body.
Removing components from the screen module

Contrary to popular belief, iPhone display modules do not have built-in speakers, their own TouchID button, some important cables, or a front camera. All these components must first be removed from the old module. If it is very broken, then some components will have to be ordered separately.
In our case, the upper part of the module was severely damaged - it bore the brunt of the impact. This means that removing the necessary components will be difficult (but possible). This is even better for the sake of example.

1. On the back side of the module, unscrew the 3 bolts from the bottom shield, then remove it with tweezers. The shield covers the components of the Touch ID button, which we need to move.


2. ATTENTION. This is the most dangerous moment when replacing the display. Our task is to pry off and disconnect the connectors of the TouchID button cable. It is very soft and incredibly thin. You will need thin tweezers, maximum care and surgical precision: we feel for the connection point, carefully disconnect it, and then bend the cable in the opposite direction from the button. If the cable is damaged, the iPhone can be thrown away; it can no longer be restored.

3. Remove the Home button. You can’t even imagine how many home-grown “repairmen” got burned at this stage. Every day the iRepair service center receives calls from victims.

4. Move to the top of the module. You need to disconnect the large composite cable on which the front camera, speaker connection contacts and proximity sensor are located. In addition, you need to remove the plastic ring of the camera and the centering ring of the proximity sensor. We do everything according to the standard system: we pry up the cables, and take out the rest with tweezers. Here, some of the components are attached with double-sided tape, so when we are not dealing with a cable, we use a thin utility knife.


5. In our case, the cable is removed with a piece of glass - they need to be peeled off very carefully. The same goes for many other elements. The glass must be completely and very carefully removed. Even a microscopic fragment - practically dust - can affect the operation of a smartphone. For example, if he jams some cable during assembly, he can disable one of the device’s functions. And dust or glass that gets into the connection connector can break the entire contact.


6. Once all the components have been cleaned and removed, unscrew the bolts from the metal shield and remove it. We unhook the large cable that runs through the entire old module and start working on the new one.
Transferring components to a new module


Next, the main thing is to put it as it was. The placement of connectors on the cables does not leave much room for errors. The main thing is to place the metal shield not under the train of the upper part, but above it. Many people get confused, and as a result, we can cause stains to form on the matrix.
We again pay maximum attention to the TouchID cable. Under no circumstances should it be damaged!
To reassemble the upper module you will also need double-sided tape. It is necessary to cut thin strips of small size and carefully apply them with tweezers.
Assembling iPhone 6
With the module assembled, the entire process takes 2-3 minutes. We tighten the shields. We put the display cables in place, connect the lower micro-power cable. Then we test: turn on the smartphone and look at the new display. We wait for the download, check the touchscreen.
We attach the module with a click to its rightful place and tighten the two external bolts. Mission accomplished!
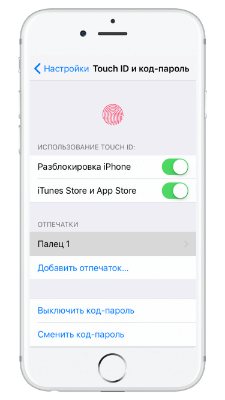
Touch ID is a useful and convenient identifier not only in the iPhone but also in other Apple devices. Very often we hear from owners that touch id doesn't work on iPhone or iPad. In this article, we will figure out why the fingerprint sensor does not work or shows a notification that a failure has occurred.
Touch ID doesn't work - what to do
If Touch ID does not work or simply crashes frequently, we recommend that you reset the fingerprints in the device. By the way, delays in Touch ID operation may appear after updating iOS.
Before updating your fingerprints, thoroughly dry the surface of the scanner on your iPhone or iPad, and even better, wash your hands and also dry them thoroughly so that they are not wet, greasy, and so on.
- Go to "Settings".
- Enter your password code.
- Delete previously entered fingerprints (swipe from right to left).
- Add fingerprints again.

|
|

|
The optimization of the operating system does not stop, Apple engineers improve and add new features and in this regard, some data, for example, the same fingerprints in the touch ID, need to be updated.
Why Touch ID stopped working in the App Store
Often in the App Store, Touch ID may also stop working. As a rule, such a problem is also associated with the software and is a common malfunction.

If touch id stopped working in the App Store, follow these steps:
- Go to "Settings".
- Enter the "Touch ID and passcode" tab.
- In the "Using Touch ID" feature section, turn off the "iTunes Store & App Store" slider.
- Exit Settings and reboot your device.
- Then we go back to "Settings" then to the tab we need "Touch ID and passcode".
- Switch the slider "iTunes Store and App Store" to active mode.
After the steps above, the “glitch” with Touch ID in the App Store should be resolved.
Touch ID stopped working altogether
If the above instructions did not help you, then you need a hard reset. If the problems were of a software nature, then this method will help restore the functionality of Touch ID. Of course, the possibility that the sensor has simply failed cannot be ruled out; in such a case, we recommend that you contact the service center for help in troubleshooting.
Touch ID stopped working in winter - what to do

According to statistics and reviews, it is already known that the fingerprint scanner on the iPhone/iPad works worse in winter at low temperatures. This is explained by the fact that due to the cold, the papillary pattern slightly changes. This change is difficult to notice with the naked eye, but the Touch ID sensor notices this change and stops recognizing the fingerprint.
How to fix it: if you often have to be in the cold, we recommend adding the same fingerprint but this time “winter”. Accordingly, you must do this in low temperature conditions so that the Touch ID sensor remembers the modified fingerprint in cold conditions.
Why the fingerprint sensor doesn't always work well
There are situations when your fingers are not completely clean and not completely dry, so dirt and moisture can prevent the fingerprint from being read. Here are recommendations only for the hygiene of your hands - use the Touch ID scanner with dry and clean hands.
Have you ever experienced problems with the fingerprint scanner on your iPhone or iPad? Share your experience in eliminating Touch ID glitches in the comments.