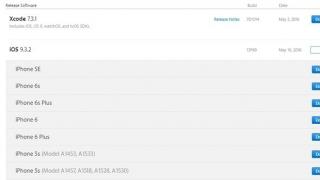
- laptops Acer, Sony, Samsung, MSI, Toshiba, HP, ASUS ...
- and how to use it!
- differs from booting from a floppy drive on a desktop computer.
- on any computer, laptop, netbook.
- let's think about why it is not possible to boot from a USB flash drive.
- or how to configure correctly two IDE hard drives on one cable.
- error when starting up the computer, how to deal.
- how to reset BIOS settings to default.
- if you cannot enter the BIOS itself
When you turn on the computer, the first thing is to test the equipment for operability, in simple words, it kind of checks itself, this is the so-called procedure (POST), then the relay baton is transferred to a special program (MBR), which chooses from which partition on the hard disk to boot operating system, and so before this choice, we must boot from a CD or from a USB flash drive, as in our article.
How do I enter (BIOS)? If by some miracle you still have instructions for the motherboard, then it is sure to be written about it, if not, then when you turn on the computer, we look at the inscription on the monitor, it may look like this: Press DEL to enter SETUP, that is, in order to enter ( BIOS), you need, while the inscription on the monitor is on, press the key several times
The inscriptions may be different, there may not even be any inscriptions, this should not confuse you, in most cases these are the F2 or Delete keys, less often F1, even less often
Ami BIOS
Award BIOS

BIOS: Boot from disk
For many who will do this for the first time, and do something wrong, important information will sound, if you changed unfamiliar parameters, you need to go to the (Exit) tab, it is located from the (Boot) tab on the right after the (Tools ) and underlined in red in the photo. Next, you need to follow the arrows on your keyboard to the item Load Setup Defaults, and press Enter, then go to the menu.

Load Setup Defaults will apply the default settings (BIOS), and they will be what they were before your experiments, select OK and the settings are reset to default, remember this.

Let's return after all these necessary digressions to the main topic and to the first photo. We need the Boot item, select it with the arrows on the keyboard, press Enter and then go to the Boot Device Priority item.
To boot from the disk and install, you need to go into the BIOS of your computer, for this you need to reboot and press the DEL button almost immediately, on some motherboards it is replaced by the F2 button, even less often with some other buttons.
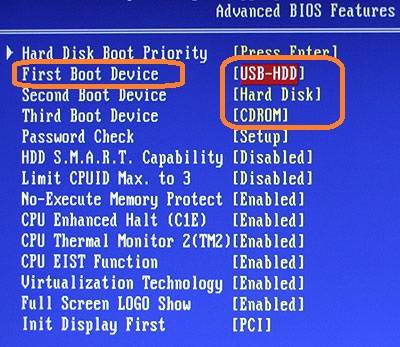
After the BIOS has opened, you need to install the boot from your OS media (DVD or flash - depending on what media you use to install Windows 7). This section can be found in different sections - it depends on the manufacturer of the motherboard and BIOS, but it necessarily contains the word BOOT: look for FIRST BOOT DEVICE, BOOT or BOOT DEVICE. As soon as you find it, install your medium there in the first place - either a DVD or a fLash disk - depending on what your Windows installer is on.
After that, exit BIOS by saving changes (F10 key, then Y (confirmation of saving changes)).
If everything is done correctly, then after restarting your computer you will see:
- if you have an installer on DVD, you will see the inscription " Press any key for load from CD ..."(press any key to boot from CD). Having seen this inscription, you must click on any key, otherwise the Windows installation will not start.
- if you used a flash drive, the installation will start immediately
Start Windows 7 installation.
If the installation has started, you will see the following picture:
Figure 1. Installer Windows 7 copies files from media for further OS installation.
After the installation window will appear Windows 7 :

Figure 2. Beginning of installation windows 7: Select the language, time format and layout to install.
Here we select the options you want, or leave everything unchanged and click Next).
The following window appears " install". We press the button.

Figure 3. Beginning of installation windows 7.
Here you can read the license agreement Microsoft and press the button again Further"(Figure 4).

Figure 4. License agreement for use windows 7.
The installer will now prompt you to select an installation type.
- A system update will allow you to install windows 7 on top of an existing operating system.
- A full installation will allow us to select an existing partition to install or re-partition the hard drive. The system will be installed cleanly, so this option is more acceptable for us.
Therefore, we will choose " Full installation (advanced options)"as shown in Figure 5.

Figure 5. Selecting the type of operating system installation.
After proceeding to the full installation, we will be presented with a list of hard drives on which you can create or select partitions for installation. In Figure 6, you can see a disk of size 35 Gigabyte.
Personal experience suggests that for section with windows 7 it is better to use a partition with a volume of at least 50 gigabytes t - so to speak " for the future".

Figure 6. Selecting a hard drive for further installation windows 7.
Going to the hard drive on which the installation will be performed, the operating system will offer you a list of the partitions created on the disk. In our case, no section has been created yet, so we click on the " create"(Figure 7) after which we indicate the volume of the section being created (Figure 8) and click on the button" to apply".

Figure 7.
Figure 8.
After that the installer windows will inform us that an additional partition will be created to store system files windows(figure 9)

Figure 9.
Now you can click on the " Further", then the installation of windows 7 will start (copying all system files and the process of setting up the OS).
As before, you can follow the steps of copying and installing the operating system (Figure 10)

Figure 10. Installing windows 7.
After completing the installation of OS components, the computer will restart. At this point, you must delete DVD disk or Flash drive from the computer, since the installation will continue from the hard drive to which the necessary files were copied.
After rebooting, you will see a window with the completion of the installation windows(figure 11)

Figure 11.
In a few minutes, the installation will be completed and the initial configuration of the operating system will start.
When the setup process comes to an end, you will be prompted to enter a username to create your account, as well as a computer name for subsequent network identification (under this name your computer will be visible on local networks windows) (Figure 12).

Figure 12. Entering the username and network computer name for the installed system.

Figure 13. Setting a password for an account (optional).
The next step is to activate your version windows with the help you received from the site Microsoft(or another Internet resource from which you downloaded the distribution kit windows 7) key.
It is advisable to activate your copy the first time you connect to the Internet windows 7.
If at the time of installation you do not have a license key(picture 14) - you can click "Further", after which the initial setup will continue OS, but you will need to activate windows within 30 days. Because windows 7 rc available to users for free, license keys for installation are published on many sites, and you can also get the key on the site microsoft, together with the product distribution kit.

Figure 14. Entering the windows 7 license key.
The next step will be to offer to accept the recommended settings. windows 7(Figure 15): Automatic installation of important updates, etc.
In this case, it is better to select the item "postpone the decision" after which you will be able to make a decision on automatic updates in the future, as well as select the operation parameters Internet Explorer(if you use this browser).

Figure 15. Selecting the initial settings for windows 7.
Now it remains to check the time zone and date (Figure 16).

Figure 16. Setting the date and time.
In case if windows detects and successfully installs network adapters, then you will be prompted to select the type of your network: read the proposed options and select the option that suits you best (Figure 17)

Figure 17
After completing this process, the system will become available for operation (Figure 18). Installing windows 7 will be finished.

Figure 18. Desktop of installed windows 7.
Download Very high quality version of Windows 7- simultaneously 32 and 64 bit, with a bunch of skins you can right here:
For technical reasons, this assembly is currently not downloaded, but you can download it in the format of a flash drive:
This version from comrade Idimm, everything unnecessary is cut, everything you need is left, everything together weighs 4 gig, uploaded to a fast file sharing service, it was installed on several dozen machines, no glitches, problems with drivers, etc. were observed on this assembly. So I strongly recommend downloading this image, albeit an old one, but the updates can always be downloaded by Windows itself, and you will have 32 and 64 bit sevens on your disk at the same time, which is very handy.
So you have learned all the basic information on how to properly install WINDOWS 7 on any computer, if you have any questions, or some point seems incomprehensible to you, please write in the comments or on the forum.
Partially taken from esate.ru
Instructions
Purchase a licensed version of the operating system. When choosing, rely on the specifications of your personal computer. If you own a PC of the latest generation, then get Windows 7 or Vista. For those with an older computer, Windows XP is recommended.
Copy all important files from your computer to removable media to avoid losing information.
Insert the operating system disc into the PC drive. Reboot your computer. While the BIOS is loading, press the key to open its menu. For different personal computers, you need to press different keys, for example, F2 or DELETE.
In the window that appears, select the boot priority tab of the media. Place CD / DVD-ROM first and Hard disc second. Save the settings and reboot the system.
The DVD menu appears. disk with the operating system. Select installation mode: automatic or semi-automatic. It will automatically copy the root files to your personal computer.
After all files have been copied, an automatic reboot will be performed. A list of virtual partitions will appear. Select where the operating system will be installed. Press the “F” key to format the partition. You can also delete one of the sections or add an additional one.
Format the system in NTFS format, as it is more adapted for modern computers and operating systems.
Provide an account name during installation. Set a password if necessary.
After installing Windows, update all drivers for your personal computer.
Related Videos
note
Installation can take 40 to 60 minutes.
Helpful advice
Use only licensed versions of Windows. This is a guarantee of quality and technical support.
Most often, CD / DVD drives of a computer are used to install a new operating system - it is most convenient for manufacturers to distribute OS distributions on such media. The installation procedure takes, as a rule, from half an hour to one hour, it is not particularly difficult, but it requires a little preliminary BIOS setup.
Instructions
Change the order in the BIOS to poll devices so that the DVD drive is queued higher than your computer's hard drive. To do this, you need to initiate a reboot and wait for the prompt to press the Delete key (or f1, f2, f10, Esc, etc.) to enter the BIOS settings (Press DEL to enter Setup) in the lower left part of the screen. After pressing the required button, find the section that contains the desired setting in your BIOS version - it can be the Boot or Advanced section, and the setting itself can be called Boot Device Select, Boot Sequence or Boot Drive Order. In any case, you need to put the CD / DVD-ROM Drive line in the first place in the list.
Insert the DVD with the operating system distribution into the reader, and then exit the BIOS settings panel, answering affirmatively to the question about the need to save the changes made. A new computer reboot cycle will begin and, depending on the BIOS version, a confirmation message may appear on the screen to boot from DVD - press any button and the preparation process for OS installation will begin.
Select the partition where you want to install the new operating system - this question will be asked by the installer. Once you make your choice, you will have the option to format this partition or keep the existing filesystem. If the selected partition is in NTFS format, then refusing to reformat will save installation time. When the hard drive is ready for OS installation, the installer will restart the computer and begin the installation procedure.
Do you want to know how to install Windows 7 on a laptop for free? Faced the need to reinstall your operating system, but do not know how to do it? Our step-by-step installation guide will help you find answers to these and many other questions.
We will tell you about three options for booting Windows 7: from a USB flash drive, a CD, and directly from a computer. In addition, you will learn how to configure BIOS for any of these options. Our instructions for dummies will help you reinstall Windows and solve other related problems on your own.
Undoubtedly, installing Windows is much easier than, for example, installing an android, nevertheless, we have to figure out something.
Important: read before starting installation
When installing Windows 7, the first step is to determine the characteristics of your computer. If its RAM is less than 2 GB, then a 32-bit operating system (OS) with an 86-bit platform is suitable for you. Most modern laptops have more than 2 GB of RAM, in which case you can safely install a 64-bit OS.
Information about the amount of memory can be obtained by opening the properties of the computer. Right-click on the "My Computer" icon on the desktop, select properties from the menu, and see what the Installed Memory (RAM) is.
Preparing to install the OS
Do not forget that the partition on which you are installing will be formatted and the information will be deleted. All the data you need should be saved in the section of the computer that will not be formatted, or on external media.
To install, you need a bootable CD or USB flash drive where Windows 7 is located. Another option is a virtual system image, the specifics of working with which are described below.
Burning the distribution disc
To create a bootable disk from scratch, we need:
- a clean blank that needs to be checked for damage and dirt, since any defects can lead to failure during recording;
- ISO image of the OS downloaded from the Internet;
- program for recording.
There are a lot of programs: Nero Burning Rom, UltraIso, CDBurnerXP, InfraRecorder. In this case, we will use the modest Small CD-Writer utility, which must first be downloaded and installed.
After installation, we perform the following actions:

Thus, if the startup process on the computer is not disabled, and everything has been correctly recorded, then a menu should appear from which you can start installing Windows.
Sometimes PC users wonder how to install Windows 7 on a laptop without a disk and a flash drive? This installation method is possible, but only if there is a valid operating system on the computer:

BIOS options for booting from DVD
If you need to boot from CDs, you need to perform the same manipulations as when booting from USB, with the only difference - when specifying the boot location, instead of Hard Disk, you need to select CD ROM.
By the way, on some computers you can specify the boot device without going into the BIOS settings. If during the reboot at the bottom on the black screen you see the inscription Select Booting Device, then you have such an opportunity!

Pressing the corresponding key brings up a simple menu.
To select a hard drive or flash drive, we need:
- go to Hard Disk, and use the Enter key to select the desired device, for example, a USB flash drive. If booting from disk is required, select CD ROM;

After installation, you need to return to BIOS and set the First Boot device - your hard drive.
Installing Windows 7 on a new laptop
If you purchased a new computer on which the OS is not installed, then you will need to install via BIOS. In addition, it may be necessary to install Windows through bios (BIOS) after replacing the hard drive or in another case when other methods are not available.
You will need a removable medium - a disk or a bootable USB flash drive.
First you need:

In our case, this option is not suitable, since we are installing Windows on an empty laptop without an OS.
Therefore, we have two other options: if you need to boot the system from a CD, select CD ROM, and if from a flash drive, then USB-HDD.

After the performed procedures, the computer will start to reboot, and during boot on a black screen you will see the inscription "Press any key to boot from cd or dvd". We press any button, after which windows starts loading from the selected device.
Installation start
We made the BIOS settings, connected USB to a laptop, or put a CD in the drive. A reboot takes place, then the text appears on the screen: "Press any key to boot from CD / DVD". Click on any button, thereby starting the installation of the OS.
Installation language
We will be asked to select the installation language, then the input language, as well as the language of the Windows OS interface.
Then click Install Now and read the license agreement, which must be confirmed by checking the box next to the inscription: "I accept the license agreement."

type of instalation
One of two ways can be used here:
- full installation, which is supposed to format the hard drive. It is also called a "clean install";
- an update to an earlier version of the OS currently installed on your laptop.
In the event that you have no important data left on the disk being formatted, it is preferable to choose the first option.
Video: Install Windows 7. Step-by-Step Guide
In which section to install
A pre-partitioned hard disk has several logical partitions. The OS partition must be formatted for a clean install.
If you want on your laptop, along with the already installed OS, for example, with Windows 8, Windows 7 acted as the second system, then it should be installed in another logical partition of the hard disk. Make sure that there is enough free space in the marked section for these purposes.
If you install Windows 7 into an unformatted partition with an identical version of the OS, then all the old data will be placed in a separate Windows.old folder, and you will be able to view the files of the old system, or you can delete it.
Formatting a partition
We select the section we need. Please note that we now have the opportunity to delete, format or create a new partition on the hard disk. Windows Installer can only access Quick Format, which is used to completely erase data.

Copy files and reboot
The program will copy the files, rebooting several times in the process. Then the OS will configure and check the hardware, after which it will ask you to enter the computer name, as well as your name, in order to create an account.
Activating Windows
The system will ask you to provide a product key. You can also skip this step. Without activation, you can use Windows for another 30 days. After the product key is entered, you must confirm the activation.
Unlicensed versions of the OS can be activated using special programs.
Installing drivers
After the OS is installed, you need to take care of the drivers, without which the computer will not be able to work properly. Currently, there are various builds of Windows with built-in drivers, but there is nothing better than using the "native" ones, which are usually found on the disk that came with the laptop, or posted on the manufacturer's website.

Programs and utilities for working in the system
There are many different programs and utilities that you cannot do without when working on a computer. First of all, you need an antivirus, which it is advisable to install before going online. Then you will definitely need an archiver, an Internet browser, and various codecs. And if you work with documents, you also need office programs, such as Microsoft Office.
OS optimization
Optimization is needed to improve the performance of your computer.
The main points that can be noted to improve its work:
- disable visual effects. Sometimes external effects interfere with good performance, this is especially noticeable if an insufficiently powerful processor or a small amount of RAM is used in the computer filling;
- disabling autorun of unnecessary programs. Unnecessary programs in autoload load the processor and prevent it from performing the necessary actions;
- disabling unnecessary services. We absolutely do not need some services used by our computer;
- removal of gadgets. Gadgets make it easier to work on a laptop, but at the same time, they waste system resources. You shouldn't install them unnecessarily;
- removal of unused programs;
- removing unnecessary shortcuts from the desktop.
Video: Optimizing the Operating System
Windows 7 itself can tell you the necessary steps for optimization:
- click Start;
- go to the control panel, select "Counters and productivity tools";
- and now next to the "?" search for “Tips to improve your computer's performance,” read and follow the instructions.
Installation errors
Occasionally problems arise when installing Windows. For example, the OS cannot be installed. Or the laptop throws an error while using it.
Users often face such difficulties as:

Hello readers of my blog! Many people think that installing Windows is a complicated procedure, but in reality everything is not that difficult and an experienced user can do it on their own.
Today I will tell you how to install and (or) reinstall Windows 7.
If you decide to reinstall Windows, then in addition you will have to reinstall all programs and drivers.
So, let's begin….
Part 1. Preparing to Install Windows 7
Step # 1. Backing up information
1. Before reinstalling the windows 7 operating system, check how many disks you have on your computer (Icon: “ My computer”). The system is usually installed on the system drive [ C] (there must be a folder on it: “Windows”). During the reinstallation process, the [ C] will be formatted and all data from this disk will be deleted!
If you have only one disc, then you must copy all important information to a USB flash drive, portable hard drive, or CD / DVD disc (s)! These are your documents, photos, music, films, etc. (Folder: "My Documents", Desktop, bookmarks of your Internet browser, your mail, etc.).
Or divide the disk into two logical disks (if the free disk space on it allows) (but this is a topic for a separate article: “”)
If you have two or more disks, then copy all important data to other disks in your system (usually they are denoted by letters: D, E, F, etc.), and you can also duplicate it to a USB flash drive, to a portable hard disk or on CD / DVD disc (s).
2. Find the device driver discs for your computer or laptop. As a rule, such discs are supplied with a computer or laptop.
It is best to download the latest drivers for the motherboard chipset, video adapter, network card and other computer components from the websites of their manufacturers.
Well, if your system does not work at all or Windows is installed from scratch, you can use the driver assembly:. To do this, you need to download it and burn it to a DVD ± R - disc (blank). (How to burn discs is described below ...)
Step # 2. Preparing a disk with a Windows 7 distribution kit
If you already have a Windows 7 distribution disc, you can skip this step. If you do not have it, then you need to burn it (ideally, purchase an original disc). If you download the Windows 7 distribution on the Internet, then look for clean MSDN builds of Windows 7. They will be the least problematic.
To burn a disc with the Windows 7 distribution kit, we need:
- Original Windows 7 disk image in .iso format.
- Utility: “” to write an image to a disk (you can use other utilities to write to a disk);
- Blank DVD ± R disc (blank).
First, install and run the utility downloaded from the link above:
(all pictures are clickable ...)

On the menu " Create / burn disk image"Select the item:" Write downCD /DVD /Blue-ray disc from disc image”.
Click on the button: " Overview"And indicate where the Windows 7 image is located:

Insert a blank DVD ± R disc into the drive. Press the button " Write downDVD»

We are waiting for the disc to be written:

Now you're done:

The Windows 7 distribution disk is ready!
Step # 3. SettingsBIOS
In order for the boot disk to boot when you turn on the computer, you need to make the appropriate settings in bios.
Every time your computer is turned on or rebooted, the system boots up in accordance with the BIOS settings.
Determining the boot order of devices is also one of the important BIOS parameters. This is what interests us. To do this, when you turn on (restart) the computer, you need to press a certain key. As a rule, at boot, at the bottom of the screen it is indicated which button to press to enter the BIOS. Usually these are F2, Del, Esc and others.
After entering the BIOS, you need to find where the boot order is configured. These settings are usually located on the “BOOT” tab, although on your computer they may also be in another BIOS menu. To change the boot order, usually use the F5 / F6, + - or arrow menu. How to change the boot order should also be indicated in the instructions or in the BIOS itself.
So go to BIOS and go to the "Boot" tab, then click on the "Boot Device Priority" tab. (Your BIOS may be different, but the meaning is the same) ...

Place your CD / DVD drive on the first place in the boot list, save the settings and exit the BIOS. Usually for this you need to find the item “Save and Exit Setup” in the BIOS.

Now that all the preparations for installing Windows are completed, and we are armed with a boot disk, you can go directly to Install Windows 7
Part 2. Install Windows 7
After all the preparations for installing Windows 7, we come to the most interesting thing: directly to the installation of Windows 7.
When booting from disk and the appearance of this inscription, you need to press any key:

In the next window, select the item “ Installing windows”:

In the next window, copying of files for installing windows 7 will start. We are waiting a little ...

After the files are loaded, the Windows 7 installer will start, where we will select the interface language we need:

In this window, we also select the system language and press the button “ Further”:

In the next window, click on the button “ Install”:

Important note: also in this window there is an item “ System Restore”. If you need to restore Windows 7 or access the recovery console, then click on this item.
In the next window, select the version of Windows 7. Select the version to which you have the key. It is indicated on a sticker on the bottom of the laptop or computer case. You will enter the key in Windows 7 at the end of the installation. You don't have to enter it right away, but within 30 days you will have to enter it in the Computer properties.

Agree to the License Agreement and click “ Further”:


In the next window, you will need to select a partition for installing windows 7. Next, click on the item “ Disk setup”:

The Disk Setup window will appear, where you can delete, create and format disks. If you have two or more sections, put on the first section. But first, you need to format it, for which place the cursor on this section and click “ Format”.
OK”:

Note: sometimes, especially on laptops, there are one or two hidden partitions (small, 100-300 MB each). DO NOT INSTALL Windows 7 on them.
If you have two or more sections (except for hidden sections), you can skip this paragraph ...
If you have one section, then it is advisable to divide it into two, i.e. Put Windows7 on the first partition (for example "C"), and everything else (games, music, movies) will be installed on another drive (for example "D"). To do this, press “ Delete", then " Create”.
Note: Please note that all data on this section will be deleted!

In the next window, set the size of the partition and click “ Apply”
Note: Set the size of the first partition for the system in the range 40960-122880 MB (40-120 GB) (The size of the partition is not critical and can vary by you)

The system will offer to create additional partitions for system files. We agree and press " OK”:

So, we see that two partitions have been created, one is the main one, the other is reserved for system files. But there is still free space on the disk, we will use it for one more partition. We put the cursor on the line “ Unallocated disk space"And click" Create”:

The installer will offer to use all the remaining free space for the partition. Agree and click " Apply”:

We see that we now have three sections, including the system one. We will immediately format the third section, and on the second we will install Windows 7 (the installer will then format it itself). So, we select “ Section 3"And click" Format”:

A warning will appear that all data from the partition that you are formatting will be deleted. We press “ OK”:

Now select “ Section 2"And click" Further”To install Windows 7 to this section:


The window “ InstallationWindows”. We are waiting for the Windows components to be installed:

When the system is installed, enter the username and computer name:

In the next window, enter the password (optional) and click “ Further”:

If you have a license key for windows 7 (if you have a laptop with Windows 7, it is printed on a sticker on the bottom of the laptop), then enter it here, if it is not there, just click "Next".
Note: You don't have to enter the license key. You can use Windows without activation for up to 30 days. This counter can then be reset several times.


We indicate the time zone, date and time:

In the next window, the system will automatically offer to indicate the type of network. Choose the type of network connection:

That's all. Windows 7 installed:

In addition, you need to rewrite all the information that you previously copied at the beginning of the article.
Also, after all the operations have been done, you can make a disk image. In the event of a “crash”, system failure, you can return everything to its original state. I will describe how to do this in the article: “How to make a Backup system