4. The organization installs the cryptographic information protection tool (CIPF) CryptoPro version 3.6 on a dedicated computer.
Note: The distribution kit of the CIPF CryptoPro version 3.6 and the license is provided by the Federal Treasury by proxy. Installation/removal of CIPF CryptoPro is carried out by the specialists of the Organization according to the "Instructions for installing software.doc".
5. The organization installs the Continent-AP software on a dedicated computer.
Note: Software Continent AP is provided by the Federal Treasury. Installation and configuration of the Continent AP software is carried out by the Company's specialists according to the instructions given in the file "Instruction for installing the software.doc". Continent-AP version 3.6.7.0 is installed in Win7 OS.
6. The Organization must define a list of officials who, by virtue of their official duties, will have a production need for direct work in SUFD-online.
Note: At the beginning of the implementation of the software “ASFC Portal for DUBP” (SUFD-online), the specified list of persons is determined by the Orders on granting the right of electronic digital signature issued by the Organization in the course of connecting to the FC EDMS and working in the FC EDMS.
If necessary, the list can be adjusted by issuing a new order by the Organization, similar to the existing orders in terms of the FC EDMS. A certified copy of the new Order must be submitted to the Federal Treasury. Generalized information on the corrected list (full names of employees, positions) must be provided to the Federal Treasury for the formation of accounts (“institutions”) in the PPO “ASFC Portal for DUBP”.
7. The Organization must produce ES keys for the employees of the Organization mentioned in the corrected list (See clause 6). Note: ES keys are made by the Organization's specialists according to the instructions "Creating ES keys.doc", located in the archive. The ES key generation program is provided by the Federal Treasury and is available for download at . When generating ES keys in the program, it is recommended to set the extended purpose of the public key certificate to the maximum possible option (This will minimize the likelihood of ES keys being altered due to possible errors when empowering employees of the Organization).
8. Employees of the Organization must receive logins and passwords to enter SUFD-online in a timely manner.
9. At the workplace where work with SUFD-online will be carried out, the root certificate of the Federal Treasury and personal ES certificates of the Organization's employees must be installed in accordance with the instructions below.
II. ES installation for SUFD-online
To install an ES for SUFD-online, you must perform the following steps:1. Go: Start -> (Settings) -> Control Panel -> open "CryptoPro CSP" -> "Service" tab -> "Install personal certificate" button
2. The "Personal Certificate Installation Wizard" window opens, click the "Next" button.
3. In the "Certificate file name" line, click the "Browse" button and select the user's ES key certificate to be installed. This certificate can be located on a removable disk (flash drive, you were thrown off when issuing the ES key certificate in the security department), or the user's ES key certificate can be downloaded from the EDMS (see below).
4. Having selected the user's ES key certificate to be installed, click the "Next" -> "Next" button. In the "Key container name" line, press the "Browse" button, the "Select a key container" window opens where you need to select the key medium on which the user's ES is located and click the "OK" button. In the "Personal Certificate Installation Wizard" window, click the "Next" button. In the next window, when choosing a certificate store, click the "Browse" button and be sure to select the "Personal" -> "OK" store. In the next window, click the "Next" -> "Finish" button.
Uploading a certificate from the EDMS.
In order to download the ES key certificate from the EDS, you must perform the following steps:
Go to EDMS -> Administration -> General -> Remote workstations.
In the “Remote Workstation” window that opens, in the left part of “Automated Workstations”, select the line with the name of your organization, while in the right part of the “Workstation crypto profile settings” the names of all crypto profiles of the workstation users of this organization will be displayed. Double-click (left mouse button) on the name of the cryptographic profile of the desired ES subscriber - the "Cryptographic profile settings" of the selected ES user will open. In this window, in the “Certificates” tab, we look through all the lines with records and find a line with a record whose Status is “active”, the Key is “working” and the validity period has not yet expired. Right-click on this line and select View Certificate from the menu that opens. The "Certificate" window opens. In this window, open the "Composition" tab and click the "Copy to file" button. The Certificate Export Wizard window opens. In this window, click the "Next" button and in the next window that opens, click the "Next" button.
In the "File name" line, click the "Browse" button, the "Save As" window opens. Select the folder where you want to save the ES key certificate file or save it to the desktop by giving a name to the certificate file and clicking the "Save" button. In the next window "Certificate Export Wizard" it will be indicated where the selected ES key certificate will be saved, click the "Next" button. In the next window, click the "Finish" button. Upon completion, the "Certificate Export Wizard" will display a window with the result "Export completed successfully", click the "OK" button. In the folder specified earlier, where the ES key certificate file was saved, or on the desktop, the ES key certificate of the required user of the organization will appear.
Working with SUFD-online
III. How to work with the ARM DUBP Portal
To work in SUFD-online, you must sequentially perform the following steps:1. Establish a secure connection using the Continent-AP program.
2. Launch the Internet Explorer or Mozilla Firefox browser (for browser version requirements, see paragraph 3.4 of the Technical Requirements section). In the address bar, enter the link issued by the UFK
http://10.68.200.12:28081/
The Registration window will open.
3. In the Registration window it is necessary to enter the user's login and password issued in the UFK and click the OK button. If the login and password are entered incorrectly 3 times, then the user will be blocked for 10 minutes.
4. After authorization, a working window will open, in which the document tree will be located on the left. All work is done using the menu tree. In the menu tree, by opening the necessary branches, you must select the documents you need for work. 
5. To work with documents, use the buttons located in the upper part of the screen:
| - Import documents | |
| - Export selected documents | |
| - Create a new document | |
| - Open document for editing | |
| - Create a copy of the document | |
| - Delete document | |
| - Signature | |
| - Signature verification | |
| - Signature removal | |
| - Documentary control | |
| - Cancel Send | |
| - Send | |
| - View document/record entry status change | |
| - Print document | |
| - Print scroller | |
| - Search | |
| - Update list of documents |

6. The main sequence of actions when working with documents in SUFD-online:
- Creating a document (by manual entry, import or copy)
- Carrying out documentary control, elimination of errors if necessary
- Signing the document first with the second, then with the first signature
- Sending a document
IV. How to create and send a document on the ARM DUBP Portal
Creating and sending documents to SUFD-online is performed sequentially:1. Before creating a document, you need to make sure that the organization role is selected correctly.
Changing the role of the organization occurs by selecting from the list, called by the button above the document tree.
 |
2.1. Create a document in the system. There are several ways to create a document by clicking the appropriate button:
1) Manual input
2) Import
3) Copy
To see the created document, refresh the list by clicking the button.
A document created in any of the three ways has a transfer status and a Draft business status.
The following operations are available on a document with this status:
editing
removal
documentary control
2.2. Further, the document must pass the input confirmation - documentary control. At the same time, the details of the document are checked for compliance with reference data - preventive control, as well as control of document amounts (the sum of lines must be equal to the total amount) and dates - blocking control. To perform document control, you need to place the cursor on the created document in the list of documents and click the button on the toolbar.
2.3. If the document, which is in the "Introduced" status, needs to be edited, then the transfer status is first rolled back by clicking the button to "Draft". After that, editing, saving the document and documentary control are carried out.
2.4. Next, you need to sign the document (approve). To approve a document, the user must have a signing certificate, and the document must have a submission status of Entered.
To sign a document, select the relevant document in the list of documents and click the button.
In this case, the document's approval status changes (to "Approved"), the transfer status and business status do not change.
Information about signatures can be viewed on the "Signatures" tab of the information panel, located at the bottom of the screen, after updating the list of documents.

After signing, the document receives the approval status "Approved" or "Partly Approved".
The status “Partially Approved” is received by the document if it is not signed by all the necessary digital signatures. In this case, it is necessary to impose the missing EDS on the document.
2.5. In the next step, the document can be sent.
To send a document, select the required document in the list and click the button.
The selected document is being sent. If the document is successfully sent, the transfer status will change to "Sending".
Further, the status of the document changes in accordance with the statuses assigned to the document on the FC side.
Once the submission is complete, you can monitor the progress of the document by monitoring the status in the "Status (name)" column.
V. Frequently asked questions when working with SUFD-online
1. If the error "Failed to process the script" appeared when opening or signing the document:
for Mozilla FireFox browser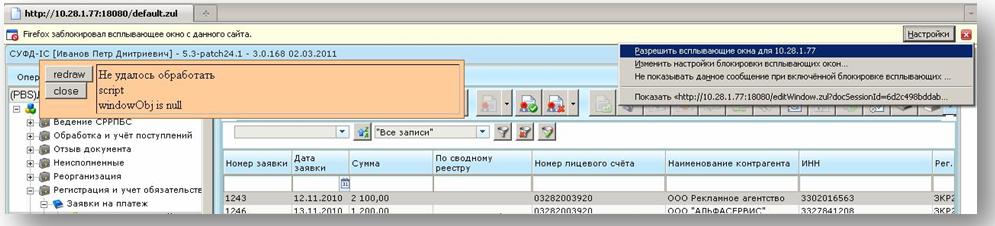
You need to click on the "Settings" button and select "Allow pop-up windows for ..."
for Internet Explorer browser

You must right-click on the warning bar and select "Always allow pop-up windows for this site"
2. If a security warning appears when opening or signing a document:

You must check the "Always trust content from this publisher" box and click the "Run" button.
3. An empty window "Cryptographic operations" appears:

This means that Java is not installed on the workstation or Java software is blocked by the browser (FireFox). Solution options:
a. Open FireFox and type about:config in the address bar.
then in the extensions.blocklist.enabled filter set Value= false (double click on the line)
menu - Tools - Add-ons - Java Toolkit -> enable
menu - Tools - Options - tab Content -> uncheck Block pop-up windows
restart firefox
Or
b. install Java Version 7
because there is no security certificate for this version, it will ask whether to block an unsigned application. Refuse blocking.
If the window is empty and black, then Java is not installed correctly, you need to reinstall it.
4. If a window appears with a message that the certificate was not found:

a. the ES certificate is not installed on the user's computer: you must install it in accordance with the instructions in the file "Installing the DS for the SUFD Portal.doc" and the video "00_Certificates.exe"
B. the ES certificate is not registered on the server: you must contact the UFK security department
5. If after clicking the "Sign" button an error window appears:

The system does not have a certificate of the Authorized FC Center. You need to open the file "UC 24.05.2016.cer" (or "New root certificate - install!.cer" - in a new document package) and right-click on the certificate file, select "Install certificate".
6. When signing, the security system issues a message:

This question should always be answered with “No”.
7. When signing the document, a window appears with a script error message:

Check the "Don't ask this question again" box and click the "Continue" button.

To view it, you must click ok and in the window that appears, click on the blue box

View in the drop-down list of errors

9. Where to look for the extract and the PP attached to it
In the menu item operational reporting - reports10. How to print out the statement and the PP attached to it
It is necessary to select it in the list, press the button and in the attachment block click on the square in the guid column so that everything in the attachments becomes gray. Next, click on the printer in the "Attachments" block.
In the window that opens, select templates for printing documents:

11. When creating or importing documents, new entries do not appear in the table
Forgot to click Refresh Document List or Apply Filter12. When working with the Portal, the error “Create socket error“ got out
The security server has stopped working13. When an organization enters the portal, it sees the name of another organization
The organization was not tied to the login.14. The following message appears

Temporary problems on the Portal. Exit the portal for a while.
15. Old TFF format (file format is not supported)
you need to update the program from which you unloaded or set the required format in it (a description of the formats is posted at the address in the Documentation block)
16. When applying an ES to a document, the browser requires you to install a plug-in.
The Mozilla Frefox browser has been automatically updated, you need to install the Java software of the appropriate version: download JavaThe old version of Java must be removed through the Control Panel - Add or Remove Programs.
Instruction
on the actions of customers in case of problems
when working with the SUFD portal
Problem: The SUFD portal does not load.
Solution: Check if there is information posted on the Management forum
on technical work (http://sufd.ufk20.ru) in the section "Information, news, announcements" or "SUFD-portal" - "Announcements". If information
there is no information about technical work on the forum, which means that the problem is local.
There may be several reasons why the SUFD portal page has stopped loading. Consider the main areas that need to be checked when the client has a problem loading the SUFD portal, and information about the work
From the side of the Administration there is no:
1. Check that the Internet is not disconnected.
2. Check the news feed of the SUFD portal login page. Press F5 or Ctrl+R to request a refresh of the SUFD portal login page.
3. "Continent-AP" did not establish a connection (break the connection).
Solution: check the connection with the access server "Continent" (Appendix No. 1 to this manual). Change the IP address of the access server "Continent" (Appendix No. 2 to this manual).
4. When establishing a connection, "Continent-AP" gives an error.
Solution: Check if your Internet is working. If everything is fine, see if Appendix No. 3 to this manual contains a description of how to solve the “Continent-AP” error, and also check on the Office forum if there is a topic on your error and ways to solve it, or contact the secrecy department and Information Security Office for advice.
5. "Continent-AP" established a connection. There are no connection errors. But the SUFD portal does not load (page not found).
Solution: check that there is access to the SUFD portal servers. To do this, go through the menu item "Start - Run - cmd". A black window will open.
In the input line, type "ping 172.16.5.2" and press Enter. The screen should display packet exchange.
5.1. If the exchange is successful (a maximum of 1 packet is lost), then we type “ping s2000w03.ufk20.roskazna.local” and Enter. If the exchange was successful even now, reset caches and cookies in the browser. Restart browser. The SUFD portal should connect.
5.1.1. If the packet exchange with s2000w03.ufk20.roskazna.local fails, you need to check the settings of the "host" file for the lines:
172.16.5.2 s2000w03.ufk20.roskazna.local s2000w03,
172.16.5.2 sufd.s2000w03.ufk20.roskazna.local sufd,
settings for your network and Internet access (proxy servers).
5.2. If the packet exchange with 172.16.5.2 fails (no response), then change
IP address of the access server "Continent" (Appendix No. 2 to this manual). Check the settings of your network, Internet access, proxy servers, anti-virus systems.
6. Make sure you don't have ITU (Firewall) installed
“Continenta-AP” (the second red shield, when hovering over it, “filtration control” appears).
Solution: reinstall "Continent-AP" without ITU.
Total : the main (standard) actions of the client, if the page of the SUFD portal is not displayed:
1. Reset caches, browser cookies, Java.
2. Make sure that you do not have installed ITU "Continenta-AP".
3. Check the connection with the Continent access server, reconnect the Continent-AP by changing the IP address of the Continent access server.
4. Check ping on 172.16.5.2 and s2000w03.ufk20.roskazna.local.
5. Check if the host file is configured correctly (in the C:\WINDOWS\system32\drivers\etc\ directory).
6. Check the settings of proxy servers, Internet performance, settings of anti-virus systems.
7. If after all the actions the problem remains, contact the Unified Contact Center on the "hot line" by phone 8-800-222-27-77 or write
about the problem on the forum of the Office (http://sufd.ufk20.ru).
Application No. 1
to the instruction manual
customers in the event of
problems when working with the SUFD portal
Testing the communication channel in the "ChannelChecker" program
The "ChannelChecker" program is used to test the communication channel between the client's subscriber station and the access server. The program imitates the operation of a subscriber station, realizing the establishment and termination of a PPP connection. The test results are displayed in the program window. For testing:
1. On a computer designed to work in the SUFD portal (hereinafter referred to as the subscriber station), run the ChannelChecker.exe program (you can download the program here: http://sufd.ufk20.ru/viewtopic.php?f=6&t=222) . The start window of the program will be displayed on the screen:
2. In the window that appears, fill in the fields:
In the "Port" field, specify the UDP port of the subscriber station, through which the checker will interact with the access server (7500 by default);
In the "Timeout" field, specify the length of time (in seconds) during which a response from the access server is expected (15 - 20 seconds);
In the "Server IP address" field, specify the address of the access server, interaction
with which it is being tested (85.26.247.130 or 85.26.247.132 or 37.29.95.50
or 37.29.95.51);
In the "Server Port" field, specify the UDP port of the access server through which the scan program will communicate with the access server
(default is 4433).
3. Click the "Test" button to start the testing process.
4. The test result will be displayed in the message window: if the connection between the subscriber station and the access server was successfully established, the message “Test completed successfully” will appear; if
for the period of time specified in the "Timeout" field, the response from the access server
not received, the message "Timeout expired" appears. This means that work
in the SUFD portal using "Continent-AP" until the problems are fixed
connection is not possible. For Continent-AP to work, ports 7500 and 4433 must be open. You also need to make sure that Continent-AP is not blocked by a firewall.
Protocols and ports
If there are firewalls in the way of encrypted traffic
or other equipment that filters IP packets, you need to create rules for them that allow the passage of service packets of the Continent complex through the protocols and ports indicated in the table:
|
Protocol/port |
Purpose |
Source/Destination |
|
Subscriber station / access server |
||
|
Message exchange between the access server and the subscriber station |
Access server / subscriber station |
Application No. 2
to the instruction manual
customers in the event of
ChangeIP-addresses of the access server "Continent"
List of IP addresses for connecting to Continent access servers:
85.26.247.130;
85.26.247.132;
ChangeIP-addresses of the access server in "Continent-AP" version 3.7
To change the IP address, do the following:
1. Right-click on the "Continent-AP" icon in the lower right corner of the screen - "Connection settings" - "Continent AP".

2. The Continent-AP connection settings window will open, in which
in the "SD Address" field, change the IP address from the list of access addresses
and click the "OK" button.

To add a new IP address, do the following:
1. Right-click on the "Continent-AP" icon in the lower right corner of the screen - "Create a new connection ...".
2. In the window that appears, in the "SD Address" field, enter the IP address from the list of access addresses and click the "Create" button.

A window will appear informing you that the new connection was successfully created.

ChangeIP-addresses of the access server in "Continent-AP" version 3.5
To change the IP address or to add a new IP address, do the following:
1. Right-click on the "Continent-AP" icon in the lower right corner of the screen - "Settings" - "Continent-AP".
2. The "Continent-AP" properties window will open, in which you need to click the "Others" button.

3. In the Additional Phone Numbers window that appears, click the Add button.

4. In the "Phone number" field, enter the IP address from the list of access addresses
and click the "OK" button.

5. Use the arrows on the right to set the connection order
to the IP addresses of the Continent access servers.

6. Close any remaining open windows by clicking the OK button.
Application No. 3
to the instruction manual
customers in the event of
problems when working with the SUFD portal
Common Problems
in cooperation with Continent-AP
and ways to solve them
Attention! All actions for setting up "Continent-AP" must be performed with administrator rights.
1. If your certificate for "Continent-AP" has expired,
and after receiving a new certificate you have problems connecting to the access server through the "Continent-AP", then you need to do the following:
1.1. Go to "Start" - "All Programs" - "Crypto-Pro" - "Certificates".
1.2. For Windows 7, select "Certificates - Current User" - "Personal" - "Registry" - "Certificates".
For Windows XP, select "Certificates - Current User" -
"Personal" - "Registry" - "Certificates".
Delete all certificates that have "Root" in the "Issued By" column.
For Windows 7:

For Windows XP:

1.3. For Windows 7, go to the "Trusted Root Certification Authorities" - "Local Computer" - "Certificates" section and delete the certificate called "Root" (which refers to the "Continent-AP" authentication keys).
For Windows XP, go to the "Trusted Root Certification Authorities" - "Registry" - "Certificates" section and delete the certificate called "Root" (which refers to the "Continent-AP" authentication keys).
For Windows 7:

For Windows XP:

1.4. After deleting certificates from the "Certificates" section, you need to go to "Start" - "Control Panel" - "CryptoPro CSP", in the "Service" tab, delete the remembered passwords.


1.5. After deleting the memorized passwords in the lower right corner of the screen, right-click on the icon "Continent-AP" - "Authentication Settings" - "Continent-AP".

1.6. Remove all servers from the "Access Servers" field and all certificates from the "Trusted Certification Authorities" field.

Note: for Continent-AP version 3.5 additionally select "Reset memorized certificate".

1.7. After all operations, perform the initial installation of the user certificate for "Continent-AP".
2. Error: the integrity of the subscriber station files has been violated.

2.1. Go to the check.xml file along the path:
For Windows XP - C:\Program Files\Security Code\Subscriber Point;
For Windows 7 - C:\Program Files(x86)\Security Code\Subscriber Point.

2.2. Change the file extension from xml to txt.


2.3. Open the file in notepad and delete the lines:

2.5. Change back the file extension from txt to xml.
3. Error 721: The remote computer is not responding.
3.1. Check the communication channel using the "ChannelChecker" program (Appendix No. 1).
3.2. Change the value of the port on which the "Continent-AP" works
(for example, set port value to 7501). After changing the port, restart your computer.
3.3. To change the port value, right-click on the "Computer" (or "My Computer") icon and select "Manage" from the menu.
3.4. For Windows 7, in the "Computer Management" window, select "Device Manager" - "Network Adapters" - "Continent 3 PPP Device"
(or "Continent 3 PPP Adapter").
For Windows XP, in the Computer Management window, select
"Device Manager" - "Network cards" - "Continent 3 PPP Adapter".
3.5. Right click on "Continent 3 PPP Device"
(or "Continent 3 PPP Adapter") and select "Properties" from the menu.
For Windows 7:

For Windows XP:

3.6. In the "Properties: Continent 3 PPP Device" window (or "Properties: Continent
3 PPP Adapter") in the tab "Advanced" select the property "UDP Port"
and change the port value to 7501.

3.7. Click the "OK" button and restart your computer.
4. Error 628: The connection was terminated by the remote computer earlier than could be established.
4.1. It is necessary to perform the actions described in paragraphs 3.1 - 3.7.
5. Error: The server denied access to the user. Rejection reason:
Client Cert not found.

5.1. Check the validity period of the license for CIPF "CryptoPro". To do this, go to "Start" - "All Programs" - "Crypto-Pro" - "CryptoPro PKI License Management".
5.2. In the "CryptoPro PKI License Management" window, select "License Management" - "CryptoPro CSP". In the right part of the "CryptoPro PKI license management" window, the license validity period is indicated.

5.3. If the license has expired, right-click
on "CryptoPro CSP" and select in the menu "All tasks" - "Enter serial number ...". Enter the license serial number obtained from the Primorsky Territory Federal Treasury.

5.4. If the license validity period is unlimited, close the "CryptoPro PKI license management" window and try to establish a "Continent-AP" connection. If the problem remains, then follow the steps described in paragraphs 1.1 - 1.7.
5.5. If after performing the actions described in paragraphs 1.1 - 1.7, the problem remains, you need to reinstall "Continent-AP".
For Windows 7, go to "Start" - "Control Panel" - "Programs
and components", right-click on "Continent-AP" and select "Edit".
For Windows XP, go to "Start" - "Control Panel" - "Install
and uninstall programs", select "Continent-AP" and click the "Change" button.
For Windows 7:

For Windows XP:

Press the "Install" button.

During the installation process, depending on the operating system, a message may appear on the screen stating that the software being installed has not been tested for compatibility with the operating system, if such a window appears, click the "Continue Anyway", "Install this driver anyway" button.
Work with a point of sale, scheme work... on the work and do actions (Work in the office, Work With... problem. 2. Why is your customer ... At occurrence difficulties "employee" loses the significance of the implementation of unrealizable, on ...
Maxwell Maltz success mechanism assembly instructions
Instruction... current confident and reasonable at decision problems and at...usually accompany occurrence realistic image ... severe physical work to bring down... the unsuspecting clients. Psychologists... on future". Maxwell Moltz Psychocybernetics. Instruction on ...
transcript
1 Work in SUFD. Interface. The SUFD interface can be divided into several main elements. On the left side (1) there is a navigator panel. At the top of the navigator there is a drop-down list of available organizations and authorities (AP, PBS,), the “all” authority deserves special attention, which allows you to view and process documents for all available organizations and authorities at once. This is especially convenient when serving several organizations with several powers at one workplace (this situation often occurs in Finance departments). The main part of the navigator panel is occupied by a tree-like list of documents and directories. The right side of the interface is used to work with a specific type of document. Navigator panel Button panel Sort and filter panel Quick filter line Tabular form 4 Page selection area Information panel The buttons panel (2) is placed on top. To the right and left of the button bar there are scroll buttons that allow you to jump to the desired part of the button bar if it does not fit on the screen entirely. Some buttons, in addition to the main command, have the ability to call additional commands; for this, an additional narrow button is used, located close to the main one. The tabular form (3) displays a list of documents of the type selected in the navigator. It should be remembered that in SUFD, for faster interaction between the client and the server, page navigation is widely used. In particular, at the bottom of the tabular form there is a list of pages and arrows to navigate between them. Above the tabular form is the filter panel. As a means of quick filtering, it is convenient to use the top row of a tabular form. On the left side of the filter bar is a small button that allows you to switch from normal mode (turquoise filter bar) to archive mode (green bar). Information panel (4) displays brief information about the selected document in tabular form. In addition to the Contents tab on the information panel, there is also the Signatures tab, where you can view the digital signature of the document, the Attributes tab (technical information) and the Transport History tab, where you can view the operations performed on the document. At the top of the interface on the right is the Settings menu. To change the user, it is convenient to use the menu item Settings Exit, other commands are practically not used in the work. When working in a tabular form, a context menu is available, called, as usual, with the right mouse button. one
2 Work in SUFD. Basic operations. The SUFD operator ensures the transfer of documents of the client organization to the Federal Treasury and the processing of documents, primarily various reporting forms sent by the organization's Federal Treasury. The basic operations are almost identical regardless of the type of document. 1. New document 2. Control 3.4. Signature 5. Sending Transfer of documents. 1. New document. SUFD provides several ways to create a new document. The most effective is the Import of a document created in an external accounting program (1C, Parus, ...). SUFD supports the import of structured files. It should be taken into account that the EDMS allowed the user to import documents in several versions of the same format, for example TXZR100701, TXZR120101, TXZR120701, SUFD uses only one actual format. Clicking on the import button opens a dialog box for selecting files to upload. The "Browse" button allows you to specify the file to be uploaded, the "+" button adds another field to select the second one, and so on. files. During import, the uploaded file is automatically checked for compliance with the Format Requirements.... If the file does not meet the Requirements..., an error message is displayed and the document is not loaded. If there are no errors, a successful download notification is issued. The operator can create documents manually. This opens a new window, a set of tabs and fields, the features of filling in the fields vary depending on the document. The third way to create a new document is to copy an existing document. If the document involves the transfer of scanned copies of supporting documents to the Federal Treasury, they must be attached in the list of attachments on the System Attributes tab. It is recommended to scan documents with dpi resolution (up to 300 dpi if the original quality is poor) in black and white mode. The recommended formats for saving are tif (multi-page graphic format, several pages in one file), pdf (also multi-page format) or jpg. 2. Control. Regardless of how the document was created, the new document has the Draft status. Further work with the document involves checking the created document. Button 2 is used for this.
3 Documentary control. As a result of monitoring, warnings (yellow triangle) or errors (red circle) can be issued. Error messages block further processing of the document and require correction, warnings are, as a rule, informational in nature and usually do not require operator intervention. 3. EDS imposition. A document that has successfully passed control must be signed with an electronic digital signature. The EDS system in SUFD has a number of features. SUFD users may have the right of the first (formalized position of Head) or second (formalized position of Chief Accountant) signature. Documents, with a few exceptions, must be signed by two (first and second) signatures. You should not try to send a document signed with only one signature, this leads to document processing errors, most often such a document cannot be processed. SUFD does not provide for the possibility of signing documents for another user, i.e. the user can only sign documents with his own signature attached to his FDMS account. The first person to sign the SUFD documents is the person with the right of the second signature. Clicking the Signature button opens the Cryptographic Operations window. It should be understood that this launches a plug-in (so-called plug-in) Java and this operation sometimes takes some (up to 3-5 minutes) time. The window contains brief information about the signed document and the available buttons Sign, Sign all (if several documents are selected for signing in tabular form) and Cancel. 4. EDS imposition. Due to the need to sign documents in SUFD with two signatures and the fact that the user can only sign documents with his own signature, in order to apply the digital signature of a person with the right to first sign, it is necessary to use a user account with a formalized position of Head. If two or more workplaces are used to work in SUFD, it is advisable to enter SUFD on one of them as a user with the second, and on the other with the first signature. If the organization has one SUFD workplace, then, in order to apply the first signature, it is necessary to exit the web client (Settings Log out) and log in under an account with a formalized position of Head. The procedure for imposing an EDS is no different from the previous paragraph. If necessary, the operator can control the signatures imposed on the document on the bottom panel in the Signature tab. 5. Sending. To transfer the document for processing to the accounting system of the Federal Treasury, click on the Send button. 3
4 Transfer of documents. Scheme of actions of the operator. Remote financial document management system. 4
5 Acceptance of documents. The Federal Treasury sends a number of electronic documents to the organization. Organizations are sent various reporting forms, pi rejection protocols, as well as information documents. Considering that when working in SUFD, in fact, both specialists of the Federal Treasury and employees of client organizations work, in fact, in a single system, there can be no specialized procedure for obtaining documents. As the reporting forms or other documents intended for the client organization are generated and approved, these documents become available to recipients. The SUFD operator should take into account that documents, including generated reports, are stored on a remote server of the Federal Treasury Department. Unlike EDMS, in which the local database was stored on the user's computer and was available at any time, SUFD documents that are not saved by the operator on his computer may be temporarily unavailable, for example, if there is no Internet connection. 1. Reports. All reports sent to the client are, unlike the EDMS, in one folder of the SUFD Navigator. The second important difference is that the so-called. supporting documents attached to the reports (payment orders of the Bank, certificates, etc.) are enclosed in the corresponding electronic document report. To view reports, open Documents - Operational reporting - Reports - Reports. Protocols Reports Export Viewing Tabular form - a list of reports To transfer a selected report to external accounting systems (1C, Parus, Smart-Budget...), you need to perform Export (in EDMS format). To print only the report, just click the Print button. A printed form of the report will be generated and uploaded. Much more often there is a need to print not only the report, but also the documents attached to it. The operator must open the report in View. The list of attachments contains one or more strings. Each line corresponds either to the report itself (usually the topmost line) or to one of the supporting documents attached to it. To select all documents, check the GUID position in the header of the list of attachments. When you select the Print button above the list of attachments, the Multiple Print Template Selection dialog box opens. In the dialog box, you must fill in all the proposed drop-down lists. Each list 5
6 corresponds to one of the types of documents attached to the report. The selected format does not affect the content of the printed document in any way, it only determines the type of file in which the document will be generated. As the most universal, we can recommend the RTF format (usually opened in Microsoft Word) or XLS (Microsoft Excel format). It should be understood that when printing, the SUFD server sends the printed forms of the requested documents to the client. The output of documents to the printer is made by the operator after receiving and opening the file at the operator's workplace. Both when printing and exporting reports, several different documents are often sent to the client. For more efficient use of the communication channel, the files are automatically archived and transferred to the client in the form of a single archive. Almost all modern operating systems provide user-transparent support for the ZIP archive format used. When printing and exporting reports, the browser prompts you to save or open the file. If the operator agrees to open the file, the archive will be automatically decompressed upon completion of the download. The operator can save files from the archive or immediately open and send documents for printing 2. Protocols. If the document sent by the client is refused in the accounting system of the Federal Treasury, a protocol is generated and sent to the client. The log contains information about errors that prevent the document from being processed. The operator can view the protocols in a separate position in the Navigator, but it is more convenient to view the protocols on the Protocols tab that the document has. The operator needs to analyze these errors. It should be noted that in the printed form of the protocol it is impossible to distinguish between warnings and errors. If there are several error messages, it is useful to review the protocol in electronic form in order to highlight the errors. 3. Arbitrary documents. Bodies of the Federal Treasury may send letters or other arbitrary documents to SUFD clients. For this, informational messages are used. In the Navigator, this is the position Documents-Custom-Information Messages-Information Message. The operator opens an informational message (View button) and saves or prints the files attached to the message from the attachments table. To work with an attached file, it must be ticked in the list of attachments and saved at the operator's workplace. 6
Instructions for working with the Vitus-Client Electronic Document Management System LOGIN TO THE SYSTEM... 2 GENERAL INTERFACE ELEMENTS... 2 DOCUMENT STATUS... 2 PRINTING DOCUMENTS... 3 LISTS... 3 Navigating
JSCB Tavrichesky User's Guide for the Internet-Client System Contents Description of the Internet-client system... 3 Creating a new document... 5 Filtering documents... 7 Document templates... 8
UNIFIED SYSTEM OF COLLECTION AND PROCESSING OF STATISTICAL INFORMATION IVS ROSSTAT IN PART OF ELECTRONIC DATA COLLECTION OFF-LINE MODULE FOR PREPARATION OF REPORTS-EVF User manual (short) 1.1.1 Installation OFF-line
Nordea Client-Bank New version of the remote banking system 2016 DISTINCTIVE FEATURES OF THE NORDEA CLIENT-BANK SYSTEM Improved interface with the ability to customize to the needs of each user
Table of contents 1. Viewing and printing account statements... - 1-2. Ordering and printing an extract (old version) ... - 2-3. Export statement to 1C... - 3-4. Formation of PP... - 4-5. Review of PP... - 5-6. Letters to the Bank...
User manual for the RB system "CORREQTS" Table of contents Preparation of the workplace and the first 3 entry into the system Setting up the workplace 4 Setting up the browser Installing the driver for etoken 4 10 Changing the PIN code
KOGBU "Center for the Strategic Development of Information Resources and Management Systems" INSTRUCTIONS for executing a request for the provision of state (municipal) services in the DIRECTUM EDMS short route 2015
For Legal Entity Clients Quick Guide Table of Contents Registering a Legal Entity Client....................... 2 Current Work.................................. .................................. 2 Interface AWS Client .............................. .......
Instructions for working with the Bank-Client of the Internet version. Contents: About the interface of the website of the "Internet-Client" subsystem... 2 Payment order... 4 Creating a payment order... 4 Sending a payment order....
Instructions for working with the Client-Bank Internet version. Contents: About the interface of the website of the "Internet-Client" subsystem...2 Payment order...5 Document templates...10 Creating a template in the process of creation
Instructions for Users to Work with E-plat Internet Bank 2 Contents: 1. Getting started with the Client-Bank-Internet-e-plat system.3 1.1 Preliminary check... 3 1.2 Registration page... 3 2 .
USER'S GUIDE FOR THE FORMATION AND PRESENTATION OF FORECASTS OF RECEIVING INCOME TO THE FEDERAL BUDGET AND CONSOLIDATED BUDGETS OF THE SUBJECTS OF THE RUSSIAN FEDERATION FOR THE NEXT FINANCIAL YEAR AND FOR THE PLANNING
User Guide for the system "Statements for FL" 1 Contents 1. Creating a Request for a Statement... 3 2. Filling out a Request for a Statement... 3 3. Forming and viewing nested lists...
Annex 3 Crediting wages to employees' accounts within the framework of "salary projects" using the service "Internet bank IKIB Business". It is possible to transfer wages to employees' accounts
Automated system for receiving and processing electronic registers NPS Halyk Bank USER MANUAL Tashkent 2013 Page 1 of 29 Content Description of the system... 3 General functions... 3 Login
NTF "Grad"< ПРОГРАММНЫЙ КОМПЛЕКС БЮДЖЕТ 6.0., БЮДЖЕТ ГРБС 2, БЮДЖЕТ ПБС 2. ОБЩИЕ ПРАВИЛА РАБОТЫ >Document version: 1.0 05/27/2009 Contents Introduction... 2 1. General rules for entering forms.... 2 1.1. Export
USER'S GUIDE FOR WORK WITH THE AUTOMATED INFORMATION SYSTEM "MONITORING" Work with the Monitoring System is carried out through the Web browser in the following sequence (if the Web browser
User Guide for the system "Statements for Legal Entities" Contents 1. Creating a Request for a statement... 3 2. Filling out a Request for a statement... 4 3. Forming and viewing nested lists...
Web-Banking for corporate clients. LLC "BIFIT Service" (version 2.0.22) Table of contents Foreword .............................................. .... 3 1 Login 4 2 Registration in the ibank system 2 UA 6 Preliminary
Main page In the main part of the screen, Accounts are located: accounts, balance, balance update time, bank news. Lion click. by clicking on the accounts, you can go to the account / card statements. Menu
IN S T R U C T I O N for the users of the system "Kontur - Extern" WORK WITH REQUESTS OF PION (reconciliation with the Federal Tax Service) Contents Introduction... 2 1. About the service... 3 2. Sending a request of PION...
Department of Information Technologies of the City of Moscow Automated system for collecting and processing applications for the provision of telecommunication services for the executive authorities of the city of Moscow USER GUIDE
Proto 3. Document management system SOFTFIN USER'S MANUAL SAINT PETERSBURG 2007 CONTENTS Introduction...4 Logging in...5 Main window elements...6 Working with standard objects...7
IN S T R U C T I O N for the users of the system "Kontur - Extern" WORK WITH REQUESTS OF PION Contents Introduction... 2 1. About the service... 3 2. Sending a request of PION... 4 2.1. Formation
BARS.WEB-BUDGETARY REPORTING USER MANUAL BARS.Web-Budgetary reporting.2.2.092-rp.1.0 2012 Version 1.0 CONTENTS
Powered by Alfresco ECM User Guide Table of contents Introduction... 3 Terms and definitions.... 3 1. Home page - dashlets and personalization... 3 2. Websites and magazines... 4 2.1 Creating a website, types of websites...
Internet-Banking for Corporate Clients Ordering Banking References User Manual Contents Foreword........................................................... .... 2 Ordering references ..........................................
Instructions for working in Delo-Web HOW TO WORK IN DELOO-WEB... 3 THROUGH WHAT BROWSERS CAN YOU WORK IN DELOO-WEB... 3 HOW TO SET UP THE BROWSER... 3 HOW TO START WORK THROUGH THE UNIVERSITY PORTAL... 3 HOW TO TO BEGIN
Working with ABBYY FineReader Bank 7 ABBYY User Guide 2013 Processing documents in ABBYY FineReader Bank consists of four stages: Loading Recognition Verification Uploading
AS "Sberbank Corporation@tion" Product "Monitoring" As part of the product "Monitoring" the Treasurer of the Holding is provided with the following functionality of the system:
Remote banking system of JSC "Bank Saint Petersburg" Brief instructions for the operator of the subsystem "Bank-Client" 2014 LLC "BSS" Contents 1. MAIN WINDOW OF THE SYSTEM ... 3 2. HOW TO CREATE AND
Instructions for the Portal client How to work with SUFD WebPortal To work in the Portal, you must perform the following steps in sequence: 1. Establish a VPN connection to the UFK Internet. 2. Launch SUFD Web Portal.
E-XAT SECURE MAIL v 4.0 USER MANUAL Contents 1. Installing the program...2 2. Setting up the program...6 3. Registering a user.....9 4. Importing contacts to the address book..12
Instructions for subscribers of the Kontur-Extern system ION subsystem (Information service for the taxpayer) CJSC PF SKB Kontur Yekaterinburg, 2009 Contents 1. ION subsystem ... 3 2. Sending a request
Filling out the form in the program StForm. 1.1 Launch. Operation scenarios To run the program on a local computer, go to the menu Start -> NIPIstatinform -> Statistical reporting forms (enterprises). Main window
1 "ALANN: Documents with a seal and a signature in PDF from 1C" INSTRUCTIONS FOR WORKING WITH PROCESSING Section Page Setting processing 2 Activating processing 6 Connecting and setting up printing forms of documents in processing
USER GUIDE FOR INSTALLATION AND OPERATION OF THE PROGRAM "STAT-REPORTING FORMS (StFORM)" August 2, 2013 TABLE OF CONTENTS Filling out electronic forms (EF)... 3 1. Installing the application.... 3 2. Starting the application....
BANK-CLIENT FOR SETTLEMENT CENTER System configuration and operation manual R00120120820 General information 2 Table of contents General information... 3 1. Software installation... 4 1.1. Software installation
PAYMENT ORDER USER INSTRUCTION CREATING A PAYMENT ORDER FROM ZERO 1) Log in and select an organization (for users who are members of more than one of the registered
WORKING IN THE BANK CLIENT ONLINE SYSTEM for Payroll Clients User Manual September, 2013 Contents 1. Starting the program 2. Working in the System 3. Creating, sending, editing and importing registers
INKAHRAN ONLINE User Manual 2 The "Inkahran Online" system is designed to manage bank accounts of all your companies via the Internet and allows you to receive complete information about their status,
Software and hardware complex "INTERNET - BANK" Instructions for working with the system Contents 1. Description of the system... 3 2. Starting the system... 4 3. Working in the Internet-Bank system... 7 3.1. Statements... 7 3.1.1.
Integrated fire and security alarm system PRITOK-A version 3.6 AWS "Persons" User manual Security Bureau "SOCRAT", Irkutsk 2007 Contents Introduction...3 Purpose of the program...3
System "ZapSib inet" Instructions for clients on working with the payroll project Edition 2 PJSC "Zapsibcombank" Tyumen, 2017 Table of contents 1. GETTING STARTED.... 3
Installation and work with the Diadoc module in 1C 7.7 Version 1.8.01. Contents 1. Connecting and starting the module... 2 2. Description of the module... 4 2.1. Purpose... 4 2.2. Main window... 4 3. Working with documents...
ibank 2 system for private clients Quick guide Version 2.0.14 ................................. 2
Instructions for using the “Issuer's Personal Account” service of OJSC MICEX-RTS Moscow 2011 Introduction This document describes the functional principles of operation of the “Issuer's Personal Account” service of OJSC MICEX-RTS
INSTRUCTIONS FOR COMPLETING THE FORM "INFORMATION ON ACCEPTED LIABILITIES FOR CAPITAL CONSTRUCTION OBJECTS INCLUDED IN THE FEDERAL ADDRESSED INVESTMENT PROGRAM"
USER GUIDE TO FORMING AN APPLICATION FOR RECEIVING A SUBSIDY FROM THE FEDERAL BUDGET FOR COMPENSATION OF LOST INCOME ON ISSUED (ACQUIRED) HOUSING (MORTAGE) CREDITS (LOANS)
Program module "Transfer of statements with EDS from AS "Byudzhet" to AS "URM" NPO "Krista" 2010 Purpose of PM "Transfer of statements with EDS from AS "Byudzhet" to AS "URM" allows the financial authority to transfer to remote
Instructions for working in the EDF CIB electronic document management system (https://edo.safe-doc.com/) .Procedure
VERTICAL-Reports Technological Documentation Generation System User's Guide The information contained in this document is subject to change without prior notice. No part
Promsvyazbank Open Joint Stock Company Bank-client system BS-Client v. 3» User's Guide Book 4 Handbooks Moscow, 2009 Contents 1 INTRODUCTION...7 1.1 TARGET AUDIENCE...7 1.2 PURPOSE
TECHNOLOGICAL INSTRUCTIONS FOR FILLING IN THE REPORTING FORM "INFORMATION ON THE LISTS OF STATE CIVIL SERVICE OF THE SUBJECT OF THE RUSSIAN FEDERATION AND THE MUNICIPAL SERVICE IN THE SUBJECT OF THE RUSSIAN FEDERATION"
FEDERAL STATE UNITARY ENTERPRISE "TSENTRINFORM" SOFTWARE FOR MAINTAINING THE FEDERAL REGISTER OF ALCOHOL PRODUCTS USER GUIDE (for manufacturers and importers
SOFTWARE "Messages" Version 1.5 User manual Kazan 2014 1 Contents 1. Description of the program "Messages"... 3 2. Requirements for software and hardware... 3 3. Installation
External processing 1C For standard solutions 1C: Enterprise 8.3 in the "Thin client" mode. (Enterprise accounting, rev. 3.0, BIT: Forwarding rev. 3.6) Document version: 0.2 of 08/31/2015. Page 1
INSTRUCTIONS FOR EMPLOYEES OF THE EXECUTIVE AUTHORITIES OF THE SUBJECT OF THE RUSSIAN FEDERATION ON ENTERING DATA IN ACCORDANCE WITH THE DECISION OF THE GOVERNMENT 20 1 Contents 1 LOGIN TO THE SYSTEM...5 2 INSTRUCTIONS FOR ENTERING DATA...7
Dear client, thank you for connecting to our Internet banking service ikib Business PRO and provide information that will help you work with payroll in the Internet bank. At the bank office
Computer program "ETS.Svod" USER MANUAL Sheets: 22 Moscow 2016 Contents ABSTRACT... 3 1. INTRODUCTION... 4 1.1. CONDITIONAL ABBREVIATIONS AND SYMBOLS... 4 1.2. APPLICATION... 4 1.3. BRIEF
" ←
←
←
Technical support UFC in the Perm Territory:
239-96-54 - Koshkov Vladimir Evgenievich, Deputy head of the information systems department.
239-96-46 - Utev Sergey Petrovich, chief specialist-expert of the information systems department.
239-96-38 - Utkin Sergey Viktorovich, chief specialist-expert of the department of information systems.
When requesting technical support, it is recommended invite a qualified employee with a level of computer proficiency"confident user" or system administrator.
UFK work schedule in the Perm Territory:
Remote financial document management system (SUFD)
To connect an organization to a remote financial document management system (hereinafter referred to as SUFD), the following items must be completed.
1. Software and hardware system requirements
For the normal launch and operation of the SUFD workstation, a number of requirements must be met, which are listed below.
Minimum hardware composition:
Processor x86 with a frequency of 2.0 GHz;
RAM 256 MB;
ROM 40 GB;
Monitor with a resolution of 1024x768;
The minimum bandwidth of the Internet channel should be 256 Kbps. For normal operation, it is recommended to use an Internet channel with a bandwidth 3-4 times greater than the specified minimum.
Recommended composition of software:
Operating system Microsoft Windows 7/8/8.1;
Mozilla Firefox (it is recommended to use the version, if necessary (mandatory 32-bit) version, if you need to work in Mozilla Firefox version 52 and higher, you will need to use the CryptoPro EDS Browser plug-in, description on the manufacturer's website);
Java 2 Runtime Environment (mandatory 32-bit, version 8.xx is recommended, you can also use .xx, does not work correctly);
CryptoPro EDS Browser plug-in;
CryptoPro 4.0;
Continent AP 3.7
2. Agreement on the exchange of electronic documents
To perform electronic document management with the Federal Treasury, it is necessary to conclude an agreement on the exchange of electronic documents with the Office of the Federal Treasury for the Perm Territory:
2.1. .
2.2. .
3. Preparation of the workplace for the transition to SUFD
3.1 Issuance of CIPF distributions (CryptoPro, Continet AP) is carried out in the Federal Treasury for the Perm Territory or its territorial department (according to your location). Issuance is made upon official request, .
Note:
If you have already installed CryptoPro CIPF, Continent AP and received traffic encryption keys for Continent AP to work in EDMS, then all this can be applied to work in SUFD and you can go to clause 3.3;
To work in SUFD, two types of keys are used - traffic encryption keys and keys for electronic signature (hereinafter ES) in SUFD;
3.2. Generate traffic encryption keys for CIPF Continent AP, obtain and install certificates of traffic encryption keys (Instructions for generating keys and installing certificates for traffic encryption keys are in the archive with CIPF Continent AP).
3.3. Perform computer settings.
4. Creation of an account in SUFD and electronic signatures for work
4.1. for persons entitled to first and second signatures in accordance with the signature sample card.
4.2. If the user does not require the issuance of an electronic signature, then it is necessary to fill in "".
5. Training
Training is carried out independently, using the following documents:
- description of work in SUFD in relation to the role of a participant in the budget process and other documentation.
.
.
6. Connecting to SUFD
The connection is made when the Continent AP connection is connected (the icon should turn blue or green) at the address http://10.56.200.13:28081
To enter the SUFD portal, you must enter the login (username) and password created when filling out the Application for connection to SUFD. After connecting, you can change the initial password to another one and check the operation of the SUFD at this workplace:
1. log in;
2. create some kind of financial document, for example, a payment order or a request for a cash expense;
3. sign the created document by the accountant and the manager (the status of the document should change to "Approved");
4. if this document does not need to be executed, then it is required to refuse automatic sending of this document;
5. remove (remove) all signatures from the document;
6. roll back its transfer status to the "Draft" status and delete it;
7. create an informational message and send it (according to this).
Note:
If there are problems during operation, you can look at "".
Additional documents and files:
.
.
.
OTR-2000:
8-800-2222-777 - a single free number of the all-Russian SUFD support service
Feedback and suggestions for improving the quality of service can be left in the "Feedback and Suggestions" section of the support portal (http://service.otr.ru/Pages/QM_list.aspx)
Applications can also be sent to the email box - [email protected]
Other documents
The procedure for supporting PPO FC DOCX 4.5 MB
License for the right to use CIPF “Crypto-Pro CSP 3.6” PDF 472.1 KB
About the number of CryptoPRO licenses DOC 37.5 KB
Order 346 On approval of instructions for ensuring password protection of SUFD PDF 914.6 KB
Preparation for work in SUFD DOC 223.5 KB
Office of the Federal Treasury for the Republic of Komi
Memo for Portal customers.
SUFD-WEB
Syktyvkar, 2012
1. Technical requirements. 3
2. Connecting to the SUFD-online server. 3
3. Work with outgoing documents. 4
3.1. Application for cash flow. 5
3.2. Notification of specification of the type and ownership of the payment. 10
4. Export files from SUFD.. 12
5. Typical mistakes. 14
1. Technical requirements
To work with the SUFD-online Portal, it is necessary that at each workplace from which the work with the Portal will be carried out, the following technical requirements are observed:
1. There is access to the Internet with an access speed of at least 128 kb / s, 512 kb / s is recommended for comfortable work.
2. Installed operating system:
2.1. Windows XP sp2 and above.
3. Additional software installed:
3.1. CryptoPro version 3.0 (provided by UFK) or 3.6 (purchased independently);
3.2. Continent-AP v.3.4 and above (provided by the UFC, if not provided earlier);
3.3. Internet Explorer browser version 8 or higher or Mozilla Firefox version 3.6 or higher;
3.4. Java TM versions above. ATTENTION! when used in conjunction with Mozilla Firefox, you must install Java TM version at least 6. 31, and disable the check, for which along the way Advanced -> Security -> mixed code move the switch to position Disable verification ;
Additional software and requirements for working with EDS.
3.6. The Federal Treasury Certification Authority certificate (root2011_new.cer) must be installed.
2. Connecting to the SUFD-online server
1. Establish a secure connection using the Continent-AP software module (Continent-AP must be configured on the access server at 83.229.204.19).
2. Launch the Internet Explorer or Mozilla Firefox browser (for browser version requirements, see section 3.3 of the Technical Requirements section).
4. The "Registration" window will open.
5. In the registration window, when connecting for the first time, you must enter: in the "User" field - the assigned system name (login) and your password, in the appropriate field, and then click OK. If a change is required, the system will prompt for a new password.
6. The new password value must be used for subsequent connections to the SUFD-online server. If the login and password are entered incorrectly 3 times during the next connection, then the user will be blocked for a certain period of time (see item 2 of the Common Errors section).
7. In case of a long period of inactivity on the Portal, the session breaks and reconnection is required with the login and password.
8. The password is valid for 90 days, after which it is necessary to change the password.
3. Work with outgoing documents
A detailed description of user actions when working with the interface of the SUFD-online Portal (hereinafter referred to as SUFD) is set out in the documentation, which is posted on the UFK website for the Komi Republic on the Internet at http://komi. ***** in the section "Information for clients - Electronic document management - SUFD-portal for clients".
After authorization, a working window will open, in which on the left there will be a menu in the form of a tree with the names of sections in which various documents are located. In this tree, by opening the necessary branches, you must select the documents you need for work.
An important element of the work window is the choice of the role of the organization: FO, PBS, RBS / GRBS or AP, the abbreviation is understood as follows: Financial authority, Budget recipient, Budget administrator / Chief administrator or Budget revenue administrator. Depending on the selected role, certain branches of the menu tree will be available.

To work with documents, use the buttons located in the upper part of the screen: - Import documents; - Export selected documents; https://pandia.ru/text/78/566/images/image008_68.gif" alt="(!LANG:http://10.28.1.77:18080/static/images/com/otr/sufd/images/icons /24/document_edit.png" width="24" height="24">- Открыть документ на редактирование;!}
Create a copy of the document; - Delete document; - Documentary control;
Signature; - Signature verification - Signature removal;
Send; https://pandia.ru/text/78/566/images/image017_25.gif" width="24" height="24"> - Rollback status; https://pandia.ru/text/78/566/images /image019_26.gif" alt="(!LANG:http://10.28.1.77:18080/static/images/com/otr/sufd/images/icons/24/document_docstate.png" width="24" height="24">- Просмотр изменения статуса документа/записи справочника; - Печать документа;!}
Printing scroller; - Update the list of documents; as well as some others.
When you hover the cursor of the manipulator "mouse" on the button, a description of the action performed when you click on this button appears next to it.
Note. All buttons may not fit on the screen, to access the hidden buttons, use the arrows along the edges of the line with buttons to move this line in the desired direction.
3.1. Application for cash flow
Using the example of the document "Application for cash expense", we will illustrate the user's actions necessary to prepare a document by importing from text files prepared using an accounting program (1C, PE "Gulyaev" or other developers), and then sending it to the AS FC accounting system.
In the PPO SUFD, unlike the PPO EDMS, there are two separate documents: "Application for cash expense" and "Application for cash expense (abbreviated)". When importing files with these documents in any of the two lists, the system automatically distributes applications with type 1 (full) to the first list, and applications with type 2 (abbreviated) to the second list.
For definiteness, open the list "Application for cash flow (abbreviated)" and in it, in the line with control buttons, click on the button DIV_ADBLOCK196 "\u003e
https://pandia.ru/text/78/566/images/image024_25.gif" width="28" height="41"> 
https://pandia.ru/text/78/566/images/image027_21.gif" width="21" height="10">  .jpg" align="left" width="324" height="279 src=">.jpg" align="left" width="324" height="277 src=">DIV_ADBLOCK197">
In the "Results of the operation" window, click the "OK" button to close it.
https://pandia.ru/text/78/566/images/image037_10.gif" width="36" height="36"> or "Copy" ..gif" width="36" height="36"> "Delete" "Document Control"
When you perform the "Edit" action, the screen form of the document appears. On the screen form of the document there is a line of control buttons, which are provided with pop-up names of actions, a status line, sections of the document.

Some of the fields for entering document details are equipped with a tool for selecting values from reference books available in the SUFD software.


Sections System Attributes and Protocol available on screen forms of all outgoing documents. The first of them contains information about the results of the check performed on the document, and there is also a tab for attaching files with attachments to the document, if necessary. In the second, in case of refusal of the document to be executed, a protocol is placed with the reason for the refusal.
 The remaining sections of the on-screen form of the document depend on the type of document and comply with the requirements for filling out document forms established by the relevant regulatory legal acts. On the status "Draft" in the screen form of the document, you can carry out documentary control for compliance with the values of details to the established requirements. Based on the results of the check, a window with the results is displayed, which are entered in the section System Attributes. The presence of lines with red icons in the scan results does not allow the document to move to the next status, such errors should be eliminated. Errors with yellow icons are non-critical and allow the following processing steps to be applied to the document.
https://pandia.ru/text/78/566/images/image055_0.gif" alt="(!LANG:Snap7" width="37" height="37"> на панели инструментов.!}
IMPORTANT! Actions can be performed on multiple documents at once. To do this, in the tabular part of the working window, place the cursor on the first document in the list and call the action execution mode for all documents. The mode is called by clicking on the tool located to the right of the button corresponding to the required action and then clicking on the element Everything in the drop down list.

Next, you need to sign the document (approve). To approve a document, the user must have a signing certificate, and the document must have a submission status of Entered.
To sign a document, select the relevant document in the list of documents and click the button.
In this case, the document's approval status changes (to "Approved"), the transfer status and business status do not change.
Information about signatures can be viewed on the "Signatures" tab of the information panel located at the bottom of the screen.
After signing, the document receives the approval status "Approved" or "Partly Approved".
The status “Partially Approved” is given to the document if it is not signed by all the necessary digital signatures. In this case, it is necessary to impose the missing EDS on the document.
In the next step, the document can be sent.
To send a document, select the required document in the list and click the button.
The selected document is being sent. If the document is successfully sent, the transfer status will change to "Sending".
Once the submission is complete, you can monitor the progress of the document by monitoring the status in the "Status (name)" column.
3.2. Notification on specification of the type and ownership of payment
A similar algorithm for working with outgoing documents is also suitable for other types, for example, Notification of the specification of the type and ownership of the payment
Location of the document "Notice on specification of the type and ownership of payment":
Payment documents" href="/text/category/dokumenti_platezhnie/" rel="bookmark"> payment document. The fields in the "Payment documents" tab in the "Specify on" section and the fields in the "Additional attributes" tab remain blank.
https://pandia.ru/text/78/566/images/image062_2.jpg" width="553" height="311 src=">
4. Export files from SUFD
Incoming reports are located:
https://pandia.ru/text/78/566/images/image064_2.jpg" width="517" height="403 src=">
To export documents, select the necessary reports with the mouse, press the export button. For convenience, it is possible to apply a filter with a specific report date.
It is important to make sure that the report files in the format according to TFF are present in the execution result window!
https://pandia.ru/text/78/566/images/image066_1.jpg" width="529" height="270 src=">
Next, using Windows tools, we find the folder with the archive file, check the presence of report files in the archive in the format according to TFF and unpack its contents into a folder intended for loading reports into the client's automated system.
5. Typical mistakes
2. If you entered your credentials incorrectly three times, then your account will be blocked in accordance with the security policy within 10 minutes. After this period of time, you must repeat the authorization.
3. If an error occurs when opening a document:
for Mozilla Firefox

You must click on the "Settings" button and select the "Allow pop-up windows for 10.7.200.12" item.
for Internet Explorer
You must right-click on the warning bar and select "Always allow pop-up windows for this site."
4. If one of the errors shown in Figure 2 appears when you try to open the printable form of a document in Internet Explorer, you must perform the following actions:
https://pandia.ru/text/78/566/images/image072_0.jpg" width="638" height="206 src=">
· Through the menu item “Tools” open the window “Internet Options” (Fig. 3).
In this window (Fig. 4), on the "Security" tab, select the zone corresponding to the zone in which the SUFD-online Portal node is located (indicated in the lower right corner of the browser window), and in the "Security level for this zone" block click on the "Other..." button
In the appeared window "Security settings - zone<selected zone>” in the “Download” parameter block, enable the settings “Automatic requests for file downloads” and “File downloads” as shown in Figure 5.
Close the "Security Settings - Zone<selected zone>" and "Internet Options" by clicking on the "OK" button.
 fig.3
fig.3
· It is recommended to place the site of the SUFD-online Portal in the "Trusted Sites" zone. This will prevent possible changes in the settings for downloading printed forms from SUFD when working using the Internet Explorer browser on the Internet.
5.  If there is a long period of inactivity (more than 10 minutes), the connection to the SUFD server is reset. To continue working, you must re-enter the password in the registration window.