Sometimes in everyday computing, the task arises of finding duplicate files. There can be many reasons for this: lack of hard disk space, attempts to reduce entropy in your files, deal with photographs dropped at different times from the camera, and many other necessary cases.
A large number of programs can be found on the Internet that allow you to search for duplicate files. But why look for any programs, if a gorgeous tool for such work is usually always at hand. And this tool is called Total commander(TC).
In this article, I will show all methods based on Total commander versions 8.5 , in this version, the search for duplicate files has become very rich in functionality.
!!! A small important digression. What should be understood as a duplicate file? Two files are IDENTICAL only when they completely match bit by bit. Those. any information in a computer is represented by a sequence of zeros and ones. So, the files match only when they completely match the sequence of zeros and ones that make up these files. All the talk that it is possible to compare two files for any other criterion is deeply mistaken.
TC has two, inherently different, methods for finding duplicate files:
- Synchronize directories;
- Search for duplicates;
Their peculiarity and application are best illustrated by examples.
1.Synchronizing directories.
This method is used when you have two compared folders have an identical structure. This usually happens in many cases, here are a few of them:
- You have regularly backed up your working folder. After a while, you needed to find out which files were added or changed since the archive was created. You unpack the entire archive into a separate folder. The folder structure in it practically coincides with the working one. You compare two folders "original" and "restored from archive" and easily get a list of all changed, added or deleted files. A couple of simple manipulations - and you delete all duplicate files that are in the working folder from the restored folder.
- You work in a folder on a network drive and regularly make a copy to your local drive. Over time, your working folder has become quite large and the time it takes for a full copy has become very large. In order not to copy the entire folder every time, you can first compare with the backup and copy only those files that have been changed or added, as well as delete files in the backup folder that have been deleted from the main one.
Once you get a taste, feel the full power of this method, you yourself can think of thousands of situations where the method of directory synchronization will be of great help to you in your work.
So, how does everything happen in practice. Let's get started.
Suppose we have a main folder "Working", which contains the files with which the work is taking place. And there is a folder "Archive" containing the old copy of the folder "Working"... Our task is to find duplicate files in both folders and remove them from the folder "Archive".
Opening TC. Open the compared folders in the right and left panels:
Press the menu "Commands" - "Synchronize directories ..."

Comparison of directories window opens 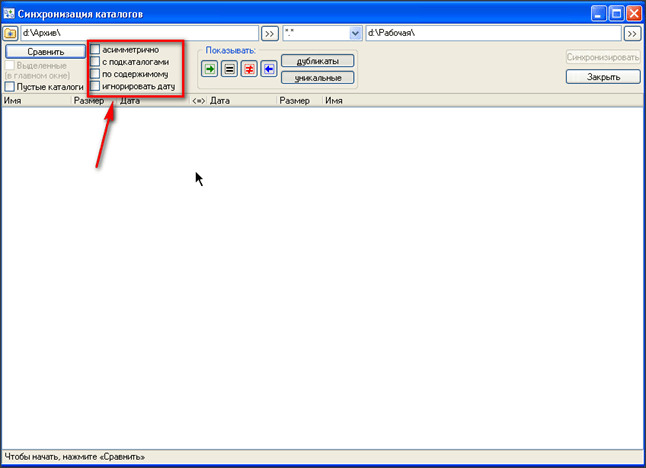
Next, we need to set the comparison parameters. Putting check marks in the parameters "With subdirectories", "by content", "ignore date"
- "With subdirectories"- files in all subdirectories of specified folders will be compared;
- "By content"- this is the key option that makes TC compare files ABOUT !!! Otherwise, files will be compared by name, size, date;
- "Ignore date"- this option makes TC show different files, without trying to automatically determine the direction of future copying;
!!! Only files with the same names will be compared !!! If the files are identical, but they have a different name, then they will not be compared!
Push the button "Compare". Depending on the size of the files, the comparison can take a very long time, do not be alarmed. In the end, the comparison will end and the result will be displayed on the bottom status bar (section 1 in the figure): 
If the buttons in the "Show" section (section 2 in the figure) are pressed, then you will see the comparison result for each file.
- this button turns on the display of files that are in the left panel, but which are not in the right;
- this button enables the display of identical files;
- this button turns on the display of different files;
- this button turns on the display of files that are in the right panel, but which are not in the left;
If you, initially, all display buttons are disabled, then the comparison result can be assessed only by the status bar (in the picture above, section 1), in this case we see that 11 files were compared, of which 8 files are the same, 2 files differ, and there is also a file in the left pane that is not in the right pane.
To complete our task, it is necessary to leave the display of only identical (identical) files, so turn off all other display buttons 
Now we have only identical files left, and we can safely delete them in the folder "Archive"... To do this, select all files. The easiest way to do this is by pressing the universal combination. CTRL + A... Or first select the first line with the mouse, then press the key on the keyboard SHIFT and without releasing it, select the last line with the mouse. As a result, you should get something like this: 
In the final step, we right-click on any line and in the menu that opens, select the item "Delete left"
TC kindly asks us about our desire, 
and if we press "YES" then it deletes all marked files in the folder "Archive".
After that, automatically, there is a repeated comparison of the two folders. If you do not need a second comparison, the process can be interrupted by clicking on the button "Abort" or press the key ESC on keyboard. If the repeated comparison was not interrupted, and we enabled all the display buttons, then we will see such a window 
Everything. The task has been completed. All identical files were found and deleted in the folder "Archive".
Related video tutorials
2. Search for duplicates.
The fundamental difference between this method and the directory synchronization method is that TC ignores the names of compared files. In fact, it compares every file to every one, and shows us identical files, no matter how they are called ! This search is very useful when you do not know the folder structure or the names of the files to compare. In any case, after searching for duplicates, you will get an exact list of identical files.
I will show you how to find duplicates in one practical task, finding duplicate personal photos. Quite often, you upload photos from your digital gadgets to your computer. Quite often the situation gets confused, something is reset many times, something is skipped. How to quickly delete files dropped multiple times? Very simple!
Let's get started.
Let's say you always drop all your photos into a folder "PHOTO" on disk D. After all the resets, the folder looks like this: 
As you can see, some files are located in folders named by the date of shooting, some are dropped to the root of the folder "_New" and "_New1"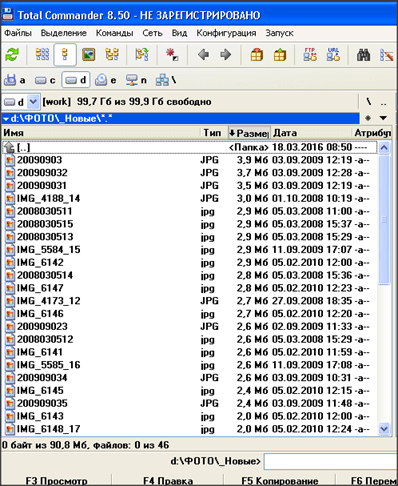
To start searching for duplicates, open the folder in which we will search in any TC panel. In our case, this is the folder "PHOTO"
Next, press the key combination on the keyboard ALT + F7 or select from the menu "Commands" - "File Search"
The TC standard search window opens. String "Search files:" leave empty, then all files will be compared. 
Then go to the bookmark "Additionally" and tick the boxes "Find duplicates:", "by size", "by content" and press "To start searching".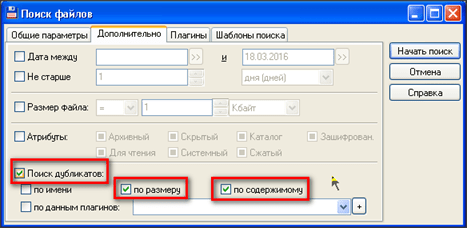
The search can take a VERY long time, do not be intimidated by this, as there is a huge number of comparisons of a large volume of files. In this case, the status bar shows the percentage of completion 
When the search is over, the search results window will open, in which we press the button "Files to Panel"
In the search window and in the panel window, identical files are collected in sections separated by dotted lines 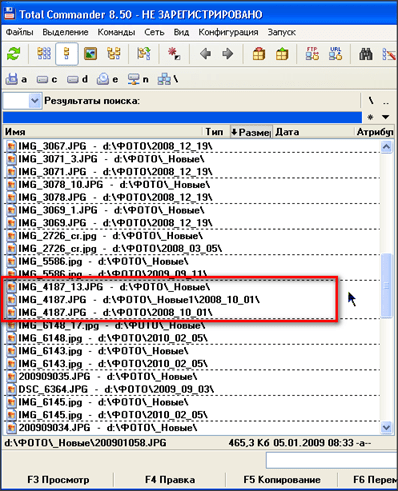
Each section displays the file name and full path to the file. Names of IDENTICAL files can be completely different!
In this case, it can be seen that the same photograph was recorded THREE times, and twice under the same name ( IMG_4187.JPG) and the third time this photo was recorded under a completely different name ( IMG_4187_13.JPG).
Next, it remains to select unnecessary identical files and delete them. This can be done manually by highlighting each file with a key press. Ins... But this is long and ineffective. There are more correct and faster ways.
So, our task is to remove duplicate files in folders "_New" and "_New1".
To do this, press on the additional keyboard, on the right, a large key [+]
... Usually, this key in TC selects files by mask. The same operation can be done through the menu Select - Select Group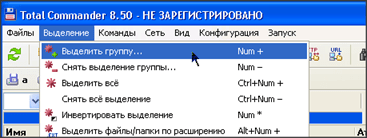
What is a duplicate file:
This is a copy of a file located on the computer in a completely different directory, or disk, folder and has the same name as the original file, weight, and extension.
There are duplicate files on almost every personal computer, even if you did not make a copy,(duplicate) your files, (for the purpose of any failures in the system), they will still be on your computer.
Where do the duplicate files come from:
For example, you downloaded two albums of songs of the same artist from the Internet, basically the songs in the collections are repeated, i.e. the same, the same with photos - in different folders the same photos, over time these duplicate files become more and more on the computer, respectively, they take up a lot of space on your computer's hard drives or flash drive, and this also leads to the slowdown of your PC system.
Therefore, they must be removed periodically. By deleting duplicate files, you can significantly increase the free space on your PC's hard drives - You can download this program by this link. The program is in Russian and has an intuitive interface, so it will not be so difficult to understand the program.
Program installation:
Unpack the archive, click on the installation file of the program, in the opened program window, click "NEXT"
In the next window, we agree with the license "I accept the agreement", click "NEXT"


Then put a check mark "Create a desktor icon " create a shortcut on the desktop, click "Next"

Program setting:
We launch the program and in the window that opens on the left, select the hard disk or external media we need, I recommend that you select all disks for scanning for duplicates.
In the center of the window, select the types of files that the program will look for on the PC. There are two search options. "Among files of all types" and "Among only these types of files „.
I recommend choosing the second "Among only these types of files" in order to avoid deleting the necessary files that are used by the system. You can also uncheck the box from a section if you do not want to scan it for duplicate files. after selecting the desired settings, click "Next".

In the next window there will be settings “ignore files less than 1 MB”. You can also select the setting for "ignore files larger than 1 GB". You can also change the created values in the program to your own. I will check both boxes. We press "Next".

In the next step, you can select the settings for finding duplicates, ignoring the name and date of the file creation. By default, the program has a check mark on the "ignore file creation date" checkbox.
You can select both items, then the program will make a wider scan of the selected hard drives. Select the desired settings and click "Next".

In the next window, select what to do with the found duplicates. By default, the program is set to delete to the trash, so that you can restore those files that you think were deleted by mistake.
In the second step, the files will be restored from the created archive. In the third paragraph, everything is clear, files from the computer are deleted irrevocably. Select the desired settings and click "Search".

Find duplicate files:
The program will start searching for duplicate files. Scanning hard drives takes place in 3 stages:
1. The program determines the number of folders;
2. After that, the program finds the folders that contain the types of files that you selected in the settings for search, then the date and name of the file creation is checked;
3. After that, a full check of hard drives and external media is performed.

Upon completion of the search, a window will open with the result of scanning the program for duplicates. On my computer, the program found 71 duplicates of a file with a size of 635.88. The program window displays the name of the file, its location on the disk, the size of the file, and the date of the last modification.
Next, click on the "Select " at the bottom of the window and select the most suitable item for removing duplicate files. I selected "Select all duplicates in each group" then click "Delete selected files " and confirm in the window that opens with the OK button.
You can also mark files manually by checking the box next to the selected files, and then click on the corresponding delete button. All duplicate files that you marked will be deleted, in the directory where you previously indicated to delete them, (in our case, this is a basket).


Then we close this program. Auslogics Duplicate File Finder is designed to search for duplicate files on hard drives and external media. On this I will end this post, I hope it turned out to be useful. YET everyone !!!
Sincerely,
After constant use of a computer, large amounts of data accumulate on its disks, that is, all sorts of photographs, videos, films, music, documents, etc. This data takes up a lot of space. But very often duplicate files take up too much space.
In Windows, unfortunately, there are no normal built-in tools for finding duplicate files. There is an option to do this through the PowerShell command line, but this is very inconvenient, especially since it will be difficult for beginners. Therefore, it is easier to use third-party programs. One of these is called AllDup. It is completely free, available in Russian, supported by all Windows operating systems and, finally, quite easy to use.
Downloading and installing the AllDup program
The program can be downloaded for free from the official AllDup website. Below is the link to the download section:
The program is available in 2 versions: regular installation and portable (Portable). Portable differs in that it does not require installation on a computer, that is, the program can be launched directly from the downloaded folder.
To download, press the button "Server # 1", or "Server # 2" or "Server # 3" (if the first button does not download, you are given spare servers) under the required version of the program.
For the latest versions, always refer to the official AllDup website!
Installation of the program is very simple, one might say it consists of successive clicks "Next", no special settings need to be made. Therefore, this process will not be considered. See also How to disable or uninstall OneDrive on Windows 10 and.
Finding duplicates with AllDup
After you have installed the program, run it. The main window for search settings will open:

Search setup includes several stages:
File name;
File extension;
File size;
File contents.
Selecting folders on your drives where AllDup will look for duplicates.
The folders are selected under Source Folders. You can mark both entire local drives and individual folders on your computer. Usually, users roughly assume where the duplicates can be located, and in this case it is better to select specific folders, because the entire search across all disks, firstly, can take a lot of time (depending on the amount of stored data), and secondly, it will give you a bunch of duplicates of those files that you are not interested in (for example, duplicates of any Windows system files, which it is better not to touch at all).
So, select the necessary folders / drives for search in the window by checking the boxes next to them. If the desired folder is not in the list, you can add it manually by right-clicking (hereinafter "RMB") in the window and selecting "Add folder".

The explorer will open, where you just need to select the desired folder and it will be added to the list.
It is better to leave the rest of the parameters as they are at this stage. See also Ways to Crack Your Passwords and Limiting Working Time in Windows 10.
Duplicate search method.
This is an important stage, where you configure the criteria by which AllDup will determine the presence of duplicates. Several criteria can be set at once. The point is that not always similar files can be considered duplicates. For example, you have 2 identical photos, but one of them has a small black point, even if it is 1 pixel in size. In this case, it is already a different photo, because its content is different. On the other hand, these 2 photos may have the same file name, the same file extension, and when choosing the last 3 criteria, the program will regard these photos as the same when searching.
With this choice, you will surely unmistakably find really duplicate files.
Thus, mark the criteria and nothing else at this stage can be configured.

File filtering.
You can configure the program so that during the search it finds only files with the extensions you need, for example, only JPG photos, only MP4 videos. This is very convenient when you know which duplicates you want to get rid of first of all (for example, from a video, because it can take up a lot of space) and then do not want to search through all the files in the search results, of which there may be thousands. Or you can filter files by size, for example, find only those larger than 1 GB.
Thus, on the "File filter" tab, enable the "Use file filter" option (1), check "Inclusive" (2), then below (3) select the file extensions that the program will find. Files of any other extensions will not appear in search results.

Most likely, the list of extensions will not include all that you may need. To add an extension there, right-click and select "Add filter by text input".

In the window that opens (1), enter * .file_extension, where instead of "file_extension", respectively, specify the file extension you need so that the program finds these files in the search.

For example, if you want the program to find video in AVI format, write * .avi and click "OK" (2). The “*” symbol means that the file names can be any.
At the same stage, you can configure the filtering of files as a result of the search by their size, for example, to filter out those that are smaller than the size you specified. Specify the options you want below, under the File Size heading. In my example, the option is enabled to exclude files that are less than 500 KB in size. You will also be interested in the Tool for recording user actions in case of problems and Computer and laptop won't start on Windows 10. How to fix it? ...

These are all the main stages of setting up a search, the rest can be left off.
Now, to start searching for duplicates, click the "Search" button at the top of the AllDup window:
The search process will begin.
The more files in the folders you specified are on your disks, the longer the search will take.
After the search is completed, the program will display the found files with duplicates in the form of a table.

The first thing to do right away is to save the search results, because if you close this window with the results now, then you will have to perform the search again. To save, click the button with the image of a floppy disk, or select "Search result" in the top menu and click "Save search result".

Now, even if you turn off your computer and then run the program again, you will be able to get to the search results again.
You can sort the search results by different parameters by clicking on the headings in a column in the table. The most useful criterion for sorting, in my opinion, is the size of the files. Therefore, if you want the largest found files to be displayed at the top of the table, then click on the "Size (Byte)" column.

The next thing to adjust for easier viewing of the results is the displayed size. Initially, the program shows the file size in bytes, which is not very convenient. It is better to set the display in megabytes or even gigabytes. To do this, click the button marked in the screenshot below (1), then check one of the options (2):

Now I will dwell on how, in fact, use the search results, how to view and remove unnecessary duplicates ...
The program divides the found duplicates into so-called groups. One group is all found copies of the same file, including the original (it will also be displayed in this group).
To see duplicates of one of the groups, you need to open it by clicking on the arrow. Example:

After expanding a certain group, you can check what kind of file it is by opening it. To do this, just double-click on a file in the group, or right-click and select "Open file". The file will be opened through a standard Windows program, through which you usually open all files of the selected type.
To remove duplicates, mark them with a tick, right-click and select one of the options: delete the file in the Windows recycle bin, or permanently delete it.

Accordingly, do not delete all files from the group, because this way you will delete both duplicates and the original at once! For example, if there are 3 files in a group, then deleting 3 at once will delete both the original and 2 duplicates. In this case, to keep only one single copy of the file, you need to remove 2 files from the group.
This way you can check each group separately and remove duplicates. But if you find a lot of information, you can make it easier. Make the program automatically select all files in each group except one (that is, only duplicates), after which you can get rid of all duplicates at once or run through and double-check whether everything marked is exactly to be deleted.
To automatically mark duplicates, go to the "Select" menu (1) and check one of the options (2) there, for example, "Select all files except the first file".

As a result, the program will select 2 duplicates in each group, and leave the first file in the list unselected. Those. this way you will mark 2 duplicates and the original will remain unchecked. Or you can try other options that are convenient for you through the "Choice" menu.
After the program has marked the files, you can recheck the selection if required. And in order to quickly delete everything unnecessary or perform some other action, click the button marked in the screenshot below:

In the window that opens, you will see the total size of the selected files, i.e. how much space the found duplicates take and the number of selected files. At the bottom, you need to select an action on the selected files. You can delete files through the trash can, delete irrevocably (item "Deleting files"), copy or move files to any folder, as well as rename the duplicates found. If you are sure that the marked files are duplicates and you no longer need them, then it is easier to delete them, but in any case, the choice is yours.
So, select the desired action (1) and click "OK" (2). You don't have to configure anything else here.

After that, the program will perform your chosen action on the previously marked files!
That's the whole process :) To exit the search results, just close this window. If you have saved the search results, then if you need this result again, you can get to it through the "Search result" section (1) in the main program window. The results you saved will be displayed in the table (2). To open the desired result, just double-click on it.

Conclusion
AllDup is a very handy program for finding duplicates of your files on your computer. In fact, there is nothing superfluous in the program, it has all the necessary tools, filters and parameters for quickly processing a large volume of found duplicates. Of course, there are similar programs that, for sure, also do their job well. I have tried only AllDup so far and I don't see any point in changing it yet.
Carrying out an effective general cleaning of the computer's disk space, along with the use of programs for automatic cleaning of Windows, also requires manual work to remove unnecessary files and duplicate files. To track unnecessary files, special programs are designed - disk space analyzers, they help to filter the contents of computer disks according to certain criteria (in particular, by weight) so that the user can make a decision about deleting files or leaving them. There is also special software to search for duplicate files - either in the form of separate programs or small utilities, or as part of an integrated software for cleaning and optimizing Windows. Below we will consider five programs for finding duplicate files. The top five includes completely free programs with Russian language support.
When searching for duplicate files on the system drive C, it is better to specify not the entire partition as a whole, but only individual folders where user files are stored. Duplicates found in Windows working folders cannot be deleted. If you find on the C drive individual weighty folders or files with unfamiliar names, it is recommended to get help about them on the Internet.
1. AllDup
AllDup is equipped with many different options for fine-tuning the search for duplicate files. Among the customizable options are the choice of a comparison method, search criteria, priority of checking for duplicates, the use of exclusion filters, the inclusion of the contents of archive files, etc. It is even possible to change the themes and individual interface settings. The program is good, however, with a somewhat ill-conceived interface. On its toolbar, all tabs - even basic operations, even additional functions - appear as equivalent. And in order to help the user who first launched AllDup to master the specifics of the program, its creators equipped the interface with a floating widget in the form of a quick guide, which step after which to take. The "Source folders" tab specifies the search area - disk partitions, connected devices or individual user folders on the system drive C.
Next, the search criteria are set in the "Search method" tab. Here, the search for duplicates can be specified and the extension, size, content, etc. can be added to the preset search criteria by file names.
Duplicate search results can be sorted by size, path, file modification date, etc. The detected files can be deleted, their location can be opened in Windows Explorer, and other actions provided by the program can be applied.
To return to the analysis of the duplicate search results performed by AllDup, later, but not wait for the scan to complete, the current results can be saved to a program format file or exported to TXT and CSV files.
AllDup has a portable version that does not require installation on the system.
2. Duplicate Cleaner
Another functional program for flexible search for duplicate files is Duplicate Cleaner. Duplicate Cleaner comes in two editions - the paid Pro and the free Free. Although the latter is limited by the inaccessibility of some functions, its capabilities will be sufficient for efficient duplicate search. Duplicate Cleaner Free allows you to set search criteria by name, content, size, date of creation of files. Provides additional search criteria for audio file data, as well as filtering by content type and file extension. All these points are configured in the first tab of the program "Search criteria".
In the second tab of the program - "Scan path" - the search area is selected.
In the search results window, you can sort, delete, open their location in Explorer, and apply other program options to them.
Duplicate Cleaner search results can be exported to CSV tabular data format file. Data export is carried out both for the entire list of duplicates and for only files marked by the user. The advantages of Duplicate Cleaner are a user-friendly interface and a well-thought-out organization.
3. DupeGuru
DupeGuru is the simplest search engine for duplicate files for those who do not have the time or desire to master all the subtleties of functional highly specialized programs such as those discussed above. At the bottom of the small window of the program, the search area is selected and scanning starts.

Duplicate search results can be sorted by location path and file size. The context menu of the DupeGuru search results contains only the operations necessary to work with the found duplicates.

Search results are saved to a program file or exported to HTML.
DupeGuru is a cross-platform program, but only old versions have been adapted for Windows. The program installer for Windows 7 offered on the official website is also suitable for system versions 8.1 and 10.
4. CCleaner
At one of the stages of its improvement, the most popular Windows cleaner CCleaner received the function of finding duplicate files. You can use this function in the "Service" section. To search for duplicates, search criteria are available by name, creation date, file content, and their size.
Like the previous reviewer, the CCleaner program in the duplicate search results environment is not very rich in functionality, but basic operations are present. This, in particular, sorting search results and deleting files.
5. Glary Utilities 5
A comprehensive program for cleaning and optimizing Windows Glary Utilities 5 among the arsenal contains a utility for finding duplicate files. The same utility, if desired, can be downloaded separately from the official website of the program, if you do not need the full power of the software package.
The duplicate finder in Glary Utilities 5 is simple, but convenient and customizable. Scanning for duplicates can be started immediately by selecting only the search area - disk partitions, removable devices or individual folders. Or you can narrow down your search by clicking the "Options" button.
In the options you can configure the search criteria for duplicates - by name, by size, by the time the files were created. In some cases of thorough cleaning of disk space, you can change the preset search selection only among common file types to scan all types.

The search results only cover the necessary operations for working with duplicates, such as deleting and opening a location path in Windows Explorer.
For the convenience of the user, Glary Utilities 5 catalogs the found duplicates by content type - documents, pictures, videos, programs, etc. The total weight of the found files is displayed for each type.
The program for finding duplicate files is most often needed by users who store a large amount of music, photos and documents on the disk.
And although you can manually delete such redundant copies, specialized applications can save you a lot of time.
Especially if the files are located in different folders or in.
You can search for such duplicates using universal software or designed for a specific data type.
In the first case, the search speed increases, in the second, the probability of finding all copies increases.
Content:Universal Applications
Generic copy search applications mainly work by comparing file sizes.
And, since the probability of the coincidence of the number of bytes in different photos is practically zero, the same values are considered a sign of a duplicate.
Sometimes the algorithm provides for checking the names - also an important parameter for the search, especially since the same data in most cases coincides in name.
The advantages of the programs are the ability to find files of any type with their help and the relatively high speed of work. The disadvantage is lower detection accuracy.
So, for example, none of these utilities will consider the same one saved with different resolutions to be a duplicate.
1. DupKiller
Among its advantages are:
- ease of customization;
- setting multiple search criteria;
- the ability to ignore some files (with a certain size or date of creation, as well as system or hidden).
Important: If files with zero size are found, they do not need to be deleted. Sometimes it can be information created in another operating system (for example, Linux).

Rice. 4. System optimization software CCleaner can search for duplicate files.
5. AllDup
Among the advantages of another program, AllDup, one can mention support for any modern Windows operating system - from XP to 10th.
In this case, the search is carried out both inside hidden folders, and even in archives.
Although the comparison of information by default occurs by file names, so it is advisable to change the settings immediately.
But during the search process, each found duplicate can be viewed without closing the application.
And if a copy is found, you can not only delete it, but also rename it or move it to another location.
Additional advantages of the application include completely free work for any period of time.
In addition, the manufacturer also releases a portable version in order to search for copies on those computers on which the installation of third-party software is prohibited (for example, on a working PC).

Rice. 5. Search for files using the portable version of AllDup.
6. DupeGuru
Another useful application for finding duplicates with any extension is DupeGuru.
Its only drawback is the lack of new versions for Windows (while updates for and MacOS appear regularly).
However, even a relatively outdated utility for copes well with its tasks when working in newer operating systems.
With its help, even system files are easily detected, and the menu is intuitive and Russian-language.

Rice. 6. Detection of copies using the DupeGuru utility.
It is noteworthy that, in addition to the usual universal version, the manufacturing company has created a utility for finding files of a certain type.
There is a separate version for images and another for music.
And, if you need to clean your computer not only of documents and system files (which, by the way, need to be deleted very carefully - sometimes you even need to leave an "extra" copy, than disrupt the system's performance), you should also download these applications.
7. Duplicate Cleaner Free
The utility for detecting copies of any file Duplicate Cleaner Free has the following features:
- filtering data by extension;
- Russian interface language;
- the possibility of free use;
- high speed of work.
Its disadvantages include small restrictions when searching for images (it is recommended to purchase a paid version for this) and not entirely accurate translation of individual menu items.
Nevertheless, due to its efficiency and ease of use, the application enjoys a certain popularity.

Rice. 7. Search for duplicates using the Duplicate Cleaner Free utility.
Find duplicate audio files
If the search results for duplicates do not suit the user, you can consider an option designed for specific files. For example, for the accumulated disk.
Such a need often arises when downloading several albums and collections of the same artist at once - often the same tracks appear in different folders.
They can have similar sizes and differ, by and large, only in names. Especially for this there are utilities for finding similar melodies.
8. Music Duplicate Remover
Among the features of the Music Duplicate Remover program is a relatively fast search and good efficiency.
In fact, this application "listens" to the composition and compares it with other audio files.
At the same time, of course, its operation time is longer than that of universal utilities.
However, the amount of data checked by the program, as a rule, is ten times less, so the average duration of a check rarely exceeds a couple of hours.

Rice. 8. Detection of copies of music and audio files by album.
9. Audio Comparer

At the same time, photo analysis also takes longer compared to searching for files of any extension, but the result pays off.
Images are detected even if there are several duplicates of the same image on the disk, but with different resolutions and, accordingly, sizes.
In addition, to improve efficiency, files with any graphic extensions are scanned - from to .png.

Rice. 11. Search for pictures using yet another version of DupeGuru.
12. ImageDupeless
Moreover, it is distributed free of charge and has a Russian interface. And the manufacturer periodically releases updates to it, increasing the efficiency of image search.

Rice. 12. Stylish interface of the ImageDupeless application.
13. Image Comparer
The advantages of Image Comparer, in addition to the simple interface, include the presence of a step-by-step wizard that allows you to learn how to quickly and efficiently search for images.
This feature distinguishes the utility from most others, to work with which you have to read the help files, which are not always correctly translated (and sometimes even provided only in English).
In fact, the application is another version of Audio Comparer, and is also distributed under a "shareware" license - that is, the user will have to pay for certain functions.

Rice. 13. Image Comparer is a good way to find duplicate images.


