A local home network via a WiFi router opens up a wide space for opportunities for users of mobile gadgets and personal computers with the Internet. The user can set up such a network on his own, without even having deep knowledge in network management.
A Wi-Fi router allows you to organize wireless Internet at home, to which you can connect from several devices at the same time.
Since computers and laptops are no longer luxury items, anyone can buy these devices, many even have several personal gadgets. For ease of use, it is recommended to combine them into a local network (LAN).
A home local area network has a lot of functions and allows you to share files, distribute the Internet, play network games and much more. It is set up quite easily.
What is a local network?

Figure 1. Changing adapter settings.
A local network is a group of devices, such as personal computers, laptops, printers, TVs, etc., connected through interfaces through a certain data transmission medium (cable, radio channel).
The main benefits that the user receives with the establishment of a locale:
- Direct file sharing. You can transfer photos, music, movies and other files between computers directly via local area without using external drives such as flash drives, disks, etc.
- Access to shared network resources. These include, for example, a printer. If it is connected to a local network, this allows you to print the necessary information on it from any computer in it.
- Organization of the play area. Video games often have a multiplayer mode that allows players to compete.
- Access to the Internet. Each device on the home network can access the Internet if it is connected to one of the computers, and sharing is enabled and configured.

Figure 2. Creating a homegroup.
In a classic local area network, the connection between computers is provided using a cable. However, in the age of portable devices and wireless technologies, the use of such a connection method is no longer relevant.
Instead, it is proposed to build a home network through a WiFi router, it will be possible to include devices that support WiFi: tablets, smartphones and others.
They will also have access to all the functionality of the local network, such as file transfer and access to the Internet, possibly with some restrictions related to the specifics of the use of mobile devices.
What is needed for a home network?
So, the task is to create a network through a router. For its organization, it is necessary to provide the following equipment configuration:

Figure 3. Network location settings.
- WiFi router with DHCP support. Must be connected to the internet.
- Stationary personal computer.
- Notebook, laptop.
- Tablet, smartphone.
Before setting up a network through a router, you need to take a few steps. First you need to make sure that the DHCP server is enabled and active on the router. This network protocol is used to automatically assign network parameters (for example, an IP address) to nodes connected to the router. Then it is worth understanding the concept of "working group". For security purposes, all computers to be joined must belong to the same workgroup. This is necessary so that foreign devices, which were not included in the network structure, were not able to use its resources and penetrate network nodes.
You can configure the system belonging to a particular workgroup by following the following path: "Start" - "Control Panel" - "System".

Figure 4. Sharing.
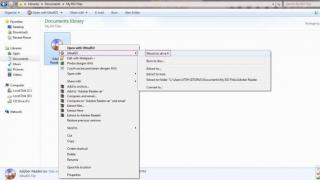
In the subsection called "Computer name, domain, workgroup settings" you need to click the link on the right "Change settings", then in the window that opens, click the "Change" button (Fig. 1).
This window allows you to configure settings such as computer name, workgroup, and others. The workgroup field can initially be set to the standard name Workgroup, but you can enter your own name instead, such as Homenetwork.
In the same window, you can specify a unique computer name. Then you need to restart your computer. The specified operation must be repeated exactly on all computers included in the local network. The name of the group should be the same for everyone, and it is desirable to make the names different.
How to create a home group?
You must create a local network location home group, the home group. You should go along the path: "Start" - "Control Panel" - "Network and Access Control". The router with which a home LAN is organized must be connected and connected in advance.

Figure 5. Enabling password protection.
In the subsection of active networks on the right there is the line "Home group", next to it you need to click on the link "Ready to create", then on the button "Create home group" (Fig. 2).
It should be noted that if the configured locale does not have home status in the network browsing section, it can be given it by clicking on the "Networks" link (in the figure - Network 5). The network location settings window will open, where you can select one of three types (Fig. 3):
- Home network. It is designed to ensure that all nodes are known and safe, the user knows about all devices, and fully trusts their work. Access is practically unlimited.
- Enterprise network. Optimized for office or corporate local systems.
- Public network. Serves to work in public public places, where it is important to maintain the anonymity and security of each site. Computers in such a network are invisible to each other, which provides high protection against unauthorized entry.

Figure 6. Connecting to a home network.
By clicking on the "Create a homegroup" button, you can select the directories and devices that you want to open for public use (Fig. 4).
After applying these parameters, the system will generate a password. You need to write it down separately (or take a screenshot), as it may be required for a WiFi connection.
Otherwise, setting up a local network through a router will not be possible (Fig. 5).
How to connect to your home network?
After all these actions are completed, the home group is considered created. It is recommended to reboot the device to fully apply the configuration. Since you need to set up a network for several computers, then you should definitely check the ability of various computers to connect to the created homegroup. A second computer (for example, a laptop) must be connected to the Wi-Fi point of the router. On it we go to "Network Management", look for the item "Homegroup", click on the "Join" button (Fig. 6).

Figure 7. Network setup for multiple computers.
After entering the written password, we repeat the setup cycle, specify the allowed folders and reboot the device. If the connection cannot be established, you need to disable all third-party firewalls and firewalls (firewalls). When the connection is made, all network devices should become visible, access to resources and directories should be open.
By default, only a few special shared folders are accessible on a computer. But this is far from the limit of possibilities, it is possible to make available almost any directory in the system. To do this, open the folder properties, find the “Access” tab, click on “Advanced settings” there and check the box that opens sharing. Applying the settings, the folder should become visible to other computers (Fig. 7).
Now let's figure out how to get using WiFi from a tablet to a computer.
In the created home network, you can additionally include tablets and smartphones running on Android.
The application "ES Explorer" will help with this. After installing it, you need to connect to Wi-Fi. The program has a LAN tab (this is access to the local network). Once there, you need to click on the "Search" button. The application will find all available computers, you can now go into each of them and view the contents of open folders.
When using several computers at home, you may want to combine them into one network, and you should think about using a router for more detailed routing and a single Internet connection. Such a solution will allow you to get several advantages:
- Ease of connecting multiple devices to the Internet;
- using network folders instead of flash cards and removable hard drives;
- use of a network peripheral device (printer, scanner);
- use one antivirus license on multiple devices, or centrally manage multiple antiviruses.
Of course, to create a network, you need a router. You can find out how to choose the right router for your home.
After you have decided on the router, you should make a kind of markup, that is, determine where each of the network devices will be installed. You need to do this in order to correctly place the router.
Important! When using wireless equipment, try not to obstruct the signal path from the router to the client. In the case of a distributed network (if subscribers are located in different rooms), it is recommended to install the router so that the computers are equidistant from it. In the case of using a wired transmission medium, an approximate marking of the location of all network participants will allow you to prepare patch cords of the required length in advance (you can read about the manufacture of power cords) .
When choosing a Wi-fi router, do not forget to check if all computers have a wireless network card.
When setting up a home network, for each of the subscribers, you should use a network address from any private range, that is, an IP that is not used on the Internet:
- 10.0.0.0 – 10.255.255.255;
- 100.64.0.0 – 100.127.255.255;
- 172.16.0.0 – 172.31.255.255;
- 192.168.0.0 – 192.168.255.255.
On a note! If you have not configured the subscriber addresses manually, and at the same time your router does not have the “DHCP” mode of operation (from the English Dynamic Host Configuration Protocol, automatic assignment protocolIP addresses to the host), then network clients will be assigned an address from a special stack "APIPA" (from English.Automatic Private IP AddressingIP private range) that includes networks 169.254.0.0 - 169.254.255.255, and there is no guarantee that networked devices will be able to access each other. It is recommended to configure network cards manually.

When setting addresses, do not forget about network masks - these are additional identifiers of the network address. It is used to distinguish between subnets and is a group of 32 bits, just like IP, but without alternating zeros and ones.
On a note! An IP address, as you know, consists of four decimal numbers, in the range 0 - 255, for example 192.168.0.3. However, the computer perceives information exactly as bits, that is, in the binary number system, respectively, the machine sees the specified address as 11000000.10101000.00000000.00000011. As you can see, there is an alternation of zeros and ones. The subnet mask is also entered in the decimal system, but alternations in it are not allowed - the left side always consists of ones, the right side is padded with zeros up to 32 bits, for example 255.255.255.192 will be perceived as 11111111.11111111.11111111.11000000.
The subnet mask can be used to restrict access to your network. The limit values for the number of devices can be calculated, but it is quite difficult, so it is better to use a special table or calculator. Let's assume you are using a wireless router and there will be a total of five devices in the network (including the router).
Step 1. Go to the site with the IP calculator.

Step 2 Fill in the required fields. The source network can be any private IP. In the "Sizes of subnets" field, specify the number of subscribers in your network. Leave the mask field as default. To process the data, click the "Calculate" button.

Step 3 Check out the calculation results. The calculator automatically selects the subnet mask as close as possible to the required one. Pay attention to the column "Required size", it contains the given value of hosts and "+2". These two additional addresses are the address of the network itself (in this case 10.19.1.0) and the broadcast address (to broadcast to all addresses on the network, in this case 10.19.1.7).

On a note! Of course, since all information in computers is processed in binary, the number of computers on a subnet must be a power of two. The nearest value containing 5 devices is 2 3 , that is 8.
Setting up a router
TP-Link is selected as a router. The main methods for connecting to routers are described. To set up a home network, the most important is the DHCP setting, so we will dwell on it in more detail.
Step 1. Start the DHCP service. Enter the start and end addresses found using the calculator. Don't forget to specify the IP lease period (this parameter provides an additional guarantee of security, since the IP of each device changes after a specified period of time). As the default gateway, you should specify the router itself. Specifying a domain for a workgroup is not relevant. The DNS server in domain networks is specified by the domain controller; for the home network, it is recommended to use the address 8.8.8.8 (Google's DNS server).

Step 2 The "List of clients" option contains records about each network subscriber, namely, a comparison of the MAC address with the IP address.

Step 3"Address Reservation" is used to avoid renting specific network components, such as printers.

Setting up a Windows 7 network connection
After assigning network addresses to all devices, including the router, you can begin to form a network group.
Step 1. Launch the "Run" window by pressing the "Win + R" buttons on the keyboard.

Step 2 Enter the line "sysdm.cpl".

Step 3 Check the name of the network group or domain. All devices must belong to the same group.

Step 4

Step 5

Important!
Step 6 Enter network management by right-clicking on the network connections icon.

Step 7 To configure connection options, use the link to change network access settings in the left frame.

Step 8 Expand the list of home network profile options.

Step 9 Check the recommended options. Network discovery must be enabled in order for multiple network devices to "see" each other. Printer sharing is enabled as needed. Access to directories is configured on each individual computer. The encryption settings in the homegroup, where all devices are known to you, are irrelevant. Home network connections are best left under the control of the operating system.

Step 10 To share a directory, go to its "Properties". Call the menu with the right button and click the corresponding line.

Step 11 In the settings window, switch to the "Access" tab.

Step 12 To configure, use the "Share ..." button.

Step 13 To restrict access, you can specify specific users (used in a domain) or select the “All” option (for a workgroup).

Step 14 To “share” (from the English share - share) a network printer, enter the “Devices and Printers” through the start menu.
Step 15 Select the device that you want to make network and enter its properties. Call the menu with the right button and select the corresponding line.

Step 16 In the dialog box, go to the "Access" tab.

Step 17 To configure, use the "Sharing settings" option.

Important! You must have administrator rights.
Step 18 Check the options to enable printer access. When working in a domain, it is also recommended to check the "Add to Active Directory" option to facilitate the search for a network device.

Step 19 To connect to a network printer or folder, you need to find in the network environment the computer on which you configured access to these resources.

Step 20 Upon entering the network computer, you will be presented with a list of available resources.

Step 21 To connect the printer on the subscriber's PC, you need to call the context menu, and go to the "Connect ..." item, after automatic installation of the driver, the network device will be available on the subscriber's computer.

Important! If the bitness of the server computer and the subscriber computer are different, additional ones may be required for the correct operation of the printer.
Step 22 To facilitate access to shared resources, you can configure a network resource on the subscriber computer as a network drive. This can be done through the menu, when selecting the item "Connect a network drive ...".

Step 23 In the expanded wizard, specify the letter that will correspond to the drive. Pay attention to the option "Restore at login". If it is inactive, then the drive will become disconnected every time you reboot or turn off the power.

Step 24 Upon completion of the installation, the network folder will be available as a regular hard drive through "My Computer".

Windows 10 network setup
Step 1. Call the system list using the combination "Win + X". In the window that opens, go to the "System" section.

Step 2 To configure connection options, use the change sharing settings link in the left frame of the window.

Step 3 In the window that opens, switch to the "Computer Name" tab.

Step 4 Check the workgroup or domain name. All devices must belong to the same group.

Step 5 To switch to another group, select the "Change ..." button.

To switch to a different group, click the "Change ..." button.
Step 6 Change the station name and connect to the desired group or domain.
Important! Changes will only be applied after a reboot.
On a note! Folder access settings are similar to those for Windows 7.
Conclusion
We have considered the main aspects of setting up a network for operating systems of the Windows family. In order to increase information security, do not forget to calculate the subnet mask and use the DHCP service.
Video - How to set up a network between computers through a router
Good afternoon.
For laptops, the most convenient and practical to use would be to create a wireless LAN using wifi. Even a novice who turned on the computer for the first time can handle setting up such a local network between two laptops.
You need to follow these steps:
 The local network between two laptops is miraculously created, you just have to connect to it from the second laptop, remembering to enter the password.
tvoi-setevichok.ru
Wireless wi-fi network between Windows 7 laptops
Setting up wi-fi between two laptops is a pressing issue for entry-level users. Wi-fi wireless technology is installed in almost all portable devices, and, naturally, the question arises: “If you can set up a wi-fi wireless network between two laptops for data transfer and communication, then why not take advantage of this opportunity?”.
Indeed, a wi-fi network opens up endless possibilities for wireless communication: you can exchange data and information between laptops, you can chat and arrange entire conferences, play network games and simply download the file you need from one computer to another. And all this without any wires! You can set up a wireless wifi network between laptops in a matter of minutes and use it repeatedly in the future. But first, let's look at what the word “wi-fi” means in general, and how this technology “freed us from wires” that tied our hands and took up extra space.
WiFi technology
Wi-Fi technology and wireless network was created in 1991 by NCR Corporation/AT&T. This product was originally designed for wireless data transmission of point of sale systems and was called WaveLAN. The maximum transfer rate was 1-2 Mbps. The creator of the Wi-Fi wireless network, Vic Hay, further participated in the development of international standards IEEE 801.11a, IEEE 802.11g, IEEE 802.11b, the maximum transmission rate of which was already 54 Mbps. Later, in 2009, a new wi-fi wireless network standard was launched - IEEE 802.11n, which could transmit information to devices with a similar chip at a speed of 600 Mbps. The development of wireless network technology did not stop at this limit, and literally in 2011 a new Super Wi-Fi standard was released that supported IEEE 802.22 technology. Thanks to this wireless network technology, a laptop could achieve a data transfer rate of 22 MB/s within a radius of one hundred meters, which was a real breakthrough in the world of portable devices.
What are the benefits of a wireless Wi-Fi network?
Thanks to wi-fi technology, a wireless network can be created both between two laptops and between other laptops, tablets, mobile phones and other devices that are adapted for this module.
Wi-Fi is the most widespread segment of the wireless network on the market.
Allows you to connect devices to each other for free and quickly, which significantly saves time and money on the purchase of network wires.
A wireless wi-fi network between laptops is more than a hundred times more harmless than cell phone radiation.
How to create a wireless wi-fi network between two Windows 7 laptops?
How to create a Windows 7 wireless network between its devices will be useful to everyone, because such settings will be used both when connecting computers and mobile devices with this operating system. Why are we dismantling OS Windows 7? The fact is that this operating system is fully adapted to all kinds of devices and encryption protocols, is the most stable and easy to set up a wireless wifi network between laptops. With new technology in Windows 7, you can connect to one network at the same time and monitor other wireless networks that are nearby from the state. You should know that setting up a wireless network on Windows 7 laptops is approximately similar to other OS operating systems from Microsoft, for which special thanks to them. So, let's get down to visually setting up a wireless wi-fi network between two laptops step by step.
So .... let's get started!)
1. When you turn on Wi-Fi on both laptops, you can immediately notice a notification in the tray that "There are connections available." To configure it, go to the "Network and Sharing Center".

2. When we go to the "Network and Sharing Center", you must select "Set up a new connection or network".

3. After we see a new window that opens, in order to create a wireless network between Windows 7 laptops, you must select "set up a computer-to-computer wireless network".


5. Here, in order to create a wireless network between Windiws 7 laptops, we need to enter the desired network name, security type and password. You can come up with all these parameters arbitrarily, the only limitation is that the “wep” encryption protocol supports a password in the range of 5-13 characters.

6. Write down or remember your password, as it will come in handy for further wireless network setup on the second laptop.


7. Turn on wi-fi on the second laptop and immediately see a notification in the tray that a new wireless network has appeared. We click "connect".


That's all! We use!)
Also in the attached video you can see the whole sequence of actions visually.
www.netbooks.by
Create a Wi-Fi hotspot on a laptop

How to create a wireless Wi-Fi local area network between two computers, a computer and a laptop, a laptop and any other wireless device: smartphone, tablet, TV with an integrated wireless module without a separate wireless access point quickly and easily?
In this article, we will write “on the fingers” how you can create a Wi-Fi access point on a laptop with a minimum amount of computer knowledge “on board”.
At the very beginning of the setup, we need a working, well-tuned laptop with a Wi-Fi module. You can repair and set up a laptop of any brand in our company. All information on the site is at the link here. Before setting up, it is advisable to make sure that there are no viruses in the Windows operating system, since viruses very often make it difficult to work with wireless networks. Without leaving our resource, you can read about antiviruses, compare, then download and install a fresh free antivirus. After installation, it is desirable to conduct a full or at least a quick system scan. This completes the preparation of the laptop - further tips on using this kind of network and a description of the settings.
Let's define the scope of this Wireless Local Area Network (wireless local area network).
- Typical situation number 1: you have Internet via cable (home network, cable modem, like Cosmos TV) on a laptop with Windows 7 installed, but then a smartphone (iPhone, any tablet, Android) appears and an urgent need to access the Internet via him.
- Typical situation number 2: you have files on a perfectly configured laptop that urgently needed to be transferred to a Wi-Fi-enabled mobile device. It is possible that such a need arises regularly or periodically and you really need it.
For such situations, you can easily and simply adapt the wireless access point (Wi-Fi Hot Spot) we created. So, further everything is only on the topic.
To create a local wireless Wi-Fi network between two computers with the ability to access the Internet through one of them, which will be connected to the Internet via a LAN wire (a regular network cable), you need to go through several steps. They are quite simple - the main thing is to understand the principle and strictly follow the settings.
- Stage - we create a virtual network adapter on the Virtual Wi-Fi laptop, which will broadcast the wireless network and the Internet.
- Stage - we configure access to the Internet. We implement the principle of a full-fledged access point based on a laptop.
Stage 1
The first step begins with the fact that on a laptop that will become an access point and to which any wireless device can be connected, we will create a Virtual Hotspot.
To do this, run the cmd command with administrator rights. In the console that appears, type manually or copy the line:
netsh wlan set hostednetwork mode=allow ssid="MS Virtual Wi-Fi" key="Pass for virtual Wi-Fi" keyUsage=persistent
Where ssid is the name of our created network, and the key value is the password for connection, choose it yourself (8 - 63 ASCII characters). For example, values like: erQ564U0. In our case, we get the following line, which we enter into the console:
netsh wlan set hostednetwork mode=allow ssid= "MS Virtual Wi-Fi" key= "erQ564U0" keyUsage=persistent
As a result of our actions, another wireless device should appear in the laptop - the Microsoft Virtual WiFi miniport adapter.

This is a virtual wireless adapter. It is created as a separate device for broadcasting the network, since Wi-Fi technology does not encourage the use of one adapter for several purposes. So far, our network has been created, but is in an inactive state.
Important: if a new wireless device called Microsoft Virtual Wi-Fi miniport adapter does not appear in Device Manager, then there is a problem with the Wi-Fi module driver - download and install the original driver. Otherwise, the network will not work.

To activate our wireless network, launch the console again with the cmd command with administrator rights. Enter the following values in it:
netsh wlan start hostednetwork
By analogy, to stop the network if necessary, we type the command:
netsh wlan stop hostednetwork
All these commands are better to be issued in the form of bat files for quick launch as needed.
After starting our network via netsh wlan start hostednetwork, another Wi-Fi network will begin to be detected in our room. You can check the presence of the network we created by going to the menu for searching and connecting networks, for example, a smartphone on Andoid OS (Settings-Network-Wi-Fi Settings-Enable WiFi-Wi-Fi networks).
You can connect to it by clicking the "Connect" button in the list of available networks and entering the password that we set when creating the network. In our case, this is erQ564U0.
Stage 1 completed. The password-protected Wireless Software Access Point (SoftAP) is set up and ready to use.
Stage 2
At this stage, we need to access the Internet through our laptop-based software access point. To do this, we need to share (make open) access to the wired LAN network adapter on the laptop.
This is done like this: Go to Control Panel - Network and Internet - Network Connections. We find the network adapter, in our case it is: LAN connection - Atheros AR8162/8166/8168 PCI-E Fast Ethernet Controller. Right-click on the adapter icon - Properties - Access - Put a birdie (checkbox): Allow other network users to use this computer's Internet connection. You also need to specify which adapter we are giving access to the network in the drop-down menu just below (Home network connection). Here we need to specify our newly created virtual network. In our case, this is Wireless Network Connection 2.

Click the OK button to save the settings. The network should immediately start distributing the Internet without rebooting. The network configuration on a laptop distributing the Internet should look like this - the network we created should be with access to the Internet.

Important: you need to start the created network after each restart of the Windows operating system. Those. write netsh wlan start hostednetwork in the console. And it's tedious to do it over and over again. To avoid this, you need to create a bat file (.bat) and display its shortcut on the desktop for maximum convenience.
It is possible that the Internet in such a network will work rather mediocrely, the speed may not drop, but the ping will increase, the network will most likely fail for periods. It should also be noted that you can automatically configure a wireless Wi-Fi router using special software. Alternatively, in the future, for maximum comfort, you can buy and install a wireless access point using the example of installing a wireless access for cosmos TV in Minsk.
hpc.by
How to create a network via Wi-Fi?

How to create a network via wifi?
The local Wi-Fi wireless network is an innovation, of course, useful. Here you can also exchange files (moreover, quite voluminous - such as films, programs) and play games with a neighbor, especially since installing and configuring this network is not so difficult, now you will see for yourself! All you need is a new working router, a modern computer and a network cable with working internet. But before creating a network, remember that many antivirus software can significantly degrade the quality of the connection by blocking some settings and processes.
How to create a local network between two computers via Wi-Fi?
First you need to go to the system properties of your computer and in the window that opens, enter the name of the new workgroup, and this action is tedious to perform on all machines that plan to connect to the network.
Next, go to the "Start" menu, through the "Control Panel" look for the "Network and Sharing Management" menu, then determine what type our current network belongs to, and click on "Ready to create". 
Creation of a working group
In the window that appears, click "Create a homegroup", then we begin to select the elements that will be opened to computers from the same network space, set a password, if necessary, and click "Finish".

Create a homegroup
If you suddenly want to turn off the password request, then you need to scroll through the previous window again, find the “Sharing with password protection” setting, select the desired tab to turn it off, open the “General” settings tab and, finally, having found the previous item, finally turn off password protection. When finished, be sure to click on "Save Change".

Sharing with password protection
This completes the last step of these network settings. Now it remains only to restart all network computers, then go to "My Computer" and select the "Network" tab.
As you can see, the shared folder has the same access and can be used by any computers connected to the network.
AskPoint.org
Create wifi network between laptops | Computer PEOPLE

create a wifi network between laptops
Many users, especially students, like to play games on laptops in pairs. Or just need to transfer files. For these steps you need to have a network between laptops. That is why today I am writing an article on how to create a wifi network between laptops. The operation is quite simple and fast in execution, but still not everyone knows it.
First, click Start -> Control Panel -> Network and Internet.
 Now we are looking for the item Network and Sharing Center and click it.
  On the left side of the window there is an item Manage wireless networks.
  In the next window, we see many networks, but we do not need them, but we are just looking for the Add button.
  You have two choices, but ours is Create a computer-to-computer network.
  Next, a window is shown in which it is written what kind of network, and in what conditions it will work. So just click Next.
  In the next window, we must enter three parameters of our future network: Network name (name of the future network), Security type (you can not change anything), Security key (password for your network, at least 8 characters). Once everything has been entered, click Next.
  Congratulations, the network has been created and now a window is shown with a message that you have done it.
The last step is the connection itself, and all that remains is to ask a friend to search for your network among wifi points.

That's all for today I wanted to tell in the article How to create a network between laptops.
If there are several computers or other gadgets (tablets, phones, laptops) in the house that have the ability to access the Internet, the question arises of how to create a home network through a router with the ability to transfer data between all devices.
To connect all devices with each other, you need a router, which will be a connection point. If you do not know, you can read in one of the articles on my blog. Communication between the necessary equipment can be organized both via a wired connection and wirelessly; both types of connection can be used on modern routers.
In order to create a home network through a wifi router, it must be borne in mind that the wireless access point must be located in the center of this network and form a so-called “star” when connecting all devices. A Wifi router connects to the Internet via a cable provided by the provider and automatically distributes it to all devices connected to it.
There is also the possibility and thereby do without a router. However, this method is more labor intensive.
The wireless connection point has a "WAN" (Wide area network) port, which means connecting to a global network. And the rest of the devices connected via cable are included in the local / home and, accordingly, are connected via wire to any connector labeled "LAN" (Local area network). On most routers, the number of these ports is four, which, accordingly, allows you to connect four computers via a wired circuit. If it is necessary to expand the number of "LAN" ports (there are times when four is not enough), then it is possible to use network switches. Using the 8-port network switch model, you will increase the number of connected devices by 6 pieces, since one port on the router and one port on the switch will be occupied by connecting to each other.
In addition to a wired connection, the well-known wireless can be used to create a private network; the combination “WLAN” is usually used to denote it.
If you have a fairly large area of \u200b\u200bthe apartment, then when connecting devices via Wi-Fi, disconnection may occur due to a very weak signal in remote parts of the room. In this case, I suggest using or using
Having chosen the type of connection, based on the capabilities of your devices and personal preferences, a so-called home network is organized through a router, which allows you to organize data transfer. However, in order for everything to work harmoniously, you need to make some more settings. Below will be described , how to create a home network through a wifi router on computers and laptops. You can read about connecting Android tablets and mobile devices in another.
Create a workgroup for your home network
First, we need to create a workgroup that will include all the computers on our network. To do this, go to the following path:
Start > Control Panel > System and Security > System

Click on "advanced system settings" in the column on the left, the "System Properties" window will open. The default name of your workgroup will be WORKGROUP, however you can change it by clicking on the Change button.

We carry out the same actions on all computers that will be connected to the access point.
Sharing Files and Printers
If you do not perform these actions, then so that you do not share, access to this data will not be available. To do this, you should go to the following path:
Start > Control Panel > Network and Internet > Network and Sharing Center

Several profiles will be displayed on the screen. Each profile must be shared and password protection disabled.

When you create a home network through a wifi router, be sure to make the same changes on all computers.
Access to folders and files
If we want to be able to work with the files of the user of another computer, we need to share the necessary folders.
On the folder for which we want to share, right-click and select from the pop-up menu Sharing >HomeGroup

After such simple actions, the folder will be open to all users of the workgroup.
I would like to note one more point, if you are unable to connect to any computer, be sure to check the settings of the standard and built-in firewall. It happens that there are different connections.
If the home network through the wifi router is created correctly, then after logging in you will see the computers in your group and, accordingly, the shared folders and files.
That's actually all the information on how to create a home network through a Wi-Fi router, but if you haven't done the setup yourself, then leave your questions in the comments and I will try to answer them.
The main purpose of the router is to create an access point to Internet resources. The router-router performs the function of a connecting element for creating a home local network, it-router provides the ability to connect peripheral devices located at home or office to the ISP channel. A home network through a wifi router is very convenient, modern and practical!
We will understand in detail how to create a home network through a wifi router, we will also consider the advantages of working with a home local network.
Benefits of creating a local network
A local area network is commonly understood as a group of devices connected to each other using two types of networks:
- Wired type;
- Wireless type.
Classic type - connection by means of cable elements. Today, this approach can be easily supplanted by the router and wireless LAN.
Such a group of devices connected via LAN has benefits:
- Possibility of immediate transmission of information arrays– data and files between the individual devices in the group. At the same time, the need to use physical data carriers is eliminated;
- uninterrupted and permanent access to Internet resources;
- Creating a local network will also allow you to have access to all resources of any of the devices in the group. For example, it will be possible to easily carry out through a PC document printing located on a mobile gadget;
- Local network through a wifi router allows you to organize single play space, which will be useful for fans of network games.
What you need to organize a local group
The task set - creating a network through the use of a router, will require the presence of certain equipment:
- Directly router;
- Personal computer, which will serve as the center of all subsequent manipulations;
- laptop or netbook;
- Tablet computer or smartphone;
- Printer
- Other devices that support data transfer via wi-fi
DHCP
Before you do and implement your plan, it is important to make sure that the server is available and active. DHCP: The protocol will automatically set network parameters for all devices in the group. In the tab DHCP there is a subsection DHCP Clients List in it you will see all the devices connected to the router. Of course, you can do without deploying DHCP, but in the absence of automatic distribution of addresses, in order to connect to the router, you will have to prescribe network parameters manually on each device.
Switch

The appearance of the D-Link switch
The router has ports on the side or back for connecting your devices. One of the ports is highlighted in color (usually yellow) and is designed to connect the ISP cable, it is called the WAN port. LAN ports are for connecting devices. If there are not enough sockets to connect all your gadgets, you can buy a special eight port switch. Then you connect the switch to the router, and already connect all your devices to the switch. Switches can be:
- Megabit;
- Gigabit (if you need a higher speed connection to the disk).
Learn more about creating and configuring a local network
So, how is the creation of a home network through a router? We present all the required actions in the form of a list:
Before carrying out all the necessary manipulations:

In order to set up the home network correctly, as well as for its proper functioning, it is necessary to provide general access to certain folders or disks - the network through the router must be open for access by one technical device to another and vice versa. To do this, in the properties of the object - a file, folder or disk - set the public access and select the ability to write and read.
What's Next: Connection
When the homegroup is ready, installed and organized, it is recommended to restart the central personal computer.
Now you can check if everything is done properly. To do this, it is recommended that from another device of the created group, for example, a laptop connected to wi-fi, go to the "network management" menu and connect to it in the "home group" option.
Then, after entering the security password and carrying out the manipulations described in the previous paragraph - opening access to disks and files, folders - we reboot the laptop. Communication between the internal networks of individual equipment should become available. In this case, the required "bridge" between the computer and the laptop is built correctly.
What you need to connect your tablet or smartphone to your homegroup
To connect to a home local group from a tablet computer or smartphone (which should preferably support the ability to install applications and run on the Android operating system), you will need to perform a number of actions:
Install on the device from which you plan to connect, the application "ES Explorer";
After installing the program, you need to connect to a Wi-Fi wireless network;
"ES Explorer" has an option (tab) LAN - access to your home local network. Turning to this tab, we initiate the search procedure;
The result of the search will be the display of a list of computers available for connection;
By selecting any of the home group, you can safely access it and exchange data packets between a tablet or smartphone and a computer.
Checking connection and functioning
To make sure that the newly created home network is working, you can use two ways:
Go to "Network Neighborhood". If all of the devices required for connection are found in the list that opens, then everything is in order;
Use command line and the "ping + device address" command. We build a chain of checks according to this command. If satisfactory results are obtained and responses are received from each of the devices in the home or work group (depending on the settings previously configured), the process can be considered normal.
Summing up
Competently and correctly built local group and, subsequently, connection, has a number of advantages compared to cable counterparts from the past: it is not only a qualitatively new level of data transfer, but also convenience and practicality of use.
We figured out how to set up a local network, how to organize communication between all the equipment that is in the group we created on the central computer. The main nuances and subtleties of organizing such a method of communication between home computers, regardless of their functional affiliation, are also considered: both static monoblocks and laptops, netbooks, smartphones and tablets can be connected. Access to shared data is open to any of the devices.
It remains for you, dear user, to carry out all the considered operations yourself and enjoy the manufacturability and all the advantages of your new local group connected wirelessly.