On your own and without the involvement of a specialist, if necessary, you can connect an additional hard drive to your computer. Next, we will analyze installation diagram and subsequent connection of a new hard drive in the system unit. It should be noted that the actions are performed smoothly, clearly, without the use of force and abrupt actions.
First step need to de-energize the entire system unit, for this we turn off the power, and then disconnect absolutely all the wires. Next, the side covers are unscrewed and removed, as well as in the image.
For the hard drive, of course, there are their own compartments, which, depending on the model of the system unit, can be located in different positions and have a different position. 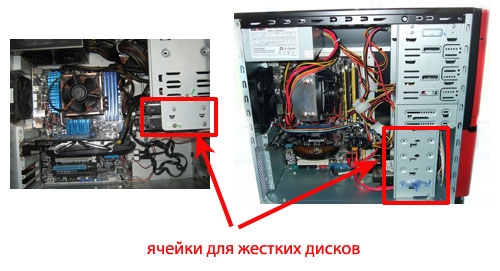
According to the method of connecting the hard drive directly to the motherboard, they are divided into two types, and exactlySATAandIDE. The second option, which has very wide cables and ports for connection, is considered obsolete and is now rarely used. Due to its irrelevance IDE variation will not be considered here.
If the SATA hard drive is already connected to the computer, then adding a second one can be quick and easy. An additional disk is inserted into the appropriate free cell and attached to the case. It is desirable that they are located at a sufficient distance from each other to avoid overheating. 
In order to connect a new hard drive to the motherboard itself, you need a cableSATA. Plug one end into the corresponding slot on the board, and the other to the hard drive. 
It should be noted that in each modern model of the system unit, there is a minimum twoSATA- connector.
The next step will require connect new hard drive directly to the power supply. For this, it is applied special cable, the plug of which is slightly wider than that of the SATA cable. In the case when a single plug comes out of the power supply, you will need a splitter. It happens that a narrow plug in the power supply was not provided, then you should purchase an adapter. Examples are shown in the images: 
Having obtained all the above cables, you should connect the hard drive to the power cable.
The secondary media is now fully connected. You can then start the computer by attaching the covers, connecting the cables, and applying power. After that, will follow, if necessary, the stage of system setup of a new hard drive.

Instruction
Second Winchester allows not only to get additional space for files, but also to significantly increase the reliability of data storage by duplicating important files on . Before you start installing the hard drive, be sure to make sure that the computer is disconnected from the network! Then unscrew the screws holding the left (when looking at the front) side cover with a screwdriver. Note that the procedure for removing the cover may differ for different case models - for example, you may first need to remove the front panel. Remove the screws and carefully remove the side panel. You may need to pull it back a little to do this.
Having removed the panel, you will see the computer motherboard, power supply, various wires and cables. And, of course, the hard drive, usually located at the front of the computer. Pay attention to how it is installed - second the hard drive will need to be installed in the same way, in a free niche. Such niches can be found above or below the main disk. If possible, do not place disks immediately one above the other - you should leave a gap between them, this will help them cool better. An important point: hard drives have special jumpers that set the operating mode. On the main disk, it must be set to the "Master" position. On the second - to the "Slave" position. The jumpers are very small, you may need tweezers to install them. After placing the jumper, carefully install the disk in the place chosen for it, tighten the retaining screws. Together with Winchester ohm, they are usually not there, so a couple of short screws should be found in advance - they should fit the threaded holes on the left and right sidewalls Winchester a.
The disk is installed, it remains to connect power and a data transfer cable to it. To connect the power, you may need an adapter to a SATA drive. Best before you buy Winchester but to open the computer and see if the adapter is worth it on the existing disk, and if so, buy the same one. When connecting, pay attention to the shape of the connectors and the color of the wires of the main disk suitable for them - the new disk must be connected in the same way. To connect the adapter, use any free connector with wires of the desired colors. The power is connected, the whole process is very simple. And most importantly, do not apply force - all connectors are equipped with special protrusions that do not allow them to be installed incorrectly.
The power is connected, now you need to connect the data cable. When buying a disc, make sure that the cable is included in the kit. If not, then purchase it. Usually it is a flat red wire with connectors at the ends, its width is within a centimeter. One end of the cable is connected to Winchester y, you can easily find the right connector. The second is connected to the corresponding socket on the system board. To find it, look where the cable of the main drive is connected - the socket for the second (and often also the third and fourth) should be nearby.
Everything, the disk is connected. We put the cover back in place, turn on the computer. If everything is connected correctly, the computer will start to boot. After loading, open "My Computer" - a new disk should appear in the list of hard drives. If you don’t like the letter assigned to it by the system, go to: Start - Control Panel - Computer Management. In the "Storage Devices" section, select "Disk Management". By clicking on the new drive with the right mouse button, select "Change drive letter or drive path." A window opens, select "Change" and set the desired drive letter.
Useful advice
If you have to disconnect any cables when installing a drive, draw a picture of the connection on a piece of paper. This will allow you to connect them correctly in the future.
Sources:
- how to put a second hard drive on a computer
- How to connect a second hard drive
Modern hard discs very reliable and can work for a very long time. But no one is immune from the breakdown of any equipment. If a hard drive fails, there is little chance that it can be repaired. Then you will have to purchase and install a new hard drive. This process is not complicated, but there are some nuances associated with the type of interfaces of hard drives and motherboards. You need to choose a hard drive that fits the interface of your motherboard.
You will need
- computer, hard drive with SATA or IDE connector, screwdriver.
Instruction
First, find out what interfaces your motherboard is equipped with. This can be done by looking at the technical documentation for your computer. See if the motherboard has a SATA interface. If you do not have technical documentation, you can look at the connection interfaces on the motherboard itself. Indeed, in any case, the system unit will have to be opened.
Unplug your computer. Loosen the screws that secure the system unit cover and remove the system unit cover. Now look for the inscription SATA on the motherboard. Nearby are the SATA connection interfaces. Typically, these interfaces are located in the lower right corner of the motherboard. Please note that SATA interfaces may not be available on fairly old motherboards.
In the age of information in which we live, the area for storing this very information is almost a critical component. In this regard, many are faced with the need to get more free space on their laptop or computer. There are questions like “Do I need an additional hard drive? How to install it? We will try to answer these and other questions in this article.
How to install an additional hard drive on a computer?
PC or laptop
When installing a brand new hard drive, the first (and main) question will be the type of device whose memory is to be expanded. If you have a PC, the procedure will be a little faster and easier, but do not despair if you are the owner of a laptop: for laptops, things are not as bad as it might seem at first glance.
PC
If you have a full size PC and don't know how to install an additional hard drive on your computer, the following guide will help you:
- Determine the type of power your power supply supports. They come in 2 types: SATA (looks like a narrow flat cord, usually red, with an l-shaped connector) or MOLEX (has a massive 4-pin connector). Most likely you have SATA, since MOLEX is technically and morally obsolete. In any case, there are a great many adapters, and if necessary, you can use them.
- Determine the type of connection to your computer's motherboard. It can also be a SATA connector (similar to power, but has a different width) or IDE (a very wide and thin cable). The latter is also obsolete, but still found.
- Decide on the type of memory and amount you need. It can be HDD or SSD. The key difference lies in the speed of work, volume and price. So, HDDs are cheaper and much more capacious, while SSDs are an order of magnitude faster. The best companies for HDD are Seagate and Western Digital, among SSDs are Samsung and Intel.
- Install a fresh purchase in a special connector on your computer, fasten it with screws that are usually included in the kit, and connect the necessary connectors. Of course, all manipulations must be performed with the power supply disconnected from the network.
After performing these manipulations, simply boot the computer as usual, format the additional hard drive (via My Computer) and use it like a regular hard drive.
Notebook
In case you want to know how to install an additional hard drive not on a PC, but on a laptop, you have to do the following:
- Choose and buy the storage device that suits you according to step 3 of the previous section. Please note that the hard drive of mobile computers has a smaller .
- Buy a drive-to-hard drive adapter, they are sold at any computer store. Typically, these adapters have a standard size.
- Unscrew the screw securing the drive, carefully remove it from the laptop case. Then insert a brand new HDD (or SSD) into the adapter, aligning the power and interface connectors, insert the adapter and secure with a fixing screw.
- Turn on your PC, format the secondary hard drive and use it as intended
If the new hard drive does not appear
In the case when the new device could not be installed, that is, Windows simply “does not see” it, you must first of all check whether the device itself is enabled in the BIOS settings. Also, in the BIOS, the memory configuration settings may be incorrectly set (should be AHCI). Correct your settings and try again. It is also possible that the root of the problem is poor cable connections. Check all joints, including adapters. In the presence of dirt and traces of corrosion, wipe the contacts with an eraser and connect again. If after the additional hard drive does not work, then most likely you are out of luck and you bought a marriage. Feel free to carry the purchase back to the store or to the service center, they will help you.
How to take care of your memory
As with any thing, memory needs care. To avoid an early breakdown of a new device, it is recommended to regularly clean up temporary files and carry out no less regular defragmentation. Utilities for these actions, including free ones, are easy to find on the Internet. By giving your drive 10-30 minutes a month, you can extend its "life" for months and years.
Today we want to tell you how to properly connect a hard drive to a computer. In particular, we will look at how to install a new hard drive in a computer, we will also talk about installing a second hard drive, and at the end we will superficially consider installing an external hard drive.
In fact, there is nothing complicated in installing hard drives. By the way, we talked about that in our last article. So, now let's talk about everything in order.
How to install a new hard drive
If you are building a computer or want to replace an old hard drive, then the procedure for installing it is as follows. First you need to remove the hard drive from the package, to do this, carefully cut off its edge with scissors. Remove the hard drive and check for damage and scratches - if everything is fine, then proceed to install it. It is important to note that any work must be done with the computer powered off.
Unscrew the fixing screws and remove the cover from the system unit. If you are installing a new hard drive, choose its position in the hard drive bay. Its most optimal position is in the center so that it is well ventilated. So, when you have chosen a place for the hard drive, you need to fix it.
To date, there are two options for mounting a hard drive: on bolts and on special rack brackets. The first type of fastening is that the hard drive is inserted into the bay and fixed on the sides with special bolts. The second option is a little easier: to do this, you must pull out the hard drive brackets, and use the latches to secure them to the sides of the hard drive. Then we insert the strips into the grooves and drive the hard drive there until it clicks.
Now we need to connect power to the hard drive, it will not be difficult to do this, be guided by the L-shaped corner on the edge of the connector. Check if the power cable is fully inserted. Next, connect the SATA cable. One end of the cable is connected to the connector on the motherboard, the other - to the hard drive. It is worth noting here that if your hard drive does support SATA III, then you need to connect the SATA cable to the corresponding motherboard connector, as a rule, there is a corresponding marking next to these connectors.
When installing a hard drive, try not only to connect the wires, but to route them in such a way that they do not stick out or possibly lead inward so that they are not visible. If necessary, fasten the wires with plastic ties so that they do not stick out.

How to install a second hard drive
To install a second hard drive, you need to follow all the same steps as described above, with the exception of a few points. First of all, you will need to choose a place to install the hard drive in the system unit. We would like to note that it is best to install the second hard drive not near the first one, but so that there is a distance of 2-3 openings between them. In this case, we recommend installing a cooler for better cooling of hard drives. When a place is selected, according to the instructions above, insert a second hard drive into the system unit.
As for the connection, then do everything as described above. When connecting a second hard drive, there is one caveat - a jumper. In some hard drives, mostly old modifications, when connecting to a computer, you must set its status using a special jumper. Therefore, for the main hard drive, the jumper must be set to the “Master” position, and for the second hard drive, to the “Slave” position. In modern hard drives, this is no longer necessary. Please note that it is better to make the main hard drive a more powerful and larger HDD by installing an operating system on it.

How to install an external hard drive
And finally, it is worth saying a few words about connecting an external hard drive to a computer. To install an external hard drive, it must be connected to a USB port. If your external hard drive supports USB 3.0, then it must be connected to this port on the motherboard connector panel, there should be a corresponding designation opposite these ports. If your external HDD has a USB 2.0 connection type. then connect it to the most convenient port for you.
When a new HDD is purchased, the question arises of how to connect a second hard drive to a computer. This is not difficult to do, but before you get started, you need to make sure that your system unit is not under warranty. The fact is that in order to install a second hard drive, you need to remove the side cover of the computer. This will break the seal and therefore void the warranty. To avoid this situation, you should contact the service center.
If the warranty has expired or is missing, feel free to remove the side wall. It is attached with two screws on the back of the PC. Be sure to turn off your computer and unplug it from the network. Installation of an additional hard drive is performed only when the system unit is turned off. This is not a flash drive, and the HDD can simply fail.
You need to inspect the motherboard and the place where the hard drive is already located. Most modern computers have SATA connections. Track where the cable of the existing HDD is connected to the motherboard. There should be at least one more of the same next to this connector. This will depend on the type of your motherboard. Large ones have up to 5-6 connectors, small ones can only have 2.
If you are the owner of a standard type of motherboard, then you just need to choose a socket for connection. If you have a combo (that is, a small one), then some difficulties may arise. The fact is that the first hard drive and optical drive may already be connected to the slots. And it may turn out that there is simply no other place to connect an additional hard drive. These are budget motherboards, and sometimes they do not provide for the ability to connect multiple hard drives. How to install two hard drives in this case? You'll just have to unplug the DVD-ROM to free up the port.
If you have an old computer with an IDE connection type and only one slot remains, you have the opportunity to install two equipment on one cable. It can be either 2 HDDs or a hard drive with an optical drive. When connecting on one cable, it is desirable to follow the sequence in which a system disk is connected to the master connector, and an additional one to the slave. Master is the last connector on the cable, slave is in the middle. The instructions for the HDD should indicate in which position the jumpers should be set for a particular mode.
After we figured out where to connect the second hard drive to the computer so that it recognizes it, we move on to the next step. This is the power supply of the device with electricity. Take a close look at the wires that come from the power supply. In old system units, the type of connections is IDE, in new ones - SATA. Some PCs have both types at the same time. If the hard drive has a SATA port, and only IDEs remain free in the power supply, you should not worry. You need to purchase an adapter from one type of connection to another.
We found out in which connectors the second hard drive is connected. Now it needs to be installed and fixed. Find where the first hard drive is. Depending on the size of your case, there may be from one to three disk locations nearby. If there are many places, it is advisable to connect two HDDs so that they are far away from each other. Hard drives can get very hot during operation, and they need ventilation. The more free space around them, the better ventilation will occur.
In a small case, installing a second hard drive will mean that both hard drives will get very hot. Especially during the hot season. Therefore, it is advisable to purchase a cooling system for them. When connecting a second disk, do not forget that it must be screwed to the case with screws. Unlike solid state drives, HDDs have mechanical parts that can easily be damaged. During transportation, the hard drive may fall out of the slot, and this will damage not only it, but also, possibly, the motherboard.
Second hard drive on a laptop
Hard drives on portable computers do not have the same large capacity as on stationary ones. And sometimes users want to increase the space, but the laptop does not have a slot for an additional hard drive. in this case? This can be done by installing an HDD instead of an optical drive.
For this, there are special adapters. Without them, it will not be possible to connect another hard drive, since the connectors for DVD-ROM and HDD are different. First of all, you need to find out the thickness of your drive. It may vary on different laptops. The most common are 12.7 mm and 9.5 mm. You can find it out like this:
Use a program to diagnose equipment such as Everest or AIDA. View the model of the optical drive and find the specification on the Internet. The exact dimensions must be indicated on the manufacturer's website. Unscrew the drive and take a measurement manually.
After purchasing the adapter, you can proceed to install the hard drive. Unplug your computer from power and turn it off. It can only be untwisted when not in use. Pull out the optical drive. In most cases, it is attached with 2-4 screws.
Take the adapter and remove the stop, which is located on the opposite edge from the connectors. Some try to turn on the second drive by connecting it to the adapter at an acute angle. This can break contacts. The stop is removable and is needed to fix the hard drive. Then firmly press the hard drive to the contacts. Sometimes it takes effort to do so.
After installation and fixing with an emphasis, screw the bolts for a more rigid connection of the adapter with the disk. In order not to spoil the appearance of the laptop, you need to remove the front panel from the optical drive and attach it to the hard drive adapter. Carefully insert the device into the laptop and put back all the covers. If everything was done correctly, the BIOS will display a new hard drive.
Disk system settings
You have learned how to install a second hard drive in a PC. But this is not enough for a full-fledged work with him. Now it needs to be configured so that the system recognizes it. After all, if the disk is new, it does not have marked areas and will not be displayed by the operating system. If you have Windows installed, this can be done by going to the Disk Management section. You can get to this menu by right-clicking on the "My Computer" icon and selecting "Manage".
In the central lower part, all connected drives and their volume will be displayed. The new drive will be labeled "Unallocated". You need to right-click on this area and click "Create Simple Volume". The “Settings Wizard” will appear, following the instructions of which you will determine the space of the future disk, the file system and assign it a letter. Remember that two partitions cannot be assigned the same letter. So that you do not have to deal with OS freezes and crashes in the process, close all unnecessary programs. At the end of the procedure, the system will display a new hard drive.
We have examined in detail how to connect an additional hard drive to a computer. After watching the video below or above in the text, you can understand and consider in more detail the incomprehensible points.


