This device can be easily connected to a PC and then to the Internet even by a not very experienced user.
Connecting to a computer
To connect the ASUS RT N12VP to a personal computer, you will need some items (all of them are included in the kit):
- data cable, which is a twisted pair, crimped on both sides with an RG-45 connector;
- power unit;
- the router itself directly.
The connection process itself is carried out in several stages:
- turn on the PC network card;
- connect the data cable to it;
- the other end of the data cable is connected to the router;
- From the back side we connect the power cable to the device.
It is also important not to forget to attach two antennas to the router - they are always included with the device.
Authorization
To enter parameters into a device of the type in question, it is necessary to perform authorization. This process is quite simple.
To do this, you must perform the following steps in strict order:
- connect the router to a personal computer using a patch cord;
- launch any Internet browser (Opera, Firefox, Google Chrome);
- enter 192.168.1.1 in the address bar - this set of numbers is the personal address of the router;
- a window will open where you need to enter the same thing in both fields (login and password) - “admin”;
- press the “Enter” key.

If the user has done everything correctly, then authorization is complete. Thus, you can access the device parameters, specify all the required characteristics and perform other actions.
Resetting the settings
It often happens that for some reason the equipment’s set parameters are lost, or it simply stops working normally. Such situations can sometimes be resolved by a banal reboot and resetting the settings.
There are two ways to set the default router settings:
- programmatically;
- hardware.
The easiest way is to reset the settings using hardware (mechanical). To do this, you just need a long, thin object with a rounded end (a fountain pen or something similar).
To perform a reset you must:
- turn the device body towards you with its back;
- find a small hole in the plastic (it is located between the left antenna and the “Power” button);
- press the button located in its depth and hold it in this position for 20 seconds (continuously).

To perform a software reset, you need to perform the following steps:
- perform authorization;
- on the left side of the screen we find a section called “Administration”;
- open the “Management” tab;
- Click on the “Factory parameters” button.
To date, several firmware for this device have already been released. Therefore, the soft reset process may be slightly different.
Regardless of how the operation in question was performed, the RT N12VP parameters will be reset to factory settings. This will allow you to set up the Internet and your home network again.
Internet setup
Connecting to the Internet on a device of this type is the most important step. Since RT N12VP is intended, first of all, to provide collective access to the global network. Different providers require different settings. Despite this, the process of connecting to the Internet is quite simple.
Rostelecom
The ASUS RT N12VP router for Rostelecom is configured as follows:
- We log in to the router and select the section called “Internet” on the left side of the screen;
- in the “Wan connection type” item, select PPTP;
- Check the boxes next to “Yes” in the following items:
- “Enable WAN”;
- "Enable NAT";
- "Enable UPnP";
- in the “Account Settings” section we enter the “Username” and “Password” indicated in the concluded agreement for the provision of communication services;
- if the parameters are entered on a PC that was previously connected to the Internet, then you must click on the “Clone MAC” button;
- if the PC has not been connected to the Internet before, then you should register the MAC device;
- Click the “Accept” button located at the bottom of the page.
After completing all the above steps, it is advisable to reboot the router.

In some regions, preparation for operation of this router model is performed slightly differently.
It is simpler and is done as follows:
- authorization is in progress;
- go to the “Internet” section;
- in the “WAN connection type” field, select “Automatic IP”;
- check the boxes next to “Yes” in the following items:
- “Enable WAN”;
- "Enable NAT";
- "Enable UPnP";
- click on “Clone MAC”;
- click on the “Accept” button;
- reboot the device.

After completing the process, you can safely proceed to activating the Wi-Fi connection and subsequent work on the Internet.
Beeline
When preparing to use RT N12VP with Beeline, you will need to establish an L2TP connection.
Connecting to the Internet is carried out as follows:
- log into the router interface using any browser;
- go to the “Internet” section;
- select L2TP in the “WAN connection type” field;
- enable WAN, NAT, UPnP;
- In the “User name” field, enter the number of the concluded agreement;
- in the “Password” field you must enter the password used to log into your personal account on the Beeline website;
- in the “VPN connection” we enter “tp.internet.beeline.ru”;
- click on “Apply”.

Setting up ASUS RT N12VP router for IPTV
An important feature of the RT N12VP model is the ability to work with an IPTV set-top box. This function is presented rather limitedly even in the latest firmware.
That is why preparation for work is carried out extremely quickly:
- perform authorization in the WEB interface;
- go to the “LAN” section;
- in the item called “Selecting an IPTV-STB port” we indicate the port to which the device was connected;
- Click on the “Accept” button.

This completes the process. If, to work with a set-top box of the type in question, you need to specify a VLAN ID, then this router model will not work. Since it is simply not possible to make a choice due to the absence of this item.
Video: connection and setup
Wi-Fi on the router
To provide access to the internet via Wi-Fi using Asus RT N12VP, you must perform the following steps:
- go to the “Wireless Network” section and open the “General” tab;
- fill in the “SSID” field - in Latin letters we denote the Wi-Fi name;
- select the appropriate method for protecting transmitted data in the “authentication method” field - usually this is “WPA2-Personal”;
- we register the Wi-Fi access key, which will be used on all devices without exception in the “WPA Pre-Shared Key” field;
- Click on the “Apply” button.

After completing all the steps listed above, you can safely begin connecting various types of devices via Wi-Fi.
Also, if necessary, you can use additional options presented in the following tabs:
- "WPS";
- "Bridge";
- “Wireless Network MAC Address Filter”;
- "Radius";
- "Professionally".
A large number of different parameters and options is the most important advantage of the ASUS RT N12VP model. A user-friendly interface makes it possible for any user to make a network “for themselves”, taking into account the specifics of its use in a particular case.
Firmware
It often happens that some problems arise in the operation of the device. Or it does not work quite correctly with any provider. In this case, reflashing may be a way out. To do this, you must first download it from the manufacturer’s website or another source.
The type of process in question is performed as follows:
- perform authorization through the WEB interface;
- in the left part of the window that opens, select “Administration”;
- Click on the tab called “Program Update”;
- find the field “New firmware file”;
- click on the “Browse” button and indicate the path to the update files;
- click on “Send”.

The firmware process can take quite a long time. Until it is finished, under no circumstances should you turn off the power to your computer or router. This may lead to the latter failing. When the firmware process is completed, you need to reboot the device.
ASUS RT N12VP is an excellent device for organizing public access to the Internet. Thanks to this router, you can easily connect via Wi-Fi to the World Wide Web. The operating parameters of this device make it possible to use it both for building office infrastructure and for use at home.
Attention!
When working through routers, the access speed may be lower than provided.
Check the speed of your device via an Internet connection from the seller or manufacturer!
Attention!
If you configure the router yourself, you alone are responsible for its proper functioning.
If the instructions given below cause you difficulties in understanding and following them, then it is strongly NOT recommended to configure such equipment yourself!
This article describes the process of setting up the ASUS RT-N12VP router.
Connecting a router
The computer from which the setup will be performed must be connected to any yellow port of the device (for example, the black connecting cable that comes with the device). Now turn on the power to the router and start setting up.
Setting up the router
1. Open the browser and write “http://192.168.1.1/” in the address bar (you can simply copy the address from here and paste it into the browser address bar, naturally without quotes; or you can just click on this link). Enter as username " admin"and the password too" admin" (without quotes).

2. Once in the router’s web configurator, select “Manual configuration”:

3. We come up with and specify a new password to access the router settings:

4. Select the device operating mode “Wireless router (default)” and click “Next”:

5. Select the type of WAN connection PPTP:

6. Enter the username and password to connect to the Internet from the agreement:

7. Check "Use the following IP address: No" and "Connect to the DNS server automatically: Yes", enter the VPN server address ( plus.kerch.net)
If the additional service "Fixed IP" is activated, indicate the server addressstat.kerch.net:

8. Click "Wireless network settings":

9. We come up with and indicate the name of your wireless network and the key (password) for it:

10. Make sure that all settings are made without errors:

11. Let's adjust the WAN settings. In the menu on the left, select “Internet” and check “Connect to a DNS server automatically: Yes":

12. Allow passage ping to your router from the outside.

13. Setting up IPTV:

14. Please be very careful when connecting the KerchNET network cable to the router - it must be plugged in strictly blue Asus RT-N12VP router port!
You must call the KerchNET network technical support service at 6-15-09 and tell the operator the MAC address of the device’s WAN port (on ASUS RT-N12VP it is usually indicated on a sticker on the bottom of the case and coincides with the LAN MAC address from paragraph 10 of this manual). During the conversation, you will need data from the contract, so you need to prepare it in advance. Be careful because it is very important to provide all this information correctly, otherwise the router will not connect to the Internet.
15. Wait for confirmation from the operator that the MAC address has been changed and reboot the device by disconnecting it from the power supply and turning it on again.
If everything was done correctly, then computers connected to the router will have access to the Internet within a minute. Please note that the router now connects to the Internet automatically, so there is no need to start an Internet connection on any of the computers!
Now let's try to configure Asus RT-N12(connect the router, log into the admin panel, set up the Internet, assign a Wi-Fi name, change the factory password).
Follow these instructions, and then enjoy the wireless Internet while drinking a cup of coffee. This guide is suitable for any Asus router. Before setting up the Asus RT-N12, be sure to find out from your provider the type of connection it uses, and whether it binds to a MAC address.
If the provider uses a connection type ("PPPoE", "L2TP", or "PPTP"), then additional information will be required ("username", "password", IP may be required, etc.). Your provider knows all the necessary data, so don’t hesitate to ask. This article is suitable for all series of Asus RT-N12 routers and, in general, for all models of this company. We will practice on the version RT-N12 VP B1.
Connecting Asus RT-N12 and setting it up
First, connect your router to power. If the indicator lights do not light, you need to make sure that the power supply is connected to the button on the back of the device. Connect the Internet cable from your provider or modem to the Wan connector.
 To one of four LAN ports, connect the cable, connect the other end to the PC. If you do not have a computer or an Internet cable, you can configure it via Wi-Fi, but it is more reliable to do it via a network cable.
  When setting up a router via Wi-Fi, simply connect via a wireless connection and you will have an Asus network that is not password protected. There are times when the network will have a different name or is protected by a network key.
 Perhaps someone has set up your router before. Then press the button Reset behind the router and hold for ten seconds (see image above). When you release the button, the lights will turn off and your router will reboot to factory settings.
 Go to the browser and type in the search bar 192.168.1.1
, the authorization window will appear (type login and password admin). If something goes wrong, see what to do if and here is another article if.
Go to the browser and type in the search bar 192.168.1.1
, the authorization window will appear (type login and password admin). If something goes wrong, see what to do if and here is another article if.  You will see the Quick Setup Wizard click " Go".
  Here you must set a security password, write it down so you don’t forget, then click “ Further".
  In another tab in the field " SSID"enter the name of the Wi-Fi network, and in the field" Network key"The password for connecting to Wi-Fi, write it down too.
  The router will think about it, then restart, and the Wi-Fi network with the name you wrote will be displayed. Connect to the network using the new “login” and “Password” that you assigned.
  Return to the control panel, your connection details will be displayed, click " Further".
  The router will ask you to enter the username and network key to access the admin panel that you specified. If the setup of the Asus RT-N12 went as described above, you are undoubtedly in luck. Therefore, your ISP applies the connection type " Automatic IP". At this point, the setup is complete, the Internet should already be working.
 With these connection types L2TP, PPPoE, or PPTP everything will go differently (parameters must be set manually).
Configuring the Asus RT-N12 router with L2TP, PPPoE, or PPTP connection types
 If your provider uses these connection types, when the Quick Setup Wizard starts, you need to decide on the connection type ( PPPoE, PPTP, L2TP, or Static IP) and select it (check with your provider for the type of connection).
  Next you will need to indicate (username and password) to connect to the provider (this data is issued by your provider or you can find it in the Internet connection agreement).
 You will probably need to specify other parameters (IP address, service name, etc.), depending on the type of connection. During setup, Asus RT-N12 will find an Internet connection and then prompt you to set up Wi-Fi Internet, etc. Carry out all the actions as shown in the picture.
You can change the parameters yourself at any moment. WAN(internet connections). Just go to the main settings page (there is a button in the Quick Setup Wizard) and open the " Internet - Connection".

Here you can configure the most important network connection settings at any time. If the Internet started working, the wireless network name and password were changed, then the setup of the Asus RT-N12 is complete. Now you will find out where and how to change the necessary parameters.
Measures for setting up Wi-Fi and changing the password on Asus RT-N12
 You can change the name of the Wi-Fi or key that you use to connect to your network in the router’s admin panel on the main page. Just assign a new name - password, click " Apply".
All settings related to the wireless network, including channel settings, are present in the "tab" Wireless network (left). After replacing the network name and password, reconnect all your devices to your network. If you have connection problems, delete your network and then connect to it again.
Applying measures to protect the Asus RT-N12 router
 Go to the "tab" Administration"-"System". Specify a new "Password" and confirm your action by clicking " Apply". Now to enter the admin panel, you will need to enter this password (Don't forget it).
 The Asus RT-N 12 router is a standard device with average characteristics, which should be sufficient to meet the needs of users. The presented model is compatible with IPTV, but setting up iptv on an asus router can only be done at the standard level: a port is allocated for this, but traffic is not recorded. Wi-Fi is fully supported by 802.11n, which, under ideal conditions, allows you to overclock the Internet to 300 Mbit. But in reality, of course, the speed is several times lower, although this is enough.
So how's Asus? Let's figure it out.
Setting up the router
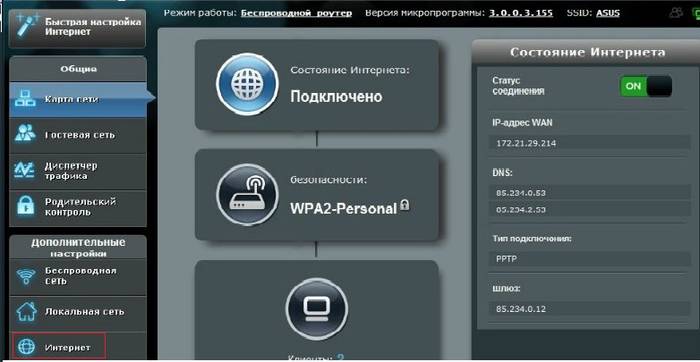
The IP address on the network for the presented device is the most common - 192.168.1.1. To see the web interface, you need to enter the following into the browser line: http://192.168.1.1. It looks something like this:Figure 1. Interface
The user name and password are standard – admin, admin. After the first login, the “Setup Wizard” will be displayed. The tool is useful for beginners as it allows you to configure the router in simple conditions. After clicking the “Next” button, an attempt will be made to automatically select the connection type. If unsuccessful, the device will give you the choice.
When setting up an asus rt router, L2TP is selected for Beeline, and PPPoE is selected for Rostelecom and other providers of a similar type. Click “Next”.
Advanced setup
How to set up a wifi router asus rt nt12 yourself without a program?If the default language is English, then change it:

Figure 2. Changing the interface language
Below you will find the settings for currently popular Russian providers.
These include:
- Rostelecom;
- Dom.ru;
- Beeline.
Setting up PPPoE for Rostelecom
In the additional settings section, you need to select the “WAN” subsection:
Figure 3. Select WAN
We use the parameters specified as follows:
- Type of WAN – connections – select PPPoE;
- Digital television receiver (IPTV STB parameter) – you should select exactly the port where the STB device is connected;
- UPnP – connect;
- Obtain an IP address offline – enable;
- DNS – server – enable offline retrieval;
- Login – information specified on the card or in the agreement concluded with the provider;
- Password – provided by the provider;
VPN L2TP on Beeline
How to configure the Asus RT N12 router to work with Beeline?- WAN – connection – L2TP;
- Port selection – where the device is connected;
- UPnP – enable;
- Automatic WAN acquisition – enable;
- Offline DNS server – enable;
- Login and password - the latter is issued by the provider, and the login is the phone number itself;
- L2TP server – resource tp.internet.beeline.ru.
Opening the port
In the additional settings section, go to “WAN” and click on the virtual server subsection:
Figure 4. Virtual server
We enable the “Virtual Server” service, that is, set it to “Yes”.
Fill in the service name line. Here you need to write the name of the program or application for which the port is opened.
In the “Port range” value we enter the one that opens for the application. The same is indicated in the value of the local port.
In the local IP address line, enter the value of the personal computer for which it will be registered.
Confirm and apply the settings.
Setting up Wi-Fi
Setting up wifi is quite simple. How to set it up correctly? Let's go to the additional section. settings and in the wireless network subsection.
Figure 5. Wi-Fi setup
Step-by-step instructions for setting up the Asus RT N12 lx router to work with a wireless network:
- "SSID". In this field we write the name (identifier) of the network. It can be absolutely anything;
- "Verification Method". Select the “WPA2-Personal” parameter;
- "WPA Preshared Key". The Wi-Fi password is entered here. This can be either a letter or number combination. But the main rule is at least 8 characters.
Reset
How to configure the Asus RT N12 wifi router to reset settings? It is worth noting that this procedure is optional and is used if the user is unable to connect to his personal account due to hacking or intentional modification of identification data.
Figure 6. Reset button
To reset the settings on the asus rt router, the router must be connected to power (anything can happen).
The button is located inside the case. Above it you can see an inscription, which from Asus means reset (in other models everything is simpler - Reset).
It is possible to press the button using a toothpick, pen, etc. You need to hold it for about 15 seconds. When the WPS button flashes, you can release it and wait a couple of minutes for the settings to reset.
Unfortunately, not every problem can be solved by resetting the router, since problems may not be related to the program, but to physical damage, incorrect network parameters, and much more.
Video with connection instructions
The video clearly and step-by-step tells and shows how to connect to the network, what settings are made and other necessary steps.