Good day.
In order to be able to organize a wireless Wi-Fi network at home and give Internet access to all mobile devices (laptops, tablets, phones, etc.) - you need a router (even many novice users are already aware of this). True, not everyone decides to independently connect it and configure it ...
In fact, this is within the power of the majority (I do not take into account exceptional cases when an Internet provider creates such "junk" with its own parameters for accessing the Internet ...). In this article I will try to answer all the most common questions that I heard (and hear) when connecting and configuring a Wi-Fi router. So let's get started...
1) Which router do I need, how to choose it?
Perhaps this is the first question that users who want to organize a wireless Wi-Fi network at home ask themselves. I would start this question with a simple and important point: what services does your Internet provider provide (IP telephony or Internet TV), what Internet speed do you expect (5-10-50 Mbps?), and how protocol you are connected to the Internet (for example, now popular: PPTP, PPPoE, L2PT).
Those. the functions of the router will begin to be drawn by themselves ... In general, this topic is quite extensive, therefore, I recommend that you read one of my articles:

search and selection of a router for home -
2) How to connect the router to the computer?
As a rule, in the configuration directly to the router itself, there is a power supply and a network cable for connecting to a PC (see Fig. 1).
By the way, please note that on the back of the router there are several sockets for connecting a network cable: one WAN port and 4 LAN ( The number of ports depends on the router model. In the most common home routers, the configuration is as in fig. 2).
Rice. 2. Typical view of the router from the back (TP Link).
The Internet cable from the provider (which was most likely connected to the PC's network card earlier) must be connected to the blue port of the router (WAN).
With the cable that comes with the router, you need to connect the computer's network card (where the provider's Internet cable was previously connected) to one of the LAN ports of the router (see Fig. 2 - yellow ports). By the way, in this way you can connect several more computers.
At the big moment! If you do not have a computer, then you can connect the LAN port of the router with a laptop (netbook) with a network cable. The fact is that the initial configuration of the router is better (and in some cases, otherwise impossible) to carry out via a wired connection. After specifying all the basic parameters (set up a wireless Wi-Fi connection), then the network cable can be disconnected from the laptop, and then work via Wi-Fi.
As a rule, there are no issues with connecting cables and power supplies. Let's assume that your device is connected, and the LEDs on it started blinking :).
3) How to enter the router settings?
This is probably the key question of the article. In most cases, this is done quite simply, but sometimes ... Consider the whole process in order.
By default, each router model has its own address for entering the settings (as well as a username and password). In most cases it is the same: http://192.168.1.1/ however, there are exceptions. Here are some models:
- Asus - http://192.168.1.1 (Login: admin, Password: admin (or empty field));
- ZyXEL Keenetic - http://192.168.1.1 (Login: admin, Password: 1234);
- D-LINK - http://192.168.0.1 (Login: admin, Password: admin);
- TRENDnet - http://192.168.10.1 (Login: admin, Password: admin).
At the big moment! It is impossible to say with 100% accuracy what address, password and login your device will have (even despite the brands I mentioned above). But in the documentation for your router, this information is necessarily indicated (most likely, on the first or last page of the user manual).
Rice. 3. Entering a login and password to access the router settings.
For those who failed to enter the router settings, there is a good article with the reasons analyzed (why this could happen). I recommend using the tips, link to the article below.

How to access 192.168.1.1? Why does not enter, the main reasons -
How to enter the settings of the Wi-Fi router (step by step) -
4) How to set up an Internet connection in a Wi-Fi router
Before describing these or those settings, a small footnote should be made here:
- First - even routers from the same model range can be with different firmware (different versions). The settings menu depends on the firmware, i.e. what you will see when you go to the settings address (192.168.1.1). The language of the settings also depends on the firmware. In my example below, I will show the settings of a popular router model - TP-Link TL-WR740N (the settings are in English, but it’s not so difficult to understand them. Of course, it’s even easier to set up in Russian).
- The router settings will depend on the organization of the network at your Internet provider. To configure the router, you need connection information (login, password, IP addresses, connection type, etc.), usually everything you need is contained in an Internet connection agreement.
- For the above reasons - it is impossible to give universal instructions that are suitable for all occasions ...
Different Internet providers have a different type of connection, for example, Megaline, ID-Net, TTK, MTS, etc. use a PPPoE connection (I would call it the most popular). In addition, it provides higher speed.
When connecting PPPoE to access the Internet, you need to know the password and login. Sometimes (for example, with MTS) PPPoE + Static Local is used: access to the Internet will be provided, after entering the password and login for access, the local network is configured separately - you will need: IP address, mask, gateway.
Necessary settings (for example, PPPoE, see Fig. 4):
- You need to open the "Network / WAN" section;
- WAN Connection Type - specify the type of connection, in this case PPPoE;
- PPPoE Connection: Username - specify the login for accessing the Internet (specified in your agreement with the Internet provider);
- PPPoE Connection: Password - password (similarly);
- Secondary Connection - here we either do not specify anything (Disabled), or, for example, as in MTS - we specify Static IP (depending on the organization of your network). Usually, this setting item affects access to the local network of your Internet provider. If you do not need it, you can not really worry;
- Connect on Demand - establish an Internet connection as needed, for example, if the user accesses the Internet browser and requests a page on the Internet. By the way, please note that there is a column below Max idle Time - this is the time after which the router (if it is idle) will disconnect from the Internet.
- Connect Automatically - connect to the Internet automatically. In my opinion, the optimal parameter, it should be chosen ...
- Connect Manually - connect to the Internet manually (uncomfortable...). Although for some users, for example, if there is limited traffic, it is quite possible that this type will be the most optimal, allowing them to control the traffic limit and not go into the red.

Rice. 4. Setting up a PPPoE connection (MTS, TTK, etc.)
You should also pay attention to the Advanced tab (advanced) - you can set DNS in it (they are sometimes necessary).

Rice. 5. Advanced tab in TP Link router
Another important point - many ISPs bind your network card MAC address and do not allow you to access the Internet if the MAC address has changed ( approx. each network card has its own unique MAC address).
Modern routers can easily emulate the desired MAC address. To do this, open the tab Network/MAC Clone and press the button Clone MAC Address.
Alternatively, you can tell your new MAC address to your ISP and they will unblock it.
Note. The MAC address is something like this line: 94-0C-6D-4B-99-2F (see Fig. 6).

Rice. 6. MAC address
Incidentally, for example, in Billine» type of connection is not PPPoE, a L2TP. The setup itself is performed in a similar way, but with some reservations:
- Wan Connection Type - select L2TP connection type;
- Username, Password - enter the data provided by your Internet provider;
- Server IP-address - tp.internet.beeline.ru;
- save the settings (the router should reboot).

Rice. 7. Setting up L2TP for Billine…
Note. Actually, after the entered settings and rebooting the router (if you did everything correctly and entered exactly the data that you need), you should have the Internet in your laptop (computer) that you connected via a network cable! If this is the case, the only thing left is to set up a wireless Wi-Fi network. In the next step, we will do this ...
5) How to set up a wireless Wi-Fi network in a router
Setting up a wireless Wi-Fi network, in most cases, comes down to specifying the network name and password to access it. As an example, I will show the same router (although I will take the Russian firmware to show both the Russian and English versions).
First you need to open the section Wireless (wireless network), see fig. 8. Next, set the following settings:
- Network name - the name that you will see when searching for and connecting to a Wi-Fi network (specify any);
- Region - you can specify "Russia". By the way, in many routers there is not even such a parameter;
- Channel Width, Channel- you can leave Auto and do not change anything;
- Save your settings.

Rice. 8. Setting up a Wi-Fi wireless network in the TP Link router.
Next, you need to open the tab " Wireless Security". Many people underestimate this point, but if you do not protect the network with a password, then all your neighbors will be able to use it, thereby lowering your network speed.
- Version: you can not change and leave automatic;
- Encryption: same, automatic;
- The PSK password is the password to access your Wi-Fi network. I recommend that you specify something that is difficult to pick up with the usual enumeration, or by guessing by chance (no 12345678!).

Rice. 9. Encryption type setting (security).
After saving the settings and rebooting the router, your wireless Wi-Fi network should start working. Now you can set up a connection on a laptop, phone, and other devices.
6) How to connect a laptop to a wireless Wi-Fi network
As a rule, if the router is correctly configured, there should be no problems with setting up and accessing the network in Windows. And such a connection is made in a couple of minutes, no more ...
First, click on the Wi-Fi icon in the tray next to the clock. In the window with the list of found Wi-Fi networks, select your own and enter the password to connect (see Fig. 10).
Rice. 10. Selecting a Wi-Fi network for connecting a laptop.
If the network password is entered correctly, the laptop will establish a connection and you can start using the Internet. Actually, this completes the setup. For those who did not succeed, below are a few links to typical problems.

The laptop does not connect to Wi-Fi (does not find wireless networks, no connections available) -

Wi-Fi problems in Windows 10: network without internet access -
Connecting a laptop to a Wi-Fi router is not difficult. But with connecting a computer to a wireless network, many have difficulties. Most PCs do not have a Wi-Fi module installed. Therefore, a special USB Wi-Fi adapter is required for setup.
Wi-Fi adapter for PC is designed for wireless exchange of packet data over a broadband communication channel. To put it simply, it is a device that provides an Internet connection without any cables.
Types of Wi-Fi adapters
There are two types of Wi-Fi adapters for a computer: external and internal. External ones have a USB output and are inserted into the corresponding port like a regular USB flash drive (by the way, these models are very similar to them). Internal adapters are installed in the PCI-Express slot on the motherboard, so to connect them you will need to disassemble the PC case.
The computer adapter operates on the frequency range in which Wi-Fi technology is used. It can read the signals received in this segment and convert them into digital form, and is also able to send data (distribute Wi-Fi) to other receiving devices, converting the “digit” into a radio wave.
For these purposes, the device is equipped with a special built-in or external antenna. A separate software-controlled microcircuit is responsible for the process of converting a radio signal into a digital code and vice versa. By installing this module on a computer, you can connect to an available network connection over the air, without cable connections.
Setting up and connecting a Wi-Fi adapter
Having connected the Wi-Fi adapter to the computer, you will also need to install the device driver into the operating system - a package of files that allow the system to identify it and correctly carry out subsequent interaction and operation.
Drivers and utilities are usually included with the adapter. They may be on the disk, or - if it is a USB model - they may be pre-installed on the device. In the latter case, when the module is connected via the USB port, the installation will start automatically.
Installing from a disk is also not difficult. You just need to run it in the CD / DVD drive, wait for the menu to autorun and select the "Install" item. If the drivers are not available, they can be downloaded from any computer with Internet access. They should be downloaded from the official website of the adapter manufacturer.
After installing the driver, go to the "Control Panel" and in the "Network and Internet" section, select the line "Network Control Center" (or "Network Connections"). A new label will appear here with the name of your adapter.
After installing the software, the computer will begin to "see" all available Wi-Fi networks. The computer will become discoverable on other devices - smartphones, laptops and TVs.
If you have already concluded an agreement with a provider that provides access to the network via Wi-Fi, then to access the Internet, just connect to the network by right-clicking on this shortcut.
Wi-Fi adapters are sold at any digital technology store. The average price is from 500 to 1000 rubles.
In this article I will tell you how to set up wi-fi from scratch. First you need to set up a wireless network on the router, and then on the laptop. With the help of a simple step-by-step instruction, even a beginner will be able to set up the Internet on TP-Link and D-Link routers, which are most common in the CIS.
Setting up a wi-fi router
Step 1. We connect the router to the network using the power supply. Turn on the power with the ON button, if the router has such a button.
Step 2 We connect the router to a laptop or computer using an ethernet cable (patch cord) that comes with the router. It is necessary to connect the cable to the port of the network card of the computer and to the LAN1 port of the router. (In no case, not to the WAN port - you won’t be able to configure it through it)
Step 3 We check that on the computer in the properties of the network card we have selected automatic receipt of the IP address. To do this, go here: "Start" -> " Control Panel» -> « Network and Sharing Center» -> «» -> « LAN connection»
Attention! In chapter " Change adapter settings» You may have multiple connections displayed. For instance, "Local Area Connection" , "Local Area Connection 2" , "Wireless Network Connection" , "Bluetooth Network Connection 2" etc. How to find the right one among these connections?
Firstly, By default, a wired connection in Windows 7 and 8 is called Local Area Connection. If no one managed to rename it manually, then it will be called that way. Unless there may be a number at the end - most often "2". This is the case if several network cards are installed in the computer (relevant for stationary computers, because in a laptop in 99% of cases there is only one wired network adapter from the factory)
Secondly, the connection we need should be active, since you connected the computer and the turned on router with a cable: the connection icon should glow in a bright color (usually blue if your Windows uses a standard icon pack), i.e. the icon should not be grayed out. See picture:

Here, we found the right active wired network connection.
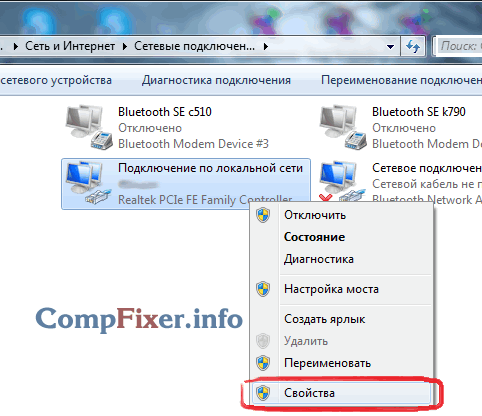
Step 3.1. Right-click on the active wired connection we need and select " Properties":
Step 3.2. In the window that opens, click the button " Properties":

Step 3.3. Select with the left mouse button Internet Protocol Version 4 (TCP/IPv4) " and press the next button " Properties»Bottom:

Step 3.4. We set both switches to the upper positions so that it is " … … … automatically»:

Step 3.5. Press the "OK" button to save the settings.
Step 4 Open the connection window again:
Step 4.1. Press the button " Details":

Step 4.2. In the window that opens, find out the IP address of the default gateway:

In most cases it is equal to 192.168.1.1
Step 5. Open the browser to go to the web interface of the router.
Step 5.1. In the address bar, enter the gateway address and press Enter:
Step 5.2. Enter login and password:

Attention! You can find out the login details in the instructions for your device. Included with the router may be both instructions on paper and in PDF-document format on the attached disk.
If the instruction is lost, you can try to download it on the manufacturer's website. For example, http://dlink.ru , http://asus.com , http://tplink.com .
Often in a new device, the default login = admin and password = admin . It also happens that the login = admin and the password is empty.
Step 5.3. After you have logged into the web interface of the router, open the wireless network settings (wi-fi):
(Illustrated with TP-Link TL-WR841ND and D-Link DIR-300 NRU as an example)

Step 6 Actually setting up a wireless connection.
Step 6.1. Disable WI-FI protected setup this feature is a serious security hole and could allow an attacker to hack into your Wi-Fi network and gain access to your information.
Step 6.2. We check that the Wi-Fi network is enabled: the “Enable wireless” checkbox is checked if it is D-Link.
Step 6.3. Set a name for our wireless network.
If the default is dlink or home, then it is recommended to specify some original name in order to avoid confusion with neighboring networks of the same name.
Step 6.4. Set the security settings. We strongly recommend using the following options:
- security mode WPA2 ;
- encryption type AES;
- key type PSK(aka Personal Key).
After specifying all the parameters, do not forget to click the save settings button!
On a TP-Link router:
 in D-Link:

Setting up Wi-Fi on a computer (laptop)
In this section, we will show you how to set up wi-fi on a windows 7 laptop.
Step 1. Find on the taskbar near the clock network connection icon and click on it with the left mouse button once. A list of available wireless networks will open:

Step 2. Find your wireless network in the list (it will have the name you specified in the previous paragraph) and click on this network with the left mouse button.
Step 3. Leave the "Connect Automatically" checkbox checked and click the "Connect" button:

Step 4. Enter the Wi-Fi network security key. This is the character set you specified in the Network Key field. After entering the key, click "OK":

After clicking "OK", it connects to your wireless network.

After a few seconds, the previous window will disappear, and the network connections icon next to the clock will change its appearance.
Now, when you click on the network connections icon, you will see that the computer is connected to your wi-fi network, but at the top you can see the inscription “ Without internet access» , because we have not set up the Internet on the router yet:

Setting up the Internet on the router
We set up a wi-fi network on the router and connected to it from a computer. We just need to help the router see the Internet so that the router can distribute the Internet to any devices that connect to it via wi-fi or cable.
Step 1. In order for the Internet to appear on computers, you need to set up a connection with the provider on the router. We show on the example of the same D-Link
Step 1.1. Type the IP address of the router in the address bar
Step 1.2. Enter your login, password and click " Log in":
Step 2. We go to the Internet settings section. For different manufacturers of routers, it may be called differently: WAN Setup, Internet settings, etc. In our D-Link, this section is called "Internet Setup":

Step 3 We get to the WAN port settings section.
Step 3.1. Remove the checkbox "Enable Access Point Mode".
Attention! Other manufacturers may refer to this setting as "Disable NAT". The bottom line is that the "Access Point" mode disables NAT and turns the router into an access point. This option is useful if this router is connected not to the provider, but to another one of your routers.

Step 3.2. Select the type of connection with the provider.
To find out what settings you need to choose to connect specifically to your provider, you can:
- in the contract;
- on the provider's website;
- calling the hotline of the provider
These days, the most commonly used type is Dynamic IP.
Step 3.3. If your ISP only allows connection from a registered MAC address, you have 2 ways to resolve the issue.
- Go to the provider's office with a passport and register a new MAC address;
- Specify in the MAC address field the MAC address of the network card of the device from which you successfully accessed the Internet before purchasing the router. Usually, this is the MAC address of the computer's wired network card.
Step 3.4. Specify the DNS servers, if the instructions from the provider require it.
Step 3.5. Select the MTU value. If the provider does not require you to change this value, we recommend leaving it as it is: 1500 .
Step 3.6. Save settings
Attention! If you have lost the contract document with the provider, which contains the details, then in extreme cases you can always drive up to the office of your provider with a passport and find out all the comprehensive information: connection type, MAC address, login, password, MTU, etc.
After installing a Wi-Fi router, many people have a question, but how now to connect an ordinary stationary computer to the Internet that does not have Wi-Fi. Previously, the Internet was connected to the computer via cable, but now what to do? I do not really want to lay a network cable from the router to the computer. After all, we installed a router in order to get rid of the wires in the house.
Yes, after installing a router and setting up a Wi-Fi network at home or in the office, all laptops, tablets, phones and a number of other devices will be able to connect to the Wi-Fi network, "over the air". These devices have a built-in Wi-Fi receiver. And if you still have a stationary computer to which you also need to connect the Internet, then there are only two options:
- Lay a network cable from the router to the desktop computer. But, this option is not often suitable, because you don’t always want to fiddle with cables, and sometimes it’s simply not possible to run this cable to a PC.
- Well, the second option, which we will talk about in this article, is connecting an external or internal Wi-Fi adapter to your computer. With it, a regular, stationary computer will be able to connect to the Internet via Wi-Fi.
I faced exactly the same situation at home. After installing the router, all devices connected wirelessly. But I connected the computer that I had to leave via Wi-Fi using a USB Wi-Fi receiver. It is about these receivers that I will now tell in more detail.
Connecting a computer to Wi-Fi using an adapter. Without cable
As I wrote above, for ordinary computers that do not have built-in wireless network receivers, there are a large number of network adapters on sale. These adapters are both external and internal. As for the prices, they are not very expensive. Of course, there are different models, from different manufacturers. But, the cheapest one will cost you about 6-7 dollars (these are devices of popular manufacturers). Tenda has inexpensive models. For example, I also have an inexpensive, external USB Wi-Fi adapter TP-LINK TL-WN721N. It looks like this:
Works great. You will need to prepare instructions for setting it up on a PC. By the way, many people call such adapters "flash drives for connecting to Wi-Fi" :)
How to choose a Wi-Fi adapter for a computer: external and internal
Let's see what these adapters are, and how to choose such an adapter for your PC. So, they are external and internal.
External adapters
Connect to the USB port of the computer. To install it, you do not need to open the system unit, this is undoubtedly a plus. They look like ordinary flash drives. There are small ones, there are ones like in the picture above, and there are also antennas. I advise you to buy those with antennas if the Wi-Fi network signal is not very strong in the room where you have a computer.
If you are not very computer savvy, then I recommend buying an external Wi-Fi receiver. Almost anyone will do. The installation is not false: we connected the adapter to the USB connector of the computer, installed the drivers, and that's it, you can.

Here is another photo of external adapters:

Internal adapters
These adapters plug into the PCI (or PCI Express) slot on your computer's motherboard. It is clear that to install such an adapter, you need to disassemble the system unit. Installation is also not difficult at all. They removed the cover from the system unit, installed the adapter in the PCI slot, rebooted the computer, installed the driver and that's it.
Outside the system unit, the adapter antenna will peek out, or even several. This is all for the best reception. After all, if a regular USB receiver can be connected via an extension cable so that it would receive a signal better, then this will not work with an internal adapter.
Here's what the internal PCI adapters look like:

What is the best adapter to buy to connect a regular computer to Wi-Fi? Yes, basically, what's the difference. But, for some reason it seems to me that external USB adapters are more convenient and practical. They can be easily connected to another computer. The connection and installation process is a little easier.
As you can see, connecting a desktop computer to a Wi-Fi network is not at all difficult. But, you can get rid of the wires. This is especially true if the router is far from the computer.
As a rule, most problems occur when connecting to the router via a wireless network. And connecting via a network cable should not cause any difficulties. But, I have already met similar questions several times, and I decided to write a small instruction with a photo, in which I will tell you how to connect a computer (well, or a laptop) to the router using a LAN cable.
Yes, and what to write about here, they took the cable, connected it to the router, then to the computer, and everything is ready. But still, it might be useful for someone.
As a rule, modern routers have 4 LAN connectors. This means that you can connect 4 devices via a network cable. And all of them will receive the Internet from the router, or work in the local network. By the way, read the article on setting up a local network.We will need:
- Router with a free LAN connector (it is yellow).
- Network cable. A small cable is included with the router. But, if you need a longer cable, you can make it yourself. How to do this, I wrote in the article. Or just go to a computer store and ask them to crimp the network cable to the length you need.
- Computer with network card (usually it is integrated into the motherboard). Well, or a laptop, a netbook with an RJ-45 network connector.
Let's get started 🙂
We take our network cable, it looks like this (you may have a slightly different one, I have a different length):

We connect one end of the cable to the yellow connector (LAN) of our router.

It doesn't matter which of the four connectors you plug the cable into.
Now we connect the other end of the cable to our computer or laptop.
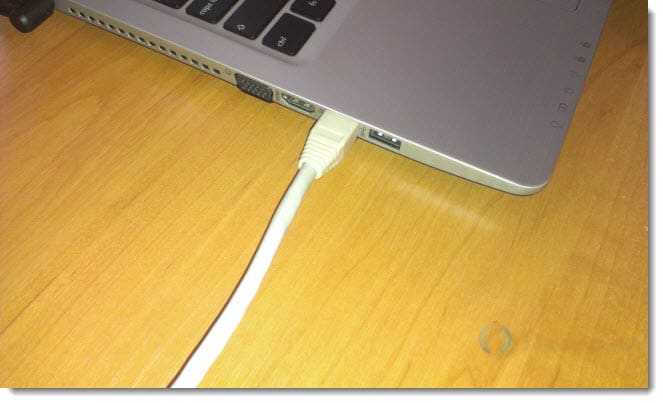
This is what the network connector looks like on the computer:

After connecting the network cable, one of the four indicators should light up on the router, which indicate the connection to the LAN connector.

Now look at the computer screen. If on the notification panel (bottom, right) you will see the following connection status (as in the screenshot below), then all is well. The Internet is already working.

But, in such a seemingly simple way, problems can also arise. Now some of the most popular, we will consider.
Problems when connecting a computer to a router via a network cable
After connecting, the status on the notification panel may not change, you will see the computer crossed out with a red cross.

In this case, first of all, you need to check the cable with which you connected the computer to the router. How to do it? You can, for example, take another cable, or connect the cable through which the Internet goes directly to the computer. If this connection status changes (even if a yellow triangle appears) then the problem is in the cable. Perhaps there is something gone. Just change it.
It is possible that the network card is simply disabled. Let's check. Go to and find there LAN connection. If there is a status near it Disabled, then right-click on this connection and select Turn on.

If a connection such as No LAN connection at all, then most likely that the driver for your network card is simply not installed. Download and install the driver. If there was a disk included with the computer (laptop), then most likely it has this driver.
Plugged in cable but no internet connection
And this may be. The problem looks like this:

First, you need to determine what the problem is. This may be due to issues on the router side. See the article for this.
But I will tell you in a simple way. If other devices work fine from this router, and there is Internet on them, then most likely the problem is on the computer itself. This is clear:).
And usually there is only one problem.
Go back to Control Panel\Network and Internet\Network Connections and right-click on Local Area Connection. Select properties. Then select "Internet Protocol Version 4 (TCP/IPv4)" and press the button again Properties.
Set to receive IP and DNS automatically and click OK.
Updated: November 11, 2013 by: admin