Zyxel is a world-renowned brand that produces the highest quality networking and peripheral equipment, proven by time and millions of users. The quality of workmanship and ease of use will allow any novice user to set up their Zyxel router in a short time and work on the network.
Turning on the router for the first time
Setting up a ZYXEL KEENETIC LITE 2 router for dummies begins with the fact that the user must connect all the wires and the device itself in the correct sequence. To do this, the user must first connect the power supply to the mains. Next, you need to connect the Internet cable to the router. After that, the user must connect with the second cable provided in the kit with the computer.
Photo: Network equipment ZyXEL Keenetic Lite II
If everything is done correctly, then a signal in the form of a round icon with a partially crossed out circle should light up on the case. It means the beginning of the power supply of the device from the mains.
The second signal in the form of a ball with a net should also light up.
This signal means that the user can start setting up the router.
Video: Setting up the ZYXEL KEENETIC LITE 2 router
Hardware connection
There are many videos on the Internet "how to set up a ZYXEL KEENETIC LITE 2 router". But you can do everything yourself and without outside help. Connecting the network kit takes place in several stages:
- checking the operation of the network card on the computer;
- connecting the router to an internet cable and a computer;
- setting up a local network and Internet connection.
Checking the performance of the network card when the router is connected is as follows:
- go to "start" and select the "control panel" tab;
- select the shortcut "Network and Sharing Center" or the "Network and Internet" tab and "Network and Sharing Center";

- open the "change adapter parameters" option;

- right-click on the "local area connection" shortcut;
- if the connection is not connected, then connect;
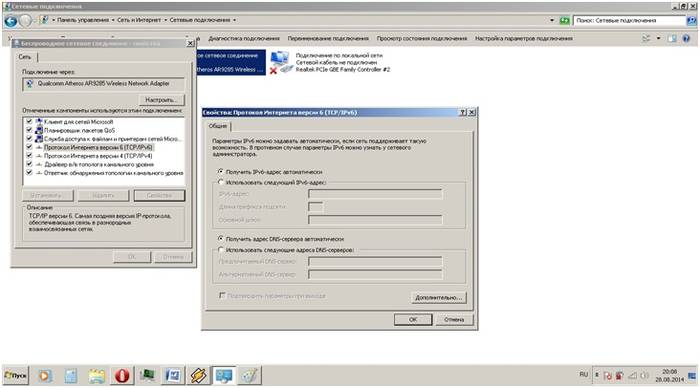
- in the connection properties, highlight the line "Protocol ..." and click on the "properties" option;

Photo: Setting protocol parameters
- in the window that appears, check the boxes for automatic configuration of ip and dns addresses;
- repeat the last operation with "Protocol ... 4".
If the user did everything correctly, a monitor icon with a yellow triangle and an exclamation mark will appear on the panel in the lower right corner of the desktop. This means that the computer and the router are connected to the network and you can proceed to the next step of configuring the router to create an Internet connection.

Photo: Local Area Connection Shortcut
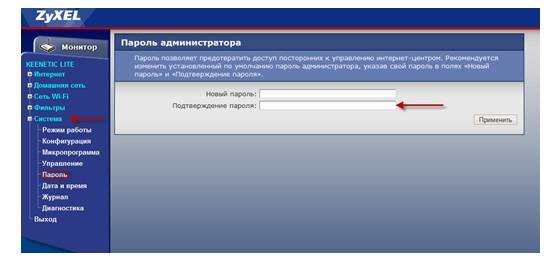
Change the factory password
After the user has made a hardware connection, it is necessary to proceed with the direct configuration of the router. First, go to the Internet browser at 192.168.1.1. In the login column we type "admin", and in the password column - 1234.

The system will prompt you to change the password at the very beginning. The user should not abandon this procedure, it is necessary to immediately change it to a more complex one in order to avoid entering the domain of third-party users in the future.

After logging into the domain, an updated window will appear in which you need to enter new login and password data using numbers, letters of different sizes and various symbols. Then select the "apply" option. The system will save the new data for the domain.
Firmware upgrade
If, during the setup process, the router did not begin to function in full force and in the proper order, then there are two options for resolving the problem:
- reset to factory settings;
- firmware update.
First option assumes a complete reset of all the set parameters of the router and is used only if the order of full configuration is violated from the moment the device is connected to the creation of a network connection. To do this, you need to press the emergency reset button on the back of the router panel, after which the device will automatically reset all the set parameters.
Second option suggests a software version update. This is due to the fact that outdated versions of drivers are not always compatible with the version of the operating system used, which can lead to a malfunction of the network equipment and the lack of an Internet connection.
To solve this problem you need to:

To fully configure the Zixel router, there is a web interface on the home page - 192.168.1.1. here you can do the following:
- change the communication mode of the router and computer to increase the transmission speed;
- configure an additional network or change its privacy parameters;
- set up a new connection or change the connection technology from "pppoe" to "l2tp";
- check the number of connected devices and restrict access;
- create a local area network between computers.
Setting up and connecting to the Internet
If during the automatic setup process it was not possible to connect to the Internet, you must manually check and set all the connection parameters for the normal operation of the network equipment. In this case, the question arises how to reset the settings. The user must press a button on the back of the router to reset all configuration settings. Thus, the system will completely erase all exposed settings. There is a video on the Internet “instructions for setting up ZYXEL KEENETIC LITE 2. But such videos do not show all the nuances of setting, which subsequently lead to a failure of the Internet connection. Most often, configuration errors occur at the dating stage on the home page of the router. If the user cannot configure pppoe on his own in the future, then it is necessary to act as follows:

Thus, the user will create a new connection with the settings of the router to connect to the Internet.
Setting for Rostelecom and Dom ru
The leaders in the Internet services market are two companies - Domru and Rostelecom. They use roughly the same connection technologies (pppoe), so the process of setting up the hardware and connecting to the network is the same. The same technology is used by the operator "TTK-Chita", for example. Setting up ZYXEL KEENETIC LITE 2 for MTS, Domru and Rostelecom will proceed as follows:
- checking the connection to the mains;
- checking the connection of cables and wires to devices;
- checking the operation of the computer's network card;
- automatic network configuration using prompts from the web interface of the router home page (192.168.1.1).
This sequence of actions can be mastered by both an experienced and a novice user.
Setting for Beeline
Beeline uses L2TP connection technology, which will require additional configuration as follows:

If all actions are carried out strictly in accordance with the above procedure, an automatic connection to the Internet should occur.
Setting up and turning on Wi-Fi
To configure a wireless data transmission network through a Zixel router, you need to check the operation of the wi-fi module. To do this, go to the "start" tab in the taskbar, and type "device manager" in the search bar. After that, the user needs to select the appropriate line, and a new window will open, in which a list of functioning equipment will be indicated.
In a new window, select the line "network adapters" and expand the line hierarchy by opening the "+" sign. Lines with connected network devices will appear just below, the name of one of which will contain "wirelessnetworkadapter". The line icon should not contain additional arrow marks in the background of the label itself. But if the mark is still there, then direct the mouse cursor to the line of this device and press the right mouse button, select the "enable" option.
No further configuration is required, since The wi-fi connection was configured automatically when creating the basic Internet connection setup.
Configuring IPTV digital television parameters
Since the ZYXEL KEENETIC LITE 2 router has the "IPTV" function, special attention should be paid to its configuration in this part. For example, Rostelecom IPTV is configured as follows:

Thus, the user gets not only a good tool for surfing the Internet, but also for using TV services without additional equipment.
Setting up the ZYXEL KEENETIC LITE 2 router should not cause significant difficulties for the user, if he did not deviate from the proposed option for selecting the Internet connection parameters. For this, the manufacturer provides a procedure for automating the connection process and configuring a network device. Therefore, when carrying out these operations, you should act in accordance with the prompts to avoid problems and malfunctions of the device. But if it was not possible to do this using the automatic connection setup program, then you can independently carry out this procedure using the tips described above.
In this article, we will be setting up an excellent, inexpensive ZyXEL Keenetic Start router. You can familiarize yourself with this device better, read and leave your review about it on, which is completely devoted to this model. There I also described my impressions of this router and indicated the main characteristics.
ZyXEL Keenetic Start is an excellent router for your home that can easily cope with the Internet connection of your computers, phones, tablets and other devices. Both Wi-Fi and network cable. You will be able to watch IPTV, and organize a local network between your devices. Keenetic Start looks very nice. The device is definitely worth the money. I will not describe all its pros and cons, you can see this at the link I gave above. And if I don’t forget, I’ll make a small review of this router later.
In the meantime, ZyXEL Keenetic Start stands on the sidelines and waits for me to torment him, I will write more about the simplicity of setting up this router. Until recently, I thought that the simplest and most understandable settings panel for routers from Tp-Link, but it turns out that I was wrong. ZyXEL really took care of the users. We made a very simple and intuitive control panel; on the device, all buttons and connectors are also signed in clear language. So, setting up ZyXEL Keenetic Start should not cause any difficulties. And according to these detailed instructions, you will set up your router in a few minutes.
As usual, let's divide the article into several sections:
- Connecting a ZyXEL Keenetic Start router and setting up the Internet (WAN)
- PPPoE, L2TP and Static IP Configuration
- Setting up a Wi-Fi network, setting a password
Connecting and configuring the Internet on ZyXEL Keenetic Start
I advise you to configure by connecting the router via a network cable to a computer or laptop. If it is not possible to connect via cable, then, in principle, you can establish a connection via Wi-Fi. First of all, we need to connect the router to the device through which we will configure it. There is one point here: if your provider makes a binding by MAC address ( you can call support and ask), it is best to configure from the computer to which the Internet is tied.
Factory reset
If you have already tried to configure the router, or it has been configured before, then I advise you to do a factory reset. So that there are no parameters left in the settings from the old provider, etc. It is very simple to reset the settings on the ZyXEL.
Take something sharp, a needle, or a paper clip. Then, press and hold the button for 10 seconds Reset on the back of the router.
All indicators should go out and light up again. You can go on.
We take the network cable that comes with the ZyXEL Keenetic Start and connect it to a computer or laptop. On the router, we connect to one of the yellow connectors, which are signed "Home network", and on a computer to a network card. Like this 

Plug the router into a power outlet (if not already included)... It may be that the power is still turned off by the button on the back of the router, check. On the front panel, there are indicators by which you can monitor the operation of the router. The modes of these indicators are very well described in the instructions for the device. And in general, the instructions for the routers of this company are very good and understandable. That's it, you can leave the router for now.
Entering settings
On the computer from which we will configure, open any browser. In the line where you write the address of the sites, write the address of access to the ZyXEL Keenetic Start settings and press Enter. This is either 192.168.1.1 or my.keenetic.net... Which one you like best.
Please note that the web address of the router, the standard name of the Wi-Fi network, the password for this network and the MAC address are indicated on the label on the bottom of the router.

This information will definitely come in handy.
The router settings should open. You can see the detailed. The article was written using this model as an example. This article also describes how to connect to the Wi-Fi network of a new router.
The main thing we need to know to configure the router is what type of connection your ISP uses: Dynamic IP (for example, Kyivstar), Static IP, PPPoE (Rostelecom, TTK, Dom.ru), L2TP (Beeline). It's very simple to find out: call the provider and ask, go to their website and look there, or just find it on the Internet. Also, you need to find out if the provider binds to the device's MAC address. Very often, Dynamic IP connection technology is used, and it is very easy to set up. Above, I wrote what technology popular providers use. Also, there is a detailed article on this topic:.
If your provider uses Static IP, PPPoE, or L2TP technology, then you must have data (IP address (optional), login, password) that you will need to specify during the setup process.
After updating the firmware to v2.04 (AAKV.1) C6 and newer (you may already have this version), with the help of a special wizard, you can set up a connection with a provider much easier. There you can already select a country, region (city), provider and set the required parameters. If you have a button in the control panel, then click it and proceed to the step-by-step setup. If not, then you need to update the firmware.
Configuring a Dynamic IP connection
This means that the cable from the provider is connected to the router, we went into the settings and select the item. If there is no "quick setup" item, then you need to reset the settings. I wrote above how to do this.

Since the "Dynamic IP" technology automatically connects the router to the Internet, it will immediately offer you to update the firmware if there is a new one. Click on the button "Refresh".

We are waiting for the router to download the firmware itself, install it and reboot. When you see a message that the component update is complete, click "Further"... In the next window, the router will offer to enable the function "Yandex.DNS Internet filter"... If you enable this function, the router will block access to sites that Yandex considers to be malicious. You can disable or enable this function at any time in the settings. Push Further.

We see a message that the router is configured and the Internet connection is established. You can press the button Web configurator and go to the Wi-Fi network settings, etc. I will write about this in this article below.

The internet should already work. You can connect your devices to the router. If you do not want to change the network name and Wi-Fi password, you can use the standard data for connection, which are indicated on the bottom of the router.
Connection setup: Static IP, PPPoE, L2TP (Beeline)
Everything is a little different here. In the settings of the router, you also need to select.
The router will think, try to connect to the Internet, but it will fail, because for these types of connection, you need to set the necessary parameters. First, it will offer to configure the MAC address. You need to know if your provider is doing the binding. If not, then leave the item "My ISP is not registering MAC addresses" and click next. If the provider makes a binding, and your binding is configured on the computer from which you are configuring, then select "This computer's MAC address"... In other cases, you need to call the provider's support and ask him to bind the MAC address of the router (which is indicated at the bottom of the device, or in the same window).


In the next window, you need to specify the username and password (which the provider should give you) to access the internet. If you have PPPoE or L2TP technology, then this data must be required. If you just have a Static IP, then put a check mark that you do not have a username and password.

The router must establish a connection with the ISP. If nothing worked, then go to the Web configurator, to the tab "Internet" then select PPPoE / VPN, then press the button "Add connection" and fill in all the required fields. We select the required connection type, set the login, password and other parameters that your provider must provide. For example, setting up the Internet Beeline:

You can modify the created connections, delete and create new ones.
Setting up a Wi-Fi network and setting a password on Keenetic Start
If the Internet is already working through the router, then all that remains is to configure the wireless network. You don't have to. Your Wi-Fi network will have a standard name, and to connect to it, you can use the password, which, along with the name, is indicated on the underside of the router. But, you can change the network name and password. This is not difficult to do. You can also set up IPTV (if your provider provides such a service), configure the LAN, or. All these settings are optional. To use the Internet, it is enough to configure ZyXEL Keenetic Start to work with a provider, which we did above in the article.
You can configure a Wi-Fi network on the tab "Wi-Fi network"... I recommend only setting a new network name and password. The password must be at least 8 characters long. Come up with a password and be sure to write it down. If you have forgotten the password for your network and want to remember it, or want to change it, you can do it in detail. The rest of the settings can be left unchanged, left as I have in the screenshot below. Don't forget to click on the button "Apply" to save the settings.

If in the same window go to the tab "Guest network" then you can launch another wireless network for your guests, or for clients in the office. The main feature is that everyone who will connect to the guest network will not have access to the local network.
And also, in the settings you can. I think it will come in handy.
Afterword
Setting up any ZyXEL router shouldn't cause any problems. The control panel is not complicated. True, the WAN configuration (connections with provider) they somehow did it in an interesting way. But, after updating the firmware, the NetFriend quick setup wizard appeared, with which it is very easy to configure the router to work with the provider.
If you have any questions about setting up ZyXEL Keenetic Start, then you can leave them in the comments to this article. Good luck!
Zyxel is a world-renowned brand that produces the highest quality networking and peripheral equipment, proven by time and millions of users. The quality of workmanship and ease of use will allow any novice user to set up their Zyxel router in a short time and work on the network.
Turning on the router for the first time
Setting up a ZYXEL KEENETIC LITE 2 router for dummies begins with the fact that the user must connect all the wires and the device itself in the correct sequence. To do this, the user must first connect the power supply to the mains. Next, you need to connect the Internet cable to the router. After that, the user must connect with the second cable provided in the kit with the computer.
If everything is done correctly, then a signal in the form of a round icon with a partially crossed out circle should light up on the case. It means the beginning of the power supply of the device from the mains.
The second signal in the form of a ball with a net should also light up.
This signal means that the user can start setting up the router.
Video: Setting up the ZYXEL KEENETIC LITE 2 router
Hardware connection
There are many videos on the Internet "how to set up a ZYXEL KEENETIC LITE 2 router". But you can do everything yourself and without outside help. Connecting the network kit takes place in several stages:
- checking the operation of the network card on the computer;
- connecting the router to an internet cable and a computer;
- setting up a local network and Internet connection.
Checking the performance of the network card when the router is connected is as follows:
- go to "start" and select the "control panel" tab;
- select the shortcut "Network and Sharing Center" or the "Network and Internet" tab and "Network and Sharing Center";

- open the "change adapter parameters" option;

- right-click on the "local area connection" shortcut;
- if the connection is not connected, then connect;
- in the connection properties, highlight the line "Protocol ..." and click on the "properties" option;
- in the window that appears, check the boxes for automatic configuration of ip and dns addresses;
- repeat the last operation with "Protocol ... 4".
If the user did everything correctly, a monitor icon with a yellow triangle and an exclamation mark will appear on the panel in the lower right corner of the desktop. This means that the computer and the router are connected to the network and you can proceed to the next step of configuring the router to create an Internet connection.

Change the factory password
After the user has made a hardware connection, it is necessary to proceed with the direct configuration of the router. First, go to the Internet browser at 192.168.1.1. In the login column we type "admin", and in the password column - 1234.

The system will prompt you to change the password at the very beginning. The user should not abandon this procedure, it is necessary to immediately change it to a more complex one in order to avoid entering the domain of third-party users in the future.
After logging into the domain, an updated window will appear in which you need to enter new login and password data using numbers, letters of different sizes and various symbols. Then select the "apply" option. The system will save the new data for the domain.
Firmware upgrade
If, during the setup process, the router did not begin to function in full force and in the proper order, then there are two options for resolving the problem:
- reset to factory settings;
- firmware update.
First option assumes a complete reset of all the set parameters of the router and is used only if the order of full configuration is violated from the moment the device is connected to the creation of a network connection. To do this, you need to press the emergency reset button on the back of the router panel, after which the device will automatically reset all the set parameters.
Second option suggests a software version update. This is due to the fact that outdated versions of drivers are not always compatible with the version of the operating system used, which can lead to a malfunction of the network equipment and the lack of an Internet connection.
To solve this problem you need to:

To fully configure the Zixel router, there is a web interface on the home page - 192.168.1.1. here you can do the following:
- change the communication mode of the router and computer to increase the transmission speed;
- configure an additional network or change its privacy parameters;
- set up a new connection or change the connection technology from "pppoe" to "l2tp";
- check the number of connected devices and restrict access;
- create a local area network between computers.
Setting up and connecting to the Internet
If during the automatic setup process it was not possible to connect to the Internet, you must manually check and set all the connection parameters for the normal operation of the network equipment. In this case, the question arises how to reset the settings. The user must press a button on the back of the router to reset all configuration settings. Thus, the system will completely erase all exposed settings. There is a video on the Internet “instructions for setting up ZYXEL KEENETIC LITE 2. But such videos do not show all the nuances of setting, which subsequently lead to a failure of the Internet connection. Most often, configuration errors occur at the dating stage on the home page of the router. If the user cannot configure pppoe on his own in the future, then it is necessary to act as follows:

Thus, the user will create a new connection with the settings of the router to connect to the Internet.
Setting for Rostelecom and Dom ru
The leaders in the Internet services market are two companies - Domru and Rostelecom. They use roughly the same connection technologies (pppoe), so the process of setting up the hardware and connecting to the network is the same. The same technology is used by the operator "TTK-Chita", for example. Setting up ZYXEL KEENETIC LITE 2 for MTS, Domru and Rostelecom will proceed as follows:
- checking the connection to the mains;
- checking the connection of cables and wires to devices;
- checking the operation of the computer's network card;
- automatic network configuration using prompts from the web interface of the router home page (192.168.1.1).
This sequence of actions can be mastered by both an experienced and a novice user.
Setting for Beeline
Beeline uses L2TP connection technology, which will require additional configuration as follows:

If all actions are carried out strictly in accordance with the above procedure, an automatic connection to the Internet should occur.
Setting up and turning on Wi-Fi
To configure a wireless data transmission network through a Zixel router, you need to check the operation of the wi-fi module. To do this, go to the "start" tab in the taskbar, and type "device manager" in the search bar. After that, the user needs to select the appropriate line, and a new window will open, in which a list of functioning equipment will be indicated.
In a new window, select the line "network adapters" and expand the line hierarchy by opening the "+" sign. Lines with connected network devices will appear just below, the name of one of which will contain "wirelessnetworkadapter". The line icon should not contain additional arrow marks in the background of the label itself. But if the mark is still there, then direct the mouse cursor to the line of this device and press the right mouse button, select the "enable" option.
No further configuration is required, since The wi-fi connection was configured automatically when creating the basic Internet connection setup.
Configuring IPTV digital television parameters
Since the ZYXEL KEENETIC LITE 2 router has the "IPTV" function, special attention should be paid to its configuration in this part. For example, Rostelecom IPTV is configured as follows:

Thus, the user gets not only a good tool for surfing the Internet, but also for using TV services without additional equipment.
Setting up the ZYXEL KEENETIC LITE 2 router should not cause significant difficulties for the user, if he did not deviate from the proposed option for selecting the Internet connection parameters. For this, the manufacturer provides a procedure for automating the connection process and configuring a network device. Therefore, when carrying out these operations, you should act in accordance with the prompts to avoid problems and malfunctions of the device. But if it was not possible to do this using the automatic connection setup program, then you can independently carry out this procedure using the tips described above.
>The Zyxel Keenetic Giga II Internet Center is a multifunctional device with which you can build a home or office network with Internet access and Wi-Fi access. In addition to basic functions, it has a number of additional features that go far beyond the scope of a conventional router, which makes this device interesting for the most demanding users. To realize these possibilities as fully as possible, the router must be able to properly configure. This will be discussed further.
Before starting the configuration, you need to prepare the router for the first time. This preparation is standard for all devices of this type. You need to choose the place where the router will be located, unpack it, connect the antennas and connect it to a PC or laptop, and connect the cable from the provider to the WAN connector. If you are using a 3G or 4G network connection, you must connect a USB modem to one of the available connectors. Then you can proceed to configuring the router.
Connecting to the Zyxel Keenetic Giga II web interface
No special tweaks are required to connect to the web interface. All you need to do is:

After completing these steps, the first time you connect, the following window will open: 
The further course of the setup will depend on which of the two options offered in this window the user chooses.
NDMS - the operating system of the Internet center
One of the features of Keenetic products is that their operation is controlled not just by firmware, but by an entire operating system - NDMS. It is its presence that turns these devices from commonplace routers into multifunctional Internet centers. Therefore, it is very important to constantly keep the firmware of your router up to date.
NDMS OS is built on a modular basis. It consists of components that can be added or removed at the discretion of the user. You can view the list of installed and available components in the web interface in the section "System" in the tab "Components"(or on the tab "Updates", the location is affected by the OS version). 
By ticking the required component (or unchecking it) and clicking on the button Apply, you can install or uninstall it. However, this must be done very carefully so as not to accidentally remove a component necessary for the normal functioning of the device. These components are usually marked "Critical" or "Important".
The presence of a modular operating system makes the configuration of Keenetic devices extremely flexible. Therefore, depending on the user's preferences, the web interface of the router can have completely different subsections and tabs (except for the basic ones). Having understood this important point for yourself, you can proceed to the direct configuration of the router.
Quick setup
For those users who do not want to delve deeply into the intricacies of configuration, the Zyxel Keenetic Giga II provides the ability to set the basic parameters of the device in a few clicks. But at the same time, you still need to first look into the agreement with the provider and find out the necessary details about your connection. To start the quick configuration of the router, you must click on the corresponding button in the settings window that appears next after authorization in the device's web interface. 
Then the following will happen:

As you can see, setting up the device really happens very quickly. If the user needs additional functions of the Keenetic, he can continue it in manual mode by pressing the button "Web configurator".
Manual setting
Those who like to delve into the parameters of the Internet connection do not need to use the router's quick setup function on their own. You can directly enter the device's web configurator by clicking on the corresponding button in the initial settings window.  Then you need to:

After that, you can start creating an interface for connecting to the Internet. To do this, you need to select the required type of connection (according to the agreement with the provider) and click on the button "Add interface".
Then you need to set the necessary parameters for connecting to the Internet:

After entering the parameters, click on the button Apply, the router will receive new settings and will be able to connect to the Internet. It is also recommended to fill in the field in all cases "Description", for which you need to come up with a name for this interface. The firmware of the router allows the creation and use of multiple connections, and thus you can easily distinguish between them. All created connections will be displayed in the list on the corresponding tab in the Internet settings menu. 
From this submenu, if necessary, you can easily edit the configuration of the created connection.
3G / 4G network connection
The presence of USB ports makes it possible to connect the Zyxel Keenetic Giga II to 3G / 4G networks. This is especially convenient if the device is planned to be used in rural areas or in a country house where there is no wired Internet. The only condition for creating such a connection is the coverage of the mobile operator, as well as the installed necessary NDMS components. The fact that this is so is evidenced by the presence of a tab "3G / 4G" In chapter "Internet" router web interface. 
If this tab is missing, the necessary components need to be installed.
The NDMS operating system supports up to 150 models of USB modems, so problems with their connection are rare. You just need to connect the modem to the router for the connection to be established, since its main parameters are usually already written in the modem's firmware. After connecting, the modem should appear in the list of interfaces on the tab 3G / 4G and in the general list of connections on the first tab of the section "Internet"... If necessary, the connection parameters can be changed by clicking on the name of the connection and filling in the appropriate fields. 
However, practice shows that the need to manually set up a connection to a mobile operator rarely arises.
Configuring a backup connection
One of the advantages of the Zyxel Keenetic Giga II is the ability to use multiple Internet connections at the same time through different interfaces. In this case, one of the connections acts as the main one, and the rest are backup. This function is very handy in case of unstable connection with providers. To implement it, it is enough to set the connection priority on the tab "Connections" section "Internet"... To do this, enter numerical values in the field "A priority" list and click "Save Priorities".
Larger value means higher priority. Thus, from the example shown in the screenshot, it follows that the main connection is via a wired network, which has a priority of 700. If the connection is lost, the router will automatically establish a connection to the 3G network via a USB modem. But at the same time, he will constantly try to restore the main connection, and as soon as this becomes possible, he will switch to it again. It is possible to create a similar pair from two 3G connections from different operators, as well as set a priority for three or more connections.
Change wireless settings
By default, a Wi-Fi connection already exists in the Zyxel Keenetic Giga II, which is fully functional. The name of the network and the password to it can be found on the sticker on the bottom of the device. Therefore, in most cases, setting up a wireless network boils down to changing these two parameters. To do this, you must:

After saving the settings, the network will start working with the new parameters. They are sufficient for most users.
At the end of the review, I would like to emphasize that the article touched on the topic of only the key points in setting up the Zyxel Keenetic Giga II. However, the NDMS operating system provides the user with many more additional options for using the device. A description of each of them deserves a separate article.
If you have just signed a contract with one of the Internet providers and purchased everything you need (router, cable), you may want to install and configure network access yourself, without additional costs for technical specialists. Therefore, you came to this page and therefore you will succeed.
This article will discuss in detail the process of self-connecting the Internet via an Ethernet cable to a Zyxel Keenetic ii router for various providers and data transfer protocols (PPPoE, L2TP, PPTP).
How to start a router?
Carefully remove all accessories from the package and follow the following procedure when connecting it:
- Unpack and connect the power supply to the device;
- Insert the cable from the provider into the dedicated WAN port (the one through which Ethernet data is transmitted);
- Remove from the package and connect the connecting cable to the router, as well as to the network card of the main PC: it is short enough, the same at both ends, inserted into any of the five free slots of the router and the only one available on the computer / laptop;
- Plug in the power supply, then press the power key on the back panel;
- Wait until the device starts up completely, as a result of which 3 diodes will light up on the indicator panel: power, network, PC connection.
The new connection should now be displayed in the lower right corner of your PC screen. Let's do some preparatory work:
- Right-click on this icon, open the Control Center;
- In the right part of the window that opens, the name of your connection will be highlighted in blue. Click on it;
- Another window opened. Open the properties by clicking on the corresponding button;
- Scroll down the list of parameters of the current connection and find the Internet Protocol version 4: select it and open the properties (button below the list);
- Make sure that in both cases, IP and DNS are set to retrieve settings automatically. If this is not the case, set the selectors to the appropriate value;
- Apply changes.
This completes the preparatory work. Let's move on to the main settings.
Connection setup
When configuring the Zyxel Keenetic ii router, we will use the web configurator common to the entire Kinetic family. Therefore, having learned how to configure this model, you can cope with connecting third and third generation devices and other types like Lite, 4G, etc.
And so, first we need to open this very web configurator:
And now you are in the main menu of the device. In it you can find data about the current firmware (upper list on the right), connected connections (upper left), as well as two types of menus: a text menu at the top and a lower one, consisting mainly of graphic icons. We are interested in the second - "Internet".
But before proceeding to enter the parameters, find the provider in the contract or get the following data from the support service:
- What access protocol is used: we have already listed the most popular ones above (PPPoE, L2TP);
- Authorization data (personal login and password - contained in the agreement);
- Whether it is necessary to specify the IP address as well as the name of the dedicated server (VPN). These values, if required;
- Whether you are assigned a static address, or is it updated (dynamic) in every new session;
- Does the provider register MAC addresses (this is done, for example, by Dom.ru) and, if so, which one belongs to you;
We need all this to connect the Zyxel Keenetic ii router to the network.
After switching to the Internet tab of the main menu, you will see an updated list of tabs at the top of the page. Go to the PPPoE / VPN section and click on the add connection button. In the window that opens, we make the following settings:

Example of configuring a router in PPPoE mode
- We set the checkboxes in the first two selectors, which will turn on the connection and designate it as the main one for accessing the external network;
- In the protocol field, indicate the one that the provider told you. For example PPPoE;
- If the supplier has informed that it is necessary, we indicate the server address;
- Immediately after it, we indicate our personal data as a user;
- We set the protection method (i.e. authentication) only at the request of the Internet provider;
- Below, if you are supplied with a dynamic IP, do not change anything. And if it is static, then we select the manual setting of the parameters and write the corresponding values for the address, subnet mask and gateway used (Some providers do not supply the ip-address at all via the client wan-port. In this case, you must select the "No IP-address" option);
- All other parameters are optional for the owners of the Zyxel Keenetic ii router and are assigned only at the request of Rostelecom, Beeline or any other company with which you have entered into an agreement;
- Click on Apply Settings and wait for the changes to be made to the router configuration;

Example of configuring a router in PPTP mode
If the supply agreement provides for a static IP, and you did not succeed in setting up the connection using the algorithm above, try the following additionally:
- While in the same "Internet" section of the Zyxel Keenetic ii router, open the IPoE tab of the top menu;
- Click on the name of the only interface specified in the table;
- In the pop-up window, we also check the boxes in the two upper selectors;
- We find the line of IP parameters and select the manual configuration method;
- In the fields that appear, write the data from the provider;
- If the addresses of domain servers were provided, we indicate them below;
- Here you can also specify the static MAC address assigned to you by your ISP. To do this, remove the "Default" setting in the corresponding field;
- We apply the changes and check the internet availability again.

An example of manual configuration of ip-addresses
For reliability, you can restart Zyxel Keenetic ii and turn it off, then (after 15 seconds) turn on the network adapter of your PC.
If the router is not new, and the configuration was carried out earlier for other providers, you must reset the parameters to the factory defaults. To do this, on the rear panel of the device, you need to find the Reset button and hold it down for 10-15 seconds, then restart the router. In this case, the login password (1234) and other parameters will be initialized. Now you can set up again and continue using a high-quality Internet connection using a Zyxel Keenetic ii router.
Found a typo? Select the text and press Ctrl + Enter